Advertisement
Advertisement
Table of Contents

Related Manuals for Teac HMX2500


Summary of Contents for Teac HMX2500
- Page 1 HMX2500 Home Entertainment Party System...
- Page 5 Water Damage: The apparatus must not be exposed to dripping or splashing and objects filled with liquids,such as vases,must not be placed on the apparatus. Disconnection: The mains plug is used as the disconnect device,the disconnect device must remain readily operable. Class 1 Apparatus: Apparatus with class 1 constru ction must be connected to a mains socket outlet with a protective earth ing connection.
-
Page 7: Audio Line Output
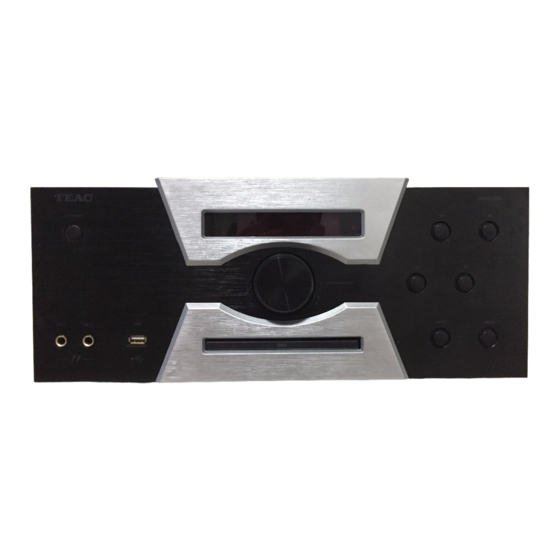
Controls 1.STANDBY 7.NEXT /TUNING+ 2.VFD DISPLAY 8.MICROPHONE1&2 JACK 3.VOLUME/MULTI 9.USB PORT 4.OPEN/CLOSE 10.COMPARTMENT DOOR 5.PREVIOUS /TUNING- 11.INPUT 12.MENU 6.PLAY/PAUSE 11 12 13 15 16 17 18 1.ADJUST MICROPHONE DELAY 11.AUDIO LINE OUTPUT 2.ADJUST MICROPHONE TREBLE LINE AUDIO INPUT 3.ADJUST MICROPHONE BASS 13.AUX AUDIO INPUT 4.MICROPHONE 3 VOLUME 14.FM ANTENNA JACK... - Page 8 MUTE STANDBY MULTI MENU SOURCE X-Bass ON/OFF EJECT SOURCE X-Bass F.WARD /TUNING+ B.WARD /TUNING- ANGLE EJECT MULTI MENU ADJUST- REV/TU- MULTI MENU ADJUST+ STEP/STEREO/MONO SPEAKER LIGHT NEXT /CHANNEL+ PREV /CHANNEL- SLOW SUBTITLE LANGUAGE/L/R TIME conflicts buttons on as this will cause a batteries.
- Page 9 Video cable (yellow) 1PC (DVD to TV) Instruction Manual 2PCS ,example: Do not place the amplifier unit on top of the speakers the vibrations may damage the unit and void the warranty.
- Page 10 3. Disc Basic Operation Press NEXT or PREV to jump to next or previous Once all the connections and settings have been track/chapter/file. made, the DVD unit is ready for normal use. Prior to playback, make sure the following operations Press PREV key: have been carried out.
- Page 11 4. DVD Description of Functions 4.1 Subtitle Track Go To: --:-- TIME This DVD function enables you to select multi subtitle languages (Depending on the disc encoded Press SUBTITLE key to get the desired display. For example,select language 1- English from 8 options.
- Page 12 4.9 Repeat 4.10 Zoom In DVD mode, press the REPEAT key. The The picture may be enlarged to facilitate your enjoyment of following will be displayed: a particular action . REPEAT Press this button repeatly,the zoom scales will be change Chapter respectively.
-
Page 13: Screen Saver
5 . S e t t i n g s 5.1.3 Screen Saver The system setup options are illustr ated below: P r e s s t h e S E T U P b u t t o n o n t h e r e m o t e c o n t r o l , t h e S E T U P M E N U ( m a i n ) w i l l b e d i s p l a y e d . - Page 14 5.3.1 Spdif output 5.3.3 3D Process setup The system setup options are illustr ated below: The system setup options are illustr ated below: Ge neral Audio Video Preference Ge neral Audio Video Preference Spdif Setup Pa ge Spdif Off Spdif Ou tput 3D Pr ocessing Pa ge Spdif/Raw Reverb Mo de...
-
Page 15: Video Setup
5.4.2 Resolution 5.4 Video setup The system setup options are illustr ated below: The system setup options are illustr ated below: Ge neral Audio Video Preference Ge neral Audio Video Preference Video Se tup Pa ge Video Se tup Pa ge Comp onent Comp onent S-Video... -
Page 16: Hdmi Setup
5.4.4 HDMI setup 5. 5. 1 Pas swor d set up The system setup options are illustr ated below: Set the pa ss wor d. Choose HDMI ON or OFF. Ge neral Audio Video Preference Ge neral Audio Video Preference Password Setup Page Password Mode HDMI Setup Pa ge... - Page 17 6.Operating the DVD unit 6.1.Operating the Mp3 function To play a Mp3 disc 1.Instructions to insert a Mp3 disc.This machine will start to search for the information on the disc and show it in the display. 2.Press the number buttons to select the track number desired. 3.Press the DIRECTION key(up,down,left,right) to select desired files,press ENTER or PLAY keys to play.
-
Page 18: Operating The Amplifier
● Set your phone or music player to search for Bluetooth devices. ● Select TEAC HMX2500 from search results on your phone or music player. ● Select OK or YES to pair this unit with your phone or music player. -
Page 19: Specifications
Guide that your that you are operating the TV and the power amplifier correctly. is a the player and the remote control. problems,switch the power off, wait a few seconds and then switch it on again. If no error message is displayed, the player should work properly. - Page 20 CAUTION ·The apparatus shall not be exposed to dripping or splashing and that no objects filled with liquids, such as vases, shall be placed on the apparatus. ·Minimum distances 10 cm around the apparatus for sufficient ventilation. ·The ventilation should not be impeded by covering the ventilation openings with items,such as newspapers, table-cloths, curtains, etc.
Need help?
Do you have a question about the HMX2500 and is the answer not in the manual?
Questions and answers