Table of Contents
Advertisement
Owner's Manual
Ironman Envision
Treadmill
Service
(800) 750-4766
Assembly
(888) 559-8810
Ironman Fitness Products
4009 Distribution Drive
Suite 250
Garland, TX 75041
www.ironmanfitness.com
CAUTION! Read all precautions
and instructions in this manual
before using this equipment.
415-00201
01/08 Rev D
Model Name : Envision
Serial Number :
Write down for future reference
Serial Number Decal Location
Advertisement
Table of Contents

Related Manuals for Ironman Fitness Envision


Summary of Contents for Ironman Fitness Envision
- Page 1 4009 Distribution Drive Suite 250 Garland, TX 75041 www.ironmanfitness.com CAUTION! Read all precautions and instructions in this manual before using this equipment. Model Name : Envision Serial Number : Write down for future reference 415-00201 01/08 Rev D Serial Number Decal Location...
-
Page 2: Table Of Contents
Table of Contents Important Safety Information Before You Start Assembly Parts Identifier Assembly Steps Moving Instructions Power Requirements Monitoring Your Heart Rate Workout Information Frequency: How Often Should You Exercise Intensity: How Hard Should You Exercise Weight Management Exercise Practice Procedures Workout: Brisk and Rhythmic Exercise Cool Down: Slow and Relaxed Exercise Exercise Guidelines... -
Page 3: Important Safety Information
The treadmill should not be placed in a garage, patio, or near water and should never be used while you are wet. Ironman Fitness recommends a treadmill mat be placed under the treadmill to protect floor or carpet and for easier cleaning. -
Page 4: Before You Start
Before You Start Thank you for purchasing the Ironman Envision Treadmill! This quality product you have chosen was designed to meet your needs for cardiovascular exercise. Before you start, please read the Owner's Manual and become familiar with the operation of your new treadmill. -
Page 5: Assembly
Assembly: Parts Identifier The Ironman Envision Treadmill will require assembly before operating. Place unopened box on a clean, level surface. After opening the box, remove any packing material from the tread- mill. Do not throw away any packing materials until the unit is working properly. -
Page 6: Assembly Steps
Remove top cover of box, and break the sides of the box to create a level assembly surface. After opening the box, remove any packing material from the treadmill. Carefully cut the strap surrounding the treadmill, only while the treadmill is laying flat. - Page 7 This is done to prevent any injury while proceeding to the following steps. Align the holes on the treadmill to the holes on the uprights. Secure the uprights by using two washers 9*22*2 and two allen bolts M8*15 on each side.
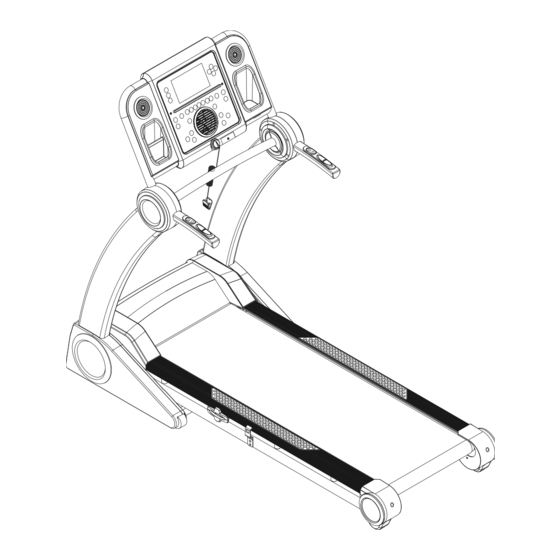
- Page 8 Assembly Step 3 With the uprights already in place and while standing on the unit, move the console into place. To do so, carefully pull the console towards you. Do so until you hear the pop pin click. This clicking sound signifies that the console is locked into place.
- Page 9 Assembly ALLEN BOLT M8*30 2 PCS Step 4 Align the holes on the console to the holes on the uprights. Secure the console onto the uprights using one allen bolt M8*30 and one washer 9*22*2 going through the outside holes of each side, and one allen bolt M8*20 and one washer 9*22*2 going through the holes in the front of the handlebar area.
- Page 10 (B). Line up the two tabs on the bottom of the fender piece with the slots on the treadmill frame, and press down to secure (D and E).
- Page 11 Assembly Step 6 Locate the handle covers for the right and left sides. A: Connect the inside handle cover to the console frame using 3 screws ST4.2*16. B: Connect the outside handle cover to the inside cover using 3 screws ST4.2*16. PHILIP SCREW ST4.2*16...
- Page 12 Assembly Congratulations! You have completed the assembly of your new Ironman Envision Treadmill! Please remove the treadmill out of the box.
-
Page 13: Moving Instructions
Lifting, Bend Your Legs And Keep Your Back Straight. As You Raise The Treadmill, Lift Using Your Legs, Not Your Back. In Order To Raise Or Lower The Treadmill Safely, You Must Be Able To Lift 45 Pounds (20kg). It Is Suggested You Always Use The Aid Of A Second Person When Moving The Treadmill. -
Page 14: Power Requirements
This treadmill can be seriously damaged by sudden voltage changes in your home’s electrical power. Voltage spikes, surges, and noise interference can result from weather conditions or from other appliances being turned on or off. To reduce the possibility of treadmill damage, always use a dedicated surge protector (not included) with your treadmill. -
Page 15: Monitoring Your Heart Rate
Monitoring Your Heart Rate Monitoring Your Heart Rate To obtain the greatest cardiovascular benefits from your exercise workout, it is important to work within your target heart rate zone. The American Heart Association (AHA) defines this tar- get as 60%-75% percent of your maximum heart rate. Your maximum heart rate may be roughly calculated by subtracting your age from 220. -
Page 16: Target Heart Rate Zone
Monitoring Your Heart Rate TARGET HEART RATE ZONE 100% Serious athletic training range Cardiovascular conditioning range Fat burning range... -
Page 17: Workout Information
Workout Information Frequency, Intensity, Time, Target Heart Rate Zone The exercise practices include four major variables: frequency, intensity, time, target heart rate zone. A continuous workout will help to improve your cardiovascular functions and increase the ability of your muscles to obtain the oxygen and nutrition. A good workout provides a greater advantage to extend the endurance of muscle and body flexibility. -
Page 18: Exercise Practice Procedures
Workout Information Exercise Practice Procedures Warm-Up A good warm-up will help you perform better and will decrease the aches and pains. The warm- up prepares your muscles for exercise and allows your oxygen supply to ready itself for what is to come. -
Page 19: Warm Up Exercises
Warm Up Exercises EXERCISE GUIDELINES WARNING! Before beginning this or any exercise program, you should consult your physician. This is especially important for individuals over the age of 35 or individuals with pre-existing health problems. Flexibility is a key to fitness. Stretch all major muscle groups at least two to three times per week after a 5 to 10 minute warmup. - Page 20 Warm Up Exercises WARNING! Before beginning this or any exercise program, you should consult your physician. This is especially important for individuals over the age of 35 or individuals with pre-existing health problems. Wrist Extensor Extend your right arm in front of you with your palm up and your elbow straight.
- Page 21 Warm Up Exercises WARNING! Before beginning this or any exercise program, you should consult your physician. This is especially important for individuals over the age of 35 or individuals with pre-existing health problems. Calf Stretch Face a solid structure such as a wall with your left foot ahead of your right, toes straight ahead.
-
Page 22: Belt Adjustment
WALKING BELT IS SHIFTING TO THE RIGHT (Diagram 2) First, turn the treadmill on to run at 1 mph. Using the hex key provided, turn the right rear roller adjustment bolt ¼ turn in the clockwise direction. Next, run the treadmill at 2.5 mph. -
Page 23: Maintenance Instructions
If it feels dry to the touch, lubrication is needed. Ironman Fitness recommends “Lube N Walk” for cleaning and lubricating the treadmill belt and deck. Ask your retailer or call Ironman Fitness at (800)750-4766. -
Page 24: Troubleshooting Guide
2. Check the house electrical breaker box and the circuit breaker for the room where the treadmill is located. If it has tripped, reset or have an electrician replace the breaker in home. 3. If the treadmill will not operate, please call Ironman Fitness Customer Service at (800) 750-4766. Treadmill walking belt slows during use. -
Page 25: Parts List
HANDLE COVER, RIGHT OUTSIDE, 210*210*62 406-00190 HANDLE COVER, LEFT INSIDE, 210*105*52, E 406-00191 HANDLE COVER, RIGHT INSIDE, 210*105*52, 406-00181 END CAP LEFT OUTSIDE, 153*13, ENVISION 406-00193 END CAP LEFT TOP, 154*153*108, ENVISION 406-00205 END CAP LEFT FRONT, 102*67*32, ENVISION 406-00192... -
Page 26: Exploded Views
Exploded View... -
Page 27: Console Exploded View
Exploded View CONSOLE WIRE HARNESS... -
Page 28: Warranty
Warranty Information PLEASE READ THESE WARRANTY TERMS AND CONDITIONS FULLY AND CAREFULLY BEFORE USING YOUR IRONMAN FITNESS EQUIPMENT. BY USING THE EQUIPMENT, YOU ARE CONSENTING TO BE BOUND BY THE FOLLOWING TERMS AND CONDITIONS. Frame: Lifetime Drive Motor: Lifetime Limited Warranty This Limited Warranty applies in the United States and Canada to Products manufactured or distributed by Keys Fitness Products, L.P. - Page 29 Notes...
- Page 30 Notes...
- Page 31 Notes...
- Page 32 Service (800) 750-4766 Assembly (888) 559-8810 Ironman Fitness Products 4009 Distribution Drive Suite 250 Garland, TX 75041 www.ironmanfitness.com IRONMAN, IRONMAN TRIATHLON and M-DOT are registered trademarks of the World Triathlon Corporation. This product is licensed by the Ironman Triathlon.
Need help?
Do you have a question about the Envision and is the answer not in the manual?
Questions and answers