Table of Contents
Troubleshooting

Subscribe to Our Youtube Channel
Related Manuals for MK Diamond Products MK-112


Summary of Contents for MK Diamond Products MK-112
-
Page 1: Operating Instructions
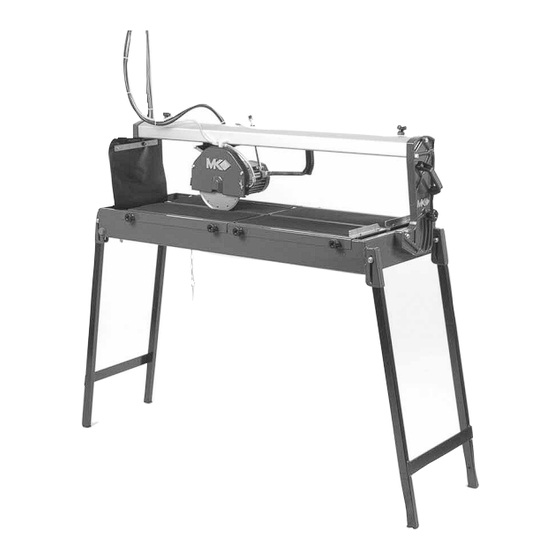
MK-112 TILE SAW OWNERS MANUAL & OPERATING INSTRUCTIONS Revision 202 02.2004 Caution: Read all safety and operating instructions before using this equipment. This parts list MUST accompany the equipment at all times. - Page 2 SAFETY INSTRUCTIONS FOR THE MK-112 TILE SAW Congratulations on your purchase of a MK-112 Tile Saw. We are certain that you will be pleased with your purchase. MK Diamond takes pride in producing the finest construction power tools and diamond blades in the industry.
-
Page 3: Table Of Contents
TABLE OF CONTENTS SAFETY DAMAGE PREVENTION AND INFORMATION MESSAGES __________ 4 SAFETY MESSAGES ________________________________________ 4 GENERAL SAFETY PRECAUTIONS AND HAZARD SYMBOLS _______ 4 CALIFORNIA PROPOSITION 65 MESSAGE ______________________ 6 ELECTRICAL REQUIREMENTS AND GROUNDING INSTRUCTIONS __ 8 TILE SAW SPECIFIC WARNINGS _____________________________ 10 SAFETY LABEL LOCATIONS _________________________________ 10 PRODUCT SPECIFICATIONS ________________________________ 11 UNPACKING, TRANSPORT and ASSEMBLY... -
Page 4: Safety
SAFETY Read and follow all safety, operating and maintenance instructions. Failure to read and follow these instructions could result in injury or death to you or others. Failure to read and follow these instructions could also result in damage and/or reduced equipment life. SAFETY MESSAGES: A safety message alerts you to potential hazards that could hurt you or others. - Page 5 SAFETY MAKE THE WORKSHOP KID PROOF Make the workshops kid proof by using padlocks, master switches or by removing starter keys. DO NOT FORCE THE TOOL A power tool will do a job better and safer operating at the rate for which it was designed. USE THE RIGHT TOOL DO NOT force a tool or an attachment, to do a job that it was not designed to do.
-
Page 6: California Proposition 65 Message
SAFETY USE RECOMMENDED ACCESSORIES Consult the owner’s manual for recommended accessories. Using improper accessories may increase the risk of personal or by-stander injury. NEVER STAND ON THE TOOL Serious injury could occur if a power tool is tipped, or if a cutting tool is unintentionally contacted. CHECK FOR DAMAGED PARTS Before using a power tool, check for damaged parts. - Page 7 SAFETY Hazard Symbols: ELECTRICAL SHOCK NEVER touch electrical wires or components while the engine is running. They can be sources of electrical shock which could cause severe injury or burns. ROTATING PARTS Keep hands, feet, hair, and clothing away from all moving parts to prevent injury. Never operate the engine with covers, shrouds, or guards removed.
-
Page 8: Electrical Requirements And Grounding Instructions
SAFETY ELECTRICAL REQUIREMENTS AND GROUNDING INSTRUCTIONS: In order to prevent potential electrical shock and injury, the following electrical safety precautions and symbols should be followed at all times! WARNING In case of a malfunction or breakdown, grounding provides a path of least resistance for electric current to reduce the risk of electric shock. - Page 9 SAFETY To avoid the possibility of the appliance plug or receptacle getting wet, position the saw to one side of a wall mounted receptacle. This will prevent water from dripping onto the receptacle or plug. A “drip loop,” shown in FIGURE 2, should be arranged by the user to properly position the power cord relative to the power source.
-
Page 10: Tile Saw Specific Warnings
Caution – Use with Ground Fault Circuit Interrupter 155678 Rail – Top/Left Lower Warning – Read Owners Manual 155806 Water Pan – Back/Left MK-112 Serial Number 160469 Water Pan – Back/Right MK Service Information 155038 Water Pan – Front MK-112 Title... -
Page 11: Product Specifications
SAFETY PRODUCT SPECIFICATIONS The MK-112 is a versatile Tile Saw. Operated and used according to this manual, the MK-112 will provide years of dependable service. General Description The saw includes a powerful 115V electric motor. It is capable of cutting tile up to thirty-six (36) inches in length and twenty four (24) inches diagonally. -
Page 12: Unpacking, Transport And Assembly
UNPACKING, TRANSPORT and ASSEMBLY UNPACKING CAUTION Use proper lifting techniques when lifting the MK-112 If not done yet, remove the MK-112 Saw and accessory box from the carton. CONTENTS In your container, you will find A. One (1) MK-112 Saw F. -
Page 13: Assembly
UNPACKING, TRANSPORT and ASSEMBLY ASSEMBLY: Remove the machine from the packaging with the aid of the side carrying handles. To set up the machine for work proceed as follows: 1. Remove the leg lock pin and raise the rear side (pump side) of the machine with the handle until the leg is fully extended (See Picture 1). -
Page 14: Setup, Adjustment & Operation
SETUP, ADJUSTMENT & OPERATION SETUP: Follow the assembly instructions to prepare your MK-112 for operation. 1. Checking before use: CAUTION THE MK-112 TILE SAW IS DESIGNED TO WORK WITH WATER Before any cutting operation, make sure that the water level inside the water pan reaches the pump. - Page 15 Check for damaged, broken, or missing parts. 2. Verify the On/Off switch is in the OFF position. 3. Before connecting the MK-112 to a power supply, be sure the voltage, cycle and phase of the job site power source meet the requirements of TABLE 3...
-
Page 16: Adjustment & Operation
Thanks to the great versatility of the MK-112 Saw it is possible to carry out different types of cuts. Take the blade to the 0° position with the angle adjustment knobs (See PICTURE 6). Position the tile on the support table and make sure that it is properly positioned against the cutting guide. - Page 17 SETUP, ADJUSTMENT & OPERATION 2. Cutting 45° Miters: The MK-112 is designed with an adjustable Cutting Head for precision 45º Miter Cuts. CAUTION DO NOT FORCE THE TOOL. It will do the job better and safer at the rate for which it was designed.
-
Page 18: Cleanup
SETUP, ADJUSTMENT & OPERATION CLEANUP To clean the MK-112 Saw loosen the Side Knobs and remove the support tables. Side Knobs PICTURE 12 When necessary clean the water nozzles as shown in pictures 13 and 14. PICTURE 14 PICTURE 13... -
Page 19: Maintenance And Troubleshooting
MAINTENANCE AND TROUBLESHOOTING MAINTENANCE 1. Disassembly of the Diamond Blade: Loosen the two nuts on the blade guard and remove it. Remove the blade shaft nut with a 19mm wrench and a 5mm Allen key (provided). Turn on this direction to loosen Hold in place PICTURE 16... - Page 20 When this occurs, the blade will need to be dressed. The diamond blade can be dressed using the MK Dressing Stick (part number 152792) and by following the steps below. Setup the MK-112 for Position the Dressing Stick Cut the Dressing Stick 7 or 8...
-
Page 21: Troubleshooting
MAINTENANCE AND TROUBLESHOOTING TROUBLESHOOTING HAVE YOUR TOOL REPAIRED BY A QUALIFIED PERSON This electric tool complies with the relevant safety rules. Repairs should only be carried out by qualified persons using original spare parts, otherwise this may result in considerable danger to the user. PROBLEM CAUSE SOLUTION... -
Page 22: Exploded View And Parts List
EXPLODED VIEW AND PARTS LIST MK-112 EXPLODED VIEW... -
Page 23: Parts List
5mm wrench 160529 5mm Allen key 159979 19mm wrench 160530 Card, MK Warranty Registration (not shown) 155037 Manual, MK-112 Owners (not shown) 160467 Label, Do Not Return (not shown) 157063 Assembly, Frame/Pan Frame / Pan Weldment 160531 Plug, Rubber Drain... - Page 24 Rail, Vertical Guide 160552 Assembly, 115V Motor Motor, 115 Volt, 60Hz, 1 hp 160553 Power, Water Pump 160554 Relief, MK-112 Strain w/Lock Nut 160555 Nut, Strain Relief Lock 160556 Screw, Soc HD Cap M5 x 25mm 160557 Cap, Motor 160558 Nut, M5-.8 Hex...
- Page 25 MK-112 PARTS LIST (Cont...) Assembly, Antenna Holder, Antenna 160580 Antenna 160581 Assembly, Back Stop Stop, Left 160582 Stop, Right 160583 Screw, Soc HD Cap M5 x 8mm 160584 Nut, Hex Flange M5 160585 Ruler, Stop 160586 Assembly, Side Table Table, MK-112 Side...
-
Page 26: Theory
THEORY THEORY OF DIAMOND BLADES Diamond blades do not really cut; they grind the material through friction. Diamond crystals, often visible at the leading edge and sides of the rim/segment, remove material by scratching out particles of hard, dense materials, or by knocking out larger particles of loosely bonded abrasive material. -
Page 27: Ordering & Return Instructions
ORDERING & RETURN INSTRUCTIONS ORDERING INFORMATION You may order MK Diamond products through your local MK Diamond distributor or, you may order direct from MK Diamond. NOTE: There is a $25.00 minimum order when ordering direct from MK Diamond. All purchases must be made using VISA or MasterCard. - Page 28 MK-112 TILE SAW OWNERS MANUAL & OPERATING INSTRUCTIONS DOCUMENT NO. 160467 REVISION 201 02/04 MK Diamond Products, Inc. 1315 Storm Parkway Torrance, CA 90501 Toll-Free: (800) 845-3729 Phone: (310) 539-2221 Fax: (310) 539-5158 www.mkdiamond.com...
Need help?
Do you have a question about the MK-112 and is the answer not in the manual?
Questions and answers