Gossen MetraWatt DIGISKY Operating Instructions Manual
Hide thumbs
Also See for DIGISKY:
- User manual (12 pages) ,
- Quick start manual (12 pages) ,
- Update manual (7 pages)
Table of Contents
Advertisement
Quick Links
Download this manual
See also:
User Manual
DIGISKY
Operating Instructions – 15477CD- V1.01
Please check that the exposure meter and accessories as detailed below are included in the
box. If the contents are incomplete, please contact your local dealer.
DIGISKY Meter
•
V070A rechargeable battery
•
Power supply and USB connector cable
•
Carrying strap
•
CD ROM (includes operating instructions)
•
Quick-start Guide
•
Revision level: Aug 1, 2011
Advertisement
Table of Contents

Related Manuals for Gossen MetraWatt DIGISKY


Summary of Contents for Gossen MetraWatt DIGISKY
- Page 1 Operating Instructions – 15477CD- V1.01 Revision level: Aug 1, 2011 Please check that the exposure meter and accessories as detailed below are included in the box. If the contents are incomplete, please contact your local dealer. DIGISKY Meter • V070A rechargeable battery •...
- Page 2 DIGISKY Thank you for selecting this state of the art Gossen product. Your DIGISKY is a top quality instrument from Gossen’s product range, and provides you with a precision multifunction exposure meter. DIGISKY is designed for ambient light, flash light, illuminance and luminance measurements and also incorporates a “Cine”...
-
Page 3: Table Of Contents
The retractable diffuser head On/Off, Flat Diffuser, Spherical Diffuser or Incident light measurement Keys DATA – MENU – M(easurement)-Key – Ring Controller How to use the DIGISKY Incident light and reflected light measurement 5.1.1 Incident light measurement – Spherical Diffuser 5.1.2 Incident light measurement –... - Page 4 Language - Country Settings 8.4.5 Information 8.4.6 Restart defaults - Standard Values - Delete Meter and User Settings Practical Notes Technical Data Interface 11.1 Update Service FCC and IC Declaration EC Declaration of Conformity Gossen Foto- und Lichtmesstechnik GmbH 4 ...
-
Page 5: Safety Precautions - Warnings
Please contact your local dealer or Gossen-Service in order to eliminate malfunctioning. If you bring or send the meter in for repairs, make sure that the rechargeable battery has been removed first. -
Page 6: Notes
This also applies to duplication in any electronic format and translation into other languages. • Documentation is subject to change without notice. • Gossen assumes no liability for damages resulting from incorrect use of the product. • Documentation for your Gossen exposure meter was prepared with the greatest of care. - Page 7 Important safety precautions: Please read these safety precautions before using the exposure meter in order to avoid damaging your DIGISKY. Important information which you should also read before using your DIGISKY Notes: additional, useful information regarding use of your DIGISKY...
-
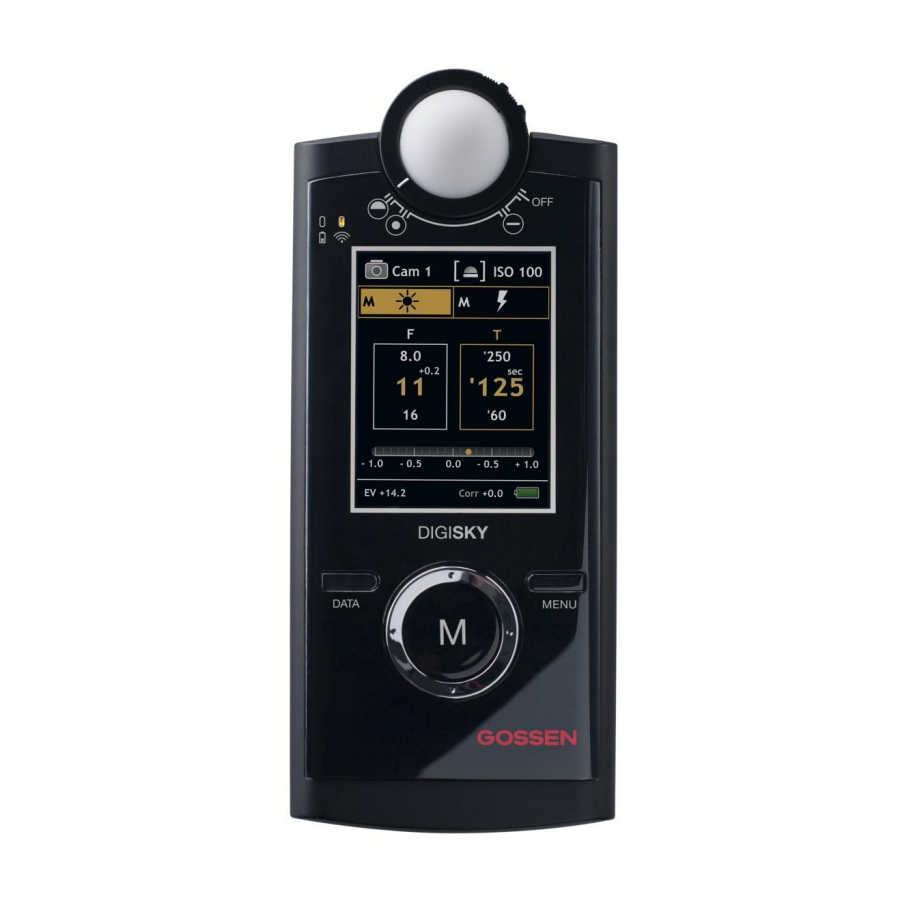
Page 8: Meter Overview
LEDs for status of the meter Display panel (see description on page 10) Data key Menu key Ring controller M(easurement)-key Socket for connecting flash Carrying strap USB port for charging battery, or synchronizing cable holder for data transmission Gossen Foto- und Lichtmesstechnik GmbH... -
Page 9: Preparation
The battery can also be charged using a USB port at a PC. Remove the mains plug to this end, and connect the USB plug to your PC. The DIGISKY can be operated with an inserted battery, and while connected to a PC or to mains power. -
Page 10: The Display Panel And Its Elements
From EV0 to EV19 Measured Value F-stop with measured value correction Film Speed in f/s Photometric values From 2 to 1000 Illuminance Luminance Sector Angle Metric Lux or cd/m² From 45 to 315 British fc or fL Gossen Foto- und Lichtmesstechnik GmbH... -
Page 11: Display On-Time
DIGISKY Display ON-Time If none of the keys on the DIGISKY are activated for a period of approximately 30 seconds, the display panel is switched off automatically (standby), i.e. the display turns blank but measured values and individual settings are stored. -
Page 12: Keys
Switch device on. Ring Controller Turn marking up. Increase values Turn marking down Down Decrease values Switch between f-stop and time preset Left Up one menu level Switch between f-stop and time preset Right Display submenu Gossen Foto- und Lichtmesstechnik GmbH 12 ... -
Page 13: How To Use The Digisky
DIGISKY How to use the DIGISKY Incident light and reflected light measurement The DIGISKY has been designed for highly motivated amateurs, as well as for professional use. The retractable diffuser head is laid out as an “optical control centre”, where the following measuring modes... -
Page 14: Reflected Light Measurement 2
Functions Menu – Measuring/Operating Modes Mode Selection: Ambient light – Flash light DIGISKY can be switched on using any key. All measuring and operating modes are instantly available. If none of the meter modes are activated for a period of time, the meter will be switched into standby mode, and subsequently into sleep mode (setting option in Menu –... -
Page 15: Ambient Light Reading - Adjust Time Preset / F-Stop Preset
Active: f-stop preset 6.1.1 Ambient light reading - Time Preset Use the ring controller ... to select the desired time. Press the measurement key to perform measurement. Press and hold the measurement key to activate contrast measurement. Gossen Foto- und Lichtmesstechnik GmbH... -
Page 16: Ambient Light Reading - F-Stop Preset - Measurement
6.1.3 Ambient light reading – Contrast Measurement Contrast can be measured with the DIGISKY by using the f-stop and time preset functions. In order to measure contrast, press and hold the M key and aim at the point of the subject to be measured. -
Page 17: Flash Light Reading - Non-Cord - Cord - Radio
Radio trigger is activated in Menu – User (Cam 1 to 3) – RF Module and RF Channel, adapted to the respective user (see page 24). Cable In order to trigger your flash unit with the measurement key (M), connect it to the DIGISKY using your flashgun’s cable. 6.2.1 Flash – Measurement Use the ring controller ... -
Page 18: Flash Light Reading - Analysis
The menu settings are correct – please select the right group. Please note that some flash units must first be triggered once when set to lower power levels. Stored power is still at the higher level, resulting in erroneous measurements. Gossen Foto- und Lichtmesstechnik GmbH 18 ... -
Page 19: Cine Function / Photometry
Cine function. Cine Meter / Photometer In order to use the DIGISKY as a cine meter / photometer, the corresponding function has to be activated in Menu – Movie (see description on page 21). The following measurement modes can be selected by the diffuser ring surrounding the... -
Page 20: How To Measure In Cine Mode
Use the data key to display average, minimum and maximum values for continuous measurement, one after the other. Average - Minimum - Maximum Use the menu key ... to switch between f-stop and photometry values. Gossen Foto- und Lichtmesstechnik GmbH... -
Page 21: Main Menu
DIGISKY Main Menu This chapter expands upon previous modes and explains the different options, default settings and presets offered by the DIGISKY. Overview Description Menu Submenu Description Cam 1 ISO speed Film sensitivity Cam 2 EV steps Measured value resolution... - Page 22 Use the ring controller ... to display values. Use the measurement key Use the ring controller ... to select the desired value. to acknowledge. Use the menu key ... to exit the main menu at any time. Gossen Foto- und Lichtmesstechnik GmbH 22 ...
-
Page 23: User Settings
DIGISKY User Settings All values which are changed on the DIGISKY are reflected in the measurement results! Changed user settings appear in the function display. 8.3.1 User Selection The selected user pre-set appears on the display. One of the following users can be selected: Cam 1, Cam 2, Cam 3 or Movie. -
Page 24: Rf Module - Radio Module - Triggering Flash Via Radio (Photo Only)
Filter Value - Setting Correction Values Known deviations can be programmed into the default setting of the DIGISKY as part of your workflow. Correction values of up to ± 5.0 EV can be entered – the setting is entered in 1/10 values. -
Page 25: Photometry - Display Of Illuminance / Luminance (Movie Only)
• From 30 to 60 seconds in 15 second steps The DIGISKY display is switched off and set to standby if no modes are activated for the duration of the selected period of time. The display is switched back on after activating any key or after having changed the retractable diffuser head setting. -
Page 26: Language - Country Settings
Standard Values - Delete Meter and User Settings The settings selected by the user, as well as the meter settings are deleted, and the meter is reset to its factory-set values. Confirm by OK if you want to reset the DIGISKY to its factory-set values. -
Page 27: Practical Notes
Use the value given by your DIGISKY. The first image is made with the exposure value displayed by the DIGISKY. Then, this exposure value is increased or reduced by up to one f-stop, dependant on the increments/“stops”... - Page 28 For accurately capturing a night scene with a lot of darkness and very little detail, it is best to use less exposure time than indicated by your DIGISKY, in order to make sure that the image does not look like a daytime exposure. However, there are no firm rules in this case.
-
Page 29: Technical Data
• Status of the meter • Dynamic contrast display Analog scale • EV-5.0 to EV+5.0 Correction values • 0.5 to 199900 lx; 0.05 to 50000 fc Illuminance • 0.2 to 30000 cd/m Luminance ; 0.05 to 9000 fL Gossen Foto- und Lichtmesstechnik GmbH 29 ... - Page 30 0 °C to + 40 °C • Operating mode: -10 °C to + 50 °C • -20 °C to +60 °C Storage Temperature • Replacement battery, order no. V070A, 3.7 V / Additional Accessories 890 mAh Gossen Foto- und Lichtmesstechnik GmbH 30 ...
-
Page 31: Interface
DIGISKY Interface The DIGISKY has a built-in USB port at the bottom of the housing. The exposure meter can be connected to a PC via this port and, amongst other applications, the battery can be recharged. Meter settings may be made by PC and transferred to the DIGISKY. It will also be possible to download future DIGISKY updates from the Internet to your PC and to transfer them directly to the meter. -
Page 32: Fcc And Ic Declaration
The following data, required for the fulfillment of FCC and IC regulations, are referred to the meter(s) mentioned in this document. Product name : Digisky Model number: H260A FCC ID number YXF-DIGISKY IC number 9333A-DIGISKY Company name: Gossen Foto- und Lichtmeßtechnik GmbH Gossen Foto- und Lichtmesstechnik GmbH 32 ... -
Page 33: Ec Declaration Of Conformity
The safety notes given in the product Richtlinien, beinhaltet jedoch keine Zusicherung von Eigenschaften. Die documentations, which are part of the supply, must be observed. Sicherheitshinweise der mitgelieferten Produktdokumentationen sind zu beachten. © GOSSEN Foto- und Lichtmesstechnik GmbH 2000 ---------------------------------------Vorlage: FC8F29 -03.02---------------------------------------------------------------------------------------------------------------- ---------------------------------------Vorlage: FC8F29 -03.02---------------------------------------------------------------------------------------------------------------- Gossen Foto- und Lichtmesstechnik GmbH 33 ... - Page 34 DIGISKY Subject to change without notice. Gossen Foto- und Lichtmeßtechnik GmbH Lina-Ammon-Str.22 D-90471 Nuremberg, Germany Phone: +49 (0)911 / 8602-181 Fax: +49 (0)911 / 8602-142 http://www.gossen-photo.de Gossen Foto- und Lichtmesstechnik GmbH 34 ...
Need help?
Do you have a question about the DIGISKY and is the answer not in the manual?
Questions and answers