Table of Contents
Advertisement
Quick Links
Advertisement
Table of Contents

Related Manuals for Chauvet LED PAR 38-18UVB


Summary of Contents for Chauvet LED PAR 38-18UVB
-
Page 1: User Manual
LED PAR 38-18UVB Snapshot Use on Dimmer Outdoor Use Sound Activated Master/Slave Auto-ranging Power Supply Replaceable Fuse User Serviceable Duty Cycle User Manual 3000 N 29 Ct, Hollywood, FL 33020 U.S.A. (800) 762-1084 – (954) 929-1115 FAX (954) 929-5560 www.chauvetlighting.com... -
Page 2: Table Of Contents
................................18 ECHNICAL PECIFICATIONS Revision 01 CHAUVET®, 2009, All Rights Reserved Information and specifications in this User Manual are subject to change without notice. CHAUVET® assumes no responsibility or liability for any errors or inaccuracies that may appear in this manual. -
Page 3: Before You Begin
Manual Conventions CHAUVET manuals use the following conventions to differentiate certain types of information from the regular text. EANING... -
Page 4: Safety Instructions
Safety Instructions Please read these instructions carefully. It includes important information about the installation, usage and maintenance of this product. Please keep this User Manual for future consultation. If you sell the unit to another user, be sure that they also receive this instruction booklet. Always make sure that you are connecting to the proper voltage, and that the line voltage you are connecting to is not higher than that stated on the decal or rear panel of the fixture. -
Page 5: Introduction
2. I NTRODUCTION Features 2-channel DMX LED black light PAR can Manual dimming with or without DMX controller Built-in automated programs via master/slave or DMX with variable speed Built-in sound activated programs via master/slave or DMX Additional Features High-power, 1 W, 350 mA LEDs Additional power output: max 16 units Double-bracket yoke doubles as floor stand Includes gel frame... -
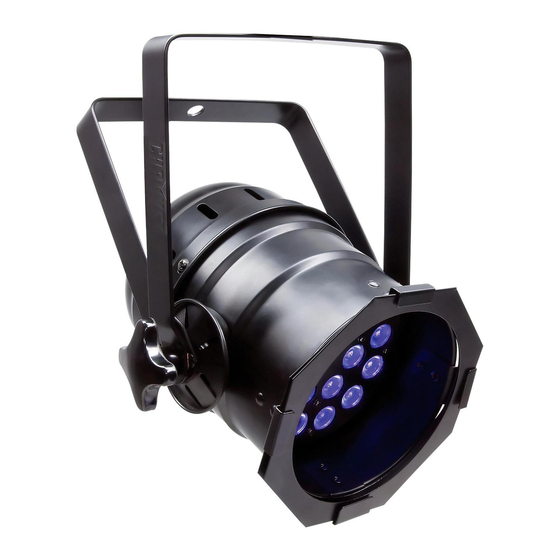
Page 6: Product Overview
Product Overview LED Signal Indicator Power Output (Edison) DIP switches Power Input (Hardwired) Fuseholder Microphone Attachment Bolt (not meant to be adjusted) Bracket Adjustment Knob Audio Adjustment Knob DMX Out DMX In Gel Frame Hanging/mounting Release (13 mm hole) Gel Frame Power Input (Hardwired) Light Output... -
Page 7: Setup
3. S ETUP AC Power This fixture runs on 100~240 VAC, 50/60 Hz. Before powering on the unit, make sure the line voltage to which you are connecting it is within the range of accepted voltages. Always connect the fixture to a switched circuit. Never connect the fixture to a rheostat (variable resistor) or dimmer circuit, even if the rheostat or dimmer channel is used only as a 0 to 100% switch. -
Page 8: Mounting
Mounting Orientation The LED PAR 38-18UVB may be mounted in any safe position provided there is adequate room for ventilation. Rigging Be sure that the structure can support the weight of the fixture. Please see the “Technical Specifications” section of this manual for a detailed weight listing. Mount the fixture securely. -
Page 9: Operating Instructions
In addition, you should note the starting address selected for future reference. The LED PAR 38-18UVB fixture uses two DMX channels. If this is your first time using DMX, we recommend reading the “DMX Primer” section in the “Appendix”. -
Page 10: Menu Map
Menu Map UNCTION UNCTION ELECTION ELECTION NSTRUCTION This is the automatic program Select 2-channel DMX mode: intensity, strobe; this also sets the DMX starting address This is the sound-activated program. You may use the sound sensitivity adjustment knob located on the rear of the fixture to adjust the microphone sensitivity This is the speed range for the automatic program... -
Page 11: Standalone Operation
Standalone Operation Automatic This fixture has an automatic program. This is accessed via the control panel, and the speed may be adjusted. Please see the instructions below for further explanation. Press <MENU> until appears on the LED screen. Press <ENTER> to confirm setting. Speed Adjustment: Press <MENU>... -
Page 12: Fixture Linking
Fixture Linking In order to use this fixture in a DMX or master/slave operation, you must daisy chain, using DMX cables to link from one fixture to another. In a master/slave operation, the DMX controller is not connected. Additional signal link out DMX controller (only in DMX... -
Page 13: Appendix
5. A PPENDIX DMX Primer There are 512 channels in a DMX connection. Channels may be assigned in any manner. A fixture capable of receiving DMX will require one or a number of sequential channels. The user must assign a starting address on the fixture that indicates the first channel reserved in the controller. There are many different types of DMX controllable fixtures and they all may vary in the total number of channels required. -
Page 14: Fixture Linking
Maximum recommended number of fixtures on a serial data link: 32 Data Cabling To link fixtures together you must obtain data cables. You can purchase CHAUVET® certified DMX cables directly from a dealer/distributor or construct your own cable. If you choose to create your own cable please use data-grade cables that can carry a high quality signal and are less prone to electromagnetic interference. -
Page 15: 3-Pin To 5-Pin Conversion Chart
3-Pin to 5-Pin Conversion Chart If you use a controller with a 5-pin DMX output connector, you will need to use a 5-pin to 3-pin adapter. The chart below details a proper cable conversion: IN TO ONVERSION HART Conductor 3-Pin Female (Output) 5-Pin Male (Input) Ground/Shield Pin 1... -
Page 16: Setting The Starting Address
Interference from AC wires Keep DMX cables separated from power cables or black lights. If you still have a problem after trying the above solutions, please contact CHAUVET® Technical Support. Contact Us W o r l d W i d e General Information CHAUVET®... -
Page 17: Returns Procedure
Package must be clearly labeled with a Return Merchandize Authorization Number (RMA #). Products returned without the RMA # will be refused. Call CHAUVET® and request an RMA # prior to shipping the fixture. Be prepared to provide the model number, serial number and a brief description of the cause for the return. -
Page 18: Technical Specifications
LED ......................18 1 W, 350 mA, 50,000 hrs PHOTO OPTIC Coverage Angle ..........................23° THERMAL Maximum ambient temperature ..................104° F (40° C) ORDERING INFORMATION LED PAR 38-18UVB (Black) ................... LEDPAR3818UVB WARRANTY INFORMATION Warranty ......................2-year limited warranty Technical Specifications 2/5/2010 5:14 PM...
Need help?
Do you have a question about the LED PAR 38-18UVB and is the answer not in the manual?
Questions and answers