
Related Manuals for Sony MDS-B5


Summary of Contents for Sony MDS-B5
- Page 1 MD RECORDER MDS-B5 [English] OPERATION MANUAL 1st Edition (Revised 1) Serial No. 800001 and Higher (UC) Serial No. 600001 and Higher (CED)
- Page 2 Record the serial number in the space provided below. equipment generates, uses, and can radiate radio frequency Refer to them whenever you call upon your Sony dealer energy and, if not installed and used in accordance with the regarding this product.
- Page 3 The following caution label is located inside the unit. This appliance is classified as a CLASS 1 LASER product. The CLASS 1 LASER PRODUCT MARKING is located on the side of the unit. For customers in Canada This Class A digital apparatus meets all requirements of the Canadian Interference-Causing Equipment Regulations.
-
Page 5: Table Of Contents
Table of Contents 1-1 Features ................... 1-1 Chapter 1 1-1-1 Features of the MiniDisc ............1-1 Overview 1-1-2 Operational Features .............. 1-1 2-1 Front Panel ..................2-1 Chapter 2 2-2 Rear Panel ..................2-3 Function of Parts and 2-3 Remote Controller ................2-5 Controls 3-1 Precautions .................. - Page 6 Table of Contents 6-1 Overview of Editing Functions ............6-1 Chapter 6 6-1-1 Types of Editing Functions ............ 6-1 Editing Functions 6-1-2 RAM Edit and Disc Edit ............6-1 6-1-3 Track Numbers After Editing Operations ......6-2 6-1-4 Editing Operations During Rehearsal Playback..... 6-2 6-1-5 Undo function ................
-
Page 7: Features
MD’s 255 tracks without the Instant playback function long cueing time required for tape. The MDS-B5 can store the first part of up to 10 selected tracks into memory in order to begin instant Various playback functions playback. - Page 8 You can undo the last editing operation (e.g., when you have mistakenly erased a track). Playback display variations The MDS-B5 displays track information (playing time, LevelSync function track title, etc.) for the current and the next tracks that have been selected for playback. By pressing the...
- Page 9 RS-232C interface. rising point. Rack mounting compatibility Digital time meter Two MDS-B5 decks can be mounted side by side in a The digital time meter displays the accumulated laser standard 19-inch EIA rack. diode recording time and spindle motor operation time.
-
Page 11: Function Of Parts And Controls
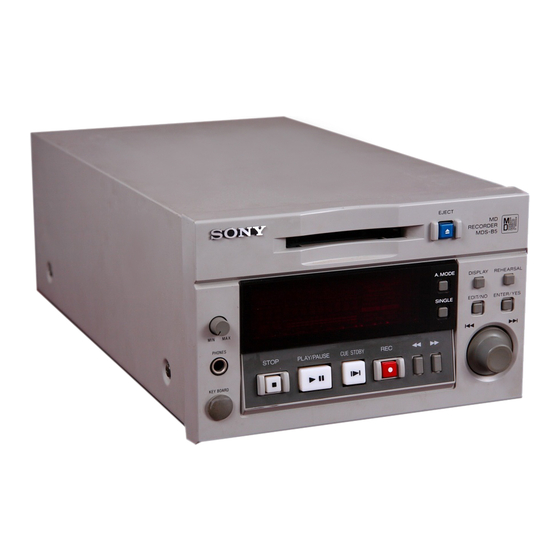
2-1 Front Panel 4 SINGLE button 5 A.MODE button 1 PHONES jack and volume control 3 Disc compartment 2 Display 6 EJECT button window 7 DISPLAY button 8 REHEARSAL button 9 ENTER/YES button 0 EDIT/NO button !¡ AMS control !™ Search buttons !£... - Page 12 2-1 Front Panel 6 EJECT button !£ REC (recording) button Press to eject the disc from the disc compartment. Press for recording standby (recording pause). To start recording, press the PLAY/PAUSE button. The REC 7 DISPLAY button button lights when recording is paused or taking place. During playback, press this button to select the !¢...
-
Page 13: Rear Panel
!¡ REMOTE connector 1 DIRECT DUPLICATION LINK connector 3 ANALOG IN/OUT connectors (XLR-type, 3-pin) Used for daisy chaining multiple MDS-B5 decks for Input and output a two channels of analog audio copying ATRAC compression data at the maximum of signals. - Page 14 Connects to an AC outlet with the supplied AC power cord. You can use a personal computer connected to the MDS-B5’s RS-232C connector to control the MDS-B5 8 IEC(958) IN/OUT connector (RCA-type, phono) including following operations: Inputs digital audio signals for professional use •...
-
Page 15: Remote Controller
2-3 Remote Controller 1 MD control buttons 2 Edit operation buttons 4 Title entry buttons 3 Display buttons 4 Title entry buttons 1 MD control buttons NAME (entering title entry mode) A.MODE (Cueing mode) CAPS (uppercase letters, numbers, symbols)* SINGLE (Single-track playback) SML (lowercase letters, numbers, symbols)* REHEARSAL (Rehearsal playback) π... -
Page 17: Precautions
• Do not disassemble the MD deck. The laser light used in the deck can cause damage to your eyes. If the MD deck needs to be inspected, contact Sony service personnel. Caution The use of optical instruments with this product will increase eye hazard. -
Page 18: Connections
Analog audio signals AES/EBU digital signals To audio/video equipment for professional use To an external remote controller Remote signal MDS-B5 To ground 120 V AC (for the AC power cord U.S. and Canada) 220 to 230 V AC (for the European... -
Page 19: Connection For Direct Atrac Data Copying
3-2-3 Connection for Direct end deck ATRAC Data Copying To specify an MDS-B5 as the main, sub, or end deck You can daisy chain multiple MDS-B5 decks through when using the direct ATRAC data copy function, do the DIRECT DUPLICATION LINK connectors to the following Setup menu procedure. -
Page 20: Connecting And Setting The Keyboard
3-2 Connections Main/sub deck indication 3-2-4 Connecting and Setting the When you specify an MDS-B5 as a main, sub or end Keyboard deck, the status of the deck appears in the display window. “MAIN” means the main deck and “SUB”... -
Page 21: Handling Minidiscs
3-3 Handling MiniDiscs Unlike CDs (Compact Discs), the Mini Disc is encased within a hard plastic cartridge which allows you to handle it without fear of dust or fingerprint contamination. However, a MiniDisc that has been contaminated or bent may cause the MD player to malfunction. -
Page 22: Setting The Analog Input And Output Reference Levels
3-4 Setting the Analog Input and Output Reference Levels 3-2 Connections You can adjust the analog input and output reference levels during recording or playback within a range of +8 dB to –12 dB by turning the PLAYBACK and RECORD level controls on the rear of the MD deck. The analog input and output reference level is factory set at +4 dB (at –20 dB from full bit). -
Page 23: Selecting The Input Signal
When recording from a consumer MD deck , a CD player , an MDS-B6P, or another MDS-B5, the MDS- B5 automatically records track numbers according to Turn the AMS control to display the F01: Analog the level and U-bit of the digital input signal, In menu indication. -
Page 24: Recording Procedure
4-2 Recording Procedure 4-1 Selecting the Input Signal To eject the disc If the inserted disc contains recorded material, the MD deck will automatically record new material at the end Press the STOP button to stop the MD, then press the of the existing material and with a new track number. - Page 25 About the sampling rate converter A built-in sampling rate converter automatically converts the sampling frequency of various digital sources to the 44.1 kHz sampling rate of the MD deck. This allows you to record sources such as 32- and 48- kHz DAT or satellite broadcasts from the digital input connectors.
-
Page 26: Display Information During Recording
4-3 Display Information During Recording 4-1 Selecting the Input Signal Changing the information display during MD-related limitations recording The recording system in your MD deck is radically different from those used in cassette and DAT decks Each press of the DISPLAY button during recording and is characterized by the limitations described changes the information on the display as follows: below. -
Page 27: Adding Disc And Track Titles
4-4 Adding Disc and Track Titles Use the title function to add titles to your own discs Press the NAME button to record the title on the and tracks using the character and numeric buttons on disc. the remote controller. The maximum number of To cancel the title entry process characters for all titles on a disc is 1,792. -
Page 28: Procedure Of Direct Atrac Data Copying
For details on the settings for direct ATRAC data copying error checking finishes, “DupComplete!” appears. and on specifying an MDS-B5 as a main deck, sub deck, or Press the AMS control or the ENTER/YES button. end deck, see “3-2-3 Connection for Direct ATRAC Data The sub and end decks write the TOC information Copying”... -
Page 29: Restrictions On Digital Copying
When using a consumer MD recorder to make The disc will be completely copy-enabled by the Serial a copy of a disc recorded on the MDS-B5 Copy Management System. This status is indicated by the track mode bit values of d2=1 and d3=1. -
Page 31: Overview Of Playback Procedures
5-1 Overview of Playback Procedures To start playback instantly The MDS-B5 provides many playback functions that can be used for a variety of purposes. This section You can memorize the beginning of selected tracks into gives an overview of these functions and their the MD deck’s built-in memory in order to begin playback... -
Page 32: Playback Procedures
5-2 Playback Procedures 5-8 Starting Playback Instantly (Multi-Access Function) 5-2-1 Playing From the First 5-2-2 Locating a Specific Point Track on the MD (Search) To find a specific point on the MD, use the 0 and ) buttons during playback to quickly scan forward or backward. -
Page 33: Playing A Single Track Only
5-2-3 Playing a Single Track Only 5-2-4 Rehearsal Playback In single-track-playback mode, the MD deck plays Press the REHEARSAL button to play back a portion only single track that you have selected. This prevents of a track repeatedly. The rehearsal playback allows unintentional playback of the next track. -
Page 34: Locating A Track
5-3 Locating a Track 5-8 Starting Playback Instantly (Multi-Access Function) 5-3-1 Locating a Specific Track 5-3-2 Locating the Beginning of a Track (AMS) You can access specific tracks instantly by entering their track numbers with the numeric buttons on the During playback or playback pause, turn the AMS remote controller or a keyboard. -
Page 35: Preparing The Next Track During Playback
5-3-3 Preparing the Next Track Turn the AMS control clockwise to change the During Playback display to “NextPlayOn,” then press the AMS control. Turning the AMS control counterclockwise In Next Play mode on a single MD deck, you can changes the display back to “NextPlayOff.” locate the next track even during playback of the current track. -
Page 36: Display Information During Playback
5-4 Display Information During Playback 5-8 Starting Playback Instantly (Multi-Access Function) Changing the display information during Display information during Program Play playback and Instant Playback Each press of the DISPLAY button during playback During Program Play and Instant Playback, the MD changes the information in the display as follows: deck displays the program list before it displays the next track’s information... -
Page 37: Playing Tracks Repeatedly
5-5 Playing Tracks Repeatedly You can use the Setup menu to select Repeat Play Turn the AMS control clockwise to display mode. “Repeat On”, then press the AMS control. The Repeat Play mode can be used with all other The “REPEAT” indication lights. playback modes. -
Page 38: Program Play
5-6 Program Play 5-8 Starting Playback Instantly (Multi-Access Function) Use the Program Play function to specify the playback Turn the AMS control clockwise to display sequence of multiple tracks. “Program,” then press the AMS control. • To turn the Program Play function on, use the Setup “PROGRAM”... - Page 39 Turn the AMS control to select a track, then press To make a program the AMS control. The position for the second track begins flashing. Repeat this step to program up to 25 tracks. 00 34 65 / 3 - 0 / 2,3,4 Press the ENTER/YES button to complete the program.
-
Page 40: Playing Tracks In Random Order (Shuffle Play)
5-7 Playing Tracks in Random Order (Shuffle Play) 5-8 Starting Playback Instantly (Multi-Access Function) You can play all the tracks on the MD in random Turn the AMS control clockwise to display order. “Shuffle,” then press the AMS control. Use the Setup menu to select Shuffle Play mode. “SHUFFLE”... -
Page 41: Starting Playback Instantly (Multi-Access Function)
5-8 Starting Playback Instantly (Multi-Access Function) You can memorize the beginning of a track in the MD Press the AMS control. deck’s built-in memory to start playback the instant The indication flashes to show that you can change you press the PLAY/PAUSE button. the setting. - Page 42 5-8 Starting Playback Instantly (Multi-Access Function) To specify tracks for Multi-Access Turn the AMS control to select a track, then press playback the AMS control. The position for the second track begins flashing. Repeat this step to specify up to 10 tracks. 00 34 65 / 3 - 0 / Press the ENTER/YES button to complete the...
-
Page 43: Varying The Playback Speed (Variable-Speed Playback)
5-9 Varying the Playback Speed (Variable-Speed Playback) You can vary the playback speed in a range between To select the playback speed +12.5% and –12.5% of the normal speed. • To select variable-speed playback, use the Setup menu. • To specify the playback speed, use the Edit menu. To select variable-speed playback mode 2 –... -
Page 45: Overview Of Editing Functions
6-1 Overview of Editing Functions Turn the AMS control until menu item F09 (“Disc 6-1-1 Types of Editing Functions Edit” or “Ram Edit”) appears. Use the Edit menu to select the editing functions. Press the EDIT/NO button, then turn the AMS control to display each edit function and its number one at a time. -
Page 46: Track Numbers After Editing Operations
6-1 Overview of Editing Functions 6-1-3 Track Numbers After 6-1-5 Undo Function Editing Operations If you make a mistake in erasing or moving a track, the Undo function allows you to cancel the results of the If an editing operation results in the deletion or last operation. -
Page 47: Erasing Tracks (Erase Function)
6-2 Erasing Tracks (Erase Function) Use the erase function to erase a single track or all To erase a single track using the remote tracks from a recorded disc. controller You can use the remote controller or a keyboard to To erase a single track erase a single track during playback or playback pause. -
Page 48: Dividing A Recorded Track (Divide Function)
6-3 Dividing a Recorded Track (Divide Function) 6-1 Overview of Editing Functions To randomly access certain portions of a track, the Turn the AMS control to adjust the dividing divide function allows you to create separate tracks for position. each portion. You can also use the divide function to The track will be divided at the top position of the erase selected portions of a track, by first specifying rehearsal playback. - Page 49 To divide a recorded track during rehearsal playback Locating the dividing position with the rehearsal playback before using the divide function allows you to skip the procedures for selecting the track to be divided and locating the dividing position. Locate the dividing position with the rehearsal playback.
-
Page 50: Combining Recorded Tracks (Combine Function)
6-4 Combining Recorded Tracks (Combine Function) 6-1 Overview of Editing Functions Use the combine function to combine tracks on a Press the AMS control. recorded disc. The display changes for selecting the latter track to The two tracks to be combined needs not to be be combined and the rehearsal playback of the consecutive. -
Page 51: Moving Recorded Tracks (Move Function)
6-5 Moving Recorded Tracks (Move Function) Use the move function to change the order of specific Press the AMS control. tracks. The display changes for selecting the track number where the track will be moved to. To move tracks 00 14 85 2 - - - 3 Turn the AMS control to select the track number where the track will be moved to. -
Page 52: Editing Titles
6-6 Editing Titles 6-1 Overview of Editing Functions Use the Edit menu to enter or edit disc or track titles. A Turn the AMS control to select “Disc” to enter a single disc can store up to 1,792 characters of title disc name or the track number to enter a track title, data. - Page 53 To erase a title To copy a title Press the EDIT/NO button while the MD deck is Press the EDIT/NO button while the MD deck is stopped, playing, or in playback pause. stopped, playing, or in playback pause. The Edit menu appears. The Edit menu appears.
-
Page 54: Marking The Cue Point
6-7 Marking the Cue Point 6-1 Overview of Editing Functions You can mark the cue point anywhere on the track to Turn the AMS control to locate the cue point to be put out the tally signal from the REMOTE connector marked. - Page 55 To erase a cue point To erase all cue points 2,3,4 2 – 5 Press the EDIT/NO button while the MD deck is Press the EDIT/NO button while the MD deck is stopped, playing back, or in playback pause. stopped, playing back, or in playback pause. The Edit menu appears.
-
Page 56: Trimming
6-8 Trimming 6-1 Overview of Editing Functions 6-8-1 Head Trimming Press the AMS control. Rehearsal playback starts from the rise in the audio signal detected according to the Autocue threshold The head trimming function allows you to change the level set in the Setup menu. beginning of a track temporarily without erasing the actual data on the disc. - Page 57 To erase all head-trimming specifications Press the EDIT/NO button. on a disc Turn the AMS control until “009-01:HT In ?” appears. Press the AMS control. “Complete!!” appears and playback starts for confirming the results of the operation. To erase the trimming specification at the beginning of a track 2 –...
-
Page 58: End Trimming
6-1 Overview of Editing Functions 6-8 Trimming 6-8-2 End Trimming Turn the AMS control to specify the amount to be trimmed. Pressing the 0/) button allows you to select By entering a trimming specification at the end of a “F” (frame), “S” (second)”, or “M” (minute) as the track, you can eliminate the ending position without unit for adjusting the end of Rehearsal playback. - Page 59 To erase a trimming specification at the To erase all end-trimming specifications end of a track on a disc 2 – 5 2 – 5 Press the EDIT/NO button while the MD deck is Press the EDIT/NO button while the MD deck is stopped, playing, or in playback pause.
-
Page 61: The Overview Of The Setup Menu
7-1 The Overview of the Setup Menu Setting items of the setup menu The Setup menu of the MDS-B5 includes the setting items shown below. Each menu item has the item number for your ease of setting. Item number Menu item... -
Page 62: Levelsync Setting (Track Marking Function)
7-2 LevelSync Setting (Track Marking Function) 6-1 Overview of Editing Functions LevelSync function adds track numbers automatically To set the items for the LevelSync at specified points where the rise in the audio signal is function detected during recording. You can set the following items as well as turning on and off of LevelSync function using the setup menu for fitting your needs. -
Page 63: Setting Up For Timer-Activated Function
MDS- B5 to the timer. Timer To an AC outlet 2 – 5 MDS-B5 Press the EDIT/NO button while holding down the STOP button. The Setup menu appears. Connecting a timer Turn the AMS control until the menu item F10 (“Timer off”, “Timer Play”... -
Page 64: Setting The Playback Resume Mode
7-4 Setting the Playback Resume Mode 6-1 Overview of Editing Functions You can set how to resume playback when you press Turn the AMS control to select the playback the PLAY/PAUSE button after the deck was stopped resume mode from the values below. with the STOP button being pressed. -
Page 65: Setting The Rs-232C Interface
External equipment connected to the RS-232C To set up for RS-232C interface connector at the rear of the MDS-B5 can be used to control the MDS-B5. Use the Setup menu to set the baud rate, parity, and stop bit length of RS-232C interface before using this interface. -
Page 66: Setting The Auto Cue Function
6-1 Overview of Editing Functions Turning the AUTO CUE function on by pressing the Setting Up the AUTO CUE function A.MODE button enables the MDS-B5 to locate the beginning of a track by detecting the rise in the audio signal. -
Page 67: Setting The Rehearsal Playback Function
7-7 Setting the Rehearsal Playback Function By pressing the REHEARSAL button, the MD deck Setting the rehearsal playback function starts the rehearsal playback from the position you pressed the REHEARSAL button for the specified time. You can change the time length and interval for rehearsal playback using the setup menu. -
Page 68: Setting The Eom Function
7-8 Setting the EOM Function 6-1 Overview of Editing Functions The EOM function enables the MD deck to put out the tally signal which tells the current track or the disc is getting closer to its end. Use the Setup menu to set when the tally signal is put out before the end of the current track or the disc. -
Page 69: Reading The Hours Meter
7-9 Reading the Hours Meter This function allows you to display the accumulated Note operating time of the laser diode (during recording When the BU block is replaced, a new EEP-ROM is operations) and of the spindle motor. Use this installed and the hours meter is zeroed. -
Page 70: Disabling The Buttons While Controlling Remotely
ATRAC data copying, you can disable the buttons on the front panel of the MDS-B5 Kill Almost: Only the STOP, EJECT, and to avoid unintentional touch of the operation buttons DISPLAY buttons are in effect. -
Page 71: Cleaning And Reset Switch
8-1 Cleaning and Reset Switch Use a soft cloth slightly moistened with a mild detergent solution to clean the cabinet and panel surface. Do not use solvents that may damage the surface such as paint thinner, benzine, or alcohol. About the reset switch Removing the screws with a Phillips screwdriver from both side of the MD deck (two screws on each side) and the rear panel (one screw) allows you to open the... -
Page 72: Display Messages
8-2 Display Messages The following tables explain in the various messages that appear in the display window. Messages during editing the MD Messages during specifying tracks for program playback and multi-access function Message Meaning Cannot Edit An attempt was made under the condition* you cannot edit the MD. -
Page 73: Menu Item List
Menu Item List The Setup menu Press the EDIT/NO button while holding down the STOP button to enter the Setup menu. Number Menu item Setting Page Input source Selecting the input signal Play mode Selecting the playback mode Repeat Setting the repeat playback Rec mode Selecting the recording mode Dup mode... -
Page 74: The Edit Menu
Menu Item List The Edit menu Press the EDIT/NO button to enter the Edit menu. Number Menu item Setting Page Name ? Editing a title Nm In ? Entering a title Nm Erase ? Erasing a title Nm All Ers? Erasing all titles on the disc Nm Copy ? Copying a title... -
Page 75: Pin Assignments For Remote (25P) Connector
Pin Assignments for REMOTE (25P) connector You can choose from following four types of pin assignment when you control the MD deck by inputting the external parallel remote signal to REMOTE (25P) connector on the rear panel. For front panel buttons For auto signal output Pin number Function... - Page 76 Menu Item List Pin Assignments for REMOTE (25P) connector For instant playback (Multi-Access For edit operations function) Pin number Function Pin number Function EDIT No.1 PLAY CUE/STANDBY No.3 PLAY No.5 PLAY DISPLAY No.7 PLAY STOP STATUS No.9 PLAY NEXT (JOG+1) SELECT STOP STOP...
-
Page 77: Rs-232C Protocol
MDS-B5 and the personal computer are ready for Notifies that the set communication. requests data transmission. Also, connect the CTS of the MDS-B5 with RTS of Acknowledges that the the personal computer. The MDS-B5 does not personal computer requests transmit that data until the CTS is received (that is, the data transmission. - Page 78 1 byte of data. In receiving data RxDATA RxRDY READ Upon reception of data, the RxRDY (RxREADY) signal of the MDS-B5 rises up and the set disables the RTS to read that data, then it enables the RTS again. Appendix...
-
Page 79: List Of Commands
123 is “023H” and “the contents of DATA” as shown below. Note N=6 since the number of data is 6 The MDS-B5 does not support a command that gives Contents of the DATA= notice of data receive error. track number 123 “023H”... - Page 80 Turns on or off the AUTO DISPLAY (displays the track title and time information 031H alternately). Misoperation prevention mode (disables most of the buttons and controls on the MDS-B5). 04CH Status detection Detects the model name and the software version.
- Page 81 Reference Items Descriptions commands 05EH Time Detects the total operation time of the spindle motor and the laser pickup during playback. information Detects the elapsed time of the current track. 0D8H 0DCH Detects the remaining time of the track being played or paused. 0DBH Detects the total remaining recordable time of the disc.
- Page 82 indicates that the data is attached to the command. Upper digit Lower digit STOP, PAUSE, AUTO PAUSE, MECHA ERROR AUTO PAUSE, MECHA CUE, AUTO CUE STATUS SENSE AUTO CUE STATUS STANDBY, SELECT SENSE REQUEST RETURN RETURN EJECT AUTO CAUTION AUTO DISPLAY SENSE DISPLAY...
-
Page 83: Command Descriptions
Stops the motor and rotation of the disc. The mechanism becomes completely stationary. RECORD, ERASE • PAUSE function The MDS-B5 stores the audio signals in the buffer memory while in the PAUSE mode, Command: 013H therefore the audio signals are immediately Function : Starts recording or erasing. - Page 84 STANBY status. • You cannot change the cueing speed. • It may take a few seconds until the deck • On the MDS-B5, cueing is performed by holding the 0 or ) button while it is pauses after receiving the RECORD STANDBY command.
- Page 85 000H: If there are no DATA2 and DATA3: A TRACK LOCATE track currently being played or paused and the previous track are combined. Command: 01AH If there are DATA2 and DATA3: When in the Function : Skips the tracks in forward or reverse STOP mode, a track specified by the DATA2 direction.
- Page 86 Command Descriptions The tracks can be set for each program area. NEXT AMS SET (program area 1-25). In this case, set the track order and program Command: 026H area. Function : Sets the Next AMS function. DATA: 4 (2) DATA: 3 DATA1 (10, 1) DATA1: (10, 1) DATA2 (**, 100)
- Page 87 Note • AUTO CUE function: In the PROGRAM SET, PAUSE, PLAY or When locating a track, if there is a silent part at PROGRAM CLEAR mode, the program area is the beginning of track, this function skips that 00 if there is no DATA2. part up to the sound rising part and pauses the RETURN command: 0ACH deck.
- Page 88 Command Descriptions 000H: EOM MODE OFF Function : Selects the audio input. If Track EOM is set: The analog input and digital input can be (10, 1) {*000 to 035, decimal number} selected. If Disc EOM is set: (E, X) DATA: 1 X=0: one second before the end of the disc DATA1...
- Page 89 000H: STEREO REC TRACK No. STATUS SENSE 001H: MONORAL REC 0FFH: sense Command: 055H Note Function : Demands to output current track number. Use this command while the MD deck is DATA: None stopped. RETURN command: 0D5H RETURN command: 0BCH DISC STATUS SENSE KILL LOCAL MODE SELECT Command: 056H...
- Page 90 Command Descriptions Note DATA: 1 DATA1 This function outputs the time in minute/second 000H: Output of minute/second only, and the sub-second time is not output. 001H: Output of minute/second/sub-second DATA: None RETURN command: 0D8H RETURN command: 0DCH CURRENT TRACK NAME SENSE TOTAL TRACK No., TOTAL TIME SENSE Command: 059H...
- Page 91 00CH: 97 to 100 characters from the DATA3: The second character set in DATA1 beginning DATA4: The third character set in DATA1 0CCH: Erases the disc title. DATA5: The fourth character set in DATA1 DATA2: The first character set in DATA1 DATA6: The fifth character set in DATA1 DATA3: The second character set in DATA1 DATA7: The sixth character set in DATA1...
- Page 92 Command Descriptions 003H: TRACK/EOM STATUS CHANGE CAUTION SENSE REQUEST The deck notifies that the track number has changed and EOM was output. Issue the Command: 071H “END OF MESSAGE TIME PRESET”: Function : The deck outputs this information to 032H. indicate that the it is in caution status (it cannot Upon this request from the set, the controller operate any more due to external causes such as...
- Page 93 Function : Returns information for the “NEXT AMS SET”: 026H. DATA1: DEVICE TYPE DATA: 3 022H: Deck for recording/playing (MDS-B5) 023H: Deck for playing only (MDS-B6P) DATA1 (10, 1) DATA2: SOFTWARE VERSION (2 DIGIT DATA2 (**, 100) Track No. (001 to 255)
- Page 94 Command Descriptions AUTO PAUSE, AUTO CUE LEVEL SYNC RECORD RETURN RETURN Command: 0B3H Function : Returns information for the setting of Command: 0B0H LEVEL SYNC RECORD function. Function : Returns information for the ON/OFF of DATA: 1 AUTO PAUSE or AUTO CUE function. DATA1 DATA: 1 000H: LEVEL SYNC RECORD OFF...
- Page 95 REPEAT MODE RETURN MECHA STATUS RETURN Command: 0BBH Command: 0D0H Function : Returns information for the “REPEAT Function : Returns information for the “MECHA MODE SELECT”: 03BH. STATUS SENSE”: 050H. DATA: 1 DATA: 1 DATA1 DATA1 000H: REPEAT OFF bit7: REC bit (in RECORD mode) 001H: REPEAT ON bit6: TOC WRITING (writing TOC on disc) REQUEST command: 03BH...
- Page 96 Command Descriptions DISC NAME RETURN CURRENT TRACK NAME RETURN Command: 0D7H Function : Returns information for the “DISC NAME Command: 0D9H SENSE”: 057H. Function : Returns information for the “CURRENT DATA: 9 TRACK NAME SENSE”: 059H. DATA1 DATA: 9 000H: 1 to 8 characters from the beginning DATA1 002H: 9 to 16 characters from the beginning 000H: 1 to 8 characters from the beginning...
- Page 97 Note CURRENT TRACK REMAIN TIME Read the above case as *-**,*** (Example: 1- RETURN 05, 2-50). In case of no error: Command: 0DCH DATA1 (0, 0) Function: Returns information for the “CURRENT DATA2 ( , 0) TRACK REMAIN TIME SENSE”: 05CH. REQUEST command: 078H DATA: 2 ERROR code:...
-
Page 98: Specifications
Specifications Specifications Digital input (COAXIAL) General Connector RCA PHONO Input impedance 75 ohms Power requirements AC 120 V, 60 Hz (for the U.S. Reference level 0.5 Vp-p and Canada), AC 220 to 230V, 50/60 Hz (for Digital input (AES/EBU) the European countries) Connector XLR-3, FEMALE Power consumption 30 W... - Page 99 RS-232C Baud rate Max 9600 (1200 baud/2400 baud/ 4800 baud/9600 baud, changeable by button operation) Word length 8 bits Stop bit Stop bit 1/Stop bit 2, changeable by button operation Parity Parity Odd/Parity Even/Parity Off, changeable by button operation Audio characteristics Frequency response 20 Hz to 20 kHz, ±0.5 dB Signal-to-noise ratio More than 88 dB (with A-weight filter, when playing back...
-
Page 101: Index
Index Erase 6-3 Playback procedures 5-2 Move 6-7 Playback resume mode 7-4 Adding a title 4-5 RAM Edit mode 6-1 Program play 5-8 Adding a disc title 4-5 Title 6-8 Rehearsal playback 5-3 Adding a track title 4-5 Undo 6-2 Repeat Play mode 5-7 Erasing a disc title 4-5 EJECT button 2-1... - Page 103 The material contained in this manual consists of information that is the property of Sony Corporation and is intended solely for use by the purchasers of the equipment described in this manual. Sony Corporation expressly prohibits the duplication of any...
- Page 104 Sony Corporation Printed in Malaysia MDS-B5 (UC, CED, Home AV Company © 1996 3-859-105-11(1) Published by Home AV Company...
Need help?
Do you have a question about the MDS-B5 and is the answer not in the manual?
Questions and answers