Table of Contents
Advertisement
Quick Links
Advertisement
Table of Contents

Related Manuals for LevelOne KVM-9000


Summary of Contents for LevelOne KVM-9000
-
Page 1: User Manual
IP KVM Extender LevelOne User Manual KVM-9000 IP KVM Extender Ver. 1.2 1 / 93... - Page 2 IP KVM Extender Certificates This equipment has been tested and found to comply with the limits for a Class A digital device, pursuant to Part 15 of the FCC. Operation is subject to the following two conditions: (1) This device may not cause harmful interference (2) This device must accept any interference received, including interference that may cause undesired operation.
-
Page 3: Table Of Contents
3.1 Operation Overview ....................16 3.2 Connecting KVM-9000 switch to the host system ..........16 3.3 Scenario of connecting KVM-9000 switch to the Multi-port KVM Switch system .. 19 4.1 Initial Configuration ....................20 4.1.1 Initial configuration via serial console ............22 4.2 Keyboard, Mouse, and Video configuration ............ - Page 4 8. FAQs ..........................85 9. Addendum ........................88 A. Key Codes ......................88 B. Video Modes ......................90 C. User Role Permissions ................... 91 D. KVM-9000 port table ....................91 E. Bandwidth Consumption ..................92 F. Cable diagrams ....................... 93 4 / 93...
-
Page 5: The Quick Installation Guide
All data is transmitted via IP. IP-KVM Extender can be used in a multi administrator and multi server environment as well. Besides, KVM-9000 is a KVM switch, which can also be used with a local console. - Page 6 IP KVM Extender Hardware installation Please perform the following steps: 6 / 93...
-
Page 7: Initial Ip Configuration
Before you connect the device to your local subnet, be sure to complete the corresponding configuration of your DHCP server. It is recommended to configure a fixed IP assignment to the MAC address of the KVM-9000 unit. You can find the MAC address labeled on the bottom side of the metal housing. - Page 8 ■ DHCP If you have installed the KVM-9000 unit on a network that enables DHCP, you can use the IPSetup to find out the KVM-9000 unit’s IP. (1) Plug Ethernet cable to KVM-9000 unit. KVM-9000 will get an IP via DHCP.
- Page 9 IP KVM Extender Install JVM on Client system The KVM-9000 unit can be accessed with a standard JAVA enabled web browser. You must install Java Runtime Environment: version 6 update 5 and above to your client system. Note: At a minimum you must have IE7.0, IE8.0, Netscape7.0, Mozilla 3.2, (Firefox 3.6) and above installed on your client computer.
- Page 10 There are some options to choose from, and the important ones are the following: Auto Adjust button If the video displayed is of bad quality or distorted in some way, press this button and wait a few seconds while KVM-9000 unit tries to adjust itself for the best possible video quality. Sync Mouse Choose this option in order to synchronize the local with the remote mouse cursor.
- Page 11 IP KVM Extender Video Settings in Options Menu This opens a new window with elements to control the KVM-9000 unit’s Video Settings. You can change some values, for instance the brightness and contrast of the picture displayed, which may improve the video quality. It is also possible to revert to the default settings for all video modes or only the current one.
-
Page 12: Introduction
KVM access devices that can save your money, time, space, and equipment. The KVM-9000 provides convenient, remote KVM access and control via LAN or Internet. It captures, digitizes, and compresses video signal and transmits it with keyboard and mouse signals to and from a remote computer. -
Page 13: Technical Specifications
IP KVM Extender 2.2 Technical specifications Function Specification VGA Resolution Local : 1920 x 1440 Remote : 1600 x 1200 OS supported Windows, Unix, Unix-like OS(Sun Solaris, Linux). Mac Browser supported Microsoft Internet Explorer version 6.0 or above or Netscape or Mozilla or Safari IP setting DHCP, Bootp, Fix IP (DDNS supported) Network Connection... -
Page 14: System Requirement
Netscape or Mozilla or Safari 2.4 When the server is up and running The KVM-9000 gives you a full control over the remote server. The Management Console allows you to access the remote server’s graphics, keyboard and mouse and to send special commands to the server. - Page 15 IP KVM Extender Using KVM-9000, administrators can determine which kind of serious hardware failure has occurred (See table 2-1). Type of failure Detected by Hard disk failure Console screen, CMOS set-up information Power cable detached, power supply Server remains in power off state after power failure on command has been given.
-
Page 16: Hardware Installation
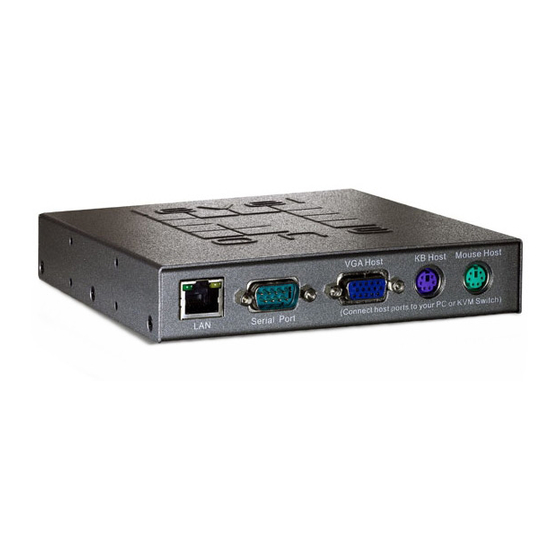
IP KVM Extender 3. Hardware installation 3.1 Operation Overview Figure 3-1 shows the connections of KVM-9000 switch to its host, to peripheral devices, to the power source and to the local area network. Single port IP-KVM IP Network Administrator Figure 3-1.a KVM-9000 switch usage scenario... - Page 17 IP KVM Extender Step 2 Connect the monitor to the KVM-9000 switch console side. Step 3 Connect the keyboard to the KVM-9000 switch console side. Step 4 Connect the mouse to the KVM-9000 switch console side. Step 5 Connect a VGA cable (15-pin HDDB Male / Male) with the Male side to both of the PC and the host of the KVM-9000 switch.
- Page 18 Connect Ethernet and/or modem or both communication ports simultaneously, depending on how you want to access KVM-9000 switch INTERNET Modem Note: - Before attempting to connect anything to the KVM-9000 switch or your computers, please ensure that all your computers and devices are power off. 18 / 93...
-
Page 19: Scenario Of Connecting Kvm-9000 Switch To The Multi-Port Kvm Switch System
IP KVM Extender 3.3 Scenario of connecting KVM-9000 switch to the Multi-port KVM Switch system 19 / 93... -
Page 20: Initial Configuration
4. Configuration 4.1 Initial Configuration If DHCP mode is enabled (IP auto configuration = DHCP), the KVM-9000 will try to contact a DHCP server in the subnet to which it is physically connected. If a DHCP server is found, it may provide a valid IP address, gateway address and net mask. - Page 21 IP KVM Extender ■ Setup fixed IP a. Setup “IP auto configuration” as “None” ; setup IP address, Subnet mask and Gateway b. Enter Super user login and password for Authentication (default : super/pass) c. Click Setup Device. If super login was authenticated, it’ll show “Successfully configured device”.
-
Page 22: Initial Configuration Via Serial Console
“Cancel” button. 4.1.1 Initial configuration via serial console For using serial terminal, the KVM-9000 has a serial line interface (host side). This connector is compliant with the RS-232 serial line standard. The serial line has to be configured with the parameters given in Table 4-2. -
Page 23: Keyboard, Mouse, And Video Configuration
4.2.1 KVM-9000 keyboard settings The KVM-9000 settings for the host's keyboard type have to be corrected in order to make the remote keyboard work properly. Check the settings in the KVM-9000 Web front-end. See section 6.5.2 for details. -
Page 24: Automatic Mouse Speed And Mouse Synchronization
The following limitations do not apply in case of USB and Mouse Type “Windows >= 2000, MacOSX”. While the KVM-9000 works with accelerated mice and is able to synchronize the local with the remote mouse pointer, there are the following limitations, which may prevent... -
Page 25: Single And Double Mouse Mode
X11 on the host system, please do not use any custom mode lines with special video modes. If you do, the KVM-9000 may not be able to detect them. We recommend using any of the standard VESA video modes, instead. -
Page 26: Usage
The following interfaces are supported: HTTP/HTTPS Full access is provided by the embedded web server. The KVM-9000 environment can be entirely managed using a standard web browser. You can access the KVM-9000 using the insecure HTTP protocol, or using the encrypted HTTPS protocol. Whenever possible, use HTTPS. -
Page 27: Login Into The Kvm-9000 And Logout
The address used might be an IP address or a domain name, in the case where you have given your KVM-9000 a symbolic name in the DNS. For instance, type the following in the URL field of your browser when establishing an unsecured connection: http://<IP address of IP-KVM>... - Page 28 Warning Please make sure to change the super user password immediately after you have installed and accessed your KVM-9000 for the first time. Unchanging of the password for the super user is a severe security risk and might result in...
-
Page 29: Logout From The Kvm-9000
Table 5-2. Buttons from the front end Warning If there is no activity for 30 minutes, the KVM-9000 will log you out, automatically. A click on one of the links will bring you back to the login screen. 5.2.2 Logout from the KVM-9000 This link logs out the current user and presents a new login screen. -
Page 30: Main Window
The Remote Console window is a Java Applet that tries to establish its own TCP connection to the KVM-9000. The protocol that is run over this connection is neither HTTP or HTTPS, but RFB (Remote Frame Buffer Protocol). As default, RFB tries to establish a connection to TCP port number 443. -
Page 31: Remote Console Control Bar
If the video display is of bad quality or distorted in some way, press this button and wait a few seconds while the KVM-9000 tries to detect the video mode of VGA port to the controlled host and adjust itself for the best possible video quality. - Page 32 IP KVM Extender Single/Double mouse mode Switches between the Single Mouse Mode (where only the remote mouse pointer is visible) and the Double Mouse Mode (where remote and local mouse pointers are visible and need to be synchronized). Single mouse mode is only available if using SUN JVM 1.4.2 or higher.
- Page 33 IP KVM Extender • Scaling Allow you to scale down the Remote Console. You can still use both mouse and keyboard, however the scaling algorithm will not preserve all display details. When you designate 25%, 50%, or100% scaling, the size of Remote Console window is calculated according to the remote host video setting with scaling algorithm execution.
- Page 34 KVM-9000 is active and passing through the incoming signal from the host system. The option Noise Filter defines how KVM-9000 reacts to small changes in the video input signal. Turning on the noise filter can help reduce video flickering that is often caused by distortions, as well as lowering unnecessary bandwidth consumption.
- Page 35 Click to run this menu item for retrieving the whole video again from the controlled host and displayed on Remote Console. In normal situation, only changed parts of video will be packed and sent from KVM-9000, for saving 35 / 93...
- Page 36 IP KVM Extender network bandwidth. This function is mainly used for troubleshooting purpose where some old video fragments are displayed as not updated in time for some reason; for example, noise filter for VGA is setting too large. • Soft Keyboard Figure 5-11.
- Page 37 IP KVM Extender system that uses an US-English keyboard mapping. In this case you have to change the Local Keyboard setting to the right language, manually. • Hotkeys Opens a list of hotkeys defined before. Choose one entry, the command will be sent to the host system.
- Page 38 IP KVM Extender the video picture. Figure 5-14. Encoding Compression Color Depth: set the desired color depth. You may select between 8 or 16 bit for Video Optimized/compression level 0, or between 1 and 8 bit for compression level 1 to 9. The higher the color depth, the more video information has to be captured and to be transferred.
-
Page 39: Remote Console Status Line
"Video Optimized". As a general result, the data rate is reduced (less bits per color). Furthermore, the KVM-9000 will not have to do any video compression. In total, this will lead to less transfer time of the motion picture. -
Page 40: Menu Options
IP KVM Extender 6. Menu Options 6.1 Remote Control 6.1.1 KVM Console Figure 6-1. KVM Console To open the KVM console, either click on the menu entry on the left, or on the console picture on the right. To refresh the picture, click on the button “Refresh”. 40 / 93... -
Page 41: Telnet Console
KVM-9000 host machine is using a text mode screen resolution. Connecting to the KVM-9000 is done as usual and as required by the Telnet client, for instance in a UNIX shell: telnet 192.168.1.22... -
Page 42: Remote Power
IP KVM Extender help Displays the list of possible commands Clears the screen quit Exits the current session and disconnects from the client version Displays the release information terminal Starts the terminal passthrough mode for serial port 1. The key sequence esc exit switches back to the command mode. -
Page 43: Cd-Rom Image
• Click “Upload” button to upload the chosen image file into the KVM-9000’s onboard memory. This image file is kept in the onboard memory of the KVM-9000 until the end of the current session, as you logged out, or initiated a reboot of the KVM-9000. 6.3.2 CD–ROM Image Use Image on Windows Share (SAMBA) To include an image from a Windows share, select “CD-ROM”... - Page 44 The specified image file is supposed to be accessible from the KVM-9000. The information above has to be given from the point of view of the KVM-9000. It is important to specify correct IP addresses, and device names. Otherwise, KVM-9000 may not be able to access the referenced image file.
- Page 45 IP KVM Extender Figure 6-10. Explorer context menu Select “Sharing” to open the configuration dialog. Figure 6-11. Share configuration dialog Adjust the settings for the selected directory. • Activate the selected directory as a share. Select “Sharing this folder”. • Choose an appropriate name for the share. You may also add a short description for this folder (input field “Comment”).
- Page 46 MS Windows You can use the tool “Raw Write for Windows”. It is included on the CD ROM shipped with KVM-9000. Figure 6-12. RawWrite for Windows selection dialog From the menu, select the tab “Read”. Enter (or choose) the name of the file in which you would like to save the floppy content.
- Page 47 IP KVM Extender To create a CDROM image file, copy the contents of the CDROM to a file. You can use the following command: dd [ if=/dev/cdrom ] [ of=/tmp/cdrom.image ] dd reads the entire disc from the device /dev/cdrom, and saves the output in the specified output file /tmp/cdrom.image.
-
Page 48: Drive Redirection
IP KVM Extender 6.3.3 Drive redirection The Drive Redirection is another possibility to use a virtual disc drive on the remote computer. With Drive Redirection you do not have to use an image file but may work with a drive from your local computer on the remote machine. The drive is hereby shared over a TCP network connection. -
Page 49: Driver Redirection Utility Installation
IP KVM Extender Disable Drive Redirection If enabled the Drive Redirection is switched off. Force read-only connections If enabled the Write Support for the Drive Redirection is switched off. It is not possible to write on a redirected device. Click Apply to submit your changes. There are two methods of Drive Redirections: External Drive Redirection Utility Built-in Java Drive Redirection function in Remote Console... - Page 50 Drive Redirection Settings Start Drive Redirection Figure 6-16. Drive Redirection dialog Drive to redirect Device This is the address (either the DNS name or the IP address) of the KVM-9000 you would like to connect to. 50 / 93...
- Page 51 The local drive you want to share with the remote computer, which could be Floppy disc, CD-ROMs, USB-Sticks and hard drives. Port This is the network port. By default, KVM-9000 uses the remote console port (#443) here. You may change this value if you have changed the remote console port in your KVM-9000’s network settings.
- Page 52 IP KVM Extender Navigation Buttons Connect/Disconnect To establish the drive redirection please press the Connect button once. If all the settings are correct, the status bar displays that the connection has been established, the Connect button is disabled and the Disconnect button is enabled. On an error, the status line shows the error message.
-
Page 53: Built-In Java Drive Redirection
IP KVM Extender 6.3.3.2 Built-in Java Drive Redirection Run Remote Control > KVM Console. Click “Floppy” icon 53 / 93... - Page 54 IP KVM Extender 3. Click Connect Drive or Connect ISO 4. Select a drive to redirect (if Connect Drive) 54 / 93...
-
Page 55: Options
IP KVM Extender 5. Select a ISO image to redirect (if Connect ISO) 6.3.4 Options Figure 6-17. USB mass storage option Set this option to disable the mass storage emulation (and hide the virtual drive) if no image file is currently loaded. If unset, and no file image will be found it may happen that the host system will hang on boot due to changes in the boot order, or the boot manager (LILO, GRUB). -
Page 56: User Management
Click “Apply” to submit your changes. 6.4.2 Users and Groups Figure 6-19. Set User The KVM-9000 comes with 1 pre-configured user account that has fixed permissions. The account “super” has all possible rights to configure the device and to use all functions KVM-9000 offers. -
Page 57: Kvm Settings
To guarantee an acceptable response time we recommend not to exceed the number of 15 users connected to the KVM-9000 at the same time. The memory space that is available onto the KVM-9000 mainly depends on the configuration and the usage of the KVM-9000 (log file entries etc.). -
Page 58: User Console
IP KVM Extender 6.5.1 User Console The following settings are user specific. That means, the super user can customize these settings for every users separately. Changing the settings for one user does not affect the settings for the other users. Figure 6-20. - Page 59 IP KVM Extender KVM-9000 and the Remote Console will be compressed in order to save bandwidth. Since high compression rates consum more computing power of KVM-9000, they should not be used while several users are accessing the KVM-9000 simultaneously. The standard color depth is 16 Bit (65536 colors). The other color depths are intended for slower network connections in order to allow a faster transmission of data.
- Page 60 IP KVM Extender a stable and identical Java Virtual Machine across different platforms. The Remote Console software is optimized for this JVM versions and offers wider range of functionality when run in SUN's JVM. Please make sure that you are installing Sun JVM 1.4.2 or above to your client system.
-
Page 61: Keyboard/Mouse
IP KVM Extender 6.5.2 Keyboard/Mouse Figure 6-22. Keyboard and Mouse Settings Host Interface Enables a certain interface the mouse is connected to. You can choose between “Auto” for automatic detection, “USB” for an USB mouse, and “PS/2” for a PS/2 mouse. - Page 62 Mouse Speed • Auto mouse speed Use this option if the mouse settings on host use an additional acceleration setting. The KVM-9000 tries to detect the acceleration and speed of the mouse during the mouse sync process. • Fixed mouse speed Use a direct translation of mouse movements between the local and the remote pointer.
-
Page 63: Video
Miscellaneous Video Settings • Noise filter This option defines how the KVM-9000 reacts to small changes in the video input signal. Turning on the noise filter can help reduce video flickering that is often caused by distortions, as well as lowering unnecessary bandwidth consumption. -
Page 64: Device Settings
Changing the network settings of the KVM-9000 might result in losing connection to it. In case you change the settings remotely make sure that all the values are correct and you still have an option to access the KVM-9000. 64 / 93... - Page 65 IP KVM Extender IP auto configuration With this option you can control if the KVM-9000 should fetch its network settings from a DHCP or BOOTP server. For DHCP, select “dhcp” , and for BOOTP select “bootp” accordingly. If you choose “none” then IP auto configuration is disabled.
-
Page 66: Dynamic Dns
Enable this option to exclude the KVM-9000 from the setup protocol. Setup protocol is a proprietary layer-2 MAC-based protocol to allow some configuration software to detect KVM-9000 devices in the network, even without IP address, and then config network related settings to KVM-9000. - Page 67 IP KVM Extender Figure 6-26. Dynamic DNS Scenario The KVM-9000 is reachable via the IP address of the DSL router, which is dynamically assigned by the provider. Since the administrator does not know the IP address assigned by the provider, the KVM-9000 connects to a special dynamic DNS server in regular intervals and registers its IP address there.
-
Page 68: Security
IP KVM Extender This is the hostname of the KVM-9000 that is provided by the Dynamic DNS Server. (use the whole name including the domain, e.g. testserver.dyndns.org , not just the actual hostname). Username You have registered this username during your manual registration with the Dynamic DNS Server. - Page 69 Force HTTPS If this option is enabled access to the web front-end is only possible using an HTTPS connection. The KVM-9000 will not listen on the HTTP port for incoming connections. In case you want to create your own SSL certificate that is used to identify the KVM-9000 refer to the Section called Certificate.
- Page 70 The rule can be configured to apply to a particular Group level (All, User, Super, Administrator). When the KVM-9000 receives a TCP packet, it will process the packet with the chain rule depicted below. The process ordering is important; The packet will enter the chain rule 1 first, if meet the rule then take action directly, otherwise go to chain rule 2.
- Page 71 IP KVM Extender 71 / 93...
-
Page 72: Certificate
However, it is possible to generate and install a new base64 X.509 certificate that is unique for a particular KVM-9000. In order to do that, the KVM-9000 is able to generate a new cryptographic key and the associated Certificate Signing Request (CSR) that needs to be certified by a certification authority (CA). - Page 73 Warning If you destroy the CSR on the KVM-9000 there is no way to get it back! In case you deleted it by mistake, you have to repeat the three steps as described above.
- Page 74 Confirm Challenge Password Confirmation of the Challenge Password Email The email address of a contact person that is responsible for the KVM-9000 and its security. Key length This is the length of the generated key in bits. 1024 Bits are supposed to be sufficient for most cases.
-
Page 75: Serial Port
IP KVM Extender 6.6.5 Serial Port Figure 6-31. Serial Port The KVM-9000 Serial Settings (Figure 6-31) allows you to specify what device is connected to the serial port and how to use it. Configuration or console login Do not use the serial port for any special function, use it only for the initial configuration. - Page 76 AT command syntax. Modem server IP address This IP address will be assigned to the KVM-9000 itself during the PPP handshake. Since it is a point-to-point IP connection virtually every IP address is possible but you must make sure, it is not interfering with the IP settings of the KVM-9000 and your console computer.
-
Page 77: Date / Time
6.6.6 Date / Time Figure 6-32. Date / Time This link refers to a page, where the internal real-time clock of the KVM-9000 can be set up (see Figure 6-32). You have the possibility to adjust the clock manually, or to use a NTP timeserver. -
Page 78: Event Log
The common way to log events is to use the internal log list of the KVM-9000. To show the log list, click on “Event Log” on the “Maintenance” page. In the Event Log Settings you can choose how many log entries are shown on each page. - Page 79 To write logging data from more than one KVM-9000 devices to only one NFS share, you have to define a file name that is unique for each device. When you change the NFS settings and press the button “Apply”...
-
Page 80: Maintenance
Warning In contrast to the internal log file on the KVM-9000, the size of the NFS log file is not limited. Every log event will be appended to the end of the file so it grows continuously and you may have to delete it or move it away from time to time. - Page 81 IP KVM Extender The Data file for support allows you to download the KVM-9000 data file with specific support information. This is an XML file with certain customized support information like the serial number etc. You may send us this information together with a support request.
-
Page 82: Even Log
IP KVM Extender 6.7.2 Even log Figure 6-36. Event Log List Figure 6-36 displays the log list including the events that are logged by the KVM-9000. 6.7.3 Update Firmware Figure 6-37. Update Firmware The KVM-9000 is a complete standalone computer. The software it runs is called firmware. - Page 83 Updating the firmware is a three-stage process: • Firstly, the new firmware file is uploaded onto the KVM-9000. In order to do that you need to select the file on your local system using the button “Browse” of the Upload Firmware panel.
-
Page 84: Unit Reset
The whole process will take about half a minute. Resetting sub devices (e.g. video engine) will take some seconds only and does not result in closing connections. To reset a certain KVM-9000 functionality click on the button Reset as displayed in Figure 6-38. -
Page 85: Faqs
KVM-9000). If not, check network hardware. Is KVM-9000 powered on? Check whether the IP address of KVM-9000 and all other IP related settings are correct! Also verify that all the IP infrastructure of your LAN, like routers etc., is correctly configured. Without a ping functioning, KVM-9000 can’t work either. - Page 86 (2) Adjust the Brightness setting until the pinkish tint is reduced or eliminated. Does any software require on servers which connect to the KVM-9000? No, the KVM-9000 is a 100% hardware solution. No extra software require on servers. What operating systems does KVM-9000 support? The KVM-9000 supports Windows 2000/XP/Vista/Server 2003, Unix, Unix-like OS (Sun Solaris, Linux Fedora Core 6 and above).
- Page 87 The KVM-9000 provides AES 256 bits connection encrypted. Local mouse and remote mouse didn’t sync after doing mouse Intelligent Sync. Please don’t put window on left-up corner of remote console of KVM-9000. Intelligent Sync has to re-calculate the coordinate of mouse from left-up corner on remote console.
-
Page 88: Addendum
IP KVM Extender 9. Addendum A. Key Codes Table A.1 shows the key codes used to defines keystrokes or hotkeys for several functions. Please note that these key codes do not represent necessarily key characters that are used on international keyboards. They name a key on a standard 104 key PC keyboard with an US English language mapping. - Page 89 IP KVM Extender Key (and aliases) 0 - 9 SPACE PAGE DOWN A - Z ALTGR , TILDE ESCAPE, ESC LEFT -, MINUS DOWN =, EQUALS RIGHT NUM LOCK ’ NUMPAD0 <, LESS NUMPAD1 NUMPAD2 NUMPAD3 /, SLASH NUMPAD4 BACK SPACE NUMPAD5 NUMPAD6 NUMPAD7...
-
Page 90: Video Modes
IP KVM Extender B. Video Modes Table B.1 lists the video modes KVM-9000 supports. Please don’t use other custom video settings besides of these. If done so, KVM-9000 may not be able to detect them. Resolution (x, y) Refresh Rates (Hz) -
Page 91: User Role Permissions
Maintenance: Unit Reset Keyboard/ Mouse, Keyboard/ Mouse, Keyboard/ Mouse, Video Video Video, Device Table C.1 User Role Permissions D. KVM-9000 port table Port Protocol Purpose Telnet over TCP Web & Telnet client HTTP over TCP HTTPS over TCP RFB over TCP... -
Page 92: Bandwidth Consumption
Color Depth configuration in order to match the different bandwidth limitations of the network type (UMTS, ISDN, etc. ) The following suggested network bandwidth planning table for KVM-9000 installation is from the test results with 3D-Labyrinth screen saver at Resolution 800x600, the worst case consuming the highest network bandwidth. -
Page 93: Cable Diagrams
IP KVM Extender F. Cable diagrams PS/2 Cable: Mini Din 6 pin Male to Male AT to PS/2 keyboard adapter: (Optional) Din 5 pins Male to Mini Din 6 pin Female VGA Cable: HDDB15 Male to Male USB 2.0 Cable: USB A-B cable CAT5/5E/6 Straight Through UTP/STP Cable 93 / 93...
Need help?
Do you have a question about the KVM-9000 and is the answer not in the manual?
Questions and answers