Dogtra 2300NCP Advance Series Owner's Manual
Remote controlled dog training collars
Hide thumbs
Also See for 2300NCP Advance Series:
- Owner's manual (23 pages) ,
- Product manual (14 pages) ,
- Settings manual (6 pages)
Advertisement
Table of Contents
- 1 Table of Contents
- 2 Main Features
- 3 Package Contents
- 4 Description of Transmitter Parts
- 5 Button Function
- 6 Battery Charger
- 7 Testing Your Collar
- 8 Fitting the Collar on the Dog
- 9 Charging the Batteries
- 10 Accessories
- 11 Basic Maintenance
- 12 Trouble Shooting Guide
- 13 Warranty and Repair
- Download this manual
Advertisement
Table of Contents

Subscribe to Our Youtube Channel
Related Manuals for Dogtra 2300NCP Advance Series


Summary of Contents for Dogtra 2300NCP Advance Series
- Page 1 REMOTE CONTROLLED DOG TRAINING COLLARS OWNER’S MANUAL 22912 Lockness Avenue Torrance, CA 90501 U.S.A. telephone (310) 534 - 0101 (310) 534 - 9111 toll free 1-888- 811-9111 Copyright c 2007 Dogtra Company 2007- www.dogtra.com...
-
Page 2: Table Of Contents
CONTENTS MAIN FEATURES PRODUCT SAFETY AND HEALTH STATEMENTS PACKAGE CONTENTS DESCRIPTION OF TRANSMITTER PARTS BUTTON FUNCTION DESCRIPTION OF COLLAR/RECEIVER PARTS BATTERY CHARGER TESTING YOUR COLLAR FITTING THE COLLAR ON THE DOG CHARGING THE BATTERIES ACCESSORIES BASIC MAINTENANCE TROUBLE SHOOTING GUIDE WARRANTY AND REPAIR INFORMATION... -
Page 3: Main Features
PRODUCT SAFETY AND HEALTH STATEMENTS MAIN FEATURES Easy-to-use, ergonomic transmitter. Proper e-collar use Dogtra e-collars are intended for the sole purpose Rheostat dial allows for gradual increases in of behavior modification of dogs. They are not stimulation intensity with no jumps between levels (0-127). -
Page 4: Package Contents
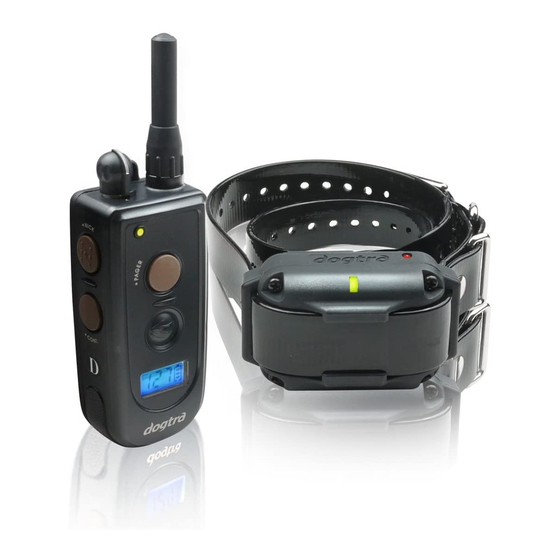
PACKAGE CONTENTS DESCRIPTION OF TRANSMITTER PARTS COLLAR DESCRIPTION OF PACKAGE CONTENTS TRANSMITTER PARTS transmitter (1-dog) Transmitter Receiver (two collar receivers for two-dog models) Antenna Battery charger and splitter cable ON/OFF Magnetic Test light Rheostat Red Dot Intensity Dial Owner’s manual ON/OFF Carrying case Indicator Light... -
Page 5: Description Of Transmitter Parts
DESCRIPTION OF TRANSMITTER PARTS DESCRIPTION OF TRANSMITTER PARTS DESCRIPTION OF TRANSMITTER PARTS transmitter (1-dog) 2 Antenna Antenna On/Off Magnatic Red Dot Transmitter Antenna Nick/Cont. Rheostat Toggle Switch Intensity Dial A short 2 antenna is supplied with the ON/OFF Switch Indicator Light transmitter. - Page 6 DESCRIPTION OF TRANSMITTER PARTS DESCRIPTION OF TRANSMITTER PARTS Rheostat Intensity Dial LCD Screen The Rheostat Intensity Dial is located on the The LCD screen indicates the stimulation top of the transmitter: (0) being the lowest level level (0-127) on the screen. and (127) being the highest.
- Page 7 DESCRIPTION OF TRANSMITTER PARTS DESCRIPTION OF TRANSMITTER PARTS Care for LCD Transmitters in Cold Temperature In cold temperatures (10 degrees F or below), the Liquid Crystal Display (LCD) on your transmitter may be dim or slow to respond. Wait until the display becomes visible before selecting any training level.
-
Page 8: Button Function
DESCRIPTION OF TRANSMITTER PARTS DESCRIPTION OF TRANSMITTER PARTS BUTTON FUNCTION (1-dog) Pager Nick Constant ON/OFF Transmitter Battery Charging Receptacle & Switch Rubber Plug Located on the backside of the transmitter, The transmitter for the the charging receptacle is covered by a rubber single dog unit has four buttons (one on the plug. - Page 9 DESCRIPTION OF TRANSMITTER PARTS DESCRIPTION OF TRANSMITTER PARTS “Constant” Button (2-dog) The “Constant” button is located on the bottom left. Pressing the “Constant” button gives Nick/Cont. continuous stimulation as long as the button is Toggle Switch -dog pushed, for up to 12 seconds. If the button is not Nick &...
- Page 10 DESCRIPTION OF TRANSMITTER PARTS DESCRIPTION OF COLLAR / RECEIVER PARTS desired stimulation based on the toggle switch DESCRIPTION OF setting. COLLAR / RECEIVER PARTS When either the orange or brown stimulation button is pressed and the toggle is set on “Nick” the receiver emits a single, rapid pulse of electrical stimulation.
- Page 11 DESCRIPTION OF COLLAR / RECEIVER PARTS DESCRIPTION OF COLLAR / RECEIVER PARTS Indicator Light (LED Window) Receiver ON/OFF Magnetic Red Dot Receiver Indicator Light (LED window) Located on the front of the receiver/collar, the To activate the receiver/collar, place the red indicator light comes on and blinks once every 4 dot on the back of the transmitter to the red dot seconds after the collar has been turned on.
-
Page 12: Battery Charger
NOTE : Only use Dogtra-approved Lithium- Polymer Battery Chargers for your Dogtra e-collar. This will prevent any damage that can be incurred from attempting to use a... -
Page 13: Testing Your Collar
TESTING TESTING 3. Turn the transmitter on by pressing the blue TESTING YOUR button on the right side of the transmitter until the LCD screen illuminates. The LCD screen shows the amount of battery life remaining COLLARS and the LED blinks once every 4 seconds. 4. -
Page 14: Fitting The Collar On The Dog
If the collar is too loose, electrical contact will be inconsistent and your NOTE : The stimulation intensity can be corrections will be inconsistent also. adjusted even while the stimulation is in use. Dogtra uses Surgical Stainless Steel contact... -
Page 15: Charging The Batteries
“Constant” button is pushed. Battery Charging Procedure Note : The unit has a partial charge when it leaves the Dogtra facility, upon receipt of the collar, be sure to give it a full 2-hour uses Lithium- initial charge before the first use. -
Page 16: Accessories
Maximum Range NOTE : Only use Dogtra-approved batteries, Typical Range chargers, and accessories for your Dogtra e-collars. When a charger is not in use, disconnect it from the power source. Minimum Range... -
Page 17: Basic Maintenance
Troubleshooting: If you suspect your unit is malfunctioning please refer to the “Troubleshooting Guide” before you send your unit in for service. If you have any questions or concerns, you may direct your inquiries to info@dogtra.com or call (888) 811-9111. -
Page 18: Trouble Shooting Guide
- The contact points may be too short for the serviced. Please contact Customer Service dog. To place an order for longer contacts at info@dogtra.com or (888) 811-9111. appropriate for your dog, please call (888) 811-9111. 3. The transmitter has no range, or stimulation If you are already using the longest contact is less when the dog is farther away. -
Page 19: Warranty And Repair
Bark collars. You can replace them yourself by ordering - 2-year warranty for parts and labor awarded the parts from Dogtra. This is the only time to the original retail purchaser of the e- you should open the unit, any other collars. - Page 20 United States. Any expedited shipping service warranty has expired, the labor cost will be determined based on the model type, year, will be at the owner’s expense. Dogtra is not and the extent of repair. responsible for loss of training time or...
- Page 21 MEMO WARRANTY AND REPAIR INFORMATION products call us Toll Free at 1-888-811-9111. Our operating hours are between 8:30am-4:00pm Pacific Standard Time. Send repair units to: 22912 Lockness Avenue Torrance, CA 90501 U.S.A.
- Page 22 MEMO...
Need help?
Do you have a question about the 2300NCP Advance Series and is the answer not in the manual?
Questions and answers