
Related Manuals for Dogtra 2300NCP EXPANDABLE


Summary of Contents for Dogtra 2300NCP EXPANDABLE
- Page 1 2300NCP EXPANDABLE EXPANDABLE UP TO 2-DOG SYSTEM: 2300NCP ADDITIONAL RECEIVER Owner's Manual Please read this manual thoroughly before operating the 2300NCP EXPANDABLE training collar.
- Page 2 Please read all safety and product information below before using your Dogtra product. Failure to follow these safety instructions could result in injury to you, your dog and others, or it could result in damage to your Dogtra product or other property. PRODUCT SAFETY...
- Page 3 Consult your physician or medical device maker before using your medical device with a Dogtra product. If you think that your Dogtra product is interfering with your pacemaker, defibrillator, or other medical device, stop using the Dogtra product.
-
Page 4: Table Of Contents
CONTENTS MAIN FEATURES ............PACKAGE CONTENTS ........... DESCRIPTION OF TRANSMITTER PARTS ....BUTTON FUNCTION ............DESCRIPTION OF RECEIVER/COLLAR PARTS ..BATTERY CHARGER ..................... USING THE TEST LIGHT ............COLLAR FITTING ..............RECEPTION ..............ACCESSORIES ............... MAINTENANCE ........TROUBLESHOOTING GUIDE .... -
Page 5: Main Features
MAIN FEATURES • Easy-to-use, ergonomically fitted transmitter • Rheostat Dial allows for gradual adjustments in stimulation intensity with no jumps between levels (0-127) • Expandable to a 2-dog system • 3/4-mile range • High output • Two different stimulation types - Nick & Constant •... -
Page 6: Package Contents
PACKAGE CONTENTS • Transmitter • Receiver/collar • Battery charger and splitter cable • Test light • Owner’s manual • Carrying case... -
Page 7: Description Of Transmitter Parts
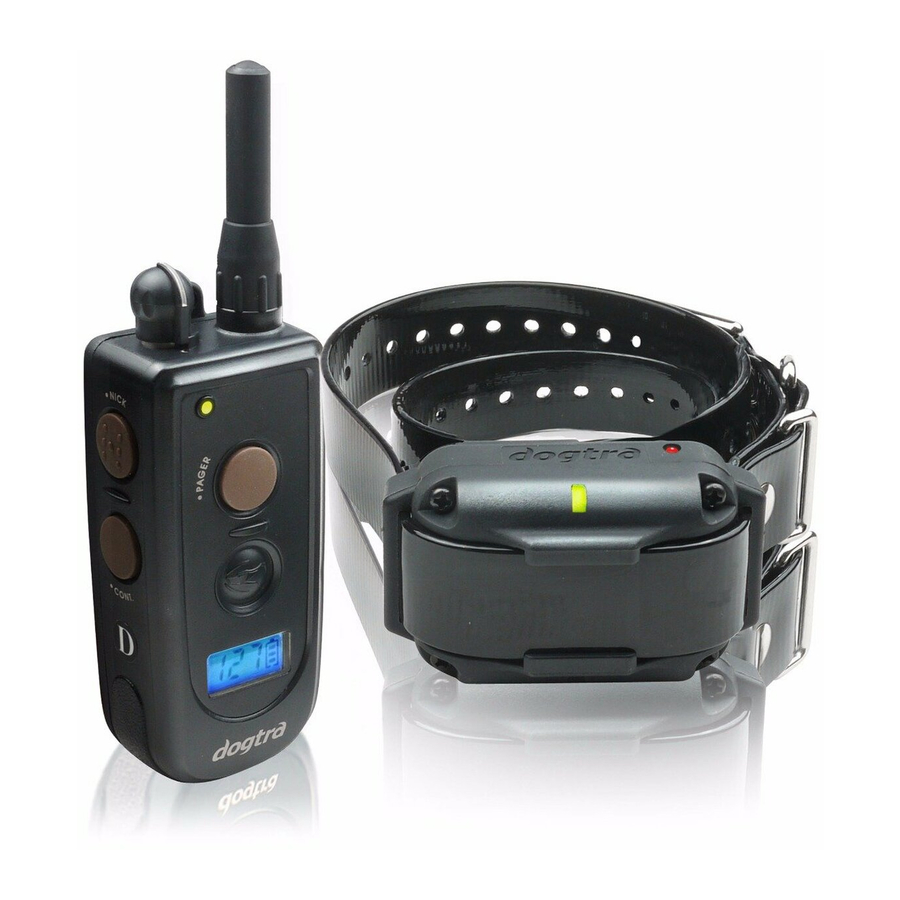
DESCRIPTION OF TRANSMITTER PARTS On/Off Magnetic Red Dot Antenna Rheostat Dial 1-Dog/2-Dog Toggle Indicator Switch Light Nick Pager Constant On/Off Switch Battery Charging Receptacle & Screen Rubber Plug 2300NCP EXPANDABLE Transmitter... - Page 8 Transmitter Antenna A 2” antenna is supplied with the 2300NCP EXPANDABLE transmitter. The antenna must be fastened to the transmitter before using the unit. Rheostat Dial The Rheostat Dial is located on the top of the transmitter: (0) being the lowest level and (127) being the highest. The LCD screen shows the intensity level during operation.
- Page 9 LCD Screen The LCD screen indicates the stimulation level (0-127) on the screen. The battery life indicator shows: 3 bars = full charge, 2 bars = medium charge, 1 bar = needs charge. The battery life indicator only shows the remaining charge of your transmitter.
- Page 10 Care for LCD Transmitters in Cold Temperature In cold temperatures (10°F or below), the Liquid Crystal Display (LCD) on your transmitter may be dim or slow to respond. Wait until the display becomes visible before selecting any training level. Even though the LCD screen might be dim or slow to respond, when you push the Nick or Constant button, the transmitter will still function properly.
- Page 11 Transmitter Indicator Light The transmitter LED indicator light is located near the Rheostat Dial. It will flash every 5 seconds when the transmitter has been turned on. The LED indicator color indicates the battery life level. Green = Full charge Amber = Medium charge Red = Needs charge If the unit is used while the LED indicator is red, it may...
- Page 12 Transmitter Battery Charging Receptacle & Rubber Plug Located on the backside of the transmitter, the charging receptacle is covered by a rubber plug. Insert one end of the battery charging cable into the receptacle to charge the battery (See Battery Charging Procedure on page 19).
-
Page 13: Button Function
Pager On/Off Constant Switch The transmitter for the 2300NCP EXPANDABLE unit has four buttons and a toggle switch on the transmitter (one on the face of the transmitter, two on the left side, and one on the right side). 1-Dog/2-Dog Toggle Switch The 1-Dog/2-Dog Toggle Switch is located on the front of the transmitter. - Page 14 transmitter. When the toggle switch is set to the up position, the transmitter will control the black collar. When the toggle switch is set to the down position, the transmitter will control the orange collar. Nick Button The Nick button is located on the top left side of the handheld transmitter.
-
Page 15: Description Of Receiver/Collar Parts
DESCRIPTION OF RECEIVER / COLLAR PARTS Battery Charging Receptacle and Cover Collar Strap Contact Points LED Indicator Light On/Off Magnetic Switch (Red Dot) 2300NCP EXPANDABLE Receiver/Collar... - Page 16 Receiver On/Off Magnetic Red Dot To turn on the receiver/collar, place the magnetic red dot on the back of the transmitter to the red dot on the receiver/collar. Hold the two red dots together for a moment until the LED light on the receiver/collar comes on.
- Page 17 Receiver Indicator Light Located on the front of the receiver/collar, the indicator light comes on and blinks once every 5 seconds after the collar has been turned on. The color of the LED indicates the battery life of the receiver. Green = Full charge Amber = Medium charge Red = Needs charge...
-
Page 18: Battery Charger
This enables you to charge the transmitter and both receivers at the same time. Note: Only use Dogtra-approved lithium polymer batteries and chargers for your Dogtra e-collar. This will prevent any damage that can be incurred from attempting to use a different charger. - Page 19 Charging the Batteries The 2300NCP EXPANDABLE uses lithium polymer batteries. 1. Charge the unit before using the unit for the first time. 2. Do not charge the batteries near any flammable substances. 3. Fully charge the batteries if the unit is to be stored without use for a period of 3 months or more.
- Page 20 Battery Charging Procedure Note: The unit has a partial charge when it leaves the Dogtra facility. Upon receipt of the collar, be sure to give it a full 2-hour initial charge before the first use. 1. Attach the charging cables to both the transmitter and receiver(s).
-
Page 21: Using The Test Light
USING THE TEST LIGHT 1. Turn on the receiver/collar by placing the magnetic red dot on the back of the transmitter to the red dot on the receiver/collar. The indicator light will come on for a moment then blink once every 5 seconds, showing that the collar is ready to use (the receiver needs to be charged if the indicator light is red). - Page 22 button is pressed. However, as a safety feature, the receiver/collar will automatically stop the stimulation if the Constant button is pressed for 12 seconds or longer. 6. Turn the Rheostat Dial on the transmitter clockwise and then counterclockwise. The test light should glow brighter with higher levels of stimulation and dimmer with lower levels.
-
Page 23: Collar Fitting
If the collar is too loose, the contact will not be consistent and cause the corrections to be inconsistent. Dogtra uses surgical stainless steel contact points and anti-microbial plastic to protect the dog’s skin. - Page 24 Intensity Selection The 2300NCP EXPANDABLE has a Rheostat Dial on the top of the transmitter (0 is the lowest and 127 is the highest). Remember that you will need to adjust the setting (upward or downward) depending on your dog’s...
-
Page 25: Reception
RECEPTION The 2300NCP EXPANDABLE collar has a range of 3/4- mile. Depending on the way you use your transmitter, the transmitter range may vary. To get the greatest range, hold the transmitter away from your body and avoid touching the antenna. Keep your unit properly charged for maximum signal strength. -
Page 26: Accessories
1-888-811-9111. You may also browse the selection at www.dogtra.com. Auto Charger Dogtra’s auto chargers are designed for use with a 10 volt car outlet. European Charger Dogtra’s European chargers are designed for use with a... -
Page 27: Maintenance
Troubleshooting If the unit is malfunctioning, please refer to the “Troubleshooting Guide” before sending it to Dogtra for service. If you have any questions or concerns, you may email them to info@dogtra.com, or call customer service... -
Page 28: Troubleshooting Guide
- The battery may be low, so check the LED light for battery life. 3. The transmitter has no range, or stimulation is less when the dog is farther away. - The antenna(s) may be damaged. To order parts, please contact customer service at (888) 811- 9111 or go to www.dogtra.com. - Page 29 If the dog is in salt-water, be sure to rinse the receiver and charging port with clean water. - If the above does not resolve your issues, contact Dogtra customer service at info@dogtra.com or (888)-811-9111.
-
Page 30: Warranty And Repair Information
If your product is not registered and a proof of purchase is not available at the time of service, Dogtra will estimate the age of the unit by the serial number. Serial number estimates can differ from the actual purchase date. - Page 31 30 days from an authorized dealer must be addressed to the dealer directly. If the products purchased from an authorized dealer are after 30 days from the date of purchase, please send the units to Dogtra for service and repair. Dogtra DOES NOT cover the cost of repairs and replacements due to misuse by the owner or dog, improper maintenance, and/or lost units.
- Page 32 Send repair units to Dogtra Company / Repairs 22912 Lockness Avenue, Torrance, CA 90501 U.S.A. The diagrams and representations in the manual may differ slightly from the actual product depending on the model type.
Need help?
Do you have a question about the 2300NCP EXPANDABLE and is the answer not in the manual?
Questions and answers