
Subscribe to Our Youtube Channel
Related Manuals for Whirlpool ACM816BA


Summary of Contents for Whirlpool ACM816BA
-
Page 1: Instructions For Use
INSTRUCTIONS FOR USE ACM816BA 60cm Induction Electric Cooktop Let our 100 years of experience do the thinking for you... - Page 2 ACM816BA (60cm) Induction Cooktop Installation Drawings...
- Page 3 210 mm 145 mm 210 mm 280/180 mm 210 mm 180 mm 145 mm 145 mm 145 mm 210 mm 210 mm 210 mm 280/180 mm 145 mm 145 mm DEUTSCH Installation Seite 2 Bedienungsanleitung Seite 4 ENGLISH Installation Page 2 Instructions for use Page 13 FRANÇAIS...
- Page 4 R = Min. 6,5 mm Max. 8 mm Min. 50 mm R = 11,5 mm 483 mm 490 mm 560 mm R = 11,5 mm 6 mm R = Min. 6,5 mm Max. 8 mm R = Min. 6,5 mm Max.
- Page 5 Min. 10 cm Min. 5 mm Min. 5 mm Min. 3 cm Max. 6 cm...
-
Page 6: Important Safety Instructions
IMPORTANT SAFETY INSTRUCTIONS YOUR SAFETY AND THAT OF OTHERS IS VERY IMPORTANT This manual and the appliance itself provide important safety messages, to be read and always observed. This is the danger symbol, regarding safety, warning of potential risks to users and others. All safety messages will be preceded by the danger symbol and the following words: DANGER Indicates a hazardous situation which, if not avoided, will result in serious... -
Page 7: Safeguarding The Environment
SAFEGUARDING THE ENVIRONMENT Disposal of packing The packing material is 100% recyclable and marked with the recycling symbol ( ). The various parts of the packing must not be dispersed in the environment, but disposed of in compliance with local regulations. Disposal This appliance is marked in conformity with European Directive 2002/96/EC on Waste Electrical and Electronic Equipment (WEEE). -
Page 8: Installation
INSTALLATION After unpacking the product, check for any damage during transport. In case of problems, contact the dealer or the After-Sales Service. For built-in dimensions and installation instruction, see the pictures in page 2. PREPARING THE CABINET FOR FITTING Install a separator panel under WARNING the hob. -
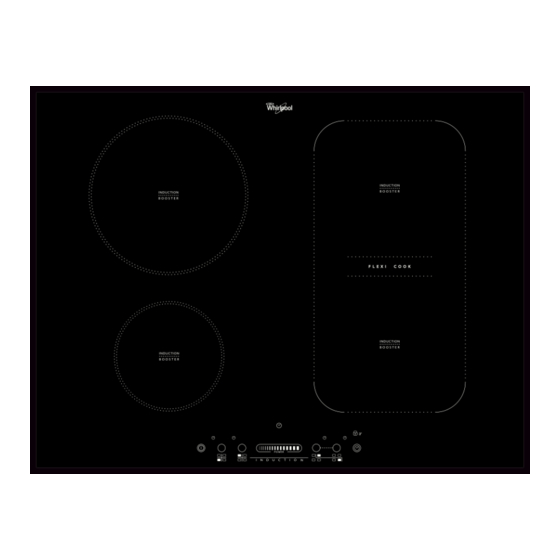
Page 9: Control Panel
Connect the yellow/green earth wire to the terminal with the symbol This wire must be longer than the other wires. 1. Remove the terminal block cover (A), undoing the screw and inserting the cover in the terminal block hinge (B). 2. - Page 10 Control panel lock This function locks the controls to prevent accidental activation of the hob. To activate the control panel lock, switch the hob on and press the Timer button for three seconds; an acoustic signal and a luminous indicator near the padlock symbol signal activation. The control panel is locked except for the switching off function. To deactivate the control lock, repeat the activation procedure.
- Page 11 The Flexi cook function is also able to detect when a pot is moved from one zone to the other one within the flexi cook area keeping the same power level of the zone where the pan originally was placed (see the example in the figure below: if the pot is moved from the front heater to the rear heater, the power level will be shown on the display corresponding to the zone where the pot is placed).
-
Page 12: Troubleshooting Guide
TROUBLESHOOTING GUIDE • Read and follow the instructions given in the section “Instructions for use”. • Check that the electricity supply has not been shut off. • Dry the hob thoroughly after cleaning it. • If, when the hob is switched on, alphanumeric codes appear on the display, consult the following table for instructions. •... -
Page 13: Power Level Table
POWER LEVEL TABLE Power level Type of cooking Level use (indicating cooking experience and habits) Ideal for rapidly increasing the temperature of food to fast boiling in the case of water or rapidly Boost Fast heating heating cooking liquids Max. power Ideal for browning, starting to cook, frying deep frozen products, fast boiling Frying - boiling Ideal for sautéing, maintaining a lively boil, cooking and grilling (for a short period of time, 5-10...
Need help?
Do you have a question about the ACM816BA and is the answer not in the manual?
Questions and answers