Table of Contents
Advertisement
Quick Links
Bedienungsanleitung
Instructions for use
Istruzioni per l'uso
Notice d'utilisation
Οδηγίες χρήσης
Gebruiksaanwijzing
Bruksanvisning
Instrucciones de uso
Brukerveiledning
Instruções de utilização
Brugsanvisninger
Käyttöohje
Инструкция по эксплуатации
Instrukcja obsługi
Инструкции за употреба
Návod k obsluze
Instrucţiuni privind siguranţa
Návod na použitie
Інструкції з використання
Пайдалану нұсқаулығы
Használati útmutató
Advertisement
Table of Contents

Related Manuals for Whirlpool 855784701000


Summary of Contents for Whirlpool 855784701000
- Page 1 Bedienungsanleitung Instructions for use Istruzioni per l'uso Notice d'utilisation Οδηγίες χρήσης Gebruiksaanwijzing Bruksanvisning Instrucciones de uso Brukerveiledning Instruções de utilização Brugsanvisninger Käyttöohje Инструкция по эксплуатации Instrukcja obsługi Инструкции за употреба Návod k obsluze Instrucţiuni privind siguranţa Návod na použitie Інструкції з використання Пайдалану...
- Page 3 180 mm 240 mm 180 mm 300/190 mm 180 mm 145 mm 180 mm 280 mm 180 mm 145 mm 180 mm DEUTSCH Installation Seite 2 Bedienungsanleitung Seite 4 ENGLISH Installation Page 2 Instructions for use Page 14 FRANÇAIS Installation Page 2 Mode d’emploi Page 23...
- Page 4 R = Min. 6,5 mm Max. 8 mm Min. 50 mm R = 11,5 mm 483 mm 490 mm 560 mm R = 11,5 mm 6 mm R = Min. 6,5 mm Max. 8 mm R = Min. 6,5 mm Max.
- Page 5 Min. 10 cm Min. 5 mm Min. 5 mm Min. 3 cm Max. 6 cm...
-
Page 6: Important Safety Instructions
Instructions for use Page IMPORTANT SAFETY INSTRUCTIONS These instructions shall also be available on website: www.whirlpool.eu YOUR SAFETY AND THAT OF OTHERS IS VERY IMPORTANT This manual and the appliance itself provide important safety messages, to be read and always observed. -
Page 7: Safeguarding The Environment
SAFEGUARDING THE ENVIRONMENT Disposal of packaging materials The packaging material is entirely recyclable and marked with the recycling symbol ( ). Do not dispose of the various packaging materials carelessly, but do so responsibly and in full compliance with local authority regulations governing waste disposal. Scrapping This appliance is marked in compliance with European Directive 2012/19/EU on Waste Electrical and Electronic Equipment (WEEE). -
Page 8: Installation
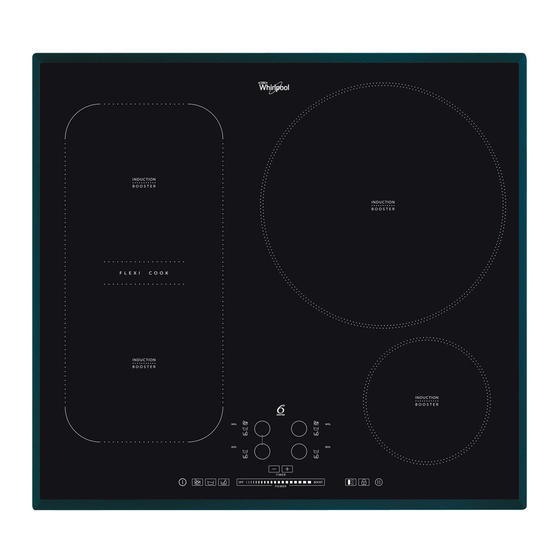
INSTALLATION After unpacking the hob, check that there has been no damage during transport. If in doubt, contact the dealer or After-sales Service. PREPARING THE HOUSING UNIT Install a separator panel under the WARNING hob. The lower part of the product must not be accessible after installation. - Page 9 INSTRUCTIONS FOR USE Control Panel Description The control panel is equipped with touch controls: to use them, just press the corresponding symbol (a light touch is sufficient). To select and activate the cooking zones MIN. To set the minute counter To enable the hold Hob ON/OFF function...
- Page 10 Timer selection The timer can be used to set a max. cooking time of 90 minutes. Select the cooking zone to be used with the timer (a dot lights up at the bottom right of the power level indicator), then set the required cooking time using the + and - keys of the timer function: the time in minutes is shown next to the cooking zone display.
- Page 11 When the flexi cook function is selected, the booster and sixth sense functions cannot be used. If the timer is set, it will be displayed alongside the hotplate display at the top. Description of automatic functions The hob features automatic functions for each cooking zone. The symbols of the available functions are shown next to the selection key of each cooking zone. Every time an automatic function is selected, an indicator light turns on next to the symbol and the letter “A”...
-
Page 12: Troubleshooting Guide
Whirlpool finishing that guarantees a perfect clean and a long- lasting brilliance. Therefore, if you have a IXELIUM hob, we strongly suggest to observe the following cleaning recommendations: •... -
Page 13: Power Level Table
POWER LEVEL TABLE Power level Type of cooking Level use (indicating cooking experience and habits) Ideal for rapidly increasing the temperature of food to fast boiling in the case of water or rapidly Boost Fast heating heating cooking liquids Max. power Ideal for browning, starting to cook, frying deep frozen products, fast boiling Frying - boiling Ideal for sautéing, maintaining a lively boil, cooking and grilling (for a short period of time,... -
Page 14: Cooking Table
COOKING TABLE Food Dishes or type Power level and cooking status categories of cooking First stage Power Second stage Power Cooking the pasta and Fresh pasta Heating the water Booster - 9 maintaining the boil Cooking the pasta and Dry pasta Heating the water Booster - 9 maintaining the boil... - Page 16 WHIRLPOOL EUROPE s.r.l. – Viale Guido Borghi, 27 – Factory: Whirlpool Europe S.r.l. 21025 COMERIO (Varese) ITALY Address: (21024) Biandronno Loc. Cassinetta (VA) – Italy Виерлпул Юроп с.р.л. – Виале Гвидо Борги, 27 – Завод: Виерлпул Юроп с.р.л. 21025, Комерио (Варезе) ИТАЛИЯ...
Need help?
Do you have a question about the 855784701000 and is the answer not in the manual?
Questions and answers