Table of Contents
Advertisement
Advertisement
Table of Contents

Related Manuals for Asko OP8640


Summary of Contents for Asko OP8640
-
Page 1: Instructions For Use
INSTRUCTIONS FOR USE OP8640... -
Page 3: Pyrolytic Oven
This is the hallmarks for all of our products and this is why they are so highly appreciated all over the world. To get the most out of your new ASKO product, we recommend that you read the installation and operating instructions before using the machine. -
Page 4: Using For The First Time
Safety Safety recommendations 30 minutes. Ensure that the room is sufficiently ventilated. You may notice a This appliance is intended for Domestic particular odour or a small amount of Cooking use and should be used in smoke. All of this is normal. accordance with the information and —... - Page 5 Safety Care for the environment — This appliance’s packing materials are recyclable. Recycle them and play a role in protecting the environment by depositing them in municipal containers provided for this purpose. — Your appliance also contains many recyclable materials. It is therefore marked with this logo to indicate that used appliances must not be mixed with other waste.
-
Page 6: Recommendations
Recommendations Please read these instructions before - Always protect your hands with oven installing and using your oven. gloves or something similar when removing The oven has been designed for domestic food, accessories or containers from the use only for cooking food. No asbestos has oven. -
Page 7: Table Of Contents
Contents Recommendations Caring for and cleaning your oven Using for the first time Perform a pyrolysis Normal use Immediate pyrolysis Contents Delayed pyrolysis Your oven, how it works Cleaning the outer surfaces Cleaning the door (model WITH Oven features PYROLYSIS function) Introduction to the programmer Disassembling the door Accessories... -
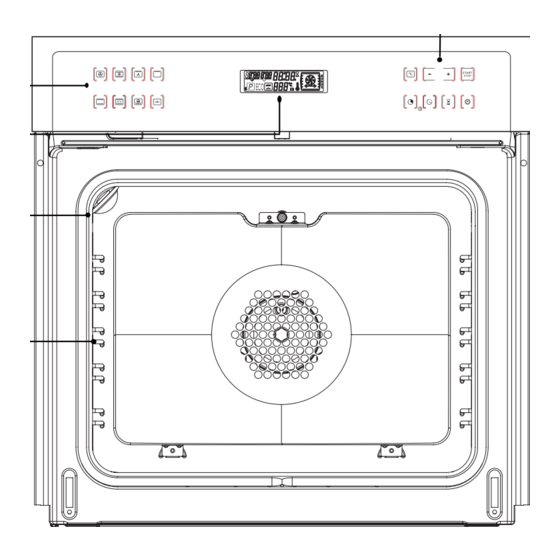
Page 8: Your Oven, How It Works
Your oven, how it works Oven features Programmer Function selector switch Light Wire shelf supports... -
Page 9: Introduction To The Programmer
Your oven, how it works Introduction to the programmer Time and cooking time display Cooking time indicator Cooking end time indicator Timer display Locked door indicator Pyrolisis Temperature display... -
Page 10: Accessories
Accessories Anti-tip safety shelf BACK Food can either be placed on the shelf in a dish or cake tin for cooking or browning. This should be used for grilled meat (which should be placed directly on it). Multi-purpose baking tray FRONT (reserved for pastries) This tray has a raised edge and can be... -
Page 11: Mm Multi-Purpose Dishfully Accessible Sliding Rail System
45 mm multi-purpose dish Child safety Fully accessible sliding rail Safety activation system - Open the door. - Press the switch on the panel until the system is engaged and then close the door. Open with safety engaged Thanks to the new sliding rail system with - Press the lever and then open the door. -
Page 12: Using Your Appliance
Using Your Appliance Using the programmer How to set the time Adjust the clock setting with the + and – touch controls. When supplied with electricity The displays flashes 12:00. Press the “ ” button to confirm. Set the time by pressing the + or – touch controls (holding your finger on the touch control allows you to scroll through the numbers rapidly). -
Page 13: Immediate Cooking
Using Your Appliance Immediate cooking Place your dish in the oven based on the recommendations provided by the cook book. The programmer should display only the time. After these steps, the oven heats up and It should not be flashing. the temperature indicator flashes. -
Page 14: Programmed Cooking
Using Your Appliance Programmed cooking After these three steps, the oven heats Cooking with immediate start and programmed duration A series of beeps will be emitted when the Select the desired cooking mode oven reaches the selected temperature. and adjust the temperature. At the end of cooking (end of programmed time): - The oven stops... -
Page 15: Cooking With Delayed Start And Chosen Cooking End Time
Using Your Appliance Cooking with delayed start and chosen At the end of cooking (end of programmed cooking end time time): Proceed as with programmed cooking. - The oven stops After setting the cooking time, - The cooking time indicator and 0:00 flash press the “... -
Page 16: Using The Timer Function
Using Your Appliance Using the timer function Press the “ ” button to confirm, or wait for a few seconds. Your oven’s programmer can be used as an independent timer that allows you The display stops flashing after a few to count down a time without operating seconds and the timer starts working, the oven. - Page 17 Using Your Appliance Setting the brightness of the You can adjust the brightness of your display. To do this: display Press and hold the “START and C°” You can adjust the brightness of your buttons for a few seconds until display.
-
Page 18: Oven Cooking Modes
The oven cooking modes Circulating heat* High grill (recommended temperature 180°C (recommended temperature 275°C min 35°C max 235°C) min 180°C max 275°C) • Cooking controlled by the heating • Cooking controlled by the upper element. element located at the back of the oven •... -
Page 19: Eco
The oven cooking modes ECO* Defrosting (recommended temperature 200°C (recommended temperature 30°C min 35°C max 275°C) min 30°C max 50°C) • Cooking controlled by the upper and • You can defrost in your oven with a lower heating elements. minimum amount of heat as the fan •... -
Page 20: Caring For And Cleaning Your Oven
Caring for and cleaning your oven Performing a pyrolysis Immediate pyrolysis Remove the grids and trays from the oven and clean any major spill residue. Check that the programmer is The symbol is displayed in the displaying the time of day and that it programmer indicating that the door is is not flashing. -
Page 21: Delayed Pyrolysis
Caring for and cleaning your oven Notes: After these steps, the beginning of pyrolysis is delayed so that it finishes at The cleaning temperature cannot be 18 hours adjusted. During the pyrolysis cycle, the oven lighting is off. If your oven is not clean after a pyrolysis cycle, you waited too long to launch the cleaning cycle. -
Page 22: Cleaning The Outer Surfaces
The Cleaning function Cleaning the outer surfaces To clean both the electronic programmer window and the oven door, use a window washing product applied to a soft cloth. Do not use abrasive creams or scouring sponges. Cleaning the door (model WITH PYROLYSIS function) Lever these parts to release the glass. - Page 23 The Cleaning function If necessary, remove the door’s inner Remove the red plastic stops. glass assembly. This assembly is composed of one or two sheets of glass (depending on model), each of which has a black rubber corner pad. Your appliance is again operational. Warning Before beginning pyrolysis, remove all the accessories inside the oven,...
-
Page 24: Troubleshooting
Troubleshooting What if… IF YOU REALIZE POSSIBLE CAUSES WHAT SHOULD YOU DO? THAT • The oven isn't connected to the - Connect to power supply. power supply. - Change the fuse, checking that it is The oven isn't heating. • The fuse has blown. 16A. -
Page 25: Installer's Information
Electricity meter (mains) (20A, singlephase 220-240 V As a specialist, you alone are competent to alternating current 50 Hz) install and connect up ASKO appliances. 220-240 V single phase Our guarantee therefore applies only and alternating current supply exclusively to appliances which have been... -
Page 26: Housing
Installer's information Housing The oven may be housed either under a work surface or built into a column that is open* or closed with a suitable opening. Your oven works at its best and produces excellent results when cooking and Fixation screw position cleaning itself, if its air circulation is not... -
Page 27: General Maintenance
General maintenance Leave the oven to cool down before Changing the light bulb cleaning it manually. • The bulb is located in the top of the oven. In general, don't use any type of scouring powder or metal-backed Bulb fitting sponge, or any sharp objects for cleaning. - Page 28 99646541 EN 06/08...
Need help?
Do you have a question about the OP8640 and is the answer not in the manual?
Questions and answers