HIKVISION DS-2CD8253F-EI Quick Operation Manual
Network camera
Hide thumbs
Also See for DS-2CD8253F-EI:
- Technical manual (5 pages) ,
- User manual (80 pages) ,
- Quick operation manual (37 pages)
Advertisement
Advertisement
Table of Contents

Related Manuals for HIKVISION DS-2CD8253F-EI


Summary of Contents for HIKVISION DS-2CD8253F-EI
-
Page 1: Network Camera
Network Camera V4.0.1 Quick Operation Guide... - Page 2 Network Camera·Quick Operation Guide Thank you for purchasing our product. If there are any questions, or requests, please do not hesitate to contact the dealer. This manual applies to DS-2CD8253F-EI(Z), DS-2CD8233F-EI(Z), DS-2CD8264FWD-EI(Z), DS-2CD8264F-E, DS-2CD8254F-EI, DS-2CD8254FWD-E, DS-2CD8283F-EI, DS-2CD8255F-EI cameras. This manual may contain several technical incorrect places or printing errors, and the content is subject to change without notice.
-
Page 3: Physical Description Of Camera
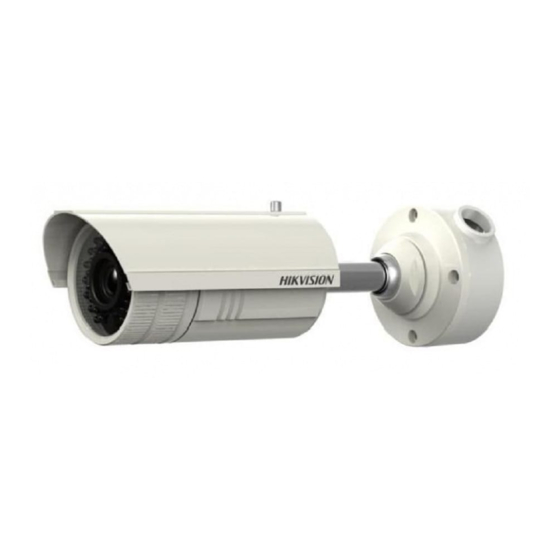
Network Camera·Quick Operation Guide 1 Physical Description of Camera 1.1 Camera Description Note: Two types of interfaces of cameras as shown in Figure 1-1 and Figure 1-2. Please choose the right figure according to the appearance of your camera. Figure 1-1 Overview Figure 1-2 Overview... - Page 4 Network Camera·Quick Operation Guide Table 1-1 Physical Description Description 10M/100M self-adaptive Ethernet interface Power supply interface IN, G: Alarm input interface 1A, 1B: Alarm output interface D+, D-: RS-485 interface AUDIO IN, G: Audio input interface AUDIO OUT, G: Audio output interface 1.2 Camera Wiring Diagram Figure 1-3 Wiring Diagram...
-
Page 5: Installation
Network Camera·Quick Operation Guide 2 Installation Note: Verify the package contents are correct by checking the items against the packing list. Read the following contents carefully before the installation. Make sure that all the related equipment is power-off during ... - Page 6 Network Camera·Quick Operation Guide Mounting base Figure 2-1 Fix the Mounting Base Note: Please apply water-proof measures between the ceiling surface and mounting base and around the cables. For cement wall mounting, you need to use the expansion screw to fix the mounting base.
- Page 7 Network Camera·Quick Operation Guide Note: The “bottom” mark on the mounting base should align with the “bottom” mark on the mounting bracket. Figure 2-2 Fix the Camera 3. View the image of the camera over the network. 4. Loosen the screws on the bracket slightly. Note: Please loosen the screws slightly until you can adjust the camera and do not remove the screws from the bracket.
- Page 8 Network Camera·Quick Operation Guide 6. Loosen the lock screw on the sun shield and move the sun shield until you can remove it. Remove the sun shield. Figure 2-4 Remove the Sun Shield 7. Rotate to remove the front cover from camera and adjust the lens to get a clear image.
- Page 9 Network Camera·Quick Operation Guide 8. Fix the lens; reinstall the front cover and the sun shield to finish the installation. Note: Reinstall the front cover until aligning the mark on the front cover with the mark on the camera. Figure 2-6 Reinstall the Camera...
-
Page 10: Setting The Network Camera Over The Lan
Network Camera·Quick Operation Guide 3 Setting the Network Camera over the LAN Purpose: To view and configure the camera via LAN(Local Area Network), you need to connect the network camera in the same subnet with your PC. Then, install the SADP or iVMS-4200 software to search and change the IP of network camera. - Page 11 Network Camera·Quick Operation Guide like IP address, subnet mask, port number, device serial number, device version, etc., shown in Figure 3-2. Use iVMS-4200 software and to list the online devices. Please refer to the user manual of client software for detailed information.
- Page 12 Network Camera·Quick Operation Guide Figure 3-2 Searching Online Devices Note: Device can be searched and displayed in the list in 15 seconds after it goes online; it will be removed from the list in 45 seconds after it goes offline. Search online devices manually: You can also click to refresh the online...
-
Page 13: Modify Device Information
Network Camera·Quick Operation Guide Note: You can click on each column heading to order the information; you can click to show the device table and hide the network parameter panel on the right side, or click to show the network parameter panel. - Page 14 Network Camera·Quick Operation Guide Figure 3-3 Select a device...
- Page 15 Network Camera·Quick Operation Guide Figure 3-4 Modify Network Parameters 3. Enter the IP address of network camera in the address field of the web browser to view the live video.
- Page 16 Network Camera·Quick Operation Guide Note: The default value of the IP address is “192.0.0.64”. The default user name is “admin”, and password is “12345”. For accessing the network camera from different subnets, please set the gateway for the network camera after you log in.
-
Page 17: Accessing Via Web Browser
Network Camera·Quick Operation Guide 4 Accessing via WEB browser System Requirement: Operating System: Microsoft Windows XP SP1 and above version / Vista / Win7 / Server 2003 / Server 2008 32bits CPU: Intel Pentium IV 3.0 GHz or higher RAM: 1G or higher Display: 1024×768 resolution or higher Web Browser: Internet Explorer 6.0 and above version, Apple Safari 5.02 and above version, Mozilla Firefox 3.5 and above... - Page 18 Network Camera·Quick Operation Guide Figure 4-1 Adjust the Security Level Steps: 1. Open the web browser. 2. In the browser address bar, input the IP address of the network camera, e.g., 192.0.0.64 and press the Enter key to enter the login interface.
- Page 19 Network Camera·Quick Operation Guide Figure 4-2 Login Interface 5. Install the plug-in before viewing the live video and managing the camera. Please follow the installation prompts to install the plug-in. Note: You may have to close the web browser to finish the installation of the plug-in.
- Page 20 Network Camera·Quick Operation Guide Figure 4-3 Download Plug-in...
- Page 21 Network Camera·Quick Operation Guide Figure 4-4 Download Plug-in Figure 4-5 Install Plug-in...
- Page 22 Network Camera·Quick Operation Guide Figure 4-6 Install Plug-in 6. Reopen the web browser after the installation of the plug-in and repeat the above steps 2-4 to login. Note: For detailed instructions of further configuration, please refer to the user manual of network camera.
- Page 23 Network Camera·Quick Operation Guide...
Need help?
Do you have a question about the DS-2CD8253F-EI and is the answer not in the manual?
Questions and answers