Table of Contents
Advertisement
Quick Links
Advertisement
Table of Contents

Related Manuals for Advent ADVA10


Summary of Contents for Advent ADVA10
- Page 1 10.1" Overhead In-Vehicle Entertainment System OWNER'S MANUAL ®...
- Page 3 Congratulations Congratulations on your purchase of this In-Vehicle Entertainment System! The system has been designed to provide passengers with unlimited content options delivering smiles for many miles. Please read the directions that follow to familiarize yourself with the product to ensure that you obtain the best results from your equipment.
-
Page 4: Table Of Contents
TABLE OF CONTENTS Features ..............................................5 Accessories ............................................. 6 Controls and Indicators Diagram (Front View) ................................7 Getting Started ............................................. 9 Home Main Menu ..........................................10 System Applications ......................................... 12 USB & SD Card Playback ........................................13 WIFI Connection ..........................................14 VOXX LINK . -
Page 5: Features
FEATURES • Android Operating System • Quad-core Processor • RAM (8GB) • Internal Memory (16GB) • 10.1" TFT LCD Display (1024x600) • Capacitive Multi-Touch Panel • User Downloadable Apps (Play Store, Chrome, Netflix and Disney Plus apps preloaded*) • MicroSD Card (Supports up to 64GB) •... -
Page 6: Accessories
ACCESSORIES Wireless Headphones The monitor includes a built-in dual channel infrared transmitter for use with the included wireless headphones. The wireless headphones must be used within a direct line of sight from the screen. Infrared transmission, like visible light, travels only in a straight line. How to Use the Wireless Headphones When wearing the headphones, make sure to observe the “Left”... -
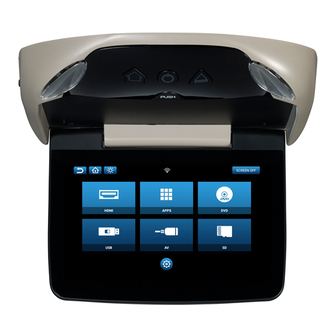
Page 7: Controls And Indicators Diagram (Front View)
CONTROLS AND INDICATORS DIAGRAM (FRONT VIEW) 1. HOME ( ) Button This button is used to display the Home Menu Screen. 2. POWER ( ) Button This button is used to turn the system on/off. 3. EJECT ( ) Button This button is used for ejecting a disc from the built-in DVD player. - Page 8 CONTROLS AND INDICATORS DIAGRAM (SIDE VIEWS) 1. DVD Disc Insertion Slot 5. HDMI INPUT For loading and removing discs. When a disc is inserted, the unit will For connection of devices with HDMI outputs. automatically turn ON and switch to DVD source. Insert a disc with label side facing up.
-
Page 9: Getting Started
GETTING STARTED Home ON/OFF Eject Button Button Button Screen Release 1. To start the system, the vehicle ignition key switch must be in ACC or engine ON position. 2. The Power Button and Home Button will flash RED and BLUE while the system is booting up. Once the boot up process is completed, the Power Button and Home Button will turn RED, and stay in Standby position. -
Page 10: Home Main Menu
HOME MAIN MENU HDMI The HDMI inputs allow the user to enjoy high-definition digital images and high-quality sound by connecting an HD device such as a Blu-ray player or smartphone with an HDMI output to the system. Plug in the HDMI device with a special adapter available from your mobile phone provider. Notes: • This source requires an HDMI enabled device and a special HDMI adapter. - Page 11 HOME MAIN MENU( CONTINUED) APPS This system comes pre-loaded with the following apps: Google Play Store, Chrome Browser, Netflix. and Disney Plus. You may also log into the Play Store with your Google account and download your favorite apps directly. If you do not have Google account, creating one is easy and free. The DVD source input is used to play DVDs, Audio CDs and MP3 discs.
-
Page 12: System Applications
SYSTEM APPLICATIONS This system comes pre-loaded with the following apps: Google Play Store, Chrome Browser, Netflix and Disney Plus. You may also log into the Play Store with your Google account and download your favorite apps directly. If you do not have Google account, creating one is easy and free. 1. -
Page 13: Usb & Sd Card Playback
USB & SD CARD PLAYBACk SD CARD PLAYBACk USB PLAYBACk 1. Insert a USB device into monitor USB port. 1. Insert a Micro SD Card into the monitor. 2. Select USB source in the Main Menu. 2. Select SD source in the Main Menu. 3. -
Page 14: Wifi Connection
WIFI CONNECTION 1. Select SETUP in the Main Menu. 2. Select WIFI and turn ON the WLAN and then touch the WLAN Bar. SCREEN OFF SCREEN OFF Wi-Fi WIFI WLAN VOXX LINK Vehicle Wi-Fi WFMM Mom's Phone IR TRANSMITTER LANGUAGE Dad's Phone ABOUT DEVICE Grandma's Phone... - Page 15 WIFI CONNECTION(CONTINUED) 4. Touch the line to enter the password, and the on-screen keyboard will appear. 5. Enter the Wi-Fi password using the on screen keyboard. Then press "DONE" to enter the password. 6. The monitor will now connect to the Wi-Fi network. Once a Wi-Fi network is saved into memory, the monitor will automatically reconnect to that network as long as the Wi-Fi setting is set to "ON".
-
Page 16: Voxx Link
VOXX LINk Voxx Link is an APP developed for Android and Apple smartphones and tablets that allows full system remote control and visual monitoring of the system without having to directly see or directly touch the monitor. This is a great tool to allow content selection and control of the system for actual users who may be infants and toddlers, too young to control the system themselves. - Page 17 VOXX LINk(CONTINUED) 18:00 SCREEN OFF SCREEN OFF SCREEN OFF Google Play Scan Searching... Scan Thomas_S9 Connected WIFI VOXX VOXX LINK Kevin_Android_R&D LINK TP-LINK_72DA TP-LINK_72DA VOXX LINK Tools Secured with WPA/WPA2 Secured with WPA/WPA2 INSTALL TP-LINK_363C TP-LINK_363C WFMM Secured with WPA/WPA2 Secured with WPA/WPA2 IR TRANSMITTER Thomas_S9...
-
Page 18: Wfmm(Wireless Fm Modulator)
WFMM(WIRELESS FM MODULATOR) WFMM allows you to broadcast audio content from the system 4. Touch the frequency button to select your preferred frequency, and tune monitor to your vehicle's factory audio system through an FM your radio FM to the same frequency. This will allow you to listen to the station. -
Page 19: Ir Headphone Transmitter
IR HEADPHONE TRANSMITTER 1. Select SETUP in the Main Menu. 3. Touch the ON or OFF button to turn ON or OFF the IR Transmitter. SCREEN OFF SCREEN OFF WIFI WIFI VOXX LINK VOXX LINK FREQUENCY WFMM WFMM 88.1MHz 89.1MHz 90.1MHz 91.1MHz 88.3MHz... -
Page 20: User Interface Language
USER INTERFACE LANGUAGE 1. Select SETUP in the Main Menu. 2. Select Language inside the SETUP screen. SCREEN OFF WIFI ENGLISH VOXX LINK WFMM ESPAÑOL IR TRANSMITTER FRANÇAIS LANGUAGE ABOUT DEVICE RESET 3. Select your preferred language. -
Page 21: About Device & Check For Update
FIRMWARE VER8.1.0 WFMM VERSION AMOVA10/OVA10.V20181105.10049 IR TRANSMITTER ZONE GMT-8:00 LANGUAGE ABOUT DEVICE & CHECk FOR UPDATE ABOUT DEVICE CHECK CHECK FOR UPDATE 3. A notification message will appear on screen if a software update is 1. Select SETUP in the Main Menu. RESET available for the monitor. - Page 22 ABOUT DEVICE & CHECk FOR UPDATE( CONTINUED) 5. This message will appear on the screen if the monitor is not NOTE: As long as the system monitor is connected to a Wi-Fi hotspot, the connected to a Wi-Fi hotspot. monitor will be able to receive software updates when they become available.
-
Page 23: Time Zone & Reset
TIME ZONE & RESET RESET TIME ZONE 1. Select SETUP in the Main Menu. 1. Select SETUP in the Main Menu. 2. Select "RESET" inside the SETUP screen. Touch the "Factory Setting" 2. Select "ABOUT DEVICE" in the SETUP screen, touch the "ZONE" button to reset all monitor settings back to factory defaults. -
Page 24: Brightness Control
BRIGHTNESS CONTROL 1. Touch the Brightness Button inside the Info Bar to change the brightness settings. 2. Touch and slide the brightness level indicator to the right to increase the brightness, and to the left to decrease the brightness.. -
Page 25: Dvd Playback
DVD PLAYBACk Supported Disc Types DVD Region Code DVD-Video: DVD contains video The DVD player is preset to a region code at the factory depending DVD +/- R: DVD contains video on where the DVD player is sold. A DVD from a different region CD-DA: CD contains audio cannot be played in this unit and the unit will display "WRONG CD-Video: CD contains video... -
Page 26: Media & File Type Compatibility
MEDIA & FILE TYPE COMPATIBILITY Media Compatibility Supported Formats This system is compatible with the media formats listed in the Format Extension Supported Variations/Codecs table below. .avi H.264, MPEG-2 Part 2, MPEG-4 Part 2 • The metadata or file information of some audio and video files .mp4, .mov H.263, H.264, H.265, MPEG-4 Part 2 may not be correctly displayed. -
Page 27: Troubleshooting
TROUBLESHOOTING Symptom Remedy Verify the vehicle is in the ON/RUN or ACC position. Monitor does not power on If the Power and Home buttons on the monitor are not illuminated, verify the cable connection to each monitor and/or the power and ground connections to the vehicle. - Page 28 TROUBLESHOOTING(CONTINUED) Symptom Remedy Some mobile devices may require a special HDMI cable and/or adapter. Contact your HDMI device supplier for the HDMI cable and/or adapter. Some devices may need to boot up before showing picture. HDMI input not working Ensure you are using an OEM branded (Apple, Samsung, etc.) HDMI cable and/or adapters. Generic HDMI cables and/or adapters may not function properly with this system.
-
Page 29: General Specifications
GENERAL SPECIFICATIONS Display Type 10.1" Capacitive Touch Screen, Resolution: 1024 (RGB) x 600 LCD Backlight Type LED Backlight Life: 20,000 Hours Supported Disc Types DVD (Single, Dual Layer), DVD-R/+R, DVD+R Dual layer, DVD-RW/+RW, CD, CD-R, CD-RW Operation Voltage: 10.5VDC ~ 16VDC, Operation Power: 20W max @ 12VDC, General Operation Temperature: 32 ~ 131°F (0 ~ 55°C) Frequency Response... -
Page 30: Compliance Information
COMPLIANCE INFORMATION FCC Notice DVD Video Playback This item incorporates copy protection technology that is protected by This device complies with Part 15 of FCC Rules and Industry Canada U.S. patents and other intellectual property rights of Rovi Corporation. license-exempt RSS standard(s). Operation is subject to the following Reverse engineering and disassembly are prohibited. - Page 31 COMPLIANCE INFORMATION(CONTINUED) FLAC HDMI The terms HDMI and HDMI High-Definition Multimedia Interface, and the Copyright © 2000-2009 Josh Coalson HDMI Logo are trademarks or registered trademarks of HDMI Licensing, Copyright © 2011-2013 Xiph.Org Foundation LLC in the United States and other countries. Redistribution and use in source and binary forms, with or without modification, are permitted provided that the following conditions are Dolby Digital...
- Page 32 voxxelectronics.com © 2020 Voxx Electronics Corp., 2351 J. Lawson Blvd. Orlando, FL. 32824 700089...
Need help?
Do you have a question about the ADVA10 and is the answer not in the manual?
Questions and answers