Table of Contents
Advertisement
Advertisement
Table of Contents

Related Manuals for Midland PMR 446 G5


Summary of Contents for Midland PMR 446 G5
- Page 1 Owner’s Manual PMR 446 Handheld transceiver http://www.alan-germany.com...
- Page 2 Featuring • 8 Channels • 38 CTCSS codes • VOX/Babymonitoring • Display illumination • Scan function • Roger Beep Tone http://www.alan-germany.com...
-
Page 3: Table Of Contents
Index Accessories Introduction Controls and Buttons LCD Display Ext. Speaker / Mic socket Installing Batteries Charging the Batteries Operation 13-22 Use and Care Technical Specification Channel-chart CTCSS-sub channel-chart European Warranty Note http://www.alan-germany.com - 3 -... -
Page 4: Accessories
Accessories – Accessories can be purchased at www.alan-germany.com or ask your dealer. AE740 Over the ear Mic. Headsets with PTT http://www.alan-germany.com - 4 -... -
Page 5: Introduction
Introduction Congratulations on your purchase! MIDLAND G5 is a new generation PMR 446 transceiver which may be used, without license, in all the countries in which Pan-European PMR446 frequencies are authorised (446.00625 – 446.09375 MHz). As of date of printing this manual in following countries your G5 may be... -
Page 6: Controls And Buttons
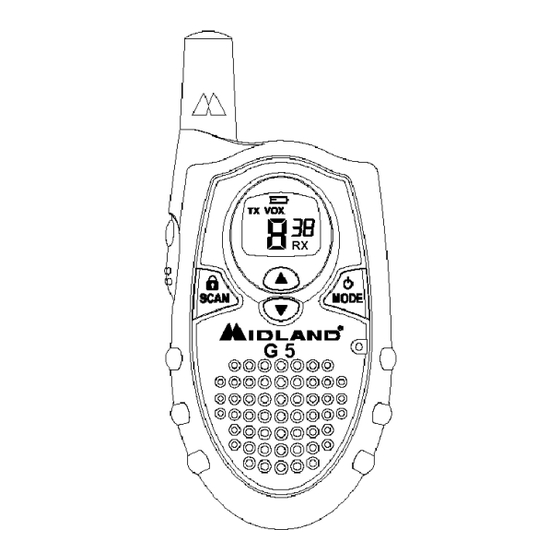
Control Buttons & Indicators Display Illumination ON / OFF Turn On/Off the Radio - Enter/Exit the menu - Talk on the Radio - Send a Call Tone Ext. Spk/Mic - Save a setting - Increase the volume - Scroll through the menu Scan for active Channels and keylock... -
Page 7: Lcd Display
Low Battery level Indicator VOX Icon Transmit (TX) Icon Channel Indicator CTCSS Channel Indicator Receive Icon (RX) External Speaker/Microphone Jack : http://www.alan-germany.com - 7 -... -
Page 8: Ext. Speaker / Mic Socket
Your G5 can be used with an optional external speaker/microphone or headset, for example AE740. http://www.alan-germany.com - 8 -... -
Page 9: Installing Batteries
Remove Battery Cover and Installing Batteries: Pull the latching tab outward, then gently slide the belt clip down toward the bottom of the radio. With the back of the radio facing you, remove the Battery Cover by sliding it down from the unit. Insert 3 1,5 V AAA batteries or rechargeable NiMH-batteries observing the polarity as shown. -
Page 10: Charging The Batteries
Battery level indicator and charging batteries Battery level indicator The battery level is indicated by the number of squares present inside the battery icon on the LCD Screen. When the battery level is low, the battery icon will flash to indicate that the batteries need to be replaced. - Page 11 Note: It takes approximately 6 hours to charge partly discharged batteries. If they are at their lowest level it will take around 10 up to 14 hours to fully charge new batteries or fully discharged batteries. Automatic energy saving circuit The radio transceiver has a built in POWER SAVER feature for maximum battery life.
- Page 12 Never attempt to charge alkaline or other “normal” dry cell batteries. When recharging, only approved recommended rechargeable NiMH batteries and chargers. Use of the charger with other batteries can cause damage to your PMR unit. Other types of batteries may burst and cause personal injury. If the unit is not to be used for an extended period of time, remove the batteries.
-
Page 13: Operation
Operation Power On Press the button for more than 3 second to turn the radio on. Three beeps will sound and the standby screen with all available icons will appear on the LCD. Power Off Press the button for over 3 seconds to turn the radio off. Volume Press the button to increase the volume, and press the... - Page 14 Reception Simply release the PTT button. When you receive a signal, the RX icon is displayed on the LCD screen. Transmit Do not transmit when You hear any activity on current channel. You may disturb a conversation between other parties. Press and hold PTT button and speak in a normal voice into the microphone.
- Page 15 Call Tone Your G5 can transmit a call tone for a fixed length of time. To send a call tone, press the PTT twice rapidly. The TX icon will appear during transmitting a call tone and tone can be heard on the speaker for confirmation.
- Page 16 Key Lock You may lock the front panel keys against accidental use. To lock , press key and hold it for about 5 seconds (You will hear a beep tone and Lc in the display. Monitor and PTT keys can still be used.
- Page 17 User Interface To access the advanced features of your G5, your radio has the following menu functions: Mode Channel CTCSS Roger 0~38 On/Off On/Off All menue points may be changed by pressing the button. Note : The unit will automatically go to normal mode after 5 seconds of no button activity during menu setting.
- Page 18 Channel Selection Your G5 has 8 channels available. To change channels: Turn the radio on. Press the button until the current channel segment flashes. Use the button to select a higher channel. Use the button to select a lower channel. All channels will be shown in the display according your selection.
- Page 19 CTCSS- (Coded Tone Controlled Squelch System) selection mode This feature allows you to utilize a less used channel range (00-38) within a main channel. This enables you to communicate with another party on the same main channel using the same subcode. This helps to avoid congestion on the main channel and filters out unwanted noise and static.
-
Page 20: Operation
At this point you will receive all signals with same selected CTCSS- code. In transmitting mode the code will be send automatically. Selecting a CTCSS code of “oF” will disable the the CTCSS feature. Note: To communicate with other PMR units, they must be switched to the same channel and CTCSS subcode. - Page 21 Note: By using the unit as babysitter, the monitoring station must be indicated with enabled VOX, while the control station must be indicated with normal receiption mode (VOX disabled). Both units must be indicated with the same frequency and same CTCSS-code setting. To use an external MIC / headphone for VOX operation First set the radio to VOX mode.
- Page 22 Roger Beep Tone : Whenever you release the PTT button, a “Roger Beep” tone may be transmitted to let your friends know you are finished talking. To enable the Roger Beep: Press the button repeatedly until the “rb” appears on the display.
-
Page 23: Use And Care
Use and Care Use a soft damp cloth to clean the radio. Do not use alcohol or cleaning solutions to clean the radio. Turn off the radio and remove the batteries during long-term storage. Do not open the radio for any reason. The opening of the transceiver by un-authorized personnel will automatically invalidate the guarantee. -
Page 24: Technical Specification
Technical Specification Installed channels 8 in European PMR 446 frequency range TX output power max. 0,5 W ERP Audio output power ca. 200 mW / 8 Ohms Modulation FM / 2,2 kHz nominal deviation Power source 3 AAA Alkaline or rechargeable Ni-MH Batteries Current Drain Transmit approx. -
Page 25: Channel-Chart
Channel chart Channel Frequency (MHZ) 446.00625 MHz 446.01875 MHz 446.03125 MHz 446.04375 MHz 446.05625 MHz 446.06875 MHz 446.08125 MHz 446.09375 MHz http://www.alan-germany.com - 25 -... -
Page 26: Ctcss-Subchannel-Chart
CTCSS-Subchannel-Chart FREQ (HZ) FREQ (HZ) FREQ (HZ) 67,0 107,2 167,9 71,9 110,9 173,8 74,4 114,8 179,9 77,0 118,8 186,2 79,7 123,0 192,8 82,5 127,3 203,5 85,4 131,8 210,7 88,5 136,5 218,1 91,5 141,3 225,7 94,8 146,2 233,6 97,4 151,4 241,8 100,0 156,7 250,3... -
Page 27: European Warranty Note
European Warranty Note If you should have purchased the radio in a country of the European Union, Your distributor will repair or replace, at its option without charge, any transceiver which fails due to a defect in material or workmanship within 2 years following the initial consumer purchase.
Need help?
Do you have a question about the PMR 446 G5 and is the answer not in the manual?
Questions and answers