Kenwood DNX9960 Instruction Manual
Gps navigation system dnx series, monitor with dvd receiver ddx series
Hide thumbs
Also See for DNX9960:
- Instruction manual (36 pages) ,
- Gps navigation instruction manual (84 pages) ,
- Installation manual (33 pages)
Table of Contents
Advertisement
GPS NAVIGATION SYSTEM
DNX SERIES
DNX9960
MONITOR WITH DVD RECEIVER
DDX SERIES
DDX896
INSTRUCTION MANUAL
Take the time to read through this instruction manual.
Familiarity with installation and operation procedures will help you obtain the
best performance from your new GPS Navigation System/DVD Receiver.
For your records
Record the serial number, found on the back of the unit, in the spaces designated on the
warranty card, and in the space provided below. Refer to the model and serial numbers
whenever you call upon your Kenwood dealer for information or service on the product.
Model DNX9960/DNX7160/DNX7020EX/DDX896/DDX8046BT Serial number
US Residence Only
Register your Kenwood product at www.Kenwoodusa.com
© B64-4673-00/00 (KW/K2W/RW)
DNX7160
DDX8046BT
Register Online
DNX7020EX
Advertisement
Chapters
Table of Contents

Related Manuals for Kenwood DNX9960


Summary of Contents for Kenwood DNX9960
- Page 1 Record the serial number, found on the back of the unit, in the spaces designated on the warranty card, and in the space provided below. Refer to the model and serial numbers whenever you call upon your Kenwood dealer for information or service on the product. Model DNX9960/DNX7160/DNX7020EX/DDX896/DDX8046BT Serial number...
-
Page 2: Table Of Contents
Muting Audio Volume upon Reception of Playback Screen Phone Call Easy Control Screen Voice Control (DNX9960 only) Source Control Screen Voice Control iPod List Screen Control iPod Album Artwork Screen Control Link search (Music file) DNX series DNX9960/ DNX7160/ DNX7020EX... - Page 3 Hands Free Unit Control Setup Menu Before Use How to Display SETUP Menu Screen Downloading the Phonebook DivX Setup (DNX9/ DDX8 series) Receiving a Call Software Information During a Call User Interface Call Waiting Language Setting Making a Call Touch Panel Adjustment Calling by Phonebook Clock and Date Setup Calling by Entering a Phone Number...
-
Page 4: Before Use
• If you try to load a 3-inch-disc with its with a hard cloth or using a volatile liquid such adapter into the unit, the adapter might as thinner or alcohol may scratch the surface or erases characters. DNX series DNX9960/ DNX7160/ DNX7020EX... -
Page 5: Notes
Kenwood dealer. ‡ MP3/WMA/AAC/MPEG1/ DVD-R • When you purchase optional accessories, MPEG2/DivX* Playback ‡ DVD-RW check with your Kenwood dealer to make Multi-border/Multisession/ sure that they work with your model and in (Playback depends on ‡ DVD+R your area. authoring conditions) •... - Page 6 In the example of folder/file tree shown See <About Audio files>. below, the files are played in the order from About Picture files • Acceptable picture files JPEG (.jpg, .jpeg) PNG (.png) BMP (.bmp) DNX series DNX9960/ DNX7160/ DNX7020EX...
- Page 7 See <About Audio files>. • When the iPod is connected to this unit, "KENWOOD" or "✓" is displayed on the iPod iPod/iPhone that can be connected to indicate that you cannot operate the to this unit iPod.
- Page 8 Analog TV tuner • KTC-V300N • A2DP is a profile designed to transfer the music from an audio player. • AVRCP is a profile designed to control playback and selection of music by an audio player. DNX series DNX9960/ DNX7160/ DNX7020EX...
-
Page 9: Region Codes In The World
Region codes in the world The DVD players are given a region code according to the country or area it is marketed, as shown in the following map. DVD disc marks Operation regulatory marks With this DVD, some functions of this unit Symbol Description such as the play function may be restricted... -
Page 10: How To Read This Manual
Continue to the next page The instruction continues to the next page. Make sure to flip the page for the rest The above operation example with the mark of the instruction. differs from the actual operation. DNX series DNX9960/ DNX7160/ DNX7020EX... - Page 11 The right mark indicates that they DNX series can be scrolled up and down. DNX9960, DNX7160, DNX7020EX DDX series DDX896, DDX8046BT Function Icon Icons representing available functions are shown below.
-
Page 12: Functions Of The Buttons On The Front Panel
Split Screen Control window. 1 sec. While watching the navigation screen Picture in Picture function On/Off. * (page 20) DDX series without navigation unit DDX series without navigation unit Displays the Top Menu screen. (page 14) DNX series DNX9960/ DNX7160/ DNX7020EX... - Page 13 Functions of the buttons on the front panel Turns the power On. * Displays the Source Control screen. (page 18) In case of visual sources, the playback screen is first displayed and changed to the source control screen by pressing the button again. 1 sec.
-
Page 14: Basic Operation
] iPod (page 33) ] USB (page 26) ] TUNER (page 37) ] SIRIUS/ XM (page 45) ] HD Radio (page 49) ] TV (page 41) ] Bluetooth Audio (page 54) ] Video ] Standby DNX series DNX9960/ DNX7160/ DNX7020EX... -
Page 15: Customization Of Top Menu Screen
Basic Operation Displays Tools screen of ] Closes the function bar. navigation. Displays Where To ? screen of navigation. Customization of Top Menu Screen ] Switches to the navigation screen. Up to 3 sources or setups frequently used ] Switches to the Hands Free Main on the Top Menu screen can be registered. -
Page 16: How To Play Media
• The playback starts automatically after loading the media or connecting the device. To disconnect the USB device, touch the [0] button on the source control screen, and then disconnect the USB device. See <Source Control Screen> (page 26). DNX series DNX9960/ DNX7160/ DNX7020EX... - Page 17 Basic Operation Next page 3 DDX series DDX896/ DDX8046BT English...
-
Page 18: How To Display The Source Control Screen
• The screen will return to the navigation screen by touching the same part of the Source Control screen. While watching the Easy Control Screen When a video screen is displayed The Source Control Screen appears. The Source Control Screen appears. DNX series DNX9960/ DNX7160/ DNX7020EX... -
Page 19: Operation On The Playback Screen Of Visual Sources
Basic Operation Operation on the Playback Screen of Visual Sources The Playback screen of a visual source appears. While watching visual sources, basic operation is possible by touching the screen. While watching the Source Control The screen has 4 function areas. The Screen function of each area is different depending on the sources. -
Page 20: How To Display The Navigation Screen
See <Navigation units that can be connected to this unit> (page 8) for connectable navigation units. The screen switches between visual source's playback screen and camera view screen each time the small window is touched. DNX series DNX9960/ DNX7160/ DNX7020EX... -
Page 21: Secondary Window Function
Basic Operation Navigation screen with Easy Secondary window function Control window You can control audio sources while the navigation screen is displayed, and view the navigation information while the source control screen is displayed. 1 sec. Pressing the button for longer than 1 second while the source control screen is Navigation screen with Split Screen displayed switches the secondary window... -
Page 22: Watching Dvd/Video Cd
On) or a track (when PBC is \ Fast Forwards. Off ). | Fast Backwards. [7] Stops playing. When touched twice, the disc is played from its beginning when you play it the next time. [38] Plays or pauses. DNX series DNX9960/ DNX7160/ DNX7020EX... -
Page 23: Source Control Screen
[4], [¢] Source Control Screen Searches for a chapter. DVD-VIDEO DVD-VIDEO Switches to the source control screen to Selects a scene (when PBC is Video CD Video CD use various playback functions. On) or a track (when PBC is Off ). Display the Source Control Screen ], [ Slow Forwards or... -
Page 24: Dvd-Video Disc Menu
• The Highlight Control is cleared automatically after approximately 10 seconds. Operation on the Menu Control 2 screen Operation on the Menu Control 1 screen [Menu] Calls the Menu. [Next] Displays the Menu Control 2 screen. DNX series DNX9960/ DNX7160/ DNX7020EX... -
Page 25: Video Cd Zoom Control
[Previous] Displays the Menu Control Video CD Zoom Control 1 screen. Displays an enlarged VCD screen. [Angle] Switches the picture angle. Display the playback screen [SUB] Switches the subtitle language. See <Operation on the Playback Screen [Audio] Switches the voice language. of Visual Sources>... -
Page 26: Music Cd/ Audio File Listening & Video File/ Picture File Watching
"#### / ####" Total number of file in Disc Disc When touched twice, the disc is played the folder and the file number display from its beginning when you play it the "3" Play Mode Display next time. DNX series DNX9960/ DNX7160/ DNX7020EX... - Page 27 "P"/ "R" Play Time Display Audio File Audio File Au Au Au Au MPEG/DivX® MPEG/DivX® JPEG JPEG Use the [TIME] to change play time [4Line]/ [2Line] Switches the number display. of lines displayed in the Information ] When appears, the text display Display.
-
Page 28: List Search
Moves to the top Audio File Audio File category. Folder list Disc/USB Disc/USB Moves to the upper Audio File Audio File level of the category. CUR] Displays the currently playing category. ] Returns to the previous screen. DNX series DNX9960/ DNX7160/ DNX7020EX... -
Page 29: Album Artwork (Usb)
Thumbnail Viewer Album artwork (USB) Searches for songs in an album artwork in USB. Display the Source Control Screen See <Source Control Screen> (page 26). Display the artwork Screen 1 Touching a thumbnail image displays it in full-screen view. 2 Returns to the Source Control screen. CUR] Displays the currently playing folder. -
Page 30: Link Search (Audio File In Usb)
Scrolls to the position of the specified ⁄ character • Touching these areas during the slide show of picture files searches for audio files. Fast Forwards. MPEG/DivX® MPEG/DivX® Fast Backwards. MPEG/DivX® MPEG/DivX® Scrolls to the selected character. DNX series DNX9960/ DNX7160/ DNX7020EX... -
Page 31: Easy Control Screen (Video File, Picture File)
Easy Control Screen Picture Control (USB) (Video file, Picture file) Adjusting the picture display. Displays the basic operation buttons on Display the Playback Screen the screen. See <Operation on the Playback Screen Display the Easy Control Screen of Visual Sources> (page 19). Display the Picture Control Screen Operation on the Easy Control Screen Adjust the picture display... -
Page 32: Movie Menu Control (Disc)
See <Operation on the Playback Screen of Visual Sources> (page 19). Display the Menu Control screen Operation on the Menu Control screen [SUB] Switches the subtitle language. [Audio] Switches the voice language. [Exit] Exits the Menu Control screen. DNX series DNX9960/ DNX7160/ DNX7020EX... -
Page 33: Ipod Control
iPod Control You can control and listen to songs in your iPod by connecting an iPod to this unit with KCA-iP301V (optional accessory). You can also display video contents on this unit when connecting an iPod with video. Playback Screen Easy Control Screen Basic functions are available even when Displays the basic operation buttons on... -
Page 34: Source Control Screen
M M M M usic usic Slider control [INFO] Displays the information screen Use the [CTRL]/ [Slider] to change the of music/video being played. control mode. [Hand] Allows you to operate iPod with the control of the iPod. DNX series DNX9960/ DNX7160/ DNX7020EX... -
Page 35: Ipod List
⁄ ] When appears, the text display is scrolled by touching it. Disabled when VIDEO is being played. ALL] Lists all the music in the • [Hand] – In the iPod Control by Hand Mode, iPod selected category. cannot be operated using this unit. TOP] Moves to the top category. -
Page 36: Ipod Album Artwork
2 Returns to the Source Control screen. Link search (Music file) Scrolls to the selected character. Searches for another song of the currently selected artist. Display the Source Control Screen See <Source Control Screen> (page 34). Start Link search DNX series DNX9960/ DNX7160/ DNX7020EX... -
Page 37: Radio Listening
Radio Listening Various control screens appear in the Tuner Source mode. • Set the remote controller mode switch to "AUD" mode before starting operation, see <Remote Controller mode switch> (page 105). Source Control Screen Multi Function Switches to the source control screen to use various functions. -
Page 38: Preset Select
Auto Memory terminates when 6 stations 2 Returns to the Source Control screen. are stored or when all stations are tuned ⁄ • The operation ends automatically if you do not operate within 10 seconds. DNX series DNX9960/ DNX7160/ DNX7020EX... -
Page 39: Manual Memory
Manual Memory Radio Text Stores the current receiving station in You can display the radio text. (Only when memory. receiving the FM broadcast) Display the Source Control Screen Select a station See <Source Control Screen> (page 37). See <Source Control Screen> (page 37). Select a station you wish to store in Display the radio text memory... -
Page 40: Traffic Information
On in order to have the Traffic Information screen appear automatically. • During reception of traffic information the adjusted volume is automatically remembered, and the next time it switches to traffic information it's automatically the remembered volume. DNX series DNX9960/ DNX7160/ DNX7020EX... -
Page 41: Tv Watching
TV Watching Various control screens appear in the TV source mode. You can only operate TV with the optional accessory TV Tuner connected. Easy Control Screen Function During TV Screen Basic functions are available even when Displays the basic operation buttons on the screen. -
Page 42: Source Control Screen
] Switches to the TV screen. 1 Information display Channel information display "TV" Band display "Preset" Memory Number Display "ch" Channel display ] When appears, the text display is scrolled by touching it. Multi Function DNX series DNX9960/ DNX7160/ DNX7020EX... -
Page 43: Auto Memory
Auto Memory Manual Memory Stores stations with good reception in Stores the current receiving channel in memory automatically. memory. Display the Source Control Screen Display the Source Control Screen See <Source Control Screen> (page 42). See <Source Control Screen> (page 42). Select a band you wish to store in Select a station you wish to store in memory... -
Page 44: Preset Select
Display the Source Control Screen See <Source Control Screen> (page 42). Start Preset Select Select a station 1 Memorized stations are displayed. Touch to tune in. 2 Returns to the Source Control screen. ] Switches to the TV screen. DNX series DNX9960/ DNX7160/ DNX7020EX... -
Page 45: Sirius/Xm Control (North American Sales Area Only)
SIRIUS/XM Control (North American sales area only) Various control screens appear in the Satellite radio source mode. (Only with the optional accessory Satellite radio connected. To connect the SIRIUS tuner, a conversion cable CA-SR20V (optional accessory) is necessary and to connect the XM tuner, an XM interface Box KCA-XM100V (optional accessory) is necessary.) •... -
Page 46: Category/ Channel Search
2 Returns to the Source Control screen. ⁄ • Touching 1 displays the previously used category list, or channel list. Select a category 1 Selects a category. Displays all the channels in the selected category. DNX series DNX9960/ DNX7160/ DNX7020EX... -
Page 47: Channel Memory
Channel Memory Preset Select Stores the current receiving channel in Lists and selects memorized channel. memory. Display the Source Control Screen Display the Source Control Screen See <Source Control Screen> (page 37). See <Source Control Screen> (page 45). Display the SIRIUS Preset List Screen Select a channel you wish to store in memory Select a channel... -
Page 48: Direct Channel Search
Enter the channel number 1 Enters the channel number. [Cancel] Cancels the direct channel search. [Clear] Clears the channel number. Tune in the channel ⁄ • The operation ends automatically if you do not operate within 10 seconds. DNX series DNX9960/ DNX7160/ DNX7020EX... -
Page 49: Hd Radio™ Control
HD Radio™ Control Various control screens appear in the HD Radio Source mode. (only with the optional accessory HD Radio tuner connected) Multi Function Source Control Screen Switches to the source control screen to use various functions. Display the Source Control Screen See <How to Display the Source Control Screen>... -
Page 50: Auto Memory
Continue to touch until the memory number appears. Auto Memory terminates when 6 stations are stored or when all stations are tuned ⁄ • The operation ends automatically if you do not operate within 10 seconds. DNX series DNX9960/ DNX7160/ DNX7020EX... -
Page 51: Preset Select
Preset Select Receive mode Lists and selects memorized channel. Sets the radio broadcasts receive mode. Display the Source Control Screen Display the Source Control Screen See <Source Control Screen> (page 49). See <Source Control Screen> (page 49). Display the HD Radio Preset List Display the Receive mode screen Screen Select the receive mode... -
Page 52: Direct Search
[Mode] Switches the search mode to See <Source Control Screen> (page 49). Frequency or Channel. [Cancel] Cancels the direct search. Display the Information Screen [Clear] Clears the frequency or channel number. Tune in the frequency or channel DNX series DNX9960/ DNX7160/ DNX7020EX... - Page 53 The memory usage can be checked Select the "Tagging Information" display. ⁄ • Up to 50 TAGs (song’s information) can be registered to this unit. When iPod is connected, the TAG information registered to this unit is transferred to the connected iPod. DDX series DDX896/ DDX8046BT English...
-
Page 54: Bluetooth Audio Control
• * If the Bluetooth Audio player does not support AVRCP profile, buttons are not displayed. Operate from the Audio player. • * If the Bluetooth Audio player supports AVRCP1.3 profile, these items can be displayed. DNX series DNX9960/ DNX7160/ DNX7020EX... -
Page 55: Other Functions
Other Functions External Device Power Supply Muting Audio Volume upon Control Reception of Phone Call Controlling the external device power When a telephone call is mode or supply. received... The Phone Call ("Call Interrupt") screen Display the Source Select Screen appears, and system is paused. -
Page 56: Voice Control (Dnx9960 Only)
[VOLUME] button, on the front panel or the remote control unit is pressed. The screen has changed to the Top Menu • The voice control is disabled while talking on screen. the phone with hands-free. You will hear a beep again. DNX series DNX9960/ DNX7160/ DNX7020EX... - Page 57 • The voice control is canceled if no operation is continued for a certain period of time. DDX series DDX896/ DDX8046BT English...
-
Page 58: Screen Control
[Contrast] Contrast Control • You can set image quality of screens such as [Black] Black Level Adjustment menu from <Screen Control> (page 87). [Sharpness] Sharpness control Displayed on Video, iPod, USB, TV or Camera View screen only. DNX series DNX9960/ DNX7160/ DNX7020EX... -
Page 59: Hands Free Unit Control
Hands Free Unit Control Various functions can be used in the Hands Free control mode. of characters.) Before Use • Depending on the type of your cell-phone, the • For details on the Bluetooth cell-phone with the following restrictions are placed: hands-free function, see <About the Cell-Phone>... -
Page 60: During A Call
For information on how to preset a switches the calling party. phone number, see <Phone Number Preset> (page 68). ] Terminates the current call. Phonebook] Displays the Phonebook Search. See <Calling by Phonebook> (page 61). DNX series DNX9960/ DNX7160/ DNX7020EX... -
Page 61: Calling By Phonebook
Outgoing Calls] Displays the Calling by Phonebook Outgoing Calls screen. See <Making a You can call a person using his/her phone Call Using Call Records> (page 63). number that you have registered in the Incoming Calls] Displays the Phonebook. Incoming Calls screen. See <Making a Display the Hands-Free Control Call Using Call Records>... -
Page 62: Calling By Entering A Phone Number
1 Calls the entered phone number. [Clear] Clears the number. Make a call You can start talking when the recipient responds. ⁄ • You can input up to 32 digits. • This function is unavailable while driving. DNX series DNX9960/ DNX7160/ DNX7020EX... -
Page 63: Making A Call Using Call Records
Making a Call Using Call Records Calling by Voice Recognition (DNX7/ DDX8 series) Calls by selecting a phone number from the outgoing, incoming, or missed calls list. Calls by recognizing the registered voice. ⁄ Display the Hands-Free Control screen • In order to perform voice recognition, voice must See <Making a Call>... - Page 64 Make a call When a beep is heard, say the category within 2 seconds. Make a call ⁄ • A message is displayed if the voice is not recognized. Read the message for the further operation. DNX series DNX9960/ DNX7160/ DNX7020EX...
-
Page 65: Controlling Tone-Based Services
Controlling Tone-based Services Setting Up the Hands-Free Phone Uses tone base service using DTMF (Dual The Hands-Free system can be set as Tone Multi Frequency). follows. Display the Talking screen Display the Hands-Free Control screen See <Calling by Entering a Phone Number>... -
Page 66: Voice Registration (Dnx7/ Ddx8 Series)
SETUP value to the initial value. ⁄ • Either the time interval for automatic answer set on this unit or the time interval set on the cell- phone, whichever is shorter, takes effect. Say within 2 seconds after the Beep. DNX series DNX9960/ DNX7160/ DNX7020EX... -
Page 67: Key Word Voice Registration (Dnx7/ Ddx8 Series)
Say the name to register (2nd try) Key Word Voice Registration Say within 2 seconds after the Beep. (DNX7/ DDX8 series) Registers the voice to select the Phone End voice registration number category by Voice Recognition. Display the Hands Free Setup screen See <Setting Up the Hands-Free Phone>... -
Page 68: Phone Number Preset
] Registers from outgoing calls list. ] Registers from incoming calls list. ] Registers from missed calls list. [Direct Number] Registers by entering phone numbers. [Voice] Registers voice for voice recognition to preset number. (DNX7/ DNX series DNX9960/ DNX7160/ DNX7020EX... -
Page 69: Sms (Short Message Service)
See <Making a Call> (page 60). Display the SMS Select screen 1 Calls the number in the selected message. [DISP] Displays the selected message. [Read] Reads out the selected message. (DNX9960 only) Next page 3 Next page 3 DDX series DDX896/ DDX8046BT English... - Page 70 ⁄ [Space] Enters a space. • This is displayed only when the Draft [SET] Determines the message and message is being edited. returns to the SMS Create Menu screen. Send the message DNX series DNX9960/ DNX7160/ DNX7020EX...
- Page 71 DDX series DDX896/ DDX8046BT English...
-
Page 72: Audio Control
[Volume Offset] Finely adjust the [Audio Control] volume of the current source to [Equalizer] minimize the difference in volume [EQ] between different sources. [Zone Control] ⁄ [SRS WOW] [Space Enhancer] • If you have increased the volume first, then DNX series DNX9960/ DNX7160/ DNX7020EX... -
Page 73: Equalizer Control
⁄ reduced the volume using the "Volume Offset", the sound generated if you suddenly • [iPod] switch to another source may be extremely During iPod source only. loud. [EQ] Displays the Graphic Equalizer [Subwoofer Level] Adjusts the setup screen. (page 73) subwoofer volume. -
Page 74: Zone Control
• When the rear speaker sound is switched, the audio source that is output at the AV OUTPUT terminal is also switched to the same source. [Rear VOL.] Adjusts the volume of the rear channel. DNX series DNX9960/ DNX7160/ DNX7020EX... -
Page 75: Space Enhancer (Dnx7 Series)
⁄ Listening Position • There are following limitations when zone You can adjust the sound effects according function is set to "ON". to your listening position. - There is no output from the subwoofer or Display the Position screen center speaker. >... -
Page 76: Srs Wow Control (Dnx9/ Ddx8 Series)
1 Selects a speaker to be set (Front, Finely adjust the distance Rear or Center speaker). [TruBass] Sets the TruBass effect level. [FOCUS] Sets the FOCUS effect level. [SRS 3D] Sets the SRS 3D effect level. DNX series DNX9960/ DNX7160/ DNX7020EX... -
Page 77: Surround Control (Dnx9/ Ddx8 Series)
⁄ ⁄ • FOCUS: Adjusts the vertical position of the • When you have selected the TV or TUNER source speaker and sound image by virtual and when you set the Dolby PL, we recommend adjustment. you to select the "Dolby PLII Matrix" mode. If you •... -
Page 78: Setup Menu
In this manual, the above selection is [TV SETUP] indicated as: [AV-IN SETUP] > > Touch [ [Navigation] Select the setup item [Software] [Audio SETUP] [Speaker Select] [Car Type] [Channel Level] [AV-OUT Interface] [Camera SETUP] DNX series DNX9960/ DNX7160/ DNX7020EX... -
Page 79: Divx Setup (Dnx9/ Ddx8 Series)
Cancel the registration DivX Setup (DNX9/ DDX8 series) Checks the registration code. This code is needed when making a disc which has DRM (Digital Rights Management). Display the DivX Setup screen > > > > Touch [ [DivX(R) SETUP]. (page 78) Touching the screen displays a confirmation message. -
Page 80: User Interface
[AUD] button. (page [Language Select] Selects a language. "American English (en)") "V.OFF": Press the [AUD] button for [Enter] Determines the selected longer than 1 second to turn the language. DNX series DNX9960/ DNX7160/ DNX7020EX... -
Page 81: Touch Panel Adjustment
[Cancel] Cancels the selected language. Touch Panel Adjustment You can adjust the touch panel operations. When [ASR] is set to "Disabled" (DNX9 Display the Touch panel Adjustment only) screen When [Select Mode] is set to > > > > > > Touch [ [System] "Advanced"... -
Page 82: Clock And Date Setup
[Angle]. (page 78) North American sales area only) Set the Monitor Angle Adjust the date or clock time 1 Sets the Monitor angle. [Off Position] Stores the current monitor angle as the angle during power off. DNX series DNX9960/ DNX7160/ DNX7020EX... -
Page 83: Ext Sw Setup
[Pulse Set] Sets the Pulse signal output EXT SW Setup time. Sets up the exteral switch power mode. Outputs 500ms when "1" is set. Display the EXT SW screen Increases by 200ms with each step. Up > > > > >... -
Page 84: Setup Memory
[No] To cancel the function, touch [No]. cancel clearing, touch [No]. To cancel memorization, touch [No]. The SETUP Menu screen appears again. Quit memorization/recalling of settings Select a desired function [Recall] Recalls the memorized settings. [Memory] Memorizes the current settings. DNX series DNX9960/ DNX7160/ DNX7020EX... -
Page 85: Changing Background Image
Select the image to load Changing Background image Loads an image from the connected USB device and sets it for the background image. Connect the device which has the image to load Display the Background screen > > > > >... -
Page 86: Panel Color Coordinate
• When touching [SET] or [Initialize], make sure [Panel Color Scan] is set to "OFF". Select a color 1 Sets to the touched color. [Adjust] Sets and registers favorite color to the preset buttons ([P1] – [P3]). DNX series DNX9960/ DNX7160/ DNX7020EX... -
Page 87: Screen Control
To register your original color Screen Control Start the RGB coordinate You can adjust the screen mode of the monitor. Display the Screen Control screen > > > > > > Touch [ [Display] [Screen Control]. (page 78) Adjust each color value Set each item 1 Selects a preset number to register. -
Page 88: Registering Bluetooth Unit
• A new device cannot be registered if there are 5 registered Bluetooth units. Delete unnecessary registration. See <Bluetooth Unit Connection> (page 90). 1 Displays the searched Bluetooth unit. Returns to the Connect Device List screen. DNX series DNX9960/ DNX7160/ DNX7020EX... -
Page 89: Registering Bluetooth Unit Pin Code
⁄ Go through the procedure of <Registering Bluetooth Unit> and • You can also register from the Bluetooth unit complete the registration (pairing) side. For the PIN code necessary for registration, see <Registering Bluetooth Unit PIN Code> (page 89). Registering Bluetooth Unit PIN •... -
Page 90: Bluetooth Unit Connection
[TEL (HFP)] Connects/disconnects cell- phone to use for Hands Free. [Audio (A2DP)] Connects/disconnects Audio player to use for Bluetooth Audio. [Remove] Deletes registration (pairing). Touching the screen displays a confirmation message. Touch [Yes]. To cancel clearing, touch [No]. DNX series DNX9960/ DNX7160/ DNX7020EX... -
Page 91: Av Input Setup
AV Input Setup AV Output Interface Setup You can set AV input parameters. You can set AV output parameters. Display the AV-IN Setup screen Display the AV-OUT Interface screen > > > > > > > > Touch [ [AV-IN SETUP]. Touch [ [AV-OUT (page 78) -
Page 92: Camera Setup
The function of the [AUD] button needs to be set to "CAM" in [AUD Key Longer than 1 Second] beforehand. [R-CAM Settings] Adjusts the CMOS- 300 with ID 1 set. For details, see the option manual. DNX series DNX9960/ DNX7160/ DNX7020EX... -
Page 93: Navigation Setup
[Through] There is an effect by DSP. system connection. ( "RGB") (DDX ⁄ series only) "RGB": Allows the Kenwood’s • When the mode is set to [Bypass], DSP System Navigation System to connect via its cannot be adjusted. interface cable. -
Page 94: Speaker Setup
2 Sets the High Pass Filter of the front speaker. 3 Sets the High Pass Filter of the rear speaker. 4 Sets the Low Pass Filter of the subwoofer. You can select any of the following speaker types. DNX series DNX9960/ DNX7160/ DNX7020EX... -
Page 95: Car Type (Dta) Setup
Display the Crossover setup screen Car Type (DTA) Setup You can setup the car type and speaker network, etc. Display the Car Type Setup screen > > > > Set the crossover Touch [ [Audio SETUP] > > [Car Type]. (page 78) Setup the Car Type If your car type is selected, the Digital Time Alignment and Equalizer is set... - Page 96 1 Set the front and rear positions and the height of the reference point to the position of the ears of the person DNX series DNX9960/ DNX7160/ DNX7020EX...
-
Page 97: Channel Level (Dnx9/ Ddx8 Series)
sitting in the front seat, and set the Channel Level (DNX9/ DDX8 series) right and left positions to the center of You can set the volume at each setup the vehicle interior. position. 2 Measure the distances from the Display the Car Type Setup screen reference point to the speakers. -
Page 98: Dvd Setup
"Wide" and "Normal", allowing you to listen to the movie's dialog more clearly. This is effective only when you are using a Dolby Digital software. DNX series DNX9960/ DNX7160/ DNX7020EX... -
Page 99: Dvd Language Setup
Set the language you use DVD Language Setup Selects a language you use for the speech and menus. Display the DVD Setup screen > > > > Touch [ [DVD SETUP]. (page 78) DVD Parental Level Setup Select the language item to set Sets a parental level. -
Page 100: Disc Setup
"1" position. [On Screen DVD] Sets an on-screen display of the DVD Playback screen. "OFF") "Auto": Information is displayed for 5 seconds when updated. "OFF": Information is not displayed. DNX series DNX9960/ DNX7160/ DNX7020EX... -
Page 101: Usb Setup
⁄ iPod Setup • [CD Read] Performs setup when using iPod. Disabled when a disc is in the unit. Display the iPod Setup screen You cannot play an Audio file/VCD disc in the > > > > Touch [ [iPod SETUP]. "2"... -
Page 102: Sirius Parental Code Setup
[Enter] Determines the code number. [Clear] Clears the code number. Confirm the code number Enter the same code number as you input in step 3. SIRIUS Parental code is now set, and the display returns to SIRIUS Setup screen. DNX series DNX9960/ DNX7160/ DNX7020EX... -
Page 103: Sirius Parental Lock Setup
Select a category SIRIUS Parental Lock Setup Selects the channel to enable SIRIUS Parental lock function. Display the SIRIUS Setup screen > > > > Touch [ [SIRIUS SETUP]. (page 78) Display the Parental Code screen 1 Category list Displays all the channels in the selected category. -
Page 104: Sirius Skip Channel Select
"Auto": Information is displayed for 5 Set the skip for each channel seconds when updated. "OFF": Information is displayed when you touch on the screen. 1 Channel list 2 Sets the skip function on or off for each channel. DNX series DNX9960/ DNX7160/ DNX7020EX... -
Page 105: Remote Controller
Remote Controller This unit can be operated using the Remote Controller supplied with this unit. ¤ CAUTION • Put the Remote Controller in a place where it will not move during braking or other operations. A dangerous situation could result, if the Remote Controller falls down and gets wedged under the pedals while driving. -
Page 106: Common Operations (Aud Mode)
Switches the display angle each time it is pressed. Volume attenuator Press the key once to lower the volume. Cursor key Press again to restore the previous volume. Moves the cursor when displaying menu. ENTER Enters options. DNX series DNX9960/ DNX7160/ DNX7020EX... -
Page 107: Dvd/Vcd (Dvd Mode)
Hands-free communication DVD/VCD (DVD mode) When a call comes in, it answers the call. Track search and file search Selects the track or file to be played. Function Switches the function screen. Play/Pause Pauses the track. Press again to resume playing. MODE Switches the screen mode. - Page 108 Switches the slow playback speed each time you press this key. DVD Top Menu Returns to the DVD top menu. DVD Menu Displays the DVD menu. Turns the playback control on or off while playing VCD. DNX series DNX9960/ DNX7160/ DNX7020EX...
-
Page 109: Music Cd/Audio File/Video File/Picture File (Aud Mode)
search feature, specify the search number Music CD/Audio file/Video file/ from the numeric keypad, and then press Picture file (AUD mode) [38] key. Folder search Numeric keypad Selects the folder to be played. • Specify the number to search in direct Track search and file search search. -
Page 110: Radio (Aud Mode)
Seek mode switching Switches the Seek mode (AUTO1, AUTO2, MANU). Direct tuning After pressing this key, use the keypad to specify the broadcast station you wish to receive. Example: 92.1MHz (FM) WXYZ « DNX series DNX9960/ DNX7160/ DNX7020EX... -
Page 111: Navigation (Nav Mode)
ROUTE M Navigation (NAV mode) Displays Route Option menu. Cursor key Scrolls the map, or moves the cursor. VIEW Switches between 2D and 3D map displays. ENTER Performs the selected function. VOICE Plays Voice guidance. ZOOM Zooms in or out the navigation map. MAP DIR Switches between the heading up navigation and north up navigation map... -
Page 112: Tv (Tv Mode)
Example: In case of Channel 6 (2-digit) « Numeric keypad • The number of the memorized station is selected. ( – • Press the direct tuning key first, then specify the channel of the station to receive. DNX series DNX9960/ DNX7160/ DNX7020EX... - Page 113 Initial Setup When pressing the Reset button or turning on the unit for the first time, the Initial SETUP screen is displayed. End initial setup Initial Setup Turns the power On Set each item ⁄ • The settings above can be changed in <Setup Menu>...
-
Page 114: Status Bar Indicator Items
"MUSIC" Identifies the music file. "PICTURE" Identifies the image file. "RDM" Indicates that the Random function is ON. "REP" Identifies that the Repeat function is ON. "PLST" Indicates that the Play list mode is selected now. DNX series DNX9960/ DNX7160/ DNX7020EX... -
Page 115: Dvd Language Codes
DVD Language Codes Code Language Code Language Code Language Afar Interlingue Russian Abkhazian Inupiak Kinyarwanda Afrikaans Indonesian Sanskrit Amharic Icelandic Sindhi Arabic Italian Sangho Assamese Japanese Serbo-Croatian Aymara Javanese Singhalese Azerbaijani Georgian Slovak Bashkir Kazakh Slovenian Byelorussian Greenlandic Samoan Bulgarian Cambodian Shona Bihari... -
Page 116: Help? Troubleshooting
<Handling discs> The DSP Select is Bypass. ☞ (page 4). <DSP Bypass Control> (page 93) ✔ The recording condition is bad. ☞ Record the media again or use another media. DNX series DNX9960/ DNX7160/ DNX7020EX... -
Page 117: Help? Error
The disc player is malfunctioning. ➡ Eject the disc and try inserting it again. "No Music" : Contact the Kenwood dealer if this indicator The connected USB device contains no continues blinking or the disc cannot be playable audio file. - Page 118 ➡ Check the connection of the antenna. The broadcast of the selected channel has finished. "ACQUIRING SIGNAL" : The unit cannot receive any signal. ➡ Move the vehicle to the area where the unit can receive signal. DNX series DNX9960/ DNX7160/ DNX7020EX...
-
Page 119: Specifications
Specifications Disc Format Monitor section : DVD-Video/ VIDEO-CD/ CD-DA Picture Size Sampling Frequency : 6.95 inches (diagonal) wide : 44.1/ 48/ 96 kHz : 156.6 mm (W) x 81.6 mm (H) Quantifying Bit Number Display System : 16/ 20/ 24 bit : Transparent TN LCD panel Drive System : TFT active matrix system... - Page 120 FM tuner section Video section Frequency Range Color System of External Video Input 200 kHz : 87.9 MHz – 107.9 MHz (DNX9960/ : NTSC DNX7160/ DNX7020EX/ DDX896) External Video Input Level (mini jack) 50 kHz : 87.5 MHz – 108.0 MHz (DDX8046BT) : 1 Vp-p/ 75 Ω...
- Page 121 DSP Section Navigation section (DNX series only) Graphics equalizer DNX9/ DDX8 series Receiver Band: 13 Band : High-sensitivity GPS receiver Frequency (BAND1 – 13) Reception Frequency : 62.5/ 100/ 160/ 250/ 400/ 630/ 1k/ 1.6k/ : 1575.42 MHz (C/A code) 2.5k/ 4k/ 6.3k/ 10k/ 16k Hz Acquisition Times Channel: Front/ Rear/ Center...
- Page 122 The Bluetooth word mark and logos are owned by the Bluetooth SIG, Inc. and any use of such marks by Kenwood Corporation is under license. Other trademarks and trade names are those of their respective owners. The "AAC" logo is a trademark of Dolby Laboratories.
-
Page 123: Laser Product
FCC WARNING DNX9960/ DNX7160/ DNX7020EX/ DDX896: This equipment may generate or use radio 2CAUTION frequency energy. Changes or modifications to this equipment may cause harmful interference unless Use of controls or adjustments or performance of the modifications are expressly approved in the procedures other than those specified herein may instruction manual. - Page 124 This symbol mark indicates that Kenwood manufactured this product so as to decrease harmful infl uence on the environment.
- Page 127 GPS NAVIGATION SYSTEM SYSTÈME DE NAVIGATION GPS SISTEMA DE NAVEGACIÓN GPS DNX SERIES DNX9960 MONITOR WITH DVD RECEIVER MONITEUR AVEC RÉCEPTEUR DVD MONITOR CON RECEPTOR DVD DDX SERIES DDX896 DDX8046BT INSTALLATION MANUAL MANUEL D'INSTALLATION MANUAL DE INSTALACIÓN © B54-4774-00/00 (KW/RW)
-
Page 128: Accessories Installation Procedure
..2 ..1 Acquiring GPS Signals The first time you turn on DNX9960, you must wait while the system acquires satellite signals for the first time. This process could take up to several minutes. Make sure your DNX9960 only ..1... - Page 129 properly, the front panel will automatically unconnected wires or the terminals. move into the position (initial setting angle) • Connect the speaker wires correctly to the terminals to which they correspond. The unit may shown in (Fig. 2). be damaged or fail to work if you share the - wires or ground them to any metal part in the car.
- Page 130 Connect to the terminal that is grounded when either the telephone rings or during conversation. ⁄ To connect the Kenwood navigation system, consult your navigation manual. Depending on what antenna you are using, connect either to the control terminal of the motor antenna, or to the power terminal for the booster amplifier of the film-type antenna.
- Page 131 Bluetooth Microphone (Accessory #) (see page 8) Voice Control Switch(Accessory $) (DNX9960 only) (see page 8) Cooling fan GPS Antenna (Accessory !) (DNX9960 only) (see page 8) Accessory 1 FUSE (15A ) To front left speaker White/Black Reverse sensor wire (Purple/White)
-
Page 132: System Connection
(commercially available) USB terminal iPod USB device (commercially available) To TMC Tuner GTM10 (optional accessory) (DNX9960 only) Audio input (iPod/AV Input 3 switchable) Resistance-free stereo type mini plug (3.5φ) Visual input (iPod/AV Input 3 switchable) Resistance-free mini plug (3.5φ) -
Page 133: Optional Accessory Connection
To SIRIUS Satellite Radio tuner/ XM Satellite Radio tuner/ HD Radio tuner (Optional Accessory) ⁄ Conversion adapter (optional accessory) may be necessary for connection of optional accessory. Contact your Kenwood dealer for details. TV Tuner Navigation System (Optional Accessory) (Optional Accessory) (DDX896/DDX8046BT only) -
Page 134: Installing The Gps Antenna
Installing the GPS Antenna Installing the Talk Switch (DNX9960 (DNX9960 only) only) and the Microphone Unit GPS antenna is installed inside of the car. It 1. Check the installation position of the microphone (accessory #) and the Talk should be installed as horizontally as possible switch (accessory $). -
Page 135: Installing The Escutcheon
Installing the Escutcheon For General Motors For Toyota/Scion 1. Cut out accessory 6 to meet the shape of 1. Cut out accessory 6 as illustrated. the opening of the center console. 2. Attach accessory 6 to the unit. Cutting line Cut out to meet the shape of the opening in the vehicle. - Page 136 Installation for Monitor/Player Unit Bend the tabs of the mounting sleeve with a screwdriver or similar utensil and attach it in place. ⁄ Make sure that the unit is installed securely in place. If the unit is unstable, it may malfunction (eg, the sound may skip). Installation on Toyota, Nissan or Mitsubishi Car using Brackets Accessory 8 (M5x6mm) or Accessory 9 (M5x7mm)
-
Page 137: Removing The Unit
Removing Monitor/Player Unit Removing the Hard Rubber Removing the Unit Frame (escutcheon) 1. Remove the hard rubber frame by referring to the removal procedure in the section 1. Engage the catch pins on the removal tool <Removing the Hard Rubber Frame>. 5 and remove the two locks on the lower 2. - Page 143 DNX9960 DNX9260BT GPS NAVIGATION SYSTEM Voice Command Table SYSTÈME DE NAVIGATION GPS Tableau des commandes vocales GPS-NAVIGATIONSSYSTEM Tabelle mit Sprachbefehlen GPS-NAVIGATIESYSTEEM Tabel met spraakopdrachten SISTEMA DI NAVIGAZIONE GPS Tabella comandi vocali SISTEMA DE NAVEGACIÓN GPS Tabla de comandos de voz SISTEMA DE NAVEGAÇÃO GPS...
- Page 144 Cambia a la fuente de USB Comuta para a fonte USB Switches to TV source Bascule en source TV Umschalten auf TV-Betrieb Schakelt over naar tv als bron Passa alla sorgente TV Cambia a la fuente de TV Comuta para a fonte TV DNX9960/DNX9260BT...
- Page 145 Contents General opreration Top Menu screen Source Control Screen Sprachbefehl/ Spraakopdracht/ Comando vocale/ Comando de voz/ Comando de voz Radio/ HD Radio/ SIRIUS/ XM/ TV German Dutch Italian Spanish DVD / iPod/ USB/ Bluetooth Allemand Néerlandais Italien Espagnol Voice Command for List screen Deutsch Niederländisch Italienisch...
-
Page 146: Top Menu Screen
Affiche la vue de la caméra arrière Zeigt das Bild der Rückspiegelkamera an Geeft de weergave via de achteruitrijcamera weer Mostra la visualizzazione dalla telecamera di retrovisione Muestra la vista de la cámara de retrovisión Apresenta a visualização da câmara de vídeo traseira DNX9960/DNX9260BT... -
Page 147: Sprachbefehl/ Spraakopdracht/ Comando Vocale/ Comando De Voz/ Comando De Voz
Pantalla de control c omandos de voz do sistema de n avegação, consulte o manual d e instruções do sistema de ção ç Rückfahrkamera Camera achter Retrocamera Cámara trasera ⁄ • Sirius: DNX9960 • XM: DNX9960 • HD Radio: DNX9960 English... - Page 148 HD Radio HD Radio [Bluetooth] Bluetooth Audio Bluetooth Audio [VIDEO1] Video One Video One [VIDEO2] Video Two Video Two [VIDEO3] Video Three Video Three [NAV] Navigation Screen Navigation screen [Tools] Navigation Tools Navigation tools [NAV SETUP] Navigation Setup Navigation setup DNX9960/DNX9260BT...
-
Page 149: Alemán Alemão
Sprachbefehl/ Spraakopdracht/ Comando vocale/ Comando de voz/ Comando de voz German Dutch Italian Spanish Allemand Néerlandais Italien Espagnol Deutsch Niederländisch Italienisch Spanisch Duits Nederlands Italiaans Spaans Tedesco Olandese Italiano Spagnolo Alemán Holandés Italiano Español Alemão Holandês Italiano Espanhol Frontkamera Vooruitzicht camera Telecamera frontale Cámara delantera AV OUT... -
Page 150: Ecrã De Controlo Da Fonte
[P3] Preset Three Preset Three [P4] Preset Four Preset Four [P5] Preset Five Preset Five [P6] Preset Six Preset Six [AM] [FM] [TI] Traffic Info Traffic Info [BAND] Band Band [PRE] Preset List Preset List List Screen List Screen DNX9960/DNX9260BT... - Page 151 Commande vocale/ Sprachbefehl/ Spraakopdracht/ Comando vocale/ Comando de voz/ Comando de voz French German Dutch Italian Spanish Français Allemand Néerlandais Italien Espagnol Französisch Deutsch Niederländisch Italienisch Spanisch Frans Duits Nederlands Italiaans Spaans Francese Tedesco Olandese Italiano Spagnolo Francés Alemán Holandés Italiano Español Francês...
-
Page 152: Dvd / Ipod/ Usb/ Bluetooth
Searches an album on iPod/ USB Search Album Search Album Cherche un album sur l'iPod/USB Sucht ein Album auf iPod/USB Zoekt een album op de iPod/USB Ricerca un album sull'iPod/USB Busca un álbum en el iPod/USB Procura um álbum no iPod/USB DNX9960/DNX9260BT... - Page 153 Commande vocale/ Sprachbefehl/ Spraakopdracht/ Comando vocale/ Comando de voz/ Comando de voz French German Dutch Italian Spanish Français Allemand Néerlandais Italien Espagnol Französisch Deutsch Niederländisch Italienisch Spanisch Frans Duits Nederlands Italiaans Spaans Francese Tedesco Olandese Italiano Spagnolo Francés Alemán Holandés Italiano Español Francês...
- Page 154 Cherche une liste de lecture vidéo sur l'iPod Sucht eine Video-Wiedergabeliste auf iPod Zoekt een video-afspeellijst op de iPod Ricerca un elenco di riproduzione video sull'iPod Busca una lista de reproducción de vídeo en el iPod Procura uma lista de reprodução de vídeos no iPod DNX9960/DNX9260BT...
- Page 155 Commande vocale/ Sprachbefehl/ Spraakopdracht/ Comando vocale/ Comando de voz/ Comando de voz French German Dutch Italian Spanish Français Allemand Néerlandais Italien Espagnol Französisch Deutsch Niederländisch Italienisch Spanisch Frans Duits Nederlands Italiaans Spaans Francese Tedesco Olandese Italiano Spagnolo Francés Alemán Holandés Italiano Español Francês...
- Page 156 Current CUR] Play Play ALL] Play All Play All USB List Root Root ROOT] Folder Up Folder Up Top Page Top page TOP] Current Current CUR] Play Play ALL] Play All Play All Music Music Video Video Picture Picture DNX9960/DNX9260BT...
- Page 157 Commande vocale/ Sprachbefehl/ Spraakopdracht/ Comando vocale/ Comando de voz/ Comando de voz French German Dutch Italian Spanish Français Allemand Néerlandais Italien Espagnol Französisch Deutsch Niederländisch Italienisch Spanisch Frans Duits Nederlands Italiaans Spaans Francese Tedesco Olandese Italiano Spagnolo Francés Alemán Holandés Italiano Español Francês...
-
Page 158: Comandos De Voz Para O Ecrã Da Lista
Name of the list Name of the list Wählt die 6. Zeile der Liste aus Selecteer de zesde regel in de lijst Selezionare la 6ª linea nell'elenco Seleccionar la 6ª línea de la lista Seleccionar a 6ª linha da lista DNX9960/DNX9260BT... - Page 159 Commande vocale/ Sprachbefehl/ Spraakopdracht/ Comando vocale/ Comando de voz/ Comando de voz French German Dutch Italian Spanish Français Allemand Néerlandais Italien Espagnol Französisch Deutsch Niederländisch Italienisch Spanisch Frans Duits Nederlands Italiaans Spaans Francese Tedesco Olandese Italiano Spagnolo Francés Alemán Holandés Italiano Español Francês...
-
Page 160: Ecrã De Reprodução De Uma Fonte Visual
Pasar a la carpeta anterior Desloca a pasta anterior Moves the next folder Folder Up Folder Up Passe au dossier suivant Verschiebt den nächsten Ordner Naar de volgende map gaan Passa alla cartella successiva Pasar a la carpeta siguiente Desloca a pasta seguinte DNX9960/DNX9260BT... - Page 161 Commande vocale/ Sprachbefehl/ Spraakopdracht/ Comando vocale/ Comando de voz/ Comando de voz French German Dutch Italian Spanish Français Allemand Néerlandais Italien Espagnol Französisch Deutsch Niederländisch Italienisch Spanisch Frans Duits Nederlands Italiaans Spaans Francese Tedesco Olandese Italiano Spagnolo Francés Alemán Holandés Italiano Español Francês...
-
Page 162: Ecrã De Controlo Mãos Livres
SMS Select Received Message List Received Message List Received Message List] Sent Message List Sent Message List Sent Message List] [Download] Download Download Return Return Received Message List/ [Read] Read SMS Read SMS Sent Message List Read Text Read Text DNX9960/DNX9260BT... - Page 163 Commande vocale/ Sprachbefehl/ Spraakopdracht/ Comando vocale/ Comando de voz/ Comando de voz French German Dutch Italian Spanish Français Allemand Néerlandais Italien Espagnol Französisch Deutsch Niederländisch Italienisch Spanisch Frans Duits Nederlands Italiaans Spaans Francese Tedesco Olandese Italiano Spagnolo Francés Alemán Holandés Italiano Español Francês...
- Page 164 Search A Search B Search B Search C Search C Search Y Search Y Search Z Search Z Search Mark Search Mark Search Other Search Other Search Number Search Number Call Number Call Number Dial Number Dial Number Return Return DNX9960/DNX9260BT...
- Page 165 Commande vocale/ Sprachbefehl/ Spraakopdracht/ Comando vocale/ Comando de voz/ Comando de voz French German Dutch Italian Spanish Français Allemand Néerlandais Italien Espagnol Französisch Deutsch Niederländisch Italienisch Spanisch Frans Duits Nederlands Italiaans Spaans Francese Tedesco Olandese Italiano Spagnolo Francés Alemán Holandés Italiano Español Francês...
- Page 167 GPS NAVIGATION SYSTEM SYSTEME DE NAVIGATION GPS SISTEMA DE NAVEGACIÓN GPS DNX9960 DNX7160 DNX7020EX DNX6960 DNX6160 DNX6020EX DNX5160 GPS NAVIGATION INSTRUCTION MANUAL MANUEL D'INSTRUCTIONS DE NAVIGATION DU GPS MANUAL DE INSTRUCCIONES DE NAVEGACIÓN GPS © B64-4619-00...
- Page 168 Contents Getting Started Safety Precautions and Important Using the Navigation System Information Help When You Need It Find It and Go! The Main Pages Finding a Restaurant Viewing the Map Page Following Your Route Trip Computer Adding a Via Point Turn List Page Taking a Detour Next Turn Page...
- Page 169 Using Speech Recognition (DNX9960) 22 Customizing the Settings Voice Commands Customizing the Navigation System Search Methods Changing the System Settings Speaking Text on the Screen Changing the Map Settings Speaking Shortcut Commands Changing the Navigation Settings Find Nearest Shortcut Command...
-
Page 170: Safety Precautions And Important Information
Neither lead to malfunction or damage. Also note that the Kenwood nor Garmin shall be liable for problems unit can be damaged by strong vibration, by metal or accidents resulting from failure to observe the objects, or by water getting inside the unit. - Page 171 FOR A FULL REFUND TO ONE OF THE FOLLOWING: Software License Agreement (1) THE DEALER FROM WHICH YOU PURCHASED BY USING THE DNX9960/DNX7160/DNX7020EX/ THIS PRODUCT; (2) Garmin INTERNATIONAL, INC. DNX6960/DNX6160/DNX6020EX/DNX5160, CUSTOMER SERVICE, 1200 EAST 151st STREET, YOU AGREE TO BE BOUND BY THE TERMS AND OLATHE, KS 66062, USA;...
- Page 172 Safety Precautions and Important Information No Warranty. This Product (including the Data) to third parties or other Data by trade name, is provided to you “as is, ” and you agree to use it trademark, manufacturer, supplier or otherwise at your own risk. Garmin and its licensors (and does not necessarily constitute or imply its their licensors and suppliers) make no guarantees, endorsement, sponsorship or recommendation...
- Page 173 to submit to the jurisdiction of Illinois for any DMTI Spatial, Inc. End User License and all disputes, claims and actions arising from Agreement or in connection with the Data provided to you hereunder. The software embedded in your Garmin product is owned by Garmin Ltd.
- Page 174 Safety Precautions and Important Information Licensed Product to create any derived product shall destroy or return the Licensed Product(s) for any of these prohibited purposes. You may including any written materials and all copies of not place the Licensed Product(s) on the Internet the Licensed Product(s) and any written materials without a prior written agreement with DMTI in connection therewith have been destroyed or...
- Page 175 use of or inability to use the Garmin product or the Traffic Service End-user Subscriber traffic data, even if Garmin has been advised of the Agreement possibility of such damages. The Traffic Service Provider holds the rights to If you purchase or your Garmin product is pre- the traffic incident data and RDS/TMC network loaded with “lifetime”...
-
Page 176: Getting Started
Getting Started The first time you use your Kenwood Navigation System, you need to set up your system. The Help menu provides additional information. Using the Navigation System Help When You Need It Touch Nav to use the navigation system. To set Touch Tools >... -
Page 177: Find It And Go
Find It and Go! The Where To? page provides several different categories for you to use when searching for addresses, cities, and other locations. The detailed map loaded in your navigation system contains millions of points of interest, such as restaurants, hotels, and auto services. Finding a Restaurant Select a place. -
Page 178: Following Your Route
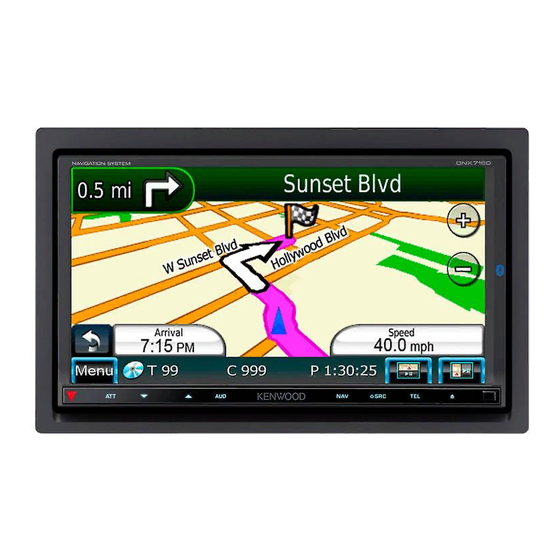
Stopping the Route A checkered flag marks your destination. With a route active, touch ⁄ Touch Stop. • 3D buildings may appear in some areas on the map (DNX9960 only). GPS Navigation System Instruction Manual... -
Page 179: Where To
Where To? The Where To? page provides several different categories you can use to search for locations. ➎ Searching Near Another Location Touch Press for more to view more information about the location. Your navigation system automatically searches for places near your current location. Touch Where To? >... -
Page 180: Finding A Place By Spelling The Name
Where To? Finding a Place by Spelling the Name Finding Places in a Different Area If you know the name of the location you are You can search for locations in a different area, looking for, you can spell it using the on-screen such as a different city or near your destination. -
Page 181: Favorites
Favorites You can save all of your favorite places in Favorites. You can also save your home location in Favorites. Saving Places You Find Saving Your Current Location After you have found a place you want to Touch View Map. save, touch Save on the Go! page. -
Page 182: Setting A Home Location
Favorites Setting a Home Location Deleting a Favorite You can set a Home Location for the place you Touch Tools > My Data. return to most often. Touch Delete Favorite(s). Touch Where To? > Go Home. Select the Favorite to delete. Select an option. -
Page 183: The Main Pages
The Main Pages This section provides details about the Map Page, the Trip Computer, the Turn List, Lane assist, and the GPS Info Page. Viewing the Map Page Trip Computer Touch View Map to open the map. Touch an The Trip Computer displays your current speed area of the map to see additional information, and provides helpful statistics about your trip. -
Page 184: Turn List Page
Next Turn page. Show Map to view the entire route on the map. ⁄ • The Lane Assist page is available on the DNX9960, Next Turn Page DNX7160, and DNX7020EX. When you are navigating a route, the Next Turn... -
Page 185: Creating And Editing Routes
Creating and Editing Routes This section describes how to create and customize your routes. Creating a New Custom Route Saving and Modifying the Active Route Touch Where To? (or Tools) > Routes > New. Touch Where To? (or Tools) > Routes. Touch Add New Start Point. -
Page 186: Using Ecoroute
If you have entered your vehicle profile and the step 1. current fuel price, your Kenwood unit calculates the average fuel economy for your vehicle, Touch OK. your carbon footprint, and the cost of the fuel consumed. -
Page 187: Taking The Ecochallenge
Taking the ecoChallenge Viewing the Mileage Report Touch Tools > ecoRoute > ecoChallenge > Start. Mileage reports provide the distance, the time, the average fuel economy, and the fuel cost of The ecoChallenge tool helps you maximize your navigating to a destination. fuel economy by scoring your driving habits. -
Page 188: Using Speech Recognition (Dnx9960)
Using Speech Recognition (DNX9960) Use the speech recognition feature to speak to your navigation system to find destinations, select options, and perform other functions. Voice Commands Shortcut Commands Cancel Route Go Home Detour Help Press the Talk button on the unit. -
Page 189: Speaking The Name Of A Popular Place
Speaking the Name of a Popular Place Speak to navigate to the place, or speak to go back to the list of found places. Speak Find Place by Name from any screen. “Yes” “Find Place by Name” Speaking an Address Listen for the voice prompt, and speak the name of the place. -
Page 190: Traffic Information
Traffic Information Using the built-in or optional FM traffic receiver, the navigation system can receive and use traffic information. When a traffic message is received, you can see the event on the map and change your route to avoid the traffic incident. Understanding FM TMC Traffic If a non-severe traffic delay occurs on your route, the traffic icon shows how much time the delay... -
Page 191: Customizing The Settings
Customizing the Settings This section describes how to customize the settings of your GPS navigation system. Customizing the Navigation System Adjusting the Display Settings Touch Settings > Display. Touch Settings. • Color Mode—select Day for a light background, Night for a dark background, or Auto to automatically switch Touch the setting you want to change. -
Page 192: Appendix
You can purchase an SD card of updated map data from Garmin or ask ⁄ your Kenwood dealer or Kenwood service center for details. • The unit may restart when you insert an SD card. -
Page 193: Custom Pois (Points Of Interest)
Custom POIs (Points of Interest) You can manually load custom points of interest (POI) databases, available from various companies on the Internet. Some custom POI databases contain alert information for points such as safety cameras and school zones. The navigation system can notify you when you approach one of these points. - Page 194 For the latest free software updates (excluding map data) throughout the life of your Garmin products, visit the Garmin Web site at www.garmin.com/Kenwood. © 2010 Garmin Ltd. or its subsidiaries Garmin International, Inc. 1200 East 151st Street, Olathe, Kansas 66062, USA Garmin (Europe) Ltd.
Need help?
Do you have a question about the DNX9960 and is the answer not in the manual?
Questions and answers