Epson TM-T20II User Manual
Hide thumbs
Also See for TM-T20II:
- User manual ,
- Technical reference manual (140 pages) ,
- Software user manual (87 pages)
Table of Contents
Advertisement
Advertisement
Table of Contents

Related Manuals for Epson TM-T20II


Summary of Contents for Epson TM-T20II
- Page 1 English User’s Manual M00069100EN TM-T88V User’s Manual 1...
- Page 2 Neither Seiko Epson Corporation nor its affiliates shall be liable to the purchaser of this product or third parties for damages, losses, costs, or expenses incurred by purchaser or third parties as a result of: accident, misuse, or abuse of this product or unauthorized modifications, repairs, or alterations to this product, or (excluding the U.S.)
-
Page 3: Important Safety Information
Shut down your equipment immediately if it produces smoke, a strange odor, or unusual noise. Continued use may lead to fire or shock. Immediately unplug the equipment and contact your dealer or a Seiko Epson service center for advice. Never attempt to repair this product yourself. Improper repair work can be dangerous. -
Page 4: Caution Labels
If water or other liquid spills into this equipment, unplug the power cord immediately, and then contact your dealer or a Seiko Epson service center for advice. Continued usage may lead to fire. Do not use aerosol sprayers containing flammable gas inside or around this product. -
Page 5: Downloading Drivers, Utilities, And Manuals
Wall hanging Rubber feet for cover bracket vertical installation TM-T20II Software & Documents Disc Power switch waterproof cover Control panel label for Screws for wall vertical installation hanging bracket 58-mm width paper guide plate Roll paper TM-T20II User’s Manual 5... -
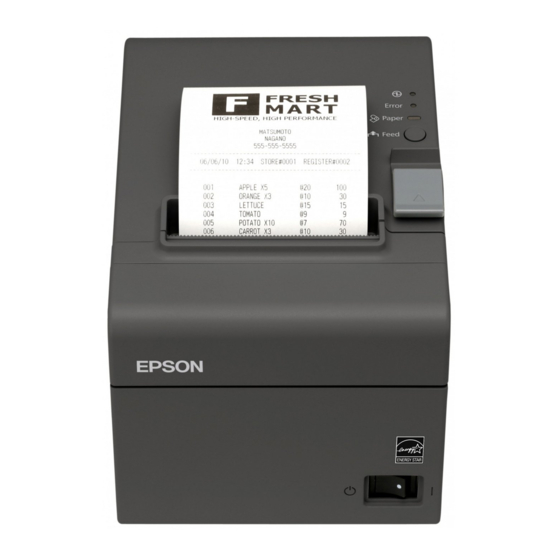
Page 6: Part Names
Power switch Control Panel (Power) LED This LED is on when the printer is on. Error LED This indicates an error. Paper LED On indicates a paper out. Flashing indicates standby. Feed button This button feeds paper. 6 TM-T20II User’s Manual... -
Page 7: Connecting The Cables
When connecting the USB cable, fix the USB cable with the hook shown in the illustration below to prevent the cable from coming off. Hook Connect the interface cable to the computer. Connect the AC cable to the AC adapter. TM-T20II User’s Manual 7... - Page 8 English Connect the DC cable of the AC adapter to the power connector of the printer. AC cable Insert the AC plug into a power outlet. 8 TM-T20II User’s Manual...
-
Page 9: Installing The Printer Vertically
4 rubber feet in the rectangular indents in the printer case, as shown in the illustration below. Control panel label for vertical installation Rubber feet TM-T20II User’s Manual 9... - Page 10 Attach 2 rubber feet in the rectangular indents in the printer case, and attach 2 rubber feet within the scribed line on the hanging bracket. Place the printer with the wall-hanging-bracket-side down. Rubber feet Control panel label for vertical installation 207 mm {8.15"} Wall hanging bracket 10 TM-T20II User’s Manual...
-
Page 11: Hanging The Printer On A Wall
Remove the installed 2 screws from the printer, as shown in the illustration below. Install the wall hanging bracket on the printer, and fix it using the screws removed in Step 2. Screws Wall hanging bracket TM-T20II User’s Manual 11... -
Page 12: Installing Roll Paper
Align the holes in the wall hanging bracket with the screws on the wall, and hook it securely. Installing Roll Paper Follow the steps below to install the roll paper. Use the cover open lever to open the roll paper cover. Cover open lever 12 TM-T20II User’s Manual... - Page 13 Remove the used roll paper core if any, and insert the roll paper. The correct direction of the paper is shown in the illustration below. Pull out some paper, and close the roll paper cover. When the printer power is on, the roll paper is automatically cut. TM-T20II User’s Manual 13...
-
Page 14: Changing The Paper Width
80 mm. When changing the paper width, be sure to make the setting for the paper width with the utility software for the TM-T20II. Open the roll paper cover. Align 3 projections on the 58-mm width paper guide plate with the rectangular holes in the printer, and push it downwards. -
Page 15: Troubleshooting
❏ Printing stops if the head overheats and resumes automatically when it cools. ❏ For other cases, turn the printer off, and after 10 seconds, back on. TM-T20II User’s Manual 15... - Page 16 Turn the knob until you see a triangle in the opening. This returns the cutter blade to the normal position. See the operating instructions on the back of the cutter cover. Knob Triangle Install the cutter cover. Open the roll paper cover and remove the jammed paper. 16 TM-T20II User’s Manual...
-
Page 17: Cleaning The Thermal Head
Turn off the printer, open the roll paper cover, and clean the thermal elements of the thermal head with a cotton swab moistened with an alcohol solvent (ethanol or IPA). Epson recommends cleaning the thermal head periodically (generally every 3 months) to maintain receipt print quality. Thermal head... -
Page 18: Specifications
*1: The values are those when the paper width is changed to 58 mm by installing the 58-mm width paper guide plate and making the paper width setting with utility software for the TM-T20II. For how to install the 58-mm width paper guide plate, see “Changing the Paper Width” on page 14. -
Page 19: Weee (Waste Electrical And Electronic Equipment) Directive
Para obter mais informações sobre os locais de recolha de lixo disponíveis, contacte a sua junta de freguesia, câmara municipal ou localonde comprou este produto. TM-T20II User’s Manual 19... - Page 20 Za više detalja o mestima za reciklažu obratite se lokalnoj samoupravi ili prodavcu od koga ste kupili ovaj proizvod. 20 TM-T20II User’s Manual...
Need help?
Do you have a question about the TM-T20II and is the answer not in the manual?
Questions and answers