Table of Contents
Advertisement
DW-CP04 Compressor-
Analog to IP Signal Converter
User's Manual
Version 1.1
Class A Digital Device (industrial & commercial environment)
This equipment has been tested and found to comply with the limits for a Class A digital device, pursuant to CE
and FCC Rules. These limits are designed to provide reasonable protection against harmful interference when the
equipment is operated in a commercial environment. This equipment generates uses and can radiate radio
frequency energy and, if not installed and used in accordance with the instruction manual, may cause harmful
interference to radio communications. Operation of this equipment in a residential area is likely to cause harmful
interference in which case the user will be required to correct the interference at his own expense.
Advertisement
Table of Contents

Subscribe to Our Youtube Channel
Related Manuals for Digital Watchdog Compressor DW-CP04


Summary of Contents for Digital Watchdog Compressor DW-CP04
- Page 1 DW-CP04 Compressor- Analog to IP Signal Converter User’s Manual Version 1.1 Class A Digital Device (industrial & commercial environment) This equipment has been tested and found to comply with the limits for a Class A digital device, pursuant to CE and FCC Rules.
- Page 2 DW-CP04 Manual DW-CP04 User’s Manual Digital Watchdog® Manual Edition 05172013– May 2013 ©2000-2013 DIGITAL WATCHDOG, INC. All Rights Reserved. DIGITAL WATCHDOG, INC. Tampa, FL ● USA Technical Support For technical support call, email, or visit our web site. USA & Canada 1+ (866) 446-3595...
-
Page 3: Table Of Contents
CTL Port Description ............................15 2.2.2. RS-232 Interface ..............................15 2.2.3. RS-485 Connection ............................. 15 2.2.4. DI Connection ............................... 15 2.2.5. DO Connection ..............................15 DW-CP04 INSTALLATION AND BASIC SETUP................16 3.1..............................16 EFORE NSTALLATION 3.2............................16 ACTORY EFAULT ETTINGS 3.3. - Page 4 DW-CP04 Manual 4.3.2. IP Installer s Main Window ..........................18 ’ 4.3.3. IP Installer s Main Window ..........................19 ’ 4.3.4. Manual Network Setup ............................ 19 4.3.5. Automatic Network Setup ..........................20 COMPRESSOR’S WEB VIEWER ......................21 5.1..............................21 NTERING 5.1.1.
- Page 5 DW-CP04 Manual 6.4. -4 IP-CCTV DNS™ S ..........................30 ETUP 6.1. -5 R ........................30 ECORDING ONFIGURATION 6.2....................................30 INISH SYSTEM CONFIGURATION ........................ 30 7.1..............................30 ERVER ETUP 7.2. & T ................................. 31 7.3............................31 DMINISTRATOR ASSWORD 7.4.
- Page 6 DW-CP04 Manual 8.1........................... 43 ERIAL ORTS ONFIGURATION 8.1.1. Serial Input Mode ............................... 43 8.1.2. Serial Output Mode ............................45 8.1.3. Transparent Mode .............................. 45 8.1.4. PTZ Mode ................................46 8.2................................48 RIVACY 8.3. & M ..............................49 AMERA OTION 8.3.1.
- Page 7 DW-CP04 Manual 10.5. SD S ..............................66 TATUS EPORT 10.6.......................... 67 LEAR ECORDING ONFIGURATION 10.7.............................. 67 ELETE ECORDED UTILITIES............................68 11.1..................................68 YSTEM 11.2..............................68 ONFIGURATION 11.3..................................... 69 EBOOT 11.4................................69 ACTORY EFAULT 11.5.
-
Page 8: Product Overview
Analog CCD camera over IP (Internet Protocol) network. It can transmit up to 120fps@D1 over the existing network. You can monitor video of DW-CP04 through web browser (for example MS Internet Explorer), if DW-CP04 is connected to network. DW-CP04 supports video compression both MJPEG and H.264 simultaneously so that user can choose appropriate video compression... -
Page 9: Key Features
DW-CP04 Manual 1.2. Key Features OnVIF Compliant 4CH BNC In 120fps @ D1 Resolution Dual Codec (H.264/ MJPEG) with Single Stream Motion Detection Two- Way Audio Micro SD Card Interface RS-232/ RS-485 PTZ Control ... -
Page 10: Technical Specification
DW-CP04 Manual 1.3. Technical Specification 32bit RISC CPU/ Embedded Linux Hardware 128Mbytes SDRAM/ 128MByte Flash Video H.264/ MJPEG(single stream) compression NTSC: 704x480, 352x240,160x112 Resolution PAL: 704x576, 352x240,160x112 Frame rate Up to max 120/100 fps@D1 (each channel) MJPEG and H.264 Single Streaming (Simultaneously) - Page 11 DHCP, NTP, SMTP client, uPNP, and etc. FCC : Class A Approvals CE : Class A RoHS Dimensions (HxWxD) and 148(W) x 118(D) x 25(H) (in mm) weight About 0.25kg without power supply. Table 1 : DW-CP04 Data Sheet 01Manual_CP04_05172013...
-
Page 12: Dw-Cp04 Packing List
(Power Cable & SMPS DC12V 1A Adapter) CD (User’s Manual, IP Installer and etc.) 1 EA Table 2 : DW-CP04 Packing List Note: Please make sure all the listed items are included in the package. For any missing items, please contact your local distributor. -
Page 13: Product Description
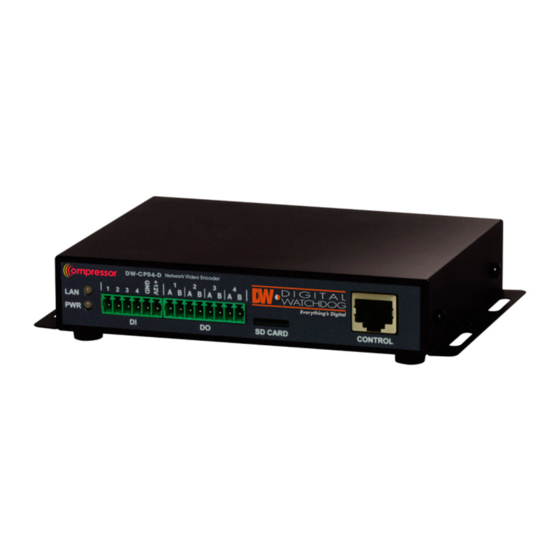
Indicates the connection status of LAN connector. It goes green when a LAN LINK LED physical connection is properly made to the LAN port. POWER LED This red LED is lit during DW-CP04 is powered on. Sensor/Contact Input Port Beacon/Alarm Output Port SD CARD... -
Page 14: Dw-Cp04 Rear View
DW-CP04 Manual 2.2. DW-CP04 Rear View Picture 4 : DW-CP04 Rear View Name Description Video In 1 BNC cable port for Video input of number 1 camera of Module 1. Video In 2 BNC connector for Camera 2 Beep one time (0.5 sec) after three seconds and then beep three times shortly After another three seconds. -
Page 15: Ctl Port Description
RS-232 Port is provided for a connection with external devices such as water level sensor, speed sensor, etc. The GND pin for RS-232 is shared with the Sensor Input GND. If the DW-CP04 needs to be connected to other network devices via RS-232, then RXD and TXD pin may need to be cross-wired. -
Page 16: Dw-Cp04 Installation And Basic Setup
1. Place the analog cameras in place and connect power supplies. Consult the cameras’ manual for additional information. 2. Connect the video output ports of the analog cameras to the video-in ports of the DW-CP04. 3. Connect the DW-CP04 to the desired network by connecting a network cable to the encoder’s LAN port. -
Page 17: Ip Installer
The IP Installer software can be found in the accessory CD available with the Compressor. The IP Installer is utility program designed to locate all DW-CP04 Compressors on your network. By using the IP Installer, users will be able to: ... -
Page 18: Uninstalling Ip Installer
Or you can also start the program by clicking Start > All Programs > IP Installer > IP Installer. 4.3.2. IP Installer’s Main Window Search Product Scan the network and show all the DW-CP04 products that are on the network. Clear Product List Clear the DW-CP04 products list created by searching the network. -
Page 19: Manual_Cp04
Define the range of MAC and IP addresses to search. 4.3.3. IP Installer’s Main Window Make sure that your DW-CP04 is connected to the network, and click the Search Product button. A status window will pop up to show the progress of the searching. When the IP Installer completes scanning the network, all supported devices will appear in the results list. -
Page 20: Automatic Network Setup
DW-CP04 Manual Note: Wireless option currently not available in DW-CP04 models Setting up Network Configuration for multiple products: Once multiple servers have been selected, press the manual IP Setup button. All selected servers will appear in a list. You can modify the value of each changeable field by clicking it. -
Page 21: Compressor's Web Viewer
DW-CP04 Manual 5. Compressor’s Web Viewer To open the Compressor’s web viewer via the IP Installer software, select one of the following options: Double-click the server’s name in the results list Right-click on the server’s name and select ‘Go Product Homepage’... -
Page 22: Single-Mode View
DW-CP04 Manual 5.1.1. Single-Mode View The Live Viewer will automatically open in single channel view, displaying Channel 1 by default. The screen will display the camera’s module name, at the bottom green bar, and the date and time on the top green bar. -
Page 23: Instant Recording
DW-CP04 Manual 5.1.5. Instant Recording Your Compressor is equipped with a built-in SD Card, allowing the Compressor to record video locally to the micro card. The recorded video can be viewed by Instant Playback feature (See section 5.1.6 for more information) or by running Smart-Player program. -
Page 24: Video Control
DW-CP04 Manual 5.1.8. Video Control The Compressor allows you to control the video display from each channel using the following buttons. These buttons are located at the tool bar at the top of the live viewer. The video will be displayed at its original resolution. Use the scroll wheel of the mouse to digitally zoom in and out. -
Page 25: Entering The Smart Player
DW-CP04 Manual 5.2. Entering the Smart Player 5.2.1. Smart Player’s Main Screen Use the Player option to search the Compressor’s playback, recorded to the SD Card. Please note that the cameras must be set to record for the playback and search options to be enabled. -
Page 26: Extra Features
DW-CP04 Manual 5. Using the red time line, move to the desired time you would like to view playback from. Video will automatically start playing according to the position of the red time line in the time bar. Condition Search: Condition search allows you to search for video by motion detection and sensor activation. -
Page 27: Entering Admin Menu
DW-CP04 Manual Snapshot- Choose the camera currently being played or paused, click Snapshot button. Then a snapshot file will be saved in a designated path. Image will be saved with time stamp at the top left-hand corner of the image. -
Page 28: Admin Menu Structure
DW-CP04 Manual 5.4. Admin Menu Structure The following table shows the hierarchy of the Admin menu structure that we’re going to deal with in this manual. Category Main Menu Level 1 Sub-Menu Level 2 Sub-Menu Server Name Setup Local Date & Time... -
Page 29: Quick Configuration
System Update 6. Quick Configuration The first time you connect to the DW-CP04, it is recommended to run the quick configuration wizard. This will guide you through setting up all the main options for the proper operation of your new Compressor. -
Page 30: Step -4 Ip-Cctv Dns™ Setup
DW-CP04 Manual 6.4. Step-4 IP-CCTV DNS™ Setup The Compressor can be assigned a Dynamic Domain Name Server [DDNS]. Using a DDNS address is recommended when a DHCP address is used. It allows you to connect to the Compressor without the worry of the changing IP address. -
Page 31: Date & Time
DW-CP04 Manual As an administrator, you can change the server’s name. To change the server’s name, enter a new server name in the Server Name filed. You may use up to 21 alphanumeric or up to 10 Unicode characters. Tab or any other special characters are not allowed. -
Page 32: Access Control
DW-CP04 Manual Because you have replaced the password with a new one, the existing network connection made with old password will be terminated. You will have to reconnect to the Compressor server using the new password. 7.4. Access Control Click Access Control on System Configuration menu. The following windows will be displayed. From the Access Permission window, select either one you would like to use. -
Page 33: Edit
DW-CP04 Manual All Channels Access: User can use all the features except for the configuration options in the Admin Page. General Access (only live viewing access): User can use only Live View features. No Access: User is not permitted of any of the features. -
Page 34: Delete
DW-CP04 Manual 7.5.3. Delete To delete an existing user, select Delete. From the list of the users, select a user’s ID you want to delete. Then, click Delete button to confirm the deletion. 8. Network Configuration Configuration of the network settings of the Compressor may vary depending on how an IP address is assigned in Ethernet-based environment. -
Page 35: Static Ip Configuration
DW-CP04 Manual 8.1. Network Configuration 8.1.1. Static IP Configuration Select the Network Configuration sub-category to view the available network settings. For static IP, select static IP and input the corresponding values for IP address, Net-Mask, Gateway, DNS1, DNS2 and click “Apply” to save. Press “Back” to cancel all changes. Press “Refresh”... -
Page 36: Pppoe Configuration
DW-CP04 Manual 8.1.3. PPPoE Configuration For PPPoE connection, enter the username and password acquired from your Internet Service Provider [ISP]. Contact your ISP or your Network Administrator for additional information. Click “Apply” to save or “Back” to cancel. 8.2. Network Ports In this configuration page, you can setup the HTTP port for the Compressor Server to communicate with the Client PC. -
Page 37: View Network Status
DW-CP04 Manual Note: IF the HTTP port number is changed to other value than default (80), make sure the new HTTP port number goes together with the Compressor’s Internet address. For example, Compressor’s IP address is 196.168.1.00 and set the HTTP port to 8080, you will have to enter http://192.168.1.100:8080 to connect to the server... -
Page 38: Network Status Notification
DW-CP04 Manual 8.5. Network Status Notification The Network Status Notifications menu allows you to setup e-mail notifications when the IP address of the Compressor changes. This function is available when the Compressor is set to DHCP or PPPoE only. The... -
Page 39: Ip-Cctv Dns™ Setup
DW-CP04 Manual 8.6. IP-CCTV DNS™ Setup IP- CCTV DNS service provides a static & public domain name to help users access Compressor products even though their IP address is changed or they are used in local network. For proper function of IP-CCTV DNS service, products should be accessible through internet. -
Page 40: Port Forwarding & Upnp
DW-CP04 Manual 8.7. Port Forwarding & UPnP UPnP (Universal Plug and Play) is a kind of network protocol to help users to find and configure network products in same local network area. Port forwarding assigns a certain network port in your router to a network product for proper access from outside the Local Area Network. -
Page 41: Rtp/Rtsp
DW-CP04 Manual 8.8. RTP/RTSP RTSP (Real-Time Streaming Protocol) is a protocol used to transfer video and audio streams over the network. Any application supporting Standard RTSP can be used for the Compressor server. Quick Time Player or VLC program can be used, but it may not be supported in an environment within a firewall. There are two types of usages;... -
Page 42: Snmp Setup
DW-CP04 Manual 8.9. SNMP Setup SNMP (Simple Network Management Protocol) is a protocol used to monitor and configure network status of a network device. SNMP V1 and V2 are supported over MIB2 standard. SNMP Trap can function when SNMP V1/V2 is enabled. -
Page 43: Device Configuration
DW-CP04 Manual 8. Device Configuration The Device Configuration menu options allow you to configure all the settings relevant to all external devices connected to the Compressor such as cameras, Input / Output, and Alarm control. 8.1. Serial Ports Configuration There are two serial ports configurable in the system, COM and AUX. COM port is primarily used for console, and AUX port is used for PTZ control. -
Page 44: Manual_Cp04
DW-CP04 Manual After rebooting, open the Serial Ports window in Device Configuration menu again. Select the Serial Input Mode. Current Port: This shows the name of the port currently configured. Current Protocol: This shows the protocol currently being used. (RS-232 Only). -
Page 45: Serial Output Mode
DW-CP04 Manual Sensor Aiming Position: The position for sensor to aim Camera Aiming Position: The position for camera to aim Add Vehicle length to calculate delay time: The length of vehicle for applying delay time 8.1.2. Serial Output Mode Using Serial Output Mode, you can send commands from the Compressor to control PTZ devices, Multiplexer, Access control box, X10 Protocol, z256 protocol. -
Page 46: Ptz Mode
DW-CP04 Manual Line Mode: The type of communication protocol Baud Rate: Data transfer rate Data Bit: The number of bits in data Stop Bit: The number of stop bit Parity Bit: Parity bit characteristic Network Protocol: The type of protocol used to send data ... - Page 47 DW-CP04 Manual Base Address should match the address of the PTZ camera or the receiver used here. (Base Address = PTZ Camera’s Base Address – 1). Once the Base Address of the camera is entered, select the channel that is connected to PTZ camera, and click ‘Save’.
-
Page 48: Privacy Zone
DW-CP04 Manual 8.2. Privacy Zone Users can set up to two (2) privacy zones per camera to block certain parts of the screen. To set the region: Click Privacy Zone from Device Configuration category. Select Camera 1~4. The selected camera’s display will appear. -
Page 49: Camera & Motion
Video with IP address: If Enabled, recorded video will contain the IP address of the server. Audio: Select if Audio function is to be used (applies to Primary Stream only). DW-CP04 supports 2-way audio streaming by combining microphone input with video data. Users can listen to the streamed audio on PC speakers. -
Page 50: Camera Configuration
DW-CP04 Manual 8.3.1. Camera Configuration On the lower part of Camera & Motion Configuration menu, select a channel you want to configure. Then, enter the detailed parameters of the camera selected here. Camera Name: Enter the name of the channel in up to 21 alphanumeric or up to 10 Unicode characters. -
Page 51: Di/Do
8.5. DI Status/DO Control The DW-CP04 has 4 output ports that act like a push button. With DI (Sensor Input) Status, you can find out the status of the Alarm Input port. If the checkbox of Check (On) is displayed as checked, the alarm is activated. -
Page 52: Advanced Configuration
Each cannel can be set with different values. 9.1.1. E-mail Service Configuration You can setup up to three (3) conditions where the DW-CP04 will send an e-mail notification to a predefined account. E-mail Server Setup To setup the SMTP server for the e-mail notifications: Go to Advanced Configuration >... - Page 53 DW-CP04 Manual E-mail Service Setup for Each Channel For each channel, the following items can be configured for email service: Condition, Post-Alarm, Buffer Size, and Post-Alarm speed. The content of e-mail message and display style of DI value can be configured as well.
-
Page 54: Ftp(Buffered)Service Configuration
DW-CP04 Manual 9.1.2. FTP(Buffered)Service Configuration Item Description Camera 1 - Camera 4 Select which channel to set up for FTP (Buffered). Service Select Enable to use the FTP (Buffered) service. Otherwise select Disable. Server Address FTP Server Address. The directory in FTP server where the data will be uploaded. - Page 55 DW-CP04 Manual To create a directory with the options shown above, click Make Directory. After finishing the configuration, click ‘Save’ button to apply the change and continue to the next page. Clicking ‘Back’ button will cancel the changes and go back to the previous page. (This service is available only in MJPEG mode.)
-
Page 56: Ftp (Periodic) Service Configuration
DW-CP04 Manual 9.1.3. FTP (Periodic) Service Configuration FTP (Periodic) Service Configuration for each Camera Item Description Select a condition for FTP (Periodic) service to be activated. Up to 3 Condition 1 ~ Condition 3 conditions can be set respectively. Alarm Speed Select the speed of images to send in FTP(Periodic) service After finishing setup, click ‘Save’... -
Page 57: Sensor Notification
DW-CP04 Manual 9.1.4. Sensor Notification Item Description Input 1 - Input 4 Select which input to set up for Sensor Notification Service Service Select Enable to use Sensor Notification. Service Mode Select network mode for CGI. Select: HTTP, TCP, or UDP. -
Page 58: Alarm Output Service Configuration
DW-CP04 Manual 9.1.5. Alarm Output Service Configuration Category Contents Output 1 – Output 4 Select the output port to configure for Alarm Output Service. Service Select Enable to use the service, otherwise select Disable. After finishing the configuration, click ‘Save’ button to apply the change and continue to the next page. -
Page 59: Recording Configuration
DW-CP04 Manual 10. Recording Configuration Use the recording configuration menu to setup recording parameters for the Compressors’ SD card. The Compressor supports micro SD cards up to 32GB. 10.1. SD Configuration If a micro SD card (SD card) is not present in the slot already, turn the Compressor OFF before inserting a SD card. -
Page 60: Sd Information
DW-CP04 Manual Note: If the program is terminated during the format process, the SD card may be damaged. To avoid this problem, make sure to close the program in the right manner and check the SD card. Once formatting is complete, the following window will appear informing it. Click the OK button. -
Page 61: Recording Configuration
DW-CP04 Manual 10.2. Recording Configuration Each camera can be configured for recording option. You can find out the list of servers with recording capability by clicking Recording Configuration. To setup a recording schedule for the Compressor, click Recording Configuration sub-menu. - Page 62 DW-CP04 Manual Item Description Condition 1~3 Set the conditions for recording Graphs for Date & Time, Alarm, Graphic displays of conditions for recording Motion, Camera Connection Recording Service Click Enable to record the video. Click Disable otherwise. Server Module ID Server ID number of the added VS Module ID (IP Devices).
- Page 63 DW-CP04 Manual Category Item Description Select Mode Always Recording is enabled all the time. Schedule Only Recording is done by configured schedule. Event Only Recording is controlled by configured event. Schedule and Event Recording is controlled by both schedule and event.
- Page 64 DW-CP04 Manual If event recording is selected, adjust the pre and post alarm recording duration and frame-rate. If continuous recording is selected, the speed set under Pre-Alarm speed will recording speed continuously. If scheduled recording is selected, the speed set under Pre-Alarm speed will be the recording speed when the camera is set to be recording.
-
Page 65: View Recording Profile
DW-CP04 Manual 10.3. View Recording Profile You can get the overview of the recording configuration by clicking View Recording Profile on the menu. It will display a pop-up window that shows the recording configuration in one screen as seen below. -
Page 66: Sd Status Report
DW-CP04 Manual 10.5. SD Status Report The SD Status Report menu allows you to setup e-mail notifications regarding the storage’s status. Click SD Status Report on Recording Configuration menu. Set the condition of SD status for sending email, and Date/Time when email is sent. -
Page 67: Clear Recording Configuration
DW-CP04 Manual SMTP Server IP address of the server for email service. Authentication Login Select Enable if the SMTP server requires user authentication. User ID User ID for authentication login Password Password for the User ID Sender Email address of sender... -
Page 68: Utilities
DW-CP04 Manual 11. Utilities In the Utilities part of the Admin menu, you can view the system log file, save any changed configurations, reboot the Compressor, restore the factory default conditions, and update the system. 11.1. System Log Select the System Log menu to view what users connected to the Compressor, their IP address, and which section of the web viewer was accessed (Live/ admin/ player/ home). -
Page 69: Reboot
DW-CP04 Manual 11.3. Reboot It is recommended to reboot the system after making changes and saving the configuration. To reboot, click “Reboot" on Utilities menu. A confirmation screen will be displayed as shown Click “Save Configuration” button, otherwise click “Back” button to cancel the rebooting. -
Page 70: System Update
System and Web Update: Only System and Web images are to be updated. Web Only Update: Only Web image is to be updated. Visit Digital Watchdog’s website at www.digital-watchdog.com to download the latest firmware for the Compressor. 11.5.1. Update by Item Click the “Start”... -
Page 71: Appendix
DW-CP04 Manual 12. Appendix 12.1. Troubleshooting the Compressor Smart Live Viewer 12.1.1. Installation Q) I can't start installation of SmartViewer when I connect to the Compressor and click Live View. A) The Internet connection is not available. Manual installation is required. -
Page 72: Audio
DW-CP04 Manual Q) Frame rate of live view is getting low. A) It is caused by slow network. Improve the network condition or cancel the real-time monitoring by any other software. Q) Only live view is displayed without Internet Explorer. -
Page 73: Other
DW-CP04 Manual A) Make sure that the Compressor is connected to the network. 12.1.7. Other Q) An error occurs if Internet Explorer is closed while SmartViewer is working. A) It can be caused if you’re using Internet Explorer 6.0. Upgrading Internet Explorer to 7 or higher can solve the issue.
Need help?
Do you have a question about the Compressor DW-CP04 and is the answer not in the manual?
Questions and answers