Advertisement
Quick Links
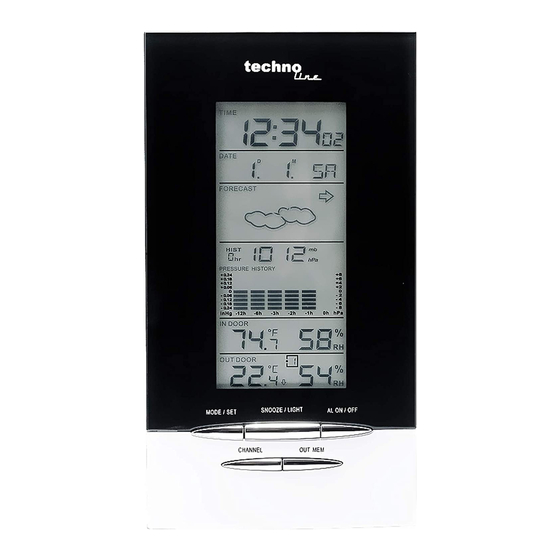
Main Unit Appearance
Part A- LCD
A1: Radio Controlled Icon
A3: Weather Forecast
A5: Barometric Pressure Bar Graph.
A7: Outdoor Temperature and Humidity
A8: Radio Controlled Time Display
A10: Barometric Pressure Trend
A12: Selected Outdoor Channel
Part B- Buttons
B1: "MODE/SET" button
B3: "AL ON/OFF" button.
B5: "ALERT" button
B7: "+(12/24)" button
B9: "▲" button
B11: " - C/F /
" button
WS 6730 Instruction manual
A2: Date
A4: Past Hour (Pressure History)
A6: Indoor Temperature and Humidity
A9 : Day of Week
A11: . Barometric Pressure Reading
B2: "SNOOZE/LIGHT " button
B4: "CHANNEL " button
B6: "HISTORY" button
B8:" IN MEN" button
B10: "▼ In C/F " button
B12: "OUT MEN" button
Advertisement

Subscribe to Our Youtube Channel
Related Manuals for Technoline WS 6730


Summary of Contents for Technoline WS 6730
- Page 1 WS 6730 Instruction manual Main Unit Appearance Part A- LCD A1: Radio Controlled Icon A2: Date A3: Weather Forecast A4: Past Hour (Pressure History) A5: Barometric Pressure Bar Graph. A6: Indoor Temperature and Humidity A7: Outdoor Temperature and Humidity A8: Radio Controlled Time Display...
- Page 2 B13: “RESET” button Part C- Structure C1: Wall Mount Hole C2: Battery Compartment C3: Stand. Thermo & Hygro Sensor Unit’s Appearance. D2: Outdoor Temperature D1: Transmission Indication LED D3: Wall Mount Hole D4: °C/°F” button D5: Channel Selecting Switch D6: “TX” button D7: Battery Compartment D8: Stand Set Up:...
- Page 3 The current weather status should be entered again if the altitude of the Main Unit is changed. ( Barometric pressure is lower at higher altitude location. Therefore, altitude change will affect the weather forecast) Totally 5 different weather condition in the weather forecast. “...
- Page 4 mb / hPa. Press “ HISTORY” button (B6) to view the past 12 hour Barometric Pressure history. The hour is indicated on the LCD. 0 HR = Current Barometric Pressure Reading -1HR = Barometric Pressure Reading in 1 hour ago -2HR = Barometric Pressure Reading in 2 hour ago ……..etc Outdoor Thermo Sensor Unit Registration Procedure:...
- Page 5 Press “ °C /°F” button (D4), on the Thermo Sensor unit, to select Temperature to be displayed in Celsius mode or Fahrenheit mode. Maximum/Minimum Temperature/Humidity recording function: Press “IN MEN” button (B8) to show the maximum or minimum of indoor temperature/humidity. Press “OUT MEN”...
- Page 6 “ ” turns on indicate signal received successfully DST is shown on the LCD is it is in Daylight Time Saving Mode Manual Time Setting: Hold “ MODE/SET” button (B1) for 3 seconds to enter Clock/Calendar setting Mode . Press “+” (B7) or “-” (B11) buttons to adjust the setting and press “MODE” (B1) button to confirm each setting.
- Page 7 that Alarm Time setting. Press “ +” (B7) or “-” (B11) buttons to adjust the alarm time. When viewing Alarm Time 1 or Alarm Time 2, press “AL ON/OFF” (B3) button to switch that alarm on or off. If it is on, “ ”...
Need help?
Do you have a question about the WS 6730 and is the answer not in the manual?
Questions and answers