Table of Contents
Advertisement
Quick Links
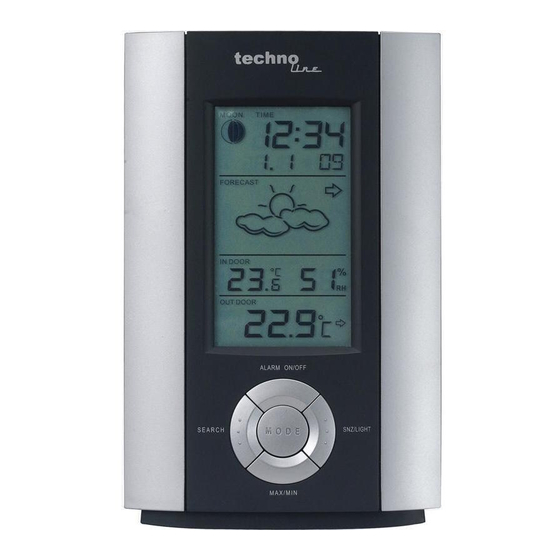
Main Unit Appearance
Part A- LCD
A1: Moon Phase
A4: Time Display
A6: Indoor Temperature.
Part B- Buttons
B1: "AL ON/OFF" button
B3: "MAX/MIN " button
B5: "MODE","SETTING" button
B7: "- (°C/°F)" button
Part C- Structure
C1: Wall Mount Hole
C3: Stand
WS 6710 Instruction manual
B2: "CHANNEL" button
B4: "SNOOZE/LIGHT" button
B6: "+(12/24)" , "WEARTHER"button.
B8: "RESET" button
C2: Battery Compartment
A3: Weather Forecast
A5: Second,Week,Alarm mode Icon display
A7: Outdoor Temperature
Advertisement
Table of Contents

Subscribe to Our Youtube Channel
Related Manuals for Technoline WS 6710


Summary of Contents for Technoline WS 6710
- Page 1 WS 6710 Instruction manual Main Unit Appearance Part A- LCD A1: Moon Phase A3: Weather Forecast A4: Time Display A5: Second,Week,Alarm mode Icon display A6: Indoor Temperature. A7: Outdoor Temperature Part B- Buttons B1: “AL ON/OFF” button B2: “CHANNEL” button B3: “MAX/MIN “...
- Page 2 Thermo Sensor Unit Appearance. D1: Transmission Indication LED D2: Outdoor Temperature D3: Wall Mount Hole D4: °C/°F” button D5: “TX” button D6: Battery Compartment D7: Stand Set Up: Insert batteries. Use a pin to press the RESET (B8) button Weather Forecast Function: After Batteries inserted, or holding “WEATHER”...
- Page 3 “ ” means Sunny . “ ” means Slightly Cloudy. “ ” means Cloudy. “ ” means Rainy “ ” means heavy rain. If there is any inconsistency of weather forecast between Local Weather Station and this unit, the Local Weather Station's forecast should prevail. We will not held responsible for any trouble that may come up due to wrong forecasting from this unit.
- Page 4 Display outdoor temperature : Hold “ CHANNEL” button (B2) for 3 seconds to cancel unused channel manually. It will automatically register a new channel again if a new channel is received. If there is no temperature displayed in existing channel ( “ - - . –“ is displayed on the LCD ), hold “CHANNEL”...
- Page 5 Language Sunday Monday Tuesday Wednesday Thursday Friday Saturday German, GE English, EN Russian, RU Denmark, DA Dutch, NE Italian, IT Spanish, ES French, FR 12/24 Hour Display mode: Press “+(12/24)” button (B6) to select 12 or 24 hours mode. Snooze Alarm Clock Function: Press “MODE”...
- Page 6 Low batteries indicator: Low battery icon “ “appear at outdoor temperature row in particular channel indicating the external transmitter of the channel in low battery status. The batteries should be replaced. Note: Use a pin to press the reset button (B8) if the Unit does not work properly. Avoid placing the clock near interference sources/metal frames such as computer or TV sets.
Need help?
Do you have a question about the WS 6710 and is the answer not in the manual?
Questions and answers