Table of Contents
Advertisement
Quick Links
OWNER'S MANUAL
1000W Monoblock Class D Subwoofer Amplifier
Thank you for purchasing a JL Audio amplifier for
your automotive sound system.
Your amplifier has been designed and manufactured to exacting
standards in order to ensure years of musical enjoyment in your vehicle.
For maximum performance, we highly recommend that you have
your new amplifier installed by an authorized JL Audio dealer. Your
authorized dealer has the training, expertise and installation equipment
to ensure optimum performance from this product. Should you
decide to install the amplifier yourself, please take the time
to read this manual thoroughly to familiarize yourself
with its installation requirements and setup procedures.
If you have any questions regarding the instructions in this
manual or any aspect of your amplifier's operation, please contact your
authorized JL Audio dealer for assistance. If you need further assistance,
please call the JL Audio Technical Support Department
at (954) 443-1100 during business hours.
Advertisement
Table of Contents

Related Manuals for JL Audio XD1000/1v2


Summary of Contents for JL Audio XD1000/1v2
- Page 1 For maximum performance, we highly recommend that you have your new amplifier installed by an authorized JL Audio dealer. Your authorized dealer has the training, expertise and installation equipment to ensure optimum performance from this product.
-
Page 2: Protect Your Hearing
12 volt, negative-ground electrical The outer shell of your JL Audio amplifier is Your amplifier needs to be installed in a dry, the operation of this product so as not to damage systems. -
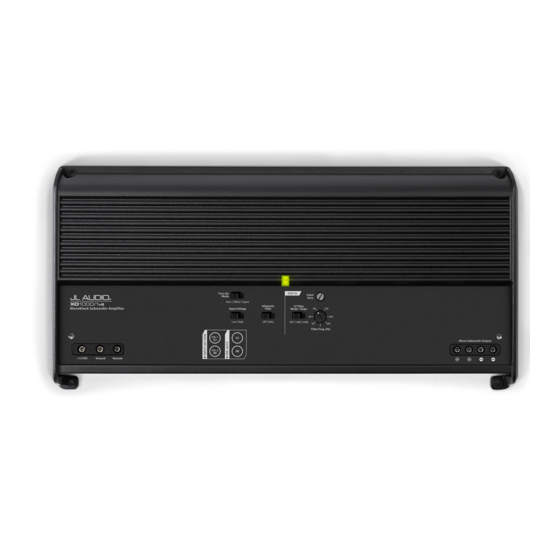
Page 3: Product Description
For optimal grounding, we recommend the operation has been optimized for low-frequency (See page 5 for important notice). use of a JL Audio ECS master ground lug amplification. For detailed specifications, please 7) Securely mount the amplifier. (XB-MGLU). Alternatively, a sheet metal refer to Appendix C (page 13). -
Page 4: Turn-On Options
JL Audio ECS Speaker Wire to RCA is firmly gripped by the set screw. moving loudspeakers that are in parallel with the to overcome the loss of signal. -
Page 5: Input Sensitivity Controls
You should always listen to the system carefully to is less necessary, but can still help protect the input stage of the XD1000/1v2 for maximum the input to the amplifier. Active filters are more determine the best choice as vehicle acoustics and speaker system from excessive excursion. -
Page 6: Subwoofer Outputs
JL Audio dealer so that it may be sent in to JL Audio for service. range, the preamp output will be full-range). 3) Constant Red: lights to indicate that the... - Page 7 24 dB/octave Butterworth @ 30 Hz (defeatable). Full-clockwise: 470 Preamp Output: Buffered pass-through type. Dimensions(LxWxH): 14.73” x 7.09” x 2.05” (374mm x 180mm x 52mm) Due to ongoing product development, all specifications are subject to change without notice. 12 | JL Audio - XD1200/1v2 Owner’s Manual...
-
Page 8: Appendix D: Troubleshooting
The speaker wire connectors are designed to accept up to 8 AWG wire. Make sure to strip the wire to allow for a sufficient connection with the metal inside the terminal block. 14 | JL Audio - XD1200/1v2 Owner’s Manual... -
Page 9: Installation Notes
INSTALLATION NOTES: Use this diagram to document your amplifier’s switch and control positions. 16 | JL Audio - XD1200/1v2 Owner’s Manual... - Page 10 Miramar, FL 33025 (do not send product for repair to this address) International Warranties: Products purchased outside the United States of America are covered only by that country’s distributor and not by JL Audio, Inc. Printed in China XD1000/1v2 MAN-01-30-2013...
Need help?
Do you have a question about the XD1000/1v2 and is the answer not in the manual?
Questions and answers