Table of Contents
Advertisement
Available languages
Available languages
Quick Links
Download this manual
See also:
Owner's Manual
owner's manual
600W 3/4/5/6 Channel Amplifier
Thank you for purchasing a JL Audio amplifier for
your automotive sound system.
Your amplifier has been designed and manufactured to exacting
standards in order to ensure years of musical enjoyment in your vehicle.
For maximum performance, we highly recommend that you have
your new amplifier installed by an authorized JL Audio dealer. Your
authorized dealer has the training, expertise and installation equipment
to ensure optimum performance from this product. Should you
decide to install the amplifier yourself, please take the time
to read this manual thoroughly so as to familiarize yourself
with its installation requirements and setup procedures.
If you have any questions regarding the instructions in this
manual or any aspect of your amplifier's operation, please contact your
authorized JL Audio dealer for assistance. If you need further assistance,
please call the JL Audio Technical Support Department
at (954) 443-1100 during business hours.
Advertisement
Table of Contents

Related Manuals for JL Audio XD600/6


Summary of Contents for JL Audio XD600/6
- Page 1 For maximum performance, we highly recommend that you have your new amplifier installed by an authorized JL Audio dealer. Your authorized dealer has the training, expertise and installation equipment to ensure optimum performance from this product.
-
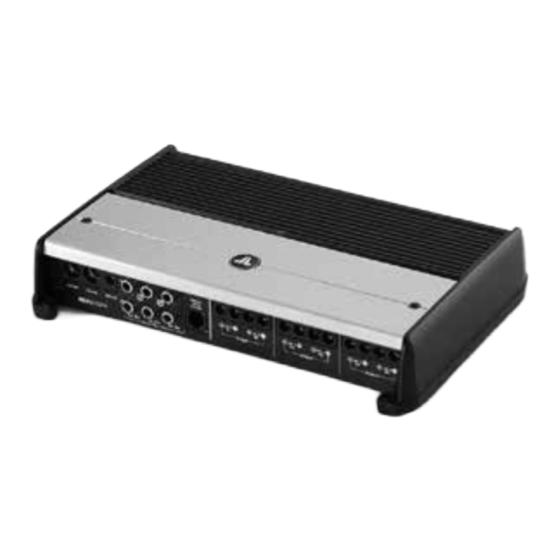
Page 2: Installation Applications
Channels 3 & 4 Channels 5 & 6 Connector Connector Preamp Input Jacks Control Knob Speaker Outputs Speaker Outputs Speaker Outputs (pg. 5) (pg. 6) (pg. 7) (pg. 9) (pg. 10) (pg. 10) (pg. 10) 2 | JL Audio - XD600/6 Owner’s Manual... -
Page 3: Product Description
(1/0 AWG is the largest, 2 only the XD600/6 is being run from that power 4) Run signal cables and remote turn-on wire overall output and the desired balance AWG is smaller, then 4 AWG, then 8 AWG, etc.). -
Page 4: Turn-On Lead
Rotating the control counter- If you wish to send six discrete channels into clockwise will result in lower sensitivity (quieter the XD600/6, simply use all six inputs and set the for a given input voltage.) “Input Mode” switch in the “6 Ch.” position. -
Page 5: Filter Controls
HD-RLC to one, two or all three pairs of the input to the amplifier. Active filters are more attenuate frequencies above the selected filter the XD600/6 from the front of the vehicle. This channels. In the “All” position, the HD-RLC stable than passive filters and do not introduce frequency at a rate of 12dB per octave. -
Page 6: Speaker Outputs
JL Audio dealer so peak power output of the amplifier. When its that it may be sent in to JL Audio for service. 1) Left Channel Only or Right Channel Only temperature returns to a safe level, the red... -
Page 7: System Configurations
Sens.” controls for all three channel pairs and are separately filtered to send appropriate frequency ranges to each speaker system. inputs of the XD600/6 (select “4 Ch.” on the Controls” section). using the method shown in Appendix A The most common application of “Input Mode”... - Page 8 34 ......286 range to be amplified by the XD600/6) at 3/4 Crossover Filters: 35 .
- Page 9 Please refer to Appendix A (page 14) to set the input sensitivity for Check your voltage source and grounding point. The power supply maximum, low-distortion output. of the XD600/6 will operate with charging system voltages “my amplifier doesn’t turn on.” down to 10V. Shutdown problems at higher volume levels Check the fuse, not just visually, but with a continuity meter.
- Page 10 Use this diagram to document your amplifier’s switch and control positions. 18 | JL Audio - XD600/6 Owner’s Manual...
- Page 11 All warranty returns should be sent to JL AUDIO ’s Amplifier Service Facility freight-prepaid through an authorized JL AUDIO dealer and must be accompanied by proof of purchase (a copy of the original Um dies und die Garantiebedingungen zu erfüllen, empfehlen wir Ihnen, die Installation nur sales receipt).
-
Page 12: Planung Der Installation
Verstärker mit den mitgelieferten alle anderen leistungsfähigen Verstärker entwi- Dieses Produkt ist nicht für den Ihr JL Audio Verstärker ist so entworfen, dass Schrauben fest am Einbauort verschraubt ist, ckeln einen enorm hohen Schalldruckpegel wenn Einsatz in einem Flugzeug konzipiert. -
Page 13: Installation
ProduktbesCHreibung Der JL Audio XD600/6 ist ein 6-Kanal- 5) Verlegen Sie die Lautsprecherkabel vom rekt sind. Widerstehen Sie dem Drang die Verlegen Sie zunächst ein geeignetes Vollbereichs-Verstärker mit JL Audio NexD™ Lautsprecher zum Einbauort des Verstärkers. Lautstärke gleich voll aufzudrehen, bis Sie... - Page 14 Die Eingangssektion des XD600/6 funkti- gilt für alle Kanäle und Verstärker im System. oniert mit einem Eingangsspannungs-Bereich Dies würde Verzerrungen und mögliche von 100mV – 4V. Dies ermöglicht, dass sowohl Schäden an den Lautsprechern verursachen. 6 | JL Audio - XD600/6 Benutzerhandbuch...
- Page 15 Wenn der Regler im Uhrzeigersinn auf die (Seite 15). Maximalstellung gestellt wird, ist die Pegelstärke des XD600/6 so angelegt, als wenn keine Tipp: Wenn Sie mit dem Der XD600/6 ein HD-RLC angeschlossen wäre. Mit anderen Subwoofer betreiben (“LP”), ein Komponenten- Worten, die HD-RLC fungiert als Pegel- Lautsprecher-System (“HP”) oder beides, ist...
- Page 16 (Links + Rechts) ausgegeben. Dies Lautsprecher zur Fahrzeugkarosserie sein. schlossenen Lautsprecher/Subwoofer. Der XD600/6 ist nützlich, wenn Sie mit zwei XD600/6 ein Die LED leuchtet ein paar Sekunden gelb, auch wurde für das Brücken an allen drei Kanalpaaren Subwoofer-System oder einen summierten wenn eine Überlastung bzw.
- Page 17 Der XD600/6 ist ein flexibler Verstärker, der Einstellung des Subwooferpegels an Kanalpaar an Kanal 5&6 des XD600/6 an. (Stellen Sie den Schalter „Input Mode“ auf „6Ch“). multiple System-Konfigurationen ermöglicht. Im 5&6 ist durch die optionale Pegelfernbedienung HD-RLC möglich, wenn unter “Remote Level Resultat: Der Anwender kann den Pegel des folgenden Abschnitt werden die gebräuchlichsten...
- Page 18 Sie Filtermodus: Hochpass, Tiefpass, abschaltbar regler ganz rechts: fortfahren. Starten Sie dann die Wiedergabe der Sinuskurve die für den XD600/6 geeig- abmessungen (lxbxH): net ist, bei 3/4 der Maximal-Lautstärke des 217mm x 180mm x 52mm Steuergeräts.
-
Page 19: Anhang D: Fehlerbehebung
Kabel und der Metallfläche im Innern der Anschlussblöcke. Die Anschlüsse sind auf einen Kabelquerschnitt von bis zu 8 mm ausgelegt. Stellen Sie sicher, dass die Lautsprecherkabel fest in den Anschlussblöcken befestigt sind. 16 | JL Audio - XD600/6 Benutzerhandbuch... - Page 20 Am Breilingsweg 3, D-76709 Kronau Tel. +49(0)7253-9465-0, Fax +49(0)7253-9465-10 www.audiodesign.de/jlaudio Jl audio, inc 10369 North Commerce Pkwy. Miramar, FL 33025, USA www.jlaudio.com (Bitte schicken Sie keine Produkte für Servicezwecke an die obigen Adressen) 18 | JL Audio - XD600/6 Benutzerhandbuch...
- Page 21 . j l a u d i o . c o m Printed in China XD600/6 MAN-07-2012...
Need help?
Do you have a question about the XD600/6 and is the answer not in the manual?
Questions and answers