Table of Contents
Advertisement
Quick Links
Advertisement
Table of Contents

Subscribe to Our Youtube Channel
Related Manuals for Cortelco 8012


Summary of Contents for Cortelco 8012
-
Page 2: Table Of Contents
Table of Contents Why VoiceManager with Cortelco Phones? ............2 Cortelco 8012 Cordless Set Features ..............3 Telephone Set Part Identification ................4 Installation — Line and Power Connection .............. 6 DSL Interference ......................6 Battery Installation ..................... 7 Charging Handset...................... 7 Key Descriptions ...................... -
Page 3: Why Voicemanager Sm With Cortelco Phones
Cortelco 8012 / Cordless Telephone Set / DECT 6 Why VoiceManager with Cortelco Phones? • Total cost of ownership savings with Cox • Total flexibility to meet your business needs • One vendor to call to support voice and equipment needs •... -
Page 4: Cortelco 8012 Cordless Set Features
Cortelco 8012 Cordless Set Features • Interference-free Communication • Call Duration Display 1.8 GHz DECT Technology • Alarm Clock w/Snooze • Five-row Backlit Dot Matrix LCD • Out-of-Range Alarm with Adjustable Contrast • PIN for Security • Lighted Key Pad •... -
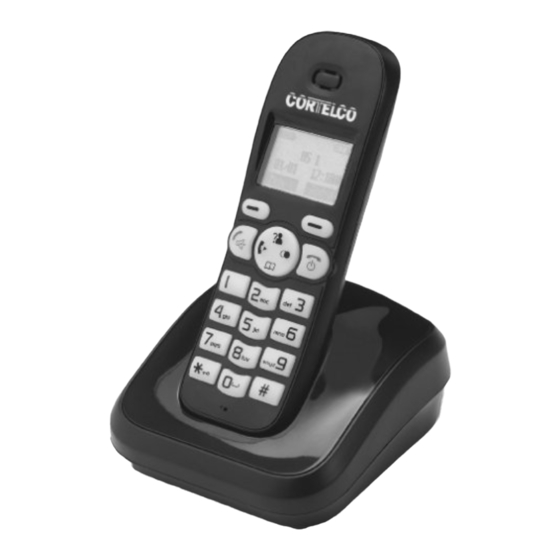
Page 5: Telephone Set Part Identification
8012 Telephone Set Part Identification Ear Piece Down/ Phone Book Key Handset Icons New Call: One or more calls have been received. MSG Waiting: One or more voice messages have been received. Off Hook: The line is in use. Speakerphone: Speakerphone function is in use. - Page 6 Charge Pins Base Rear and Bottom Views Phone Line Jack Power Jack Page Button...
-
Page 7: Installation - Line And Power Connection
Installation — Line and Power Connection 1. Connect the phone line cord to the telephone line jack in the base. Connect the other end of the line cord to a telephone outlet. 2. Connect the AC power adapter to the base power jack. Plug the AC power adapter into an AC outlet. -
Page 8: Battery Installation
Battery Installation 1. Two rechargeable Ni-MH AAA size batteries come with the 8012. These must be installed before use. 2. Slide the battery cover in the direction shown and remove. 3. Install the batteries as shown. Care MUST be taken to install in the correct polarity. -
Page 9: Key Descriptions
Key Descriptions Dial/Speaker Key: Used to place or answer a call. If pressed during a call, activates the speakerphone. End Key: End a call. If pressed and held, handset will power off. Left/Right Soft Key: Performs the function indicated by the text immediately over it in the display. -
Page 10: Basic Functions
Mute During a conversation, the microphone of the 8012 can be muted so that the distant party cannot hear what is being said. To mute the microphone, press MUTE soft key. The display will show “CALL MUTED”. To un-mute the microphone, press MUTE soft key again. - Page 11 9. Press the SELECT soft key. 10. Choose the desired ring tone (1 to 10) or desired volume (1 to 5 or off). The 8012 will play the selected melody or volume level. 11. Press the SAVE soft key to confirm.
- Page 12 CANCEL soft key. Caller ID Functions • When a call is received, the 8012 will normally display the name and number of the caller. If the caller has chosen to prevent his information from being transmitted, the display will show “PRIVATE”. If information cannot be received for some other reason, the display will show “OUT OF AREA”.
- Page 13 3. Press the MORE soft key. 4. Use to choose DELETE ALL. 5. Press the SELECT soft key. 6. When the display shows “CONFIRM?”, press the DEL ALL soft key. 7. A beep will sound to confirm and the 8012 will return to standby mode.
- Page 14 7. Press the SAVE soft key. 8. A beep will sound to confirm. Language The 8012 supports eight languages: English, Spanish, German, Italian, Dutch, Polish and Traditional Chinese. To select a language: 1. Press the MENU soft key. 2. Press repeatedly to choose HS SETTINGS.
- Page 15 Basic Functions (cont’d) Handset Name The 8012 handset can be given a name. This is useful if more than one handset is registered to a base. To set the handset name: 1. Press the MENU soft key. 2. Press repeatedly to choose HS SETTINGS.
-
Page 16: Phone Book Characters
Hands-free/Speakerphone During a call, the speakerphone may be activated: • To activate Hands-free, press . The will appear in the display. • To deactivate Hands-free, press again. The will disappear in the display. Caution: Be sure the speakerphone is deactivated before putting the handset near your ears. -
Page 17: Format/Setting Date And Time
Format/Setting Date and Time 1. Press the MENU soft key. 2. Press repeatedly to choose HS SETTINGS. 3. Press the SELECT soft key. 4. Use to choose Date and Time Menu. 5. Press the SELECT soft key. 6. Use to choose Date Format or Time Format. 7. -
Page 18: Voicemanager - Feature Descriptions
VoiceManager – Feature Descriptions Call Forward Activation 1. Lift telephone handset. Press the assigned code (ex. *72). 2. Enter phone number to which calls will be forwarded. 3. Replace telephone handset. The Call Forwarding Always service is on. Call Forward Deactivation 1. -
Page 19: Voicemanager - Most Frequently Used Features
VoiceManager — Most Frequently Used Features Feature Access Codes lists the star codes for services you have. To activate a service, hit the “ ” key and the number followed by the “#” key. Some require additional information such as a phone number, but you are prompted for that information. -
Page 20: Voice Portal
Voice Portal Access the VoiceManager Voice Portal from any phone. The Voice Portal allows you to make changes to your call forwarding and initiate outbound calls that appear to originate from your office. First Time Setup 1. Initial setup must be done from your VoiceManager telephone line. 2. -
Page 21: Troubleshooting Guide
Troubleshooting Guide Phone Does Not Operate 1. Power adapter is disconnected. 2. Line cord is disconnected at telephone outlet or at telephone. Test the telephone in a different wall jack. If it works, the first jack may be defective. 3. Batteries are discharged. 4. - Page 22 Please refer to the Cortelco Owner’s Instruction Manual that came with your phone for Important Safety Instructions, FCC Information, Telephone Repair and Limited Warranty Information. Service and features not available in all areas. Some features may incur local usage charges in certain markets.
Need help?
Do you have a question about the 8012 and is the answer not in the manual?
Questions and answers