Sirius XM RAdio Onyx Quick Start Manual
Dock & play radio with home kit
Hide thumbs
Also See for Onyx:
- User manual (104 pages) ,
- Quick start manual (2 pages) ,
- Quick start manuals (2 pages)
Table of Contents
Advertisement
Quick Links
Download this manual
See also:
User Manual
Advertisement
Table of Contents

Related Manuals for Sirius XM RAdio Onyx


Summary of Contents for Sirius XM RAdio Onyx
- Page 5 Dock & Play Radio + Home Kit User Guide...
- Page 6 If you experience problems with the operation or performance of your SiriusXM product, DO NOT RETURN THIS PRODUCT TO YOUR RETAILER. Call SiriusXM Listener Care at 1-866-746-7961 and speak to one of our service representatives.
-
Page 7: Table Of Contents
Demo Mode ..... . . 52 Onyx Functions ..... 10 Home Dock . -
Page 10: Introduction
Introduction Features Thank you for purchasing the XM Onyx with Home Kit! XM Onyx has these exciting features to enhance your overall experience: Add SiriusXM to a home audio system or powered speakers with easy, do-it- yourself set-up. Choose from six different display colors to suit your environment, and personalize with the trim rings. -
Page 11: Safety And Care Information
Safety and Care Information IMPORTANT! Always read and understand all the instructions to avoid injury to yourself and/or damage to your device. Sirius XM Radio Inc. disclaims all responsibility for damage from data loss due to breakdown, repair, or other causes. - Page 12 Introduction Warning! Opening the case may result in electric shock. Make sure that you insert the Home Power Adapter’s plug all the way into the outlet. If the liquid crystal fluid comes in contact with your skin, wipe the skin area with a cloth and then wash the skin thoroughly with soap and running water.
-
Page 13: What's In The Box
What’s in the Box? menu jump direct Onyx Radio Home Dock Trim Ring Removal Tool Trim Rings info display menu direct mute jump Indoor/Outdoor Stereo Audio Home Power Remote Control Home Antenna Cable Adapter... -
Page 14: Onyx Functions
Introduction Onyx Functions Up and Down Buttons Left and Right Buttons Power Button Press to preview and tune Press to search for Press to turn Radio on to channels through the channels by category. and off. channel lineup; also press to scroll through lists and highlight menu items. -
Page 15: Home Dock
Home Dock Color-Coded Connections The color-coded Home Dock makes it simple to connect. Just match the colors on the cable ends to the colors on the dock to see what goes where. Rear View AUDIO POWER ANT (Silver) AUDIO (Green) POWER (Red) Connection for Connection for... -
Page 16: Remote Control Functions
Introduction Remote Control Functions Power Button Arrow Buttons Up/Down Press to turn Radio on Press to preview and tune to and off. channels through the channel lineup; also press to scroll Not Used through lists and highlight menu items. Select Button Arrow Buttons Left/Right Press to confirm selection of Press to search for channels by... -
Page 18: Home Installation
There are several parts to setting up your Home Kit. Follow these 4 steps for an easy installation. Step 1: Connect the Home Dock and Dock the Onyx Radio When installing the Home Dock in your home, choose a location in close proximity to your stereo system or powered speakers, and also where the cable from the Indoor/Outdoor Home Antenna can reach the Home Dock. - Page 19 Connect the Home Power Adapter to the red Power connector at the rear of the Home Dock, and plug it into a wall outlet. AUDIO POWER C. Dock the Onyx Radio Place your Onyx Radio into the Home Dock and press the Power button to turn it on.
-
Page 20: Step 2: Place And Aim The Indoor/Outdoor Home Antenna
Home Installation Step 2: Place and Aim the Indoor/Outdoor Home Antenna To begin, try experimenting with the Indoor/Outdoor Home Antenna to get a feel for the reception in your location. In major metropolitan areas, you might find that you get great reception in several locations without worrying too much about aim and placement. - Page 21 Other Indoor/Outdoor Home Antenna Installation Suggestions NOTE! If the signal reception is low, intermittent, or Acquiring Signal is displayed, after a period of time the Radio may enter demo mode. Demo mode is a feature for retail display purposes, and the Radio will automatically exit demo mode once it begins to receive a good signal.
- Page 22 Note that you will want to consider any potential hazards when you choose SOUTH the mounting location, and possibly consider professional installation. Sirius XM Radio Inc. is not liable for any damages. To mount the antenna, you will need...
- Page 23 four screws (not included) with a 1/4” OUTDOORS head (e.g., an M3 screw), and that are suitable for the material onto which you are affixing the antenna, (e.g., wood, metal, etc.). The screws should be spaced 1-3/8” apart horizontally and 1-1/8” vertically. Refer to the template on “Indoor/Outdoor Home Antenna Template”...
- Page 24 Home Installation until you find one where are receiving a good signal. The Indoor/Outdoor Home Antenna’s reception can also be tweaked by opening or closing the antenna clamshell, and turning the antenna. While observing the signal strength, make small adjustments to the angle of tilt of the clamshell until the highest possible signal strength is achieved.
-
Page 25: Step 3: Connect The Home Dock To A Stereo System Or Powered Speakers
Step 3: Connect the Home Dock to a Stereo System or Powered Speakers The Home Dock can be connected to your stereo system, or to a set of powered speakers. If you are connecting to a stereo system, see the following section. If you are connecting to a set of powered speakers, see “To Connect the Home Dock to Your Powered Speakers”... - Page 26 Home Installation 4 If you have connected everything correctly, and you are receiving the XM signal, you should hear the XM audio from channel 1. 5 The audio level of your Radio can also be adjusted, if necessary. Refer to “Set Audio Level”...
-
Page 27: Step 4: Subscribe
Onyx and subscribe to the XM service. General activation and subscription process: Make sure your Onyx is turned on, tuned to XM Preview channel 1, and receiving the XM signal so that you can hear the XM audio. - Page 28 Basics” on page 27. Activation guide: For your convenience, Onyx has an on-board activation guide. You can activate your radio and subscribe to the XM service by using this guide, where you will be guided step-by-step through the subscription process. To access and use the guide, simply follow these steps: Turn Onyx on and press the menu button.
-
Page 30: Using Your Onyx
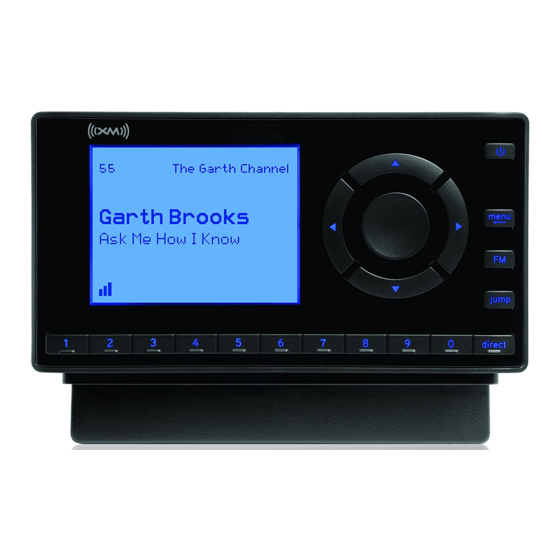
Using Your Onyx The Main Display When listening to a channel, information about the channel and what is currently playing is displayed. The Spectrum Channel Number Channel Name Tom Petty Artist Name or Talk Show Host I Should Have Known It... -
Page 31: Navigation Basics
Navigation Basics Power Button Pressing the Power button turns Onyx On or Off. Navigation Buttons Pressing Left, Right, Up, and Down navigates through various features and functions of Onyx. Left or Right button: Displays the channel categories such as Rock, Pop, Sports, Talk/News, etc. - Page 32 Using Your Onyx Menu Button menu Pressing menu displays various options to make setup and feature changes. Pressing menu when in menu options returns to the previous menu option screen until menu options is exited. Pressing and holding menu returns to the main display screen in most instances.
-
Page 33: Listening To Satellite Radio
Listening to Satellite Radio Tune to a channel: Press and release to immediately tune to the next or previous channel. 2 Press and hold to quickly scroll through the channels. Release to tune to the channel that is displayed. TIP! You can also use the Remote Control to control the Radio. View a category: Channels are organized into categories to make it easier for you to find the ones that suit your taste. - Page 34 Using Your Onyx Direct Tune A channel can be tuned directly by entering the channel number using the number buttons. To directly tune to a channel press Direct Tune direct. Enter channel # 2 Use the number buttons 0-9 to enter...
- Page 35 To listen to a favorite channel: Press the number button between 0-9 that was assigned to the desired favorite channel. Onyx will tune to that channel. TIP! When you are at the main display screen, press to see your list of favorite channels.
- Page 36 Using Your Onyx Scanning Channels in a Category You can scan a category and listen to each channel for 10 seconds before Onyx automatically tunes to the next channel. If you want to stay tuned to the channel being played and stop the scan, just press the Select button.
-
Page 38: Special Features
Color Theme. Press the Select button. Blue 3 Press to highlight the desired color theme. Onyx will immediately change to the selected color theme. 4 Press the Select button to confirm the Press arrow keys to choose selected color theme. -
Page 39: Trim Rings
Trim Rings Your Onyx has a changeable Trim Ring to style the Radio to your liking. The Trim Ring surrounds the Select button on the Radio. A total of three trim rings are included with your Onyx, including the one that is already installed in the Radio. - Page 40 3 The Trim Ring is now loose. Turn Onyx over and the Trim Ring should fall out. If it does not, gently tap the back of the Radio until it does.
- Page 41 4 Turn the Radio face up again and insert the new Trim Ring into the Radio. 5 Align the Trim Ring Removal Tool on the Trim Ring on the Radio. Use care to align the tool so it’s centered on the Trim Ring. 6 Using mild pressure to keep the tool against the Trim Ring, rotate the tool clockwise until it will not rotate any further.
-
Page 42: Parental Controls
All locked channels become unlocked and remain unlocked until you turn Onyx Off, and back On. In the category list, the previously locked channels will show an unlocked icon To turn Parental Controls On (or Off): Press menu. - Page 43 For each digit, press one of the Enter Parental Code 0-9 keys and then press advance to the next digit. (Press if you need to go back and edit a previous digit.) 0 0 0 ii. When you have selected all 4 digits of your code press the Select button.
- Page 44 Special Features To lock (or unlock) channels or categories: Press menu. 2 Press to scroll to and highlight Parental Controls. Press the Select button. 3 You will be prompted to enter the 4-digit code. For each digit, press one of the 0-9 keys and then press to advance to the next digit.
- Page 45 category and press the Select button. The lock icon will disappear indicating the channel or category is unlocked.) 8 You can continue to lock and unlock as many channels or categories as you wish. When you are finished, press and hold menu to return to the main display screen.
- Page 46 3 When you have entered all 4 digits of the code, press the Select button. If your code is correct the channel will be tuned. All locked channels become unlocked and remain unlocked until you turn Onyx Off, and back On. In the category list, the previously locked channels will show an...
-
Page 48: Where Else Can You Use Your Onyx
Satellite Radio listening experience from your home or office to your vehicle or on the go — all with a single subscription. In Your Vehicle – With Vehicle Kits, you can enjoy your Onyx in each of your vehicles. -
Page 50: Configuring Your Onyx
Configuring Your Onyx Radio ID Your Onyx has an 8 character alphanumeric ID which uniquely identifies your Radio. This ID is used during the subscription process. To display the Radio ID: Radio ID Press menu. 2 Radio ID will be highlighted. If it is not... -
Page 51: Jump Settings
Jump Settings The jump button can be configured to either jump back to the last channel to which you were listening, or to jump to the traffic and weather for the city of your choice from a list of 22 of the most congested cities. When configuring for traffic/weather, you’ll be prompted to select your city. -
Page 52: Set Brightness
Configuring Your Onyx desired location and press the Select Set Location button. Atlanta 7 The JUMP Settings screen will display the location you selected. Press and Baltimore hold menu to return to the main display Boston screen. Chicago Dallas Set Brightness To change the display’s brightness:... -
Page 53: Set Audio Level
Audio level is used to adjust Onyx’s volume level to match the volume of other audio sources you may use, such as a CD player, or an MP3 player, etc. -
Page 54: Signal Indicator
Configuring Your Onyx Signal Indicator For best reception, your antenna should have an unobstructed view of the XM satellites. In large cities, there are terrestrial transmitters (ground repeaters) to help increase the signal coverage. Your Onyx can display the strength of the satellite and terrestrial signals being received. -
Page 55: Factory Settings
Press Select to confirm you are certain that you want to reset or menu to cancel your Onyx to the default settings, press the Select button to confirm. 5 If you want to cancel, press menu to return to Factory Settings. -
Page 56: Demo Mode
If desired, you can also manually put Onyx in demo mode. The ability for Onyx to enter demo mode is enabled by default. If you don’t want Onyx to ever enter the demo mode, you can disable the demo feature. You can enable it again at another time if desired. - Page 57 6 To exit demo mode at any time, press and hold the Select button for 10 seconds. Demo Mode Entering Demo Mode. Press & Hold Select for 10 seconds to exit...
-
Page 60: Using Onyx With A Vehicle Dock
Find Available FM Channels in Your Area Before attempting any of the procedures below, you should park your vehicle in a safe location. Do not attempt to set up your FM channels or any Onyx function while driving. PowerConnect allows you to listen to SiriusXM through your existing vehicle radio. - Page 61 Once you have found an available FM channel, you’ll need to tune Onyx and your vehicle’s radio to the same FM channel to receive XM audio through your vehicle’s radio. We recommend one of the following methods to find an available FM channel: Use the SiriusXM FM Channel Finder Use the SiriusXM FM Channel Finder at www.siriusxm.com/frequency.
- Page 62 Using Onyx With a Vehicle Dock Tune Onyx to a favorite XM channel (or to channel 1, if it’s not activated). Pick the first FM channel on your list and tune the FM radio to that channel. Then tune Onyx to the same FM channel. (Refer to “Set and Select an FM Channel”...
-
Page 63: Set And Select An Fm Channel
Each FM preset is stored in its own storage location. You can easily add or edit the FM preset in any one of the 5 storage locations. IMPORTANT! Onyx and the vehicle’s FM radio need to be tuned to the same FM channel in order to hear the audio. - Page 64 Using Onyx With a Vehicle Dock (denoted by “current”), then the FM channel tuning screen is displayed. ii. If the chosen storage location has an FM preset that is not currently being used, and you want to edit it, Edit Channel is highlighted.
-
Page 65: Fm Presets
FM presets make it easy to quickly access stored FM channels and choose a new FM channel from them. Use FM presets when you use PowerConnect or the FMDA to listen to your Onyx through your vehicle’s FM radio. To use a different FM preset: 99.3 FM... -
Page 66: Auto Shut Off
56. Next, refer to “Set and Select an FM Channel” on page 59. Auto Shut Off Auto Shut Off is applicable only when Onyx is in a Vehicle Dock. Onyx will automatically shut off after 8 hours of inactivity, i.e., when no buttons have been pressed. -
Page 67: Turn Fm Transmitter On/Off
Disable the AUX Detect feature. Refer to “AUX Detect” on page 65, and disable AUX Detect. 2 Turn the FM Transmitter in Onyx On. Refer to “Turn FM Transmitter On/ Off” on page 63, and turn the FM Transmitter On. -
Page 68: To Turn The Fm Transmitter Off
4 The FM Channels menu item will now be accessible, allowing you to tune Onyx and the FM radio in your vehicle to the same FM channel. TIP! Onyx is programmed with FM channel 97.9 as the default setting. To turn the FM Transmitter Off:... -
Page 69: Aux Detect
Press Select to confirm AUX Detect AUX Detect allows Onyx to automatically detect a connection made to the AUDIO connector of the PowerConnect Vehicle Dock by an Aux In Cable or Cassette Adapter. AUX Detect is enabled by default IMPORTANT! If you are using the PowerConnect Vehicle Dock which came with your Onyx, AUX Detect should remain enabled. - Page 70 Using Onyx With a Vehicle Dock 2 Press to scroll to and highlight Factory Settings and press the Select button. 3 AUX Detect should be highlighted and show as enabled. Press the Select button to toggle the setting. 4 A warning screen will be displayed.
-
Page 72: Troubleshooting
Troubleshooting Onyx has been designed and built to be trouble-free but if you experience a problem, try this: Check that all connections are firm and secure. Make sure you have connected the Home Dock as described in this User Guide. Verify that the AC power outlet is working. - Page 73 Ensure you have selected the proper input source on your stereo system, or try another source. Increase the audio level of your Onyx. Refer to “Set Audio Level” on page 49. No song title or artist name is The information may not be available or updates displayed may be in progress.
- Page 74 Troubleshooting If this happens: Try this: Traffic and Weather channels These channels use a different audio technology sound different from other than other channels so they often sound different channels from other channels. The demo is playing Your Indoor/Outdoor Home Antenna is not connected or you are not receiving the XM signal.
-
Page 76: Product Specifications
Operating Temperature: -4°F to +140°F (-20°C to +60°C) Audio Output: 1.5 V rms (max) Onyx Radio Dimensions: 4.5 in (width) x 2.4 in (height) x 0.7 in (depth) 115 mm (width) x 61 mm (height) x 17 mm (depth) Weight: 3.4 oz (95 g) -
Page 77: Patent Information
Patent and Environmental Information Patent Information It is prohibited to, and you agree that you will not, copy, decompile, disassemble, reverse engineer, hack, manipulate, or otherwise access and/or make available ™ any technology incorporated in this product. Furthermore, the AMBE voice compression software included in this product is protected by intellectual property rights including patent rights, copyrights, and trade secrets of Digital... -
Page 78: Fcc Statement
Consult the dealer or an experienced radio/TV technician for help. WARNING! The FCC and FAA have not certified this Satellite Radio Receiver for use in any aircraft (neither portable nor permanent installation). Therefore, Sirius XM Radio Inc. cannot support this type of application or installation. -
Page 79: Copyrights And Trademarks
©2011 Sirius XM Radio Inc. “Sirius”, “XM” and all related marks and logos are trademarks of Sirius XM Radio Inc. and its subsidiaries. “BBC” and “Radio One” are trademarks of the British Broadcasting Corporation and are used under license. BBC logo © BBC 1996. Radio 1 logo ©... -
Page 80: Owners Record
Owners Record The Radio model number is located below and the XM Radio ID is located on the label on the back of Onyx. Record the XM Radio ID in the space provided below. Refer to these numbers whenever you call your dealer regarding this product. -
Page 81: Indoor/Outdoor Home Antenna Template
Indoor/Outdoor Home Antenna Template Indoor/Outdoor Home Antenna Template 1-3/8” 1-1/8”... -
Page 83: Siriusxm 90-Day Limited Warranty
This warranty covers defects in material and workmanship for 90 days from the date of purchase by the original retail purchaser only. Sirius XM Radio Inc., at its sole option, will repair or replace the product with a new or reconditioned product without charge for parts and labor. Products replaced under this warranty become the property of SiriusXM. - Page 84 Sirius XM Radio Inc. 1221 Avenue of the Americas New York, NY 10020 1.800.967.2346 © 2011 Sirius XM Radio Inc. XDNX1HKUG 061611c...
Need help?
Do you have a question about the Onyx and is the answer not in the manual?
Questions and answers
My remote (xdpr1) for my Onyz radio (xdnx1) does not appear to be working despite several attempts at changing the battery (2032). Any suggestions for getting the remote to work or should I get another remote?
To troubleshoot a non-working Sirius XM Onyx remote (XDPR1) after changing the battery:
1. Check Battery Installation: Ensure the new battery is installed correctly with proper polarity.
2. Inspect for Dead Battery: Even new batteries can be faulty. Try replacing with another fresh battery.
3. Test Remote Functionality: Confirm that the remote is working by checking if it changes channels, as it does not have a volume button.
4. Check Device Compatibility: The remote may not work with all XM or Sirius devices. Make sure it is compatible with your system.
5. Ensure Line of Sight: Make sure there is a clear path between the remote and the Onyx radio.
6. Reset or Re-pair Device: If possible, try resetting or re-pairing the remote with the Onyx system.
7. Exit Demo Mode: If the system is in Demo Mode, press and hold the Select button on the Onyx device for 10 seconds to exit.
If it still doesn’t work, the remote may be defective.
This answer is automatically generated