AudioCodes 310HD User Manual
300hd series of high definition ip phones
Hide thumbs
Also See for 310HD:
- Administrator's manual (90 pages) ,
- Administrator's manual (284 pages) ,
- Administrator's manual (102 pages)

Related Manuals for AudioCodes 310HD


Summary of Contents for AudioCodes 310HD
- Page 1 AudioCodes 300HD Series of High Definition IP Phones HD VoIP 310HD IP Phone User’s Manual 310HD IP Phone Version 1.4.0 VoIPon www.voipon.co.uk sales@voipon.co.uk Tel: +44 (0)1245 808195 Fax: +44 (0)1245 808299...
- Page 2 VoIPon www.voipon.co.uk sales@voipon.co.uk Tel: +44 (0)1245 808195 Fax: +44 (0)1245 808299...
-
Page 3: Table Of Contents
User's Manual Contents Table of Contents Introduction ......................... 9 Hardware Setup ......................11 2.1 Unpacking the Package Contents ................... 11 2.2 Physical Description ......................12 2.2.1 Front View .......................... 12 2.2.2 Rear View .......................... 14 ... - Page 4 310HD IP Phone 6.4 Making Simultaneous Calls ..................... 45 6.5 Hosting Three‐Way Conference Calls ................46 6.6 Transferring Calls ......................46 6.7 Muting Calls ........................48 6.8 Retrieving Voice Mail Messages ..................49 User's Manual Document #: LTRT-24701 VoIPon www.voipon.co.uk sales@voipon.co.uk Tel: +44 (0)1245 808195 Fax: +44 (0)1245 808299...
- Page 5 User's Manual Contents List of Figures Figure 2-1: Front View of IP Phone ........................12 Figure 2-2: Rear View of IP Phone ........................14 Figure 2-3: Cabling the IP Phone ........................15 Figure 2-4: Wall-Mounting Dimensions ......................17 ...
- Page 6 310HD IP Phone List of Tables Table 2-1: IP Phone’s Font View Descriptions ....................13 Table 2-2: IP Phone’s Rear View Descriptions ....................14 Table 3-1: In-Progress Operational Messages Displayed on LCD Screen ............22 User's Manual Document #: LTRT-24701 VoIPon www.voipon.co.uk sales@voipon.co.uk Tel: +44 (0)1245 808195 Fax: +44 (0)1245 808299...
-
Page 7: July
This document is subject to change without notice. Date Published: July-26-2010 Trademarks AudioCodes, AC, AudioCoded, Ardito, CTI2, CTI², CTI Squared, HD VoIP, HD VoIP Sounds Better, InTouch, IPmedia, Mediant, MediaPack, NetCoder, Netrake, Nuera, Open Solutions Network, OSN, Stretto, TrunkPack, VMAS, VoicePacketizer, VoIPerfect, VoIPerfectHD, What’s Inside Matters, Your Gateway To VoIP and 3GX are trademarks or registered trademarks of AudioCodes Limited. - Page 8 310HD IP Phone Reader’s Notes User's Manual Document #: LTRT-24701 VoIPon www.voipon.co.uk sales@voipon.co.uk Tel: +44 (0)1245 808195 Fax: +44 (0)1245 808299...
-
Page 9: Introduction
Voice-over-IP (VoIP) calls. The 310HD IP Phone is a fully-featured telephone that provides voice communication over an IP network, allowing you to place and receive phone calls, put calls on hold, transfer calls, make conference calls, and so on. - Page 10 310HD IP Phone Reader’s Notes User's Manual Document #: LTRT-24701 VoIPon www.voipon.co.uk sales@voipon.co.uk Tel: +44 (0)1245 808195 Fax: +44 (0)1245 808299...
-
Page 11: Hardware Setup
Ethernet Cable AC Power Adapter Wall-Mounting Screws (Two) Wall-Mounting Bracket If anything appears to be missing or broken, contact your AudioCodes sales representative for assistance. Version 1.4 July 2010 VoIPon www.voipon.co.uk sales@voipon.co.uk Tel: +44 (0)1245 808195 Fax: +44 (0)1245 808299... -
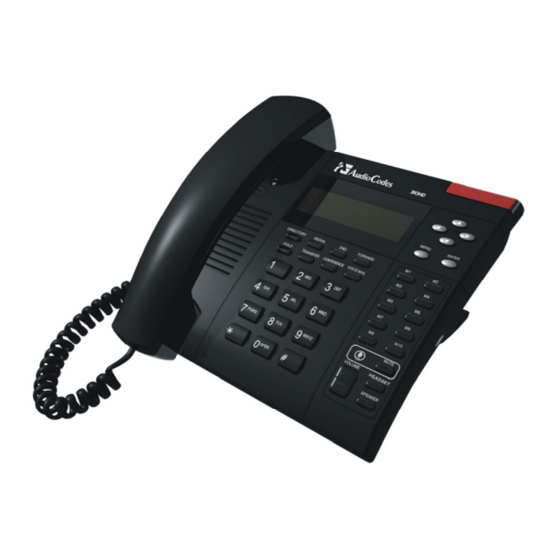
Page 12: Physical Description
310HD IP Phone Physical Description You can use the graphics below to identify buttons and hardware on your phone. Use this section to familiarize yourself with the phones buttons functions. 2.2.1 Front View The front view of the phone is shown below and described in Table 2-1. - Page 13 User's Manual 2. Hardware Setup Table 2-1: IP Phone’s Font View Descriptions Item # Label/Name Description Display Screen Displays calls and status information. MENU Press to access the menu options or cancel your selection and return to the previous menu level. Message Indicator An illuminated red light indicates that there is an incoming call (flashing) or message (steady on).
-
Page 14: Rear View
310HD IP Phone 2.2.2 Rear View The rear view of the phone is shown in the figure below and described in Table 2-2. Figure 2-2: Rear View of IP Phone Table 2-2: IP Phone’s Rear View Descriptions Item # Label/Name... -
Page 15: Cabling The Phone
User's Manual 2. Hardware Setup Cabling the Phone The procedure below describes how to cable your phone. To cable the phone: Connect the RJ-9 handset jack to the handset. (Optional) Connect the RJ-9 headset jack to a headset. Connect the LAN port to the IP network, using a CAT 5 Ethernet cable. Connect the PC port to your computer, using a CAT 5, straight-through Ethernet cable. -
Page 16: Mounting The Phone
310HD IP Phone Mounting the Phone The phone can be mounted in one of the following ways: Desktop mounting (refer to Section 2.4.1 below) Wall mounting (refer to Section 2.4.2 on page 17) 2.4.1 Placing the Phone on a Desk This section describes the procedures for placing the phone on a desk or flat surface and routing the phone’s cables. -
Page 17: Wall-Mounting The Phone
User's Manual 2. Hardware Setup 2.4.2 Wall-Mounting the Phone You can mount the phone on a wall or wall plate. You need two screws (not supplied) to fit the keyhole slots. To wall mount the phone: On the wall or a wall plate, drill two holes with a distance of 3 15/16 inches (100 mm) apart. Thread a screw into each hole with each head extending about 3/16 inch (5 mm) from the wall or wall plate. - Page 18 310HD IP Phone Reader’s Notes User's Manual Document #: LTRT-24701 VoIPon www.voipon.co.uk sales@voipon.co.uk Tel: +44 (0)1245 808195 Fax: +44 (0)1245 808299...
-
Page 19: Getting Started With The Phone's User Interface
Getting Started with the Phone’s User Interface The 310HD IP Phone provides an LCD-based user interface screen, providing an intuitive, menu- driven user interface for configuration and viewing various call information. This section provides an overview on using the phone’s screen. -
Page 20: Entering Numbers, Letters And Symbols
310HD IP Phone To access menus: Press the MENU key. Scroll through the main menu list to the required menu, using the Navigation keys. To select a menu, perform one of the following: • Press the ENTER key. • Press the right Navigation key. -
Page 21: Figure 3-4: Entering Symbols
User's Manual 3. Getting Started with the Phone’s User Interface • (period) • _ (underscore) • + (plus) Figure 3-4: Entering Symbols To add a space: Press the 0 key. To delete an entered character: Press the left Navigation key; the character to the left of the cursor is deleted. Version 1.4 July 2010 VoIPon www.voipon.co.uk sales@voipon.co.uk Tel: +44 (0)1245 808195 Fax: +44 (0)1245 808299... -
Page 22: Displayed Messages
310HD IP Phone Displayed Messages The phone’s LCD screen displays messages to indicate certain process currently in progress. These messages include the following: Table 3-1: In-Progress Operational Messages Displayed on LCD Screen Message Description “Downloading Firmware File” Downloading a firmware file “Upgrading Firmware”... -
Page 23: Customizing Your Phone
User's Manual 4. Customizing Your Phone Customizing Your Phone This chapter provides step-by-step procedures on customizing your phone. Managing Your Personal Phone Directory The phone directory feature enables you to add contacts to your phone’s local directory, and then edit and delete them if required. Once you have added a contact, you can easily call the contact directly from the directory (refer to Section on page 43). -
Page 24: Adding Contacts
310HD IP Phone 4.1.2 Adding Contacts The procedure below describes how to add a new contact to the phone directory To add a contact to the phone directory: Access the Directory screen. Select the New option (using the Navigation keys), and then press the ENTER key. -
Page 25: Deleting Contacts
User's Manual 4. Customizing Your Phone key; the phone category list is displayed. Select the required phone category (using the Navigation keys), and then press the ENTER key; the phone number is displayed. Modify the number as required (using the Navigation keys), and then press the ENTER key. -
Page 26: Viewing Contacts
310HD IP Phone 4.1.5 Viewing Contacts You can view a list of contacts defined in your phone directory. To view contacts: Access the Directory screen. Select the View option, and then press the ENTER key; the list of directory contacts appear: Scroll through the list using the Navigation keys. -
Page 27: Configuring Speed Dialing
User's Manual 4. Customizing Your Phone Press the ENTER key to display a list of options: • Dial – to dial the contact (refer to Section on page 43) • Detail – displays the contact’s details such as phone numbers •... -
Page 28: Editing Speed Dials
310HD IP Phone Enter the phone number that you want to assign the speed dial key, and then press the ENTER key to save your settings; the newly defined speed dial key with its phone number is displayed: 4.2.2 Editing Speed Dials The procedure below describes how to modify the phone number assigned to an existing speed dial. -
Page 29: Deleting Speed Dials
User's Manual 4. Customizing Your Phone 4.2.3 Deleting Speed Dials The procedure below describes how to delete an existing speed dial. To delete a speed dial: Access the Speed Dial submenu to view the list of speed dials. Select a speed dial (using the Navigation keys) that you want to delete, and then press the ENTER key;... -
Page 30: Selecting A Ring Tone
310HD IP Phone Selecting a Ring Tone You can select a ring tone for your phone for indicating incoming calls. To select a ring tone: From the idle screen, press the MENU key, select the Phone Settings menu, and then select the Ring Tone submenu. -
Page 31: Enabling Call Waiting
User's Manual 4. Customizing Your Phone Enabling Call Waiting Call waiting allows you to receive another call while you are in a call with another party. If call waiting is enabled and you receive a second call while you are currently in a call with another party, the phones Display RED LED flashes. -
Page 32: Defining Call Forwarding
310HD IP Phone Defining Call Forwarding The Call Forward feature allows you to automatically redirect an incoming call to another phone number, upon a user-defined condition (e.g., when your line is busy). The configuration of the call forward feature is performed in two stages. The first stage is the actual call forward setup; the second stage is the activation. - Page 33 User's Manual 4. Customizing Your Phone Select the condition (using the Navigation keys), and then press the ENTER key: ♦ Busy: calls are forwarded if your phone is busy ♦ No-Reply: calls are forwarded if you do not answer within a user-defined time (see Step 7) ♦...
-
Page 34: Activating Do Not Disturb
310HD IP Phone Activating Do Not Disturb The Do Not Disturb feature allows you to prevent the phone from ringing and receiving incoming calls. When Do Not Disturb is activated and someone calls your phone, the caller hears a busy tone. - Page 35 User's Manual 4. Customizing Your Phone Press the ENTER key to save the date settings; you are returned to the previous menu. Select the Time option (using the Navigation keys), and then press the ENTER key. Edit the time in the format hh:mm. Use the Navigation keys to move between digits.
- Page 36 310HD IP Phone Reader’s Notes User's Manual Document #: LTRT-24701 VoIPon www.voipon.co.uk sales@voipon.co.uk Tel: +44 (0)1245 808195 Fax: +44 (0)1245 808299...
-
Page 37: Basic Phone Operations
User's Manual 5. Basic Phone Operations Basic Phone Operations This chapter describes the phone’s basic calling operations. Using the Phone’s Audio Devices You can use one of the following audio devices on the phone for speaking and listening: Handset: Simply lift the handset off the cradle to answer or make a call. Hands-free modes: •... -
Page 38: Dialing With The Keypad
310HD IP Phone To end dialing of a call (before the call is answered): Press the SPEAKER key. 5.2.1 Dialing with the Keypad You can make calls by dialing the number directly from the phone’s keypad. To make a call using the keypad: Enter the telephone number using the alphanumerical keypad. -
Page 39: Dialing Logged (History) Calls
User's Manual 5. Basic Phone Operations 5.2.3 Dialing Logged (History) Calls The phone logs all calls (missed, received and dialled). You can easily dial a logged call, as described in the procedure below. To dial a logged call: From the idle screen, press the MENU key, and then select the Call History menu. Select the Missed Calls, Received Calls, or Dialed Numbers option (using the Navigation keys), and then press the ENTER key;... -
Page 40: Answering Calls
310HD IP Phone Answering Calls The phone indicates an incoming call by the following: Screen displays the caller’s ID and the “Calling” notification Phone rings (ringing tone) System Status LED flashes red You can answer a call, by performing one of the following:... -
Page 41: Viewing Call History
User's Manual 5. Basic Phone Operations Viewing Call History Your phone stores logged missed, received, and dialed calls. In idle display, the phone indicates missed calls by displaying the “Missed Call” notification with the number of missed calls, as shown below: To easily view missed calls from the idle display: If the “Missed Call”... - Page 42 310HD IP Phone Select a logged entry (using the Navigation keys), and then press the ENTER key; the following screen appears: Select one of the following options (using the Navigation keys), and then press the ENTER key: • Dial: dials the number of the selected call entry.
-
Page 43: Advanced Phone Operations
User's Manual 6. Advanced Phone Operations Advanced Phone Operations This chapter describes advanced calling features offered by your phone. Calling Phone Directory Contacts You can make calls to contacts that are listed in the phone’s directory. To dial a phone directory contact: Access the phone directory, by performing one of the following: •... -
Page 44: Placing Calls With Speed Dialing
310HD IP Phone Select the required number, and then press the ENTER key; the phone automatically dials the contact’s number and attempts to place the call, as shown below: Placing Calls with Speed Dialing You can use the Speed Dial keys (located on the right side of the phone) to quickly dial a configured speed dial number. -
Page 45: Making Simultaneous Calls
User's Manual 6. Advanced Phone Operations Making Simultaneous Calls Your phone allows you to make up to two calls on the same line. This is achieved by placing the first call on hold before making the second call. To make multiple calls: Make the first call. -
Page 46: Hosting Three-Way Conference Calls
310HD IP Phone Hosting Three‐Way Conference Calls You can make a three-way conference call between your phone and two other called parties. To make a three‐way conference call: Make a call to the first participant of the conference call. Put the first call on hold (by pressing the HOLD key). - Page 47 User's Manual 6. Advanced Phone Operations Transfer the call: • Semi-Attended Transfer: While the called party is ringing (i.e., before call is answered), press the TRANSFER key. • Attended Transfer: Wait until the call is answered (if necessary, speak to the called party), and then press the TRANSFER key.
-
Page 48: Muting Calls
310HD IP Phone Muting Calls The phone allows you to mute the phone’s microphone (of the handset, headset, and speakerphone) during a call so that the other party cannot hear you. While a call is muted, you can still hear the other party but the other party cannot hear you. Muting calls can also be used during conference calls. -
Page 49: Retrieving Voice Mail Messages
User's Manual 6. Advanced Phone Operations Retrieving Voice Mail Messages When you have at least one new message in your voice mail box, the System Red LED is lit. This is typically referred to as message waiting indication (MWI). To listen to voice mail messages: Press the VOICE MAIL key;... - Page 50 AudioCodes 300HD Series of High Definition IP Phones HD VoIP 310HD IP Phone User’s Manual 310HD IP Phone Version 1.4.0 www.audiocodes.com VoIPon www.voipon.co.uk sales@voipon.co.uk Tel: +44 (0)1245 808195 Fax: +44 (0)1245 808299...
Need help?
Do you have a question about the 310HD and is the answer not in the manual?
Questions and answers