Grohe Avensys Installation Instructions And Operating Manual
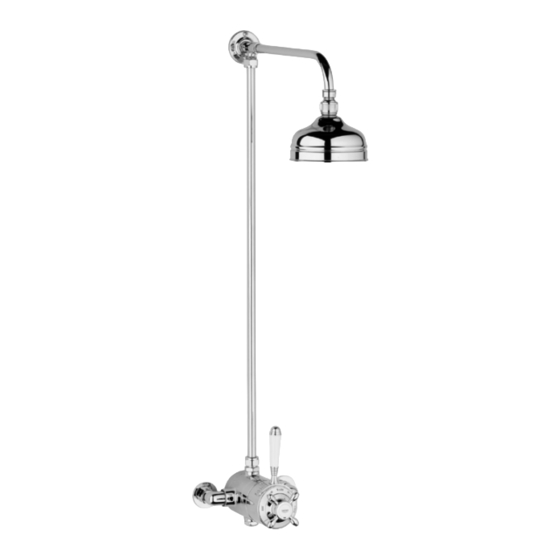
Exposed dual thermostat mixing valve
Hide thumbs
Also See for Avensys:
- Installation instructions and operating manual (14 pages) ,
- Installation instructions and operating manual (13 pages) ,
- Installation instructions and operating manual (12 pages)
Table of Contents

Related Manuals for Grohe Avensys


Summary of Contents for Grohe Avensys
- Page 1 956212.book Seite 1 Mittwoch, 19. Dezember 2001 8:04 08 Avensys Exposed Dual Thermostat Mixing Valve 34 042 Installation Instructions and Operating Guide Please leave this document with the user after finishing installation! 95.621.231/ÄM 41 385/12.01...
- Page 2 kl956212.fm Seite 1 Montag, 17. Dezember 2001 5:45 17 Table Of Contents Installation Dimensions (mm) 34 042 Wallplugs Screws Outlet Nipple Wallplugs Headshower Screws Escutcheons Backplate Filters Valve Body Threaded Rings Plug Flow Limiters...
- Page 3 kl956212.fm Seite 2 Montag, 17. Dezember 2001 5:45 17 Spare Parts...
- Page 4 Technical Data ....6 Thank you for choosing a GROHE product. Installation ..... . . 7 Please follow these instructions carefully Exposed Installation .
- Page 5 Technical Data Functioning Principle Specification This Avensys mixing valve is a thermostatic x Exposed thermostatic shower mixing mixer with wax cartridge. Turning the shut- valve, concealed or exposed supplies off lever in a counter-clockwise direction x Flow pressure opens the water flow. Turning the tem- - Low pressure 0.1 - 1 bar...
- Page 6 956212.book Seite 7 Mittwoch, 19. Dezember 2001 8:04 08 Installation Exposed Installation In case of exposed installation with supply pipes from above or below rotate inlet This thermostatic shower mixing valve is to elbows 90q and connect to 15mm supply be installed with the outlet at the top for use pipes.
- Page 7 956212.book Seite 8 Mittwoch, 19. Dezember 2001 8:04 08 Installation 6.Mark the holes in the backplate for wall- 9. Slide the escutcheons (H) over the plugs, see Fig. [4]. supply pipes and install filters (J), see Fig. [7]. 7.Drill the holes (6mm) for the wallplugs (F) and fit them into the wall, see Fig.
- Page 8 956212.book Seite 9 Mittwoch, 19. Dezember 2001 8:04 08 Installation Open hot and cold water supply. Shower Connection 1.Close bottom outlet with plug (K), Check the pipework and connections to the see Fig. [9]. thermostat mixing valve for leaks. For reversed supplies installation the complete mixing valve must be rotated 180q.
- Page 9 956212.book Seite 10 Mittwoch, 19. Dezember 2001 8:04 08 Installation Adjustment 4.Unscrew screw (N). The temperature of the outflowing water is 5.Pull off temperature cross handle (O). factory set to 43 qC. A temperature adjust- 6.Check the temperature of the outflowing ment is necessary if: water with a thermometer, see Fig.
- Page 10 956212.book Seite 11 Mittwoch, 19. Dezember 2001 8:04 08 Maintenance I. Control Unit 15. Take out O-ring seal (U1). 1. Shut off hot and cold water supply! 16. Take out wax element (V), slider (W) and 2. Turn the shut-off lever counter-clockwise spring (X).
- Page 11 10. Install shower and tighten outlet nipple (L). 11. Push on stop ring (T) with catch (T1) on top. 12. Reinstall cover ring (S) with mark (S1) on top. Only genuine GROHE replacement parts 13. Push on adapter (R). must be used.
- Page 12 Care We want to ensure that you get long-lasting your fitting dull and scratched. As the for- satisfaction and pleasure from your GROHE mulations of commercially available cleaning fitting. Therefore, please read the following agents frequently change, we cannot gua-...
- Page 13 956212.book Seite 14 Mittwoch, 19. Dezember 2001 8:04 08...
- Page 14 Fax: 0208 / 594 88 98 AG & Co. KG © 2000 Friedrich Grohe Friedrich Grohe AG & Co. KG · P.O. Box 1361 · 58653 Hemer/Germany Tel. (0) 23 72 / 93 - 0 · Fax: (0) 23 72 / 93 13 22...
Need help?
Do you have a question about the Avensys and is the answer not in the manual?
Questions and answers