Table of Contents
Advertisement
Advertisement
Table of Contents

Related Manuals for SWR 550x


Summary of Contents for SWR 550x
- Page 1 550x OWNER’S MANUAL SWR • CORONA, CA • USA 550x • 1...
-
Page 2: Important Safety Instructions
Q. SAFETY CHECK: Upon completion of any service or repairs to this product, ask the service technician to perform safety checks to determine that the product is in proper operating condition. R. HEAT: The product should be situated away from heat sources such as radiators, heat registers, stoves or other products that produce heat. 2 • 550x... - Page 3 U.S.A. at our factory in Southern California. So how did the 550x come about? We found that some folks wanted the combined feature sets of the X Series amplifiers in one package. Some 350x enthusiasts wanted more power. Others interested in the 750x preferred a two-rack-space configu- ration.
-
Page 4: Electrical Specifications
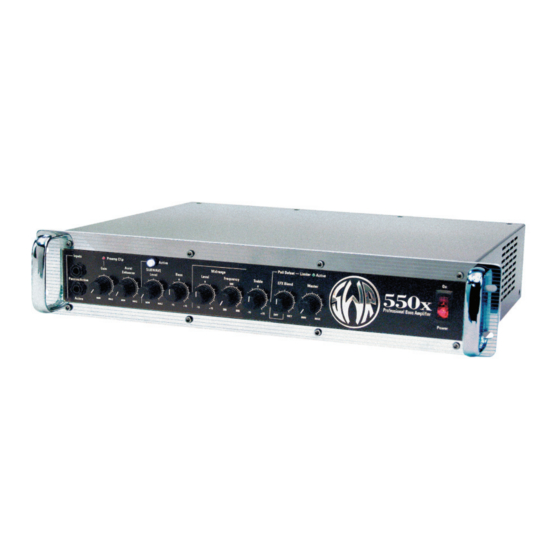
550x - FRONT PANEL FEATURES • Dual independent input jacks compatible with both passive and active instruments • Preamp Gain control with red LED clip indicator • Aural Enhancer control • SubWave™ Activator Switch (illuminated blue when engaged) • SubWave™ Level control •... - Page 5 XLR (Balanced) Out: 750 Ohms Signal To Noise Ratio -72 dB (<10 millivolts typical) Equivalent Input Noise 9 microvolts Dimensions (depth includes handles and XLR pad) 19" W x 3.5" H x 16" D Weight 26 lbs. 550x • 5...
- Page 6 Using a speaker cable of 18 gauge or heavier (the heavier the cable, the lower the gauge), simply connect any one of the 550x's Speaker Output jacks to the input jacks of your speaker cabinet. If your cabinet is a 4 ohm enclosure, the 550x will deliver 550 watts into it.
- Page 7 The best judge is your own ears. If you're using a keyboard or bass pedal with the 550x, we have found the best choice to be the Active input. NOTE: Using the Active input with passive basses (active instruments will always employ a battery) may result in a loss of high end transients.
-
Page 8: Gain Control
AURAL ENHANCER The Aural Enhancer is a feature that's been on just about every SWR amplifier since the company's inception in 1984, and is a trademark part of the "SWR Sound" people have come to know and love. It was developed to help bring out the fundamental low notes of the bass guitar, enhance the high-end transients, and reduce certain frequencies that help "mask"... - Page 9 Based on the circuit from SWR's groundbreaking Mo' Bass Soundstation, the SubWave™ on your 550x is a lightning-quick sub- octave wave engine with tracking superior to other models of sub-octave effects currently on the market. In plain terms, it hears the note you play and immediately generates a signal one octave below it–all the way down to low 'C#', 'C', or even low 'B' on some basses! SubWave™...
- Page 10 MIDRANGE CONTROLS Your 550x comes equipped with two different controls for setting the amount of midrange present: one for boosting and cut- ting the level of midrange, and another for setting the specific midrange frequency that will be adjusted in level.
- Page 11 LIMITER/COMPRESSOR CIRCUIT The Limiter found in the 550x is a soft knee type limiter. The Limiter circuit is located after (post) the Master Volume and before (pre) the power amplifier. Therefore, the Limiter is driven by the Master Volume control. Its threshold (starting point) is preset by the factory so that the user can get maximum overall apparent volume without unduly overdriving (or "clipping") the...
-
Page 12: Master Volume Control
LINE position (dictated by the setting of the Effects Blend control on your 550x). When in this position, the output level will be affected by the Gain control on the front panel as well as the XLR Pad control. - Page 13 Sometimes connecting to certain mixing boards or studio consoles with non-standard XLR wiring can cause a ground loop. Your 550x has a push-button switch for lifting the ground on the Balanced (XLR) Output. (It affects no other outputs.) Pushing on the switch will change the mode of operation. When the switch is in the "out" position (default setting from the factory), ground is on Pin 1 of the Balanced Output jack as normal.
-
Page 14: Tuner Out
To use this feature, connect a shielded patch cord from the Tuner Out jack on your 550x to the input jack on your tuner. Turn the amplifier on and you're ready to go. If you do not wish to monitor your sound during the tuning process, you may turn down the Master Volume. -
Page 15: Effects Send
This jack's primary function is to complete the Effects Loop circuit by routing the post-external-effects device signal back into the power amp of the 550x, where it can be blended back in with the original signal by using the Effects Blend control on the front panel. - Page 16 550x - SPEAKER OUTPUT SECTION This section of the manual will deal with the proper connection of speaker cabinets to the power amplifier in the 550x. Some of this ground has already been covered in the Getting Started–Connecting Your Speaker Cabinets section in the begin- ning of the manual.
- Page 17 The number one enemy of any power amp is heat. We have listed the minimum impedance of the 550x at 4 ohms so that the extraordinary amount of power available in this two-rack-space configuration is not compromised by exposing the power amp to the additional heat that operation at 2.6 ohms or 2 ohms would generate.
-
Page 18: Speaker Output Jacks
SPEAKER OUTPUT JACKS Two 1/4" phone jacks and two Speakon Jacks (all wired in parallel) are provided for connection of the 550x to your speaker system. Whenever possible, use of the Speakon jacks is recommended. Speakon jacks and connectors offer the best possible connection and are far superior to banana or 1/4"... -
Page 19: Rack Mounting Instructions
The 550x takes up two full rack spaces (3 1/2"). If the rack in which you mount your 550x requires that the rubber feet on the bottom of the chassis be removed, please remember to keep the screws handy in case you wish to reattach the rubber feet at a later date. -
Page 20: Suggested Settings
The 550x should be mounted as close to the bottom of the rack case as possible. If you must mount the 550x in an area of the rack other than the bottom space, a piece of wood or similar solid material should be installed between the bottom of the rack case and the bottom of the amplifier to prevent flexing of the amplifier's chassis. - Page 21 After you find combinations you like, don't forget to try adding in the SubWave™…as much as you feel is necessary. 550x • 21...
- Page 22 SWR 550x – SUGGESTED SETTINGS Midrange Aural Enhancer Bass Level Frequency Treble ROCK Midrange Aural Enhancer Bass Level Frequency Treble REGGAE Midrange Aural Enhancer Bass Level Frequency Treble JAZZ Midrange Aural Enhancer Bass Level Frequency Treble SLAP Midrange Aural Enhancer...
- Page 23 SWR is warranted to the original consumer purchaser for TWO YEARS from the date of purchase against defects in materials and workmanship, provided that it is purchased from an Authorized SWR dealer. This warranty applies only to products purchased in the USA or Canada.
Need help?
Do you have a question about the 550x and is the answer not in the manual?
Questions and answers