Advertisement
Quick Links
Operator's Manual
18V Lithium-Ion Hammer Drill
241-0916
IMPORTANT
WARNING! To reduce the risk of injury, user must read instruction manual.
Safety symbols in this manual are used to flag possible dangers. The safety
symbols and their explanations require your full understanding. The safety warn-
ings do not, by themselves, eliminate any danger, nor are they substitute for
proper accident prevention measures.
This Safety Alert Symbol indicates caution, warning, or danger. Failure to
obey a safety warning can result in serious injury to yourself or others. To reduce
the risk of injury, fire, or electric shock, always follow the safety precautions.
CHARGE BATTERY
BEFORE FIRST USE
Advertisement

Related Manuals for Performax 241-0916


Summary of Contents for Performax 241-0916
- Page 1 Operator’s Manual 18V Lithium-Ion Hammer Drill 241-0916 CHARGE BATTERY BEFORE FIRST USE IMPORTANT WARNING! To reduce the risk of injury, user must read instruction manual. Safety symbols in this manual are used to flag possible dangers. The safety symbols and their explanations require your full understanding. The safety warn- ings do not, by themselves, eliminate any danger, nor are they substitute for proper accident prevention measures.
-
Page 2: Table Of Contents
TABLE OF CONTENTS Safety Symbols ……………..………………………………………..Page 3 Safety Instructions ……………………………….….......Page 5 Description …..…………………………………….…......Page 10 Assembly ……………..………………………………………....Page 11 Operation……………..………………………………………..….Page 12 Maintenance ………..……………………………………..…..…Page 21 Troubleshooting ……..………………………………………....Page 23 Warranty ……..………………………………………......Page 24 INTRODUCTION SAVE THESE INSTRUCTIONS This hammer drill has many features for making its use more pleasant and enjoyable. -
Page 3: Safety Symbols
SAFETY SYMBOLS The purpose of safety symbols is to attract your attention to possible dangers. The safety symbols and the explanations with them deserve your careful attention and understanding. The symbol warnings do not, by themselves, eliminate any danger. The instructions and warnings they give are no substitutes for proper accident prevention measures. - Page 4 SAVE THESE INSTRUCTIONS Some of these following symbols may be used on this tool. Please study them and learn their meaning. Proper interpretation of these symbols will allow you to operate the tool better and more safely. SYMBOL NAME DESIGNATION/EXPLANATION Volts Voltage Amperes...
-
Page 5: Safety Instructions
SAFETY INSTRUCTIONS GENRAL SAFETY RULES WARNING: Read all safety warnings and instructions. Failure to follow the warnings and instructions may result in electric shock, fire and/or serious injury. Save all warnings and instructions for future reference. The term power tool in the warnings refers to your mains-operated (corded) power tool or battery-operated (cordless) power tool. - Page 6 3) PERSONAL SAFETY Stay alert, watch what you are doing and use common sense when operating a power tool. Do not use the tool while tired or under the influence of drugs, alcohol, or medication. A moment of inattention while operating power tools may result in serious personal injury.
- Page 7 Maintain power tools. Check for misalignment or binding of moving parts, breakage of parts and any other condition that may affect the power tool’s operation. If damaged, have the power tool repaired before use. Many accidents are caused by poorly maintained power tools. keep cutting tools sharp and clean.
- Page 8 Use protective gloves when removing the bit from the tool, or first allow the bit to cool down. The bit may be hot after prolonged use. keep your hands away from the motor-housing vents. Hot gas comes from the vents during operation. Do not operate the tool at full-load for more than 30 seconds, as this can cause the motor to become too hot, which may damage the motor.
- Page 9 keep the cord and charger from heat to prevent damage to the housing or internal parts. Do not allow gasoline, oils, petroleum-based products, etc. to come in contact with plastic parts. These materials contain chemicals that can damage, weaken, or destroy plastic. An extension cord should not be used unless absolutely necessary.
-
Page 10: Description
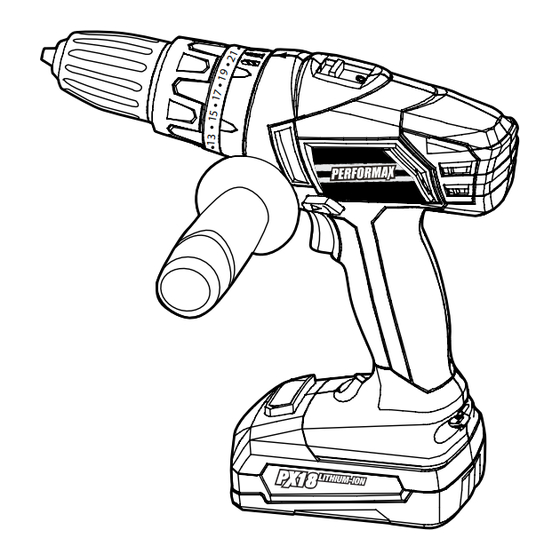
DESCRIPTION kNOW YOUR HAMMER DRILL (Fig. 1) Before attempting to use this hammer drill, familiarize yourself with all of its operating features and safety requirements. WARNING: Do not allow familiarity with your hammer drill to make you care- less. Remember that a careless fraction of a second is sufficient to inflict severe injury. -
Page 11: Assembly
WARNING: The safe use of this product requires an understanding of the information included on the tool and in this operator’s manual, as well as know- ledge of the project you are attempting. Before using this product, familiarize yourself with all operating features and safety rules. ADJUSTABLE TORQUE The drill has 23+1 screw-driving positions. -
Page 12: Operation
UNPACkING This product has been shipped completely assembled. Carefully remove the tool and any accessories from the box. Make sure that all items listed in the packing list are included. Inspect the tool carefully to make sure that no breakage or damage occurred during shipping. - Page 13 HOW TO CHARGE THE BATTERY PACk NOTICE: This Lithium-Ion battery pack is shipped partially charged. Before using it the first time, fully charge the battery pack. A fully discharged battery pack will charge about 60 minutes in a surrounding temperature between 41° F (5 C) and 122°...
- Page 14 CHARGING A COLD BATTERY PACk If the battery pack is below normal temperature range, the red LED on the charger will turn on and the green LED will be off. When the battery warms to a temperature of more than 41°F (5°C), the charger will automatically begin charge mode.
- Page 15 TO DETACH BATTERY PACk (Fig. 4) 1. Lock the trigger switch on the drill by placing the direction of rotation (forward/center lock/reverse) selector in center position. 2. Depress the battery release buttons located on the front of the battery pack to release the battery pack.
- Page 16 kEYLESS CHUCk (Fig. 6) The hammer drill has a keyless chuck to tighten or release drill bits in the chuck jaws. The arrows on the chuck indicate which direction to rotate the chuck body in order to GRIP (tighten) or OPEN Fig.
- Page 17 SCREWDRIVING/DRILLING/HAMMER DRILLING MODE SELECTION (Fig. 8) To select the mode, rotate the mode Fig. 8 selection ring until the appropriate icon Mode selection ring aligns with the arrow and clicks into position. Screwdriving Rotate the mode selection ring so the screw symbol is aligned with the arrow.
- Page 18 NOTICE: When adjusting the torque clutch make sure that the speed switch is completely in either the LO or HI position. CAUTION! Do not change the torque setting when the tool is running. LED WORkLIGHT (Fig. 10) Fig. 10 The LED worklight, located on the base of the drill, will illuminate when the trigger switch is depressed.
- Page 19 2. Open the chuck jaws. NOTICE: Rotate the chuck body in the direction of the arrow marked OPEN to close the chuck jaws. Do not use a wrench to tighten or loosen the chuck jaws. 3. Remove the drill bit. USING THE AUXILIARY HANDLE ASSEMBLY WARNING: To reduce the risk of injury, always use the auxiliary handle when operating and hold tool with both hands to maximize control.
- Page 20 2. For wood drilling, use twist bits, spade bits, power auger bits or hole saws. Begin drilling at a very low speed to prevent the bit from slipping off the starting point and increase the speed as the drill bit bites into the material. When drilling “through”...
-
Page 21: Maintenance
MAINTENANCE WARNING: To avoid personal injury, always remove the battery pack from the tool when cleaning or performing any maintenance. GENERAL MAINTENANCE The tool may be cleaned most effectively with compressed dry air. Always wear safety goggles when cleaning tools with compressed air. Avoid using solvents when cleaning plastic parts. - Page 22 BATTERY PACk REMOVAL AND PREPARATION FOR RECYCLING To preserve natural resources, please recycle or dispose of batteries properly. This product contains lithium-ion batteries. Local, state, or federal laws may prohibit disposal of lithium-ion batteries in ordinary trash. Consult your local waste authority for information regarding available recycling and/or disposal options.
-
Page 23: Troubleshooting
TROUBLESHOOTING PROBLEM CAUSE SOLUTION The drill does not Battery is depleted Charge the battery work Bit cannot be Sleeve is not released Release the sleeve installed Bit does not fit the chuck Use the proper bit Motor overheating Be sure cooling vents Clean, clear vents. -
Page 24: Warranty
MENARDS® retail store. At its discretion, PERFORMAX® agrees to have the tool or any defective part(s) repaired or replaced with the same or similar PERFORMAX® product or part free of charge, within the stated warranty period, when returned by the original purchaser with original sales receipt.
Need help?
Do you have a question about the 241-0916 and is the answer not in the manual?
Questions and answers