Table of Contents
Advertisement
Quick Links
Rating:
Amperes:
Chuck speed:
Chuck:
Maximum drilling capacity in wood:
Maximum drilling capacity in metal:
Weight:
Need Assistance?
Call us on our toll free customer support line:
1-866-349-8665
Technical questions
Replacement parts
Parts missing from package
PRODUCT SPECIFICATIONS
120 V, 60 Hz, AC
5.5 AMP
0–2,700 RPM (no load)
3/8" Keyless
1" (25 mm)
3/8" (10 mm)
3 lb 12 oz (1.7 kg)
1
5.5AMP 3/8" DRILL
Owner's Manual
241-0955
Advertisement
Table of Contents

Related Manuals for Performax 241-0955


Summary of Contents for Performax 241-0955
-
Page 1: Product Specifications
5.5AMP 3/8” DRILL 241-0955 Owner’s Manual PRODUCT SPECIFICATIONS Rating: 120 V, 60 Hz, AC Amperes: 5.5 AMP Chuck speed: 0–2,700 RPM (no load) Chuck: 3/8" Keyless Maximum drilling capacity in wood: 1" (25 mm) Maximum drilling capacity in metal: 3/8" (10 mm) Weight: 3 lb 12 oz (1.7 kg) -
Page 2: Table Of Contents
TABLE OF CONTENTS Product specifications ………….………………………………………………………………... Table of contents ……………………………………………………………………....General safety warnings ………………………………………………………………………… 3–4 Eye, ear & lung protection ………………………………………………………………………. 3–4 Electrical safety …………………………………………………………………………………... Power tool safety ……………………………………………………………………....5–6 General safety rules ……………………………………………………………………………... Work area ………………………………………………………………….……………………... Electrical safety …………………………………………………………………………………... Personal safety …………………………………………………………………………………... -
Page 3: General Safety Warnings
GENERAL SAFETY WARNINGS WARNING: Before using this tool or any of its accessories, read this manual and follow all Safety Rules and Operating Instructions. The important precautions, safeguards and instructions appearing in this manual are not meant to cover all possible situations. It must be understood that common sense and caution are factors which cannot be built into the product. -
Page 4: Electrical Safety
GENERAL SAFETY WARNINGS EYE, EAR & LUNG PROTECTION – cont’d WEAR A DUST MASK THAT IS DESIGNED TO BE USED WHEN OPERATING A POWER TOOL IN A DUSTY ENVIRONMENT. WARNING: Dust that is created by power sanding, sawing, grinding, drilling, and other construction activities may contain chemicals that are known to cause cancer, birth defects, or other genetic abnormalities. -
Page 5: Power Tool Safety
POWER TOOL SAFETY WARNING: Read all safety warnings and When operating a power tool outdoors, use all instructions. Failure to follow the warnings an extension cord suitable for outdoor use. and instructions may result in electric shock, fire Use of a cord suitable for outdoor use reduces and/or serious injury. -
Page 6: Personal Safety
POWER TOOL SAFETY PERSONAL SAFETY – cont’d Keep cutting tools sharp and clean. Properly maintained cutting tools with sharp cutting Dress properly. Do not wear loose clothing edges are less likely to bind and are easier to or jewelry. Keep your hair, clothing and control. -
Page 7: Specific Safety Rules
SPECIFIC SAFETY RULES Secure the workpiece. Use clamps or a vise to WARNING: Know your drill. Do not plug hold the workpiece. It is safer than using your the drill into the power source until you have hand and it frees both hands to operate the tool. read and understand this Instruction Manual. -
Page 8: Extension Cord Safety
EXTENSION CORD SAFETY WARNING: Keep the extension cord clear of the working area. Position the cord so it will not get caught on the workpiece, tools or any other obstructions while you are working with the power tool. Make sure any extension cord used with this tool is in good condition. -
Page 9: Symbols
SYMBOLS WARNING: Some of the following symbols may appear on the drill. Study these symbols and learn their meaning. Proper interpretation of these symbols will allow for more efficient and safer operation of this tool. Volts Direct current Amperes No load speed Hertz Alternating or direct current... -
Page 10: Know Your Drill
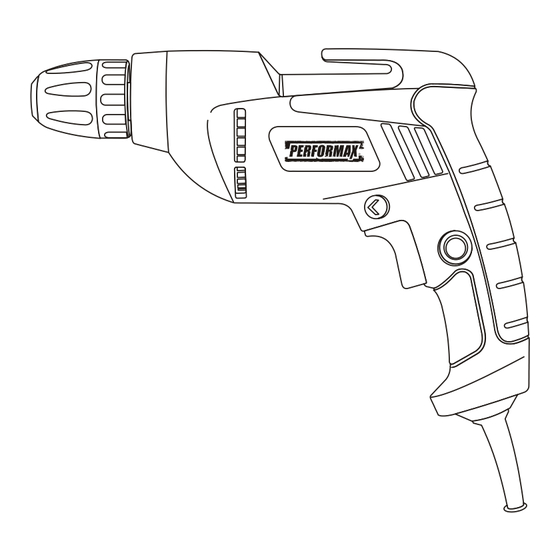
KNOW YOUR DRILL Belt clip Chuck Air vents Air vents Trigger switch Forward/reverse lock-on button button Variable speed trigger switch... -
Page 11: Assembly And Operating
ASSEMBLY AND OPERATING FORWARD/REVERSE SWITCH The forward/reverse switch (1) is conveniently mounted above the trigger switch (2) (Fig. 1). To make the drill rotate clockwise for drilling, push the forward/reverse switch to the left. To make the drill rotate counter-clockwise, push the forward/reverse switch to the right. -
Page 12: Removing Bits
ASSEMBLY AND OPERATING INSTALLING DRILL BITS – cont’d REMOVING BITS NOTE: Make sure the bit is properly aligned in To open the keyless drill chuck, grasp and the jaws and NOT at an angle. An improperly hold the chuck collar with one hand. Rotate aligned bit could be thrown from the chuck when the chuck body in a counter-clockwise the drill is started. -
Page 13: Drilling
ASSEMBLY AND OPERATING NOTE: Make sure the hand placed on the body WARNING of the drill does not cover the air vents. Covering these air vents will reduce motor cooling, and Have you read "GENERAL SAFETY possibly lead to overheating the motor. WARNINGS”, "POWER TOOL SAFETY WARNINGS", "SPECIFIC SAFETY While holding the drill firmly, place the point... -
Page 14: Removing The Chuck
ASSEMBLY AND OPERATING WARNING: Be prepared for binding and bit breakthrough. When these situations occur, the drill bit has a tendency to grab the workpiece. This action will kick the drill opposite to the direction of drill bit rotation, and could cause loss of control when breaking through material as you complete drilling the hole. -
Page 15: Retightening A Loose Chuck
ASSEMBLY AND OPERATING REMOVING THE CHUCK – cont’d Fig. 10 Fig. 9 RETIGHTENING A LOOSE CHUCK After installing a chuck that has previously been removed, the chuck may become loose on the spindle and develop a wobble. Also, the chuck screw may become loose, causing the chuck jaws to bind and preventing them from closing. -
Page 16: Maintenance
MAINTENENCE GENERAL WARNING: When servicing, use only identical replacement parts. The use of any other part may create a hazard or cause product damage. DO NOT use solvents when cleaning plastic parts. Plastics are susceptible to damage from various types of commercial solvents and may be damaged by their use. -
Page 17: Exploded View
EXPLODED VIEW... -
Page 18: Parts List
PARTS LIST WARNING: When servicing, use only original equipment replacement parts. The use of any other parts may create a safety hazard or cause damage to the drill. Any attempt to repair or replace electrical parts on this drill may create a safety hazard unless repairs are performed by a qualified technician. -
Page 19: Warranty
® PERFORMAX 5.5AMP 3/8" DRILL WARRANTY 30-DAY MONEY BACK GUARANTEE: ® This PERFORMAX brand power tool carries our 30-Day Money Back ® Guarantee. If you are not completely satisfied with your PERFORMAX brand power tool for any reason within thirty (30) days from the date of purchase, return ®...
Need help?
Do you have a question about the 241-0955 and is the answer not in the manual?
Questions and answers