Table of Contents
Advertisement
Quick Links
Download this manual
See also:
User Manual
Advertisement
Table of Contents

Related Manuals for DOD GS300


Summary of Contents for DOD GS300
- Page 1 GS600 User manual...
- Page 2 DOD GS300/GS600 CAR BLACK BOX FULL HD 1920 x 1080@30FPS Loop recording Wide vision angle 120 degree AV OUT or HDMI output...
-
Page 3: Table Of Contents
Contents Instructions before use ·························································································· 03 Preface ············································································································· 03 Product Guarantee ·························································································· 03 Copyright infringement Warning ····································································· 03 Check Product Accessories··············································································· 04 Product Structure ··································································································· 05 Front View ······································································································· 05 Bottom View ···································································································· 05 Rear View ········································································································ 06 Top View ·········································································································· 06 Remote Controller Image·················································································... - Page 4 Product Specifications ····················································································· 48...
-
Page 5: Instructions Before Use
Instructions before use Preface This user manual will describe the usage of this product in details and at the same time provide comprehensive information including usage, operation, installation instructions and specification, etc. Please read the manual carefully and keep it properly. We hope our product will satisfy your need and provide you with long-term services. -
Page 6: Check Product Accessories
Check Product Accessories Please check whether the following accessories are present before 1. Vehicle Power Cable (4M) x1 2. Holder x1 3. AV V ideo Cable x1 4. USB Cable x1 5. Remote Controller x1 6. User Manual x1... -
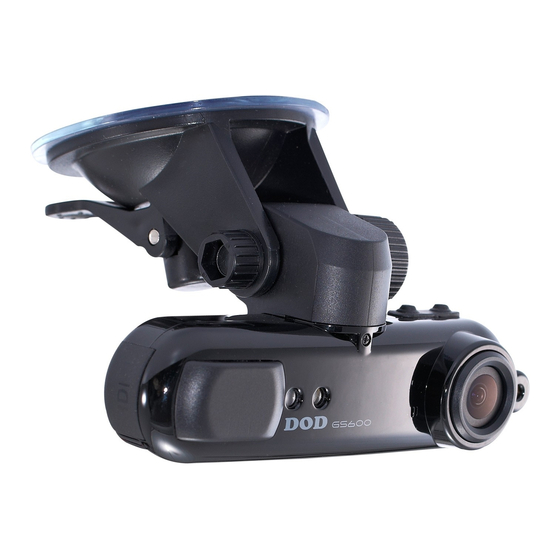
Page 7: Product Structure
Product Structure Front View Bottom View 1. Laser light 2. Lens 3. Microphone 4. Remote Controller Receptor 5. HDMI Port 6. Format Button 7. Forced Shutdown Button 8. DC Power Port 9. USB Port/AV Output... -
Page 8: Rear View
Rear View Top View 1. Micro-SD Card Slot 2. Halt Recording/USB Switch 3. Laser Ray Button 4. Blue Indicator Light (GPS) 5. Red Indicator Light (Recording) 6. Audio Switch 7. Data Protection Button... -
Page 9: Remote Controller Image
Remote Controller Image 1. Recording Button 2. Mode Button 3. Menu Button 4. Playback Button 5. Up Button 6. Down Button 7. Left Button 8. Right Button 9. OK Button... -
Page 10: Installation
Installation Holder Installation Combine the suction cup holder with the host device Memory Card Installation (Optional Purchase) Install the Micro SD card into the drive recorder in the specific direction. -
Page 11: Installation On Your Vehicles
Installation on Your Vehicles Step 1 Install the suction cup holder by having it sucked onto the windshield with the lens facing forward. Step 2 Plug the vehicle power cable in the cig lighter, and plug the other end to the DC port of the drive recorder. - Page 12 Step 3 After installation, you may arrange the surplus power cable and hide it inside Column A. Step 4 Switch ON the power, a red light blinking means it is under recording mode; press the infrared-red laser ray button and adjust the lens direction according to the position of the red dot to complete the installation.
-
Page 13: Transmit The Video To The Vehicle Monitor
Transmit the video to the vehicle monitor Video can be transmitted through AV IN interface if there are video equipments (vehicle monitor, GPS, and Satellite TV, etc.). The following is an example on transmitting the video to the monitor by using GPS with build-in AV IN function. -
Page 14: Transmit The Video To Lcd Tv
Transmit the video to LCD TV You can also transmit the video from the drive recorder to your LCD TV at home to playback the data or adjust the setting. The steps are as follows: 1. Your video equipment should have AV IN or HDMI ports. 2. -
Page 15: Component Descriptions
Component Descriptions 1. SAVE - Data Protection Button Press SAVE button, and you can manually set the data under recording to protection mode, so as to prevent it from being overwritten. Audio Button Press Audio button to select whether to record the sound during recording. - Page 16 Halt recording / USB switch Pressing and holding for 2~3 sec., the red light will stop blinking and become constant indicating recording stopped. Pressing and holding again for 2~3 sec., red light will start blinking again and recording will continue. Connect the drive recorder to the computer with USB cable, and press for 2~3 sec.
-
Page 17: Menu Operation
Menu Operation Transmit the video to the monitor (Page12,13) before proceeding to menu operation, and use the remote controller to operate (Page08). Image Param Video resolution Video resolution can be configured during recording. Higher value means higher resolution and better picture quality, and the storage capacity consumption will be relatively higher. - Page 18 Scene Scene setting can be done to allow shooting to be more conformed to the surroundings and achieve optimum shooting effect. Select [AUTO] to allow the recorder to choose the setting automatically. Remove Controller MENU Button Image Param Menu Scene Auto */ Night Portrait / Night Scenery / Sports / Landscape / Portrait / Sunset...
- Page 19 Digital effect This effect produced by this setting can achieve certain playfulness, and changes in color are more apparent. Remote Controller MENU Button Image Param Menu Digital effect Off */ Art / Sepia / Negative / Monochrome / V ivid *Setting Value...
- Page 20 White Balance Selecting [AUTO] under normal circumstances can choose white balance. If [AUTO] mode cannot produce natural colors, please use appropriate light conditions to change White Balance setting. Remote Controller MENU Button Image Param Menu White Balance Auto */ Incandescent / Sunny / Cloudy Fluorescent...
- Page 21 According to the brightness during shooting, selecting [AUTO] can set optimum ISO sensitivity. Remote Controller MENU Button Image Param Menu Auto */ 100 / 200 / 400 / 800 / 1600 *Setting Value...
- Page 22 If “EV” is adjusted to + side, you can avoid under-exposure, or dark objects as shooting against a bright background. If “EV” is adjusted to – side, then you can avoid over-exposure, or bright objects as shooting against a dark background or at night. Remote Controller MENU Button Image Param Menu -2.0 / -1.7 /...
- Page 23 Contrast Contrast indicates the degree of black color in proportion to white color on the screen. The higher the contrast, dark color will appear darker, and bright color will appear brighter. It is suitable for identifying the number plate in the driving record. Remote Controller MENU Button Image Param Menu Contrast...
- Page 24 Sharpness Sharpness means the significant degree of contour image during shooting. The higher the sharpness the more obvious the contour image of characters and scene, it is very useful for face recognition during drive recording. Remote Controller MENU Button Image Param Menu Sharpness Soft / Standard */ Hard...
- Page 25 Recycle record(GS600) Setting Recycle record can, under limited memory card, repeatedly use the new data to overwrite the old data, in order to achieve non-interrupted recording result. Remote Controller MENU Button Image Param Menu Recycle record No / 1 minute / 5 minutes */ 10 minutes 15 minutes...
- Page 26 Video flip Turn the menu and image vertically to 180 degree. You can also install the drive recorder upside down 180 degree to fit your requirement. Remote Controller MENU Button Image Param Menu Video flip No */ Yes *Setting Value...
-
Page 27: System Setup
System Setup Volume Adjust the volume of build-in speakers of the host device. Remote Controller MENU Button System Setup Menu Volume 0 / 1 / 2 / 3 / 4 / 5 */ 6 / 7 / 8 / 9 / 10 *Setting Value... - Page 28 Flicker Select 50Hz if the power voltage of the country is 220V. Select 60Hz if the power voltage is 50Hz. Remote Controller MENU Button System Setup Menu Flicker 50Hz */ 60Hz *Setting Value...
- Page 29 Auto power off When the drive recorder stop recording, if “AUTO POWER OFF” was set, it will automatically shut off after going through the set time. Remote Controller MENU Button System Setup Menu Auto power off Off */ 1 minute / 3 minutes / 5 minutes *Setting Value...
- Page 30 Time zone(GS600) Please set your area time zone according to Greenwich Mean Time. Taiwan is GMT +8, please set GMT to +8. Remote Controller MENU Button System Setup Menu Time zone -12 / -11 / -10 / -9 / -8 / -7 / -6 / -5 / -4 / -3 / -2 / -1 / 0 / +1 / +2 / +3 / +4 / +5 / +6 / +7 / +8 */ +9 / +10 / +11 / +12...
- Page 31 G Sensor sens. X.Y.Z(GS600) When there is a collision, with the help of the changes in XYZ curves, G Sensor or Gravity Sensor can determine the direction of the collision and simultaneously set the recorded data to protection mode, and the data will not be overwritten by circulated recording. Adjust the sensitivity parameter of XYZ axles.
- Page 32 TV out This setting can be adjusted when you use AV cable or HDMI cable to transmit the video to the monitor. Select local video specifications NTSC or PAL to solve the problem of flicking pictures owing to inappropriate video format. Remote Controller MENU Button System Setup Menu TV out...
- Page 33 Stamp Through this function, you can select whether to show time and date during recording. Remote Controller MENU Button System Setup Menu Stamp On */ Off *Setting Value...
- Page 34 Date & Time Adjust the current date and time. (Drive recorder with GPS feature will automatically sync the standard date and time after positioning, no setting is required). Remote Controller MENU Button System Setup Menu Date & Time Press “OK” key on Remote Controller to enter setting Press the remote controller, select Year, Month, Day, T ime, Minute Press the remote controller to adjust values...
- Page 35 Format Storage card This function will delete all data in the memory card including protected data. When the memory card is used for a long time, too much data will reduce the access efficiency. This function will optimize the access speed of the memory card.
- Page 36 Reset This function will reset all settings on the drive recorder to default factory settings. Remote Controller MENU Button System Setup Menu Reset No */ Press OK Button on the remote controller to process *Setting Value...
- Page 37 Version View the firmware version of the drive recorder. Remote Controller MENU Button System Setup Menu Version * *The version number during factory shipment will be considered as the original version.
-
Page 38: Language
Language Use this setting to adjust the menu to your preferred language. Remote Controller MENU Button Language Menu English Press OK Button on the remote controller to process *Setting Value... -
Page 39: Playback
Playback Before video playback, please transmit the picture to your monitor (Page12,13), and use the remote controller to operate (Page 08). Press playback on remote controller to enter video playback mode. Preview Normal Play/Tuned Play Down Video Index Left Previous Clip Right Next Clip Play Video... - Page 40 Play Play forward / Play Backward Down Stop Left Slow Play 1/2X 1/4X 1/8X 1/16X 1/32X Right Fast Play 2X 4X 8X 16X 32X Pause...
- Page 41 Delete file Delete the single video clip currently selected. Playback button on the remote controller Select video with the remote controller Press Menu button on the remote controller Delete file No / Delete Press OK button on the remote controller to process.
- Page 42 Slideshow Video clips can be played continuously. Setting [1 second] means, after the video is over, it will pause for 1 second before playing the next video clip. Playback button on the remote controller Select video clips with the remote controller Press menu button on the remote controller Slideshow No / 1 second / 2 seconds / 3 seconds...
- Page 43 Display all files During video preview, press key on the remote controller to enter video clips index. Select video clip and press OK key on the remote controller to confirm.
-
Page 44: Connecting To Pc
Connecting to PC Step 1 Insert the memory card into drive recorder (Page09), and take out the short USB cable provided. Step 2 Connect the USB cable with the drive recorder, and connect the other end to the USB port of PC. The red light will start blinking. Step 3 Press and hold the USB switch on the host device for 2~3 seconds to change to... -
Page 45: Q&A
Q&A Q: Why does the blue light on the drive controller not light up (or sometime)? A: Please check if your drive recorder has GPS function. Blue light will stay OFF for the host device without GPS function; this is a normal phenomenon. - Page 46 Q: How to achieve the best quality resolution? 1. Keep the windshield and the lens clean (Please see page46). 2. Please adjust the following parameters in Image Param (Please see page15). Video resolution 1920x1080 30P Digital effect Vivid -1.0 Contrast Hard Sharpness Hard...
- Page 47 Q: How to maintain the lens? Can we use alcohol on it? A: Please do not use toilet paper, alcohol, stain cleaner, and gasoline, etc. to rub the lens. On the lens is a thin plating film, which is to prevent unnecessary light wave from entering the camera.
-
Page 48: Related Parameters
Related Parameters Light indication guide Blue Red light Description Function light Memory card is full Memory card not blink simultaneously inserted USB mode blinking alternately Formatting GPS positioning ---- Constant blue light completed ---- Red light blinking Recording ---- Constant red light Recording stopped... -
Page 49: Video Recording Time (For Reference)
Video Recording Time (For Reference) Memory card(GB) 1920x1080(30FPS) mins mins mins mins 1440x1080(30FPS) mins mins mins mins 1280x720(30FPS) mins mins mins mins 848x480(60FPS) mins mins mins mins 640x480(30FPS) mins mins mins mins Recording time will be different based on different host devices, memory card brands and other settings. -
Page 50: Product Specifications
Product Specifications GS300 GS600 Sensor 5 Mega pixels CMOS Lens 120 degree Focus 10cm – infinity Internal antenna Mini HDMI: Support 1080i/720p output mode V ideo output Composite: NTSC/PAL Recording format 1920x1080(30fps) 1280x720(30fps) Recording resolution 848x480(60fps) V ideo Codec H.264...
Need help?
Do you have a question about the GS300 and is the answer not in the manual?
Questions and answers