
Subscribe to Our Youtube Channel
Related Manuals for Techness RUN 800


Summary of Contents for Techness RUN 800
- Page 1 Motorized Treadmill TECHNESS RUN 800 Owner’s Manual Retain this owner’s manual for future reference Read and follow all instructions in this owner’s manual Version A...
- Page 2 –...
- Page 6 Main frame and base Console User’s manual Left stand post Right stand post User’s manual Hardware Kit Safety key...
- Page 7 Cross Allen wrench 1pcs Allen socket head full thread screw (M8*20)8pcs Cross Allen wrench 1pcs T Allen wrench 1pc Allen screw(M8*50*20)4pcs...
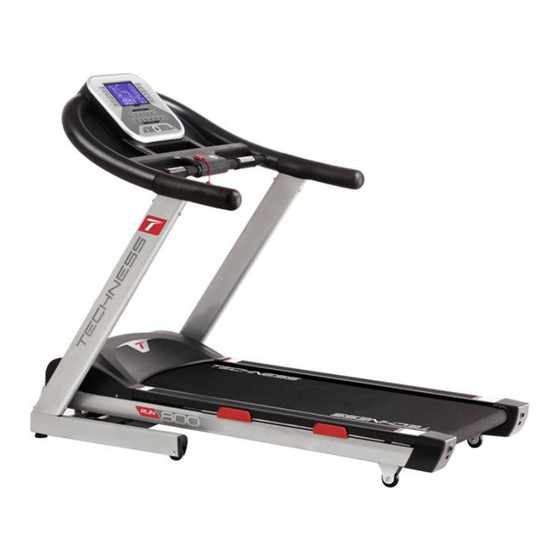
- Page 8 MAIN PARTS OF THE TREADMIL: Motor cover Front roller Rear roller Running board Running belt Side rail Decoration rail End cover (left) End cover (right) Console Incline motor Motor...
- Page 9 Consol Safety key Handle bar Handle Up-right post Motor cover Side rail Base Main Running End Caps...
- Page 10 , ;...
- Page 12 Joint & Check Valve Soft drop...
- Page 13 Wheel...
-
Page 14: Use Instructions
USE INSTRUCTIONS Computer LCD window Incline + Incline - Quick incline Speed + Quick Speed Speed - MP3 for option Program Mode Start/Stop... - Page 15 LCD window display: Distance, time, speed, calorie, pulse, FAT, running sign, running track. Function key: Start/ stop key, program key, mode key, speed increase key, speed decrease key, incline increase key, incline decrease key, quick speed key:3.6.9.12,14.16KM/H, and quick incline key: 4.6.8.10.12% Function key instruction: A.”PROG”: program key, when it stop, it can choose the user-defined program;...
- Page 16 ----...
- Page 17 “+” “-”...
- Page 18 Time Program SPEED INCLINE SPEED INCLINE SPEED INCLINE SPEED INCLINE SPEED INCLINE SPEED INCLINE SPEED INCLINE SPEED INCLINE SPEED INCLINE SPEED INCLINE SPEED INCLINE SPEED INCLINE SPEED INCLINE SPEED INCLINE SPEED INCLINE SPEED INCLINE SPEED INCLINE SPEED INCLINE SPEED INCLINE SPEED INCLINE SPEED...
- Page 19 Problem Possible cause Corrective action a .no connect to power supply Plug into socket Treadmill does not b. safety switch not insert Insert safety switch in monitor work c .transformer is not good Check the transformer d. the wiring set is burnt Check the wring set a .safety key off Put on the safety key...
- Page 20 Check the incline wiring and the plug. Check the AC wiring of the incline motor. Check the wiring of the motor. After check, Press the incline button on the incline did not self-test control board, Self-test can be completed then can use again.
- Page 21 Proper maintenance is very important to ensure a faultless and operational condition of the treadmill. Improper maintenance can cause damage to the treadmill or shorten the life of the product. All parts of the treadmill must be checked and tightened regularly. Worn out parts must be replaced immediately.
- Page 22 After each training: Wipe the console and other surfaces with a clean soft and damp cloth to remove sweat residues. Caution: Do not use any abrasives or solvents. To avoid damage to the computer, keep any liquids away. Do not expose the computer to direct sunlight. Weekly: To make the cleaning easier it is recommended to use a mat for the treadmill.
- Page 23 TO DECREASE THE TENSION ON THE RUNNING BELT, TURN BOTH BOLTS COUNTER- CLOCKWISE THE SAME NUMBER OF TRUNS. Centering the running belt: When you run, you may push off harder with one foot than with another. The severity of the deflection depends on the amount of force4 that one foot exerts in the relation to the other.
- Page 26 DETAIL OF ASSEMBLY N° DESCRIPTION Qty. N° DESCRIPTION Qty. Base fame Cross Allen wrench ST3*10 Washer Φ5 Platform frame Incline frame Wire clip Powder metallurgy coating Right Upright frame Φ17*Φ10*12 Left Upright frame hex full thread bolt M10 Computer frame hex full thread bolt M8 Motor base frame Spring...
- Page 27 N° DESCRIPTION Qty. N° DESCRIPTION Qty. PU handle bar cover Cushion Round cushion Soft drop Handle pulse Square cushion Computer Wire L=600 Motor belt Stand post wire L= 1050 Running belt Wire protector Foam Cover Incline motor Running board controller Front roller Safety key Square cushion 35*30*t3.0*Φ9...
- Page 28 1. NECK EXERCISES Tilt your head to the right and feel the tension in your neck. Slowly drop your head down to your chest in a semi-circle and then turn your head to the left. You will feel a comfortable tension in your neck again. You can repeat this exercise alternately several times.
- Page 29 4. EXERCISES FOR THE UPPER THIGH Support yourself by placing your hand on the wall, then reach down behind you and lift up your right or left foot as close to your buttocks as possible. Feel a comfortable tension in your front upper thigh. Maintain this position for 30 seconds if possible and repeat this exercise 2 times for each leg.
- Page 30 Tapis de course TECHNESS RUN 800 Manuel d’utilisation Merci de conserver ce manuel, Il vous sera utile pour le montage, l’utilisation l’entretien et tout service après-vente. Merci de lire et de suivre les instructions de cette notice d’utilisation.
- Page 35 Structure principale et base Console User’s manual Manuel d’utilisateur Montant verticaux droit et gauche Visserie Clé de sécurité...
- Page 36 Clé Allen 1pcs Vis Allen filetée (M8*20)8pcs Clé allen coudée 1pcs Clé Allen 1pc Vis Allen(M8*50*20)4pcs...
- Page 37 PARTIES PRINCIPALES DU TAPIS: Cache moteur Rouleau avant Rouleau arrière Planche de course Bande de course Rail latéral (repose pieds) Cache Cache gauche Cache droit Console Moteur d’inclinaison Moteur...
- Page 38 Console Clé de sécurité Poignée Montant vertical Capot moteur Rail latéral Base Cache coté Planche de Bande de course course...
- Page 41 Dispositif de verrouillage...
- Page 42 Roues de transport...
-
Page 43: Instructions D'utilisation
INSTRUCTIONS D’UTILISATION CONSOLE Ecran LCD Incline + Incline - Quick incline Speed + Quick Speed Speed - MP3 for option Program Mode Start/Stop... - Page 44 Informations générales: 1. P 0 est définie par l'utilisateur du programme; P1-P124 sont des programmes préenregistrés; FAT est fonction d’indice de masse corporelle. 2. Grand écran LCD fenêtre, 18 touches, les touches gauche et droite guidon 3. Fonction MP3 4. Vitesse: 1,0 ~ 18,0 KM / H 5.
- Page 45 Cette fonction est en option. Instruction d’utilisation: 1. Brancher le tapis à l’électricité et allumez-le. Un signal sonore vous avertit qu’il est prêt. 2. Insérez la clé de sécurité sur le tapis. L’ordinateur met 2 secondes pour démarrer, et mettre toutes les valeurs à 0. Le tapis commence par défaut avec le programme 3.
- Page 46 Dans les programmes P0-P12, appuyez sur la touche ou "Quick Incline" pour régler l'inclinaison Fonction Body Fat: Lorsque le tapis est à l’arrêt, appuyez sur la touche "PROGRAM" pour sélectionner la fonction "FAT". La fenêtre "DIS / CAL" affiche les paramètres. Appuyez sur "MODE" pour choisir les données à...
- Page 47 Segments Programme SPEED INCLINE SPEED INCLINE SPEED INCLINE SPEED INCLINE SPEED INCLINE SPEED INCLINE SPEED INCLINE SPEED INCLINE SPEED INCLINE SPEED INCLINE SPEED INCLINE SPEED INCLINE SPEED INCLINE SPEED INCLINE SPEED INCLINE SPEED INCLINE SPEED INCLINE SPEED INCLINE SPEED INCLINE SPEED INCLINE SPEED...
- Page 48 PROBLEME CAUSE ACTION CORRECTIVE a . l’alimentation n’est pas Le tapis de ne fonctionne Branchez la prise. branchée. b. La clef de sécurité n’est pas en Placez la clef de sécurité à sa place. place. c .le transformateur n’est pas valide. Vérifiez le transformateur.
- Page 49 1. Le capteur de vitesse n’est pas actif. 1. Vérifiez le capteur de vitesse et 2. Le capteur de vitesse n’est pas relié au changez-le si nécessaire. panneau de contrôle. 2. Vérifiez les branchements entre le 3. Le panneau de contrôle n’est pas actif. panneau de contrôle et le capteur et changer le panneau si nécessaire.
- Page 50 ENTRETIEN DU TAPIS Un bon entretien est très important pour assurer un fonctionnement optimal du tapis de course. Un entretien inadéquat peut endommager le tapis roulant ou raccourcir la durée de vie du produit. Toutes les pièces du tapis doivent être vérifiées et resserrées régulièrement. Les Pièces usées doivent être remplacées immédiatement.
- Page 51 4. RÉGLAGE DE LA BANDE DE COURSE: Vous pouvez avoir besoin d'ajuster la bande de course pendant les premières semaines d'utilisation. Toutes les bandes sont réglées à l'usine. Elle peut se détendre et se décentrer après utilisation. Un manque de tension est normal pendant la période de rodage.
- Page 52 Centrage de la bande de course: Lorsque vous courrez, vous pouvez pousser plus fort avec un pied et décaler la bande. Ce décalage est normal et la bande se recentrera en tournant à vide. Si la bande reste décentrée, il faudra l’ajuster manuellement. Démarrez le tapis roulant sans personne sur le tapis de course, réglez-vous sur 6 km/h.
-
Page 53: Remarques Importantes
REMARQUES IMPORTANTES L'appareil correspond aux normes de sécurité actuelles. L'appareil ne convient que pour un usage domestique. Nous nous dégageons de toute responsabilité en cas d’usage non adaptée. Consultez votre médecin avant de commencer votre entraînement. Il pourra vous aider à établir votre programme d'exercices pour un meilleur résultat en toute sécurité. - Page 55 LISTE DES PIECES DETACHEES N° DESCRIPTION Qté. N° DESCRIPTION Qté. Cadre de base Clé Allen ST3*10 Rondelle Φ5 Cadre de plateforme Cadre d’inclinaison Attache câble Couverture Poudre métal Support droit Φ17*Φ10*12 Support gauche Boulon hexagonal fileté M10 Cadre ordinateur Boulon hexagonal fileté M8 Cadre moteur Ressort Accessoires de connexion...
- Page 56 N° DESCRIPTION Qté. N° DESCRIPTION Qté. Mousse de poignées 70 Protection Protection ronde 71 Amorti Poignées à prise de pulsation 72 Protection carré Câble ordinateur L=600 73 Courroie moteur Câble de support L= 1050 74 Bande de course Câble de protection 75 Mousse 76 Moteur d’inclinaison Cache...
- Page 57 1. EXERCISES POUR LE COUP Inclinez votre tête vers la droite pour étier votre cou. Baissez lentement la tête vers le bas vers votre poitrine dans un demi-cercle, puis tournez votre tête vers la gauche. Répétez cet exercice plusieurs fois dans un sens puis dans l’autre.
- Page 58 Déplacez votre jambe gauche vers l’arrière en la tendant, et poussez dessus. Maintenez votre position pendant 30-40 secondes si possible. Changez de jambe et recommencer Cinta de correr motorizada TECHNESS RUN 300 Manual de utilización del usuario...
- Page 59 Conserve este manual de utilización como referencia. Lea y aplique las instrucciones de este manual de utilización.
- Page 62 Fuente de alimentación: Escoja un lugar cerca de una toma de corriente para colocar la cinta. Siempre conecte el aparato a un enchufe con un circuito de toma de conexión a tierra con no otro aparato conectado. Se recomienda no utilizar cables de extensión. Una conexión a tierra del aparato defectuosa puede provocar el riesgo de descargas eléctricas.
- Page 64 Cuadro principal y base Consola User’s manual Poste de soporte izquierdo y derecho Manual de usuario Tornilleria Llave de seguridad...
- Page 65 Cross Allen llave 1pcs Tornillo rosca completa (M8*20)8pcs Cross Allen llave 1pcs Llave Allen hexagonal 1pc Tornillo Allen(M8*50*20)4pcs...
- Page 66 PARTES PRINCIPALES DE LA CINTA DE CORRER: Cubierta de motor Rodillo delantero Rodillo de reverso Plata de carrera Banda de carrera Riel lateral Pies Protección trasera Protección delantera (izquierda) (derecha) Consola Motor de inclinación Motor...
- Page 67 Consola Llave de seguridad Manillar Montante vertical Tapa del motor Riel lateral Base Protecciones Plata de Banda de carrera traseras carrera...
- Page 70 Dispositivo de bloqueo...
- Page 71 Ruedas de transporte...
- Page 72 INSTRUCCIONES DE UTILIZACION CONSOLA Pantalla LCD Incline + Incline - Quick incline Speed + Quick Speed Speed - MP3 for option Program Mode Start/Stop...
- Page 73 Informaciones generales: 1. P 0 es un programa definido por el usuario; P1-P24 son preestablecidos programas FAT es la función de la grasa corporal 2. Grande pantalla LCD, 18 teclas, teclas de las manillas de izquierda y de derecha 3. Función MP3 (en opción) 4.
- Page 74 Teclas de seguridad: Retirar la llave de seguridad, la pantalla LCD muestra "E-07", una alarma suena, el sonido dura un medio segundo cada dos segundos, una vez, luego la cinta se parará directamente. El sonido sigue hasta que la llave de seguridad sea apretada. Después de esta operación, la pantalla mostrará...
- Page 75 En los programas P0-P24, apriete el botón o "Quick Incline" para ajustar la inclinación. Función de grasa corporal: Cuando la cinta se para, presione el botón "PROG" para seleccionar "FAT" y entrar en la función de “grasa corporal”. La pantalla de izquierda "DIS/CAL" muestra los parámetros definidos, presione el botón "MODE"...
- Page 76 Segmentos Programas SPEED INCLINE SPEED INCLINE SPEED INCLINE SPEED INCLINE SPEED INCLINE SPEED INCLINE SPEED INCLINE SPEED INCLINE SPEED INCLINE SPEED INCLINE SPEED INCLINE SPEED INCLINE SPEED INCLINE SPEED INCLINE SPEED INCLINE SPEED INCLINE SPEED INCLINE SPEED INCLINE SPEED INCLINE SPEED INCLINE SPEED...
- Page 77 Problema Causa probable Acción correctiva a. enchufe no conectado Conecte el enchufe. b. interruptor de seguridad no La cinta de correr no Inserte el interruptor de seguridad insertado funciona c. transformador no funciona Verifique el transformador. d. conjunto de cable quemado Verifique el conjunto de cable.
- Page 78 MANTENIMIENTO DE LA CINTA Un mantenimiento adecuado es muy importante para asegurar una condición impecable y el funcionamiento de la cinta. Un mantenimiento inadecuado puede causar daños en la cinta o acortar la vida útil del aparato. Todas las partes de la cinta deben ser revisadas y apretadas con regularidad. Las piezas desgastadas deben ser sustituidas inmediatamente.
- Page 79 Cada semana: para facilitar la limpieza, se recomienda utilizar una estera en la cinta de correr. Los zapatos pueden dejar suciedades en la cinta y caer por debajo de la cinta. Limpiar la estera en la cinta una vez por semana. 4.
- Page 80 PARA DISMINUIR LA TENSIÓN DE LA BANDA DE CARRERA, GIRE AMBOS TORNILLOS EN SENTIDO CONTRARIO A LAS AGUJAS DEL RELOJ Y EL MISMO NÚMERO DE VUELTAS. Centrar la banda de carrera: Durante la carrera, usted puede apretar más con un pie que con el otro. La intensidad de la desviación depende de la fuerza que un pie ejerce en relación al otro.
-
Page 81: Notas Importantes
NOTAS IMPORTANTES El aparato corresponde a las normas de seguridad en vigencia. El aparato sólo es adecuado para un uso doméstico. Cualquier otro uso es inadmisible y, posiblemente peligroso. No podemos ser responsables por los daños que serían causados por un uso inadecuado. -
Page 83: Lista De Las Piezas
LISTA DE LAS PIEZAS N° DESCRIPCION Qtd. N° DESCRIPCION Qtd. Base Tornillo estrella ST3*10 Plataforma Arandela Φ5 Cuadro de inclinación Wire clip Montante vertical izquierdo Recubrimiento de polvo metalúrgico Montante vertical derecho hex full thread bolt M10 Cuadro de la consola hex full thread bolt M8 Cuadro de base del motor Resorte... - Page 84 N° DESCRIPCION Qtd. N° DESCRIPCION Qtd. Manillar PU Cojín Cojín redondo Cilindro Handle pulse Cojín Computer Wire L=600 Correa del motor Stand post wire L= 1050 Banda de carrera Protector del cableado Espuma Cubierta Motor de inclinación Plata de carrera Controlador Rodillo delantero Llave de seguridad...
- Page 85 1. EJERCICIOS DE CUELLO Incline su cabeza a la derecha y sienta la tensión en su cuello. Lentamente deje caer su cabeza abajo hacia su pecho en un semicírculo y luego gire su cabeza a la izquierda. Usted sentirá una ligera tensión otra vez en su cuello. Usted puede repetir alternativamente este ejercicio varias veces.
- Page 86 4. EJERCICIO DE LA PARTE SUPERIOR DEL MUSLO Apóyese poniendo su mano en la pared, luego tome y levante su pie derecho o izquierdo lo más cerca de los glúteos en la medida de lo posible. Sentir una tensión confortable en su parte superior del muslo frontal.
Need help?
Do you have a question about the RUN 800 and is the answer not in the manual?
Questions and answers