
Related Manuals for Techness RUN1000


Summary of Contents for Techness RUN1000
- Page 1 USER GUIDE – TREADMILL RUN1000 Thanks for purchasing this product. The product will help you exercise your muscles in the correct way and to improve your fitness – and all this in a familiar environment.
-
Page 2: Implied Warranty
IMPLIED WARRANTY The importer of this machine assures that this device was manufactured from high quality materials. Prerequisite for the implied warranty is the proper setup in accordance with the operating instructions. Improper use and /or incorrect transportation can render the warranty void. -
Page 3: General Safety Instructions
GENERAL SAFETY INSTRUCTIONS A great deal of emphasis was placed on safety in the design and manufacture of this fitness device. Still, it is very important that you strictly adhere to the following safety instructions. We cannot be held liable for accidents that were caused due to disregard. - Page 4 SPECIAL SAFETY PRECAUCIONS Power source: Choose a place in reach of a socket when placing the treadmill. Always connect the appliance to a socket with a grounded circuit and no other appliances connected to it. It is recommended not to use any extension cords. ...
- Page 5 ASSEMBLY Before starting with the assembly of this fitness device, carefully read through the set up steps. We also recommend that you view the assembly drawing prior to assembly. Remove all packaging material and place the individual parts on a free surface. This will provide you with an overview and will simplify assembly.
- Page 6 UNPACK AND VERIFY THE CONTENTS OF THE BOX: Lift up and remove the box that surrounds the Treadmill. Check the following items are present. If any of the parts are missing, contact with the dealer. Main frame and base Console Stand post End cover Handle bar...
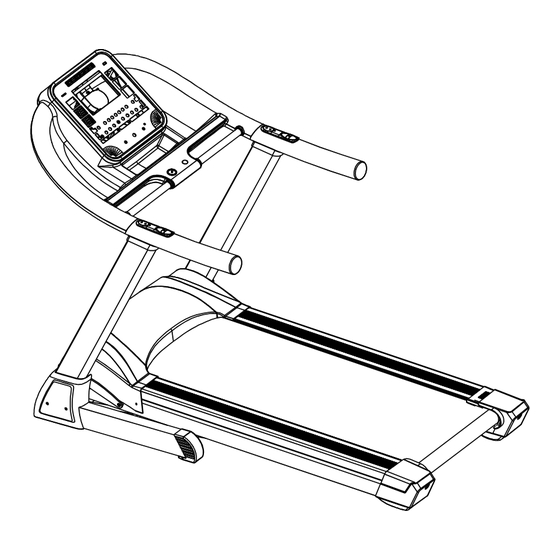
- Page 7 MAIN PARTS OF THE TREADMILL: Front roller Rear roller Decorate rail Side rail Motor cover Console Handle bar Base cover Motor Incline motor Running board Running belt...
- Page 8 End cover (left) End cover (right) Feet Soft drop...
- Page 9 ASSEMBLY DIAGRAM Console Safety Key Handle Bar Stand Post Motor Cover Side Rail Wheel cover End Cover Main Frame Running Belt...
-
Page 10: Assembly Instructions
ASSEMBLY INSTRUCTIONS Step 1: Take the machine out of package,put on a flat surface;Use 4pcs M8*15 and 6pcs M8*55*20 screws separately to fit the stand post (Left and right) onto the base frame. Please do not tight any bolts now. Step 2: Put the stand post cover on left and right stand post, and then use 4pcs M4*20 screw to tight the stand post cover. - Page 11 Step 3: Use 4pcs M8*50*20 screws fit the console to the stand post and tight the screw. Step 4: Use 4pcs M3*28 screws fit the handle bar cover to the PU handle bar and tight the screw.
-
Page 12: Setting Up Your Treadmill
SETTING UP YOUR TREADMILL 1. FOLDING/UNFOLDING & MOVING THE TREADMILL FOLDING &UNFOLDING THE TREADMILL: 1. Unplug from power point before folding 2. Lift deck until it's parallel to the upright post 3. Check the cylinder locks into right position 4. Place two hands on handle bar, and Press one foot on the middle section of the cylinder to dis-engage the locking mechanism. - Page 13 GENERAL FUCTIONALITIES To start any workout phase after the setup, the user has to press the Start key. If the user presses the Stop key during the workout phase, the workout pulses. If the user presses the Stop key twice, the workout terminates and the system will return to the initial state.
- Page 14 USE INSTUCTIONS CONSOLE Incline + Incline - Speed + Speed - Program Start/Stop Mode 1. Start the treadmill: When the treadmill connects to power, the LCD show like the below picture 1:...
- Page 15 If the treadmill without the safety key, the LCD will show like the below picture2: With the safety key, will show like below picture 3: 2. LCD window display 10” LCD window displays the item and number. Program and Pulse use the same window;...
- Page 16 3. Key information Safety Key Pull off the safety key, the LCD windows show“----”, the buzzer sound “BIBI-BI”, the sound last 0.5second every 2second once and the treadmill will stop right now. The sound will stop until put on the safety key. After putting on the safety key, the computer will show 2second, and all the data will be cleared.
- Page 17 Designed original Designed Item number range 10-99 Height 170CM 100-220 Weight 70KG 20-150 According to the standard of human being, the fat low 19 shows you are tend to be thin; it is perfect when the fat is between 20 and 25. If between 26 and 29 it suggests you are a little fat.
- Page 18 PROGRAM SPEED DIAGRAM TIME PROGRAM SPEED INCLINE SPEED INCLINE SPEED INCLINE SPEED INCLINE SPEED INCLINE SPEED INCLINE SPEED INCLINE SPEED INCLINE SPEED INCLINE SPEED INCLINE SPEED INCLINE SPEED INCLINE SPEED INCLINE SPEED INCLINE SPEED INCLINE SPEED INCLINE SPEED INCLINE...
- Page 19 SPEED INCLINE SPEED INCLINE SPEED INCLINE SPEED INCLINE SPEED INCLINE SPEED INCLINE SPEED INCLINE ERROR MESSAGE AND SOLUTIONS SYMPTOM DESCPRIPTION SOLUTION Control board is bad, cannot start the treadmill. Console show the E01, warning sound 3times. Solution: console and control board connect not Console is bad well, check the connection wire set between the console and control board.
- Page 20 Check the incline motor wire, and wire connections. Check the AC wire on incline motor and the connection to control board. Incline motor learn by itself Change the wire or incline motor. Then press the key to let the incline motor learn by itself. Treadmill cannot start, warning sound 9times.
- Page 21 2. APPLICATION OF LUBRIFICANT ON THE BELT: Position the belt so that the seam is located in the middle of the plate. Insert the spray valve in the spray head of the lubricant container. Lift the belt at one side and hold the spray valve in a distance to the front end of striding belt and plate.
- Page 22 Adjusting screw Screw Motor Belt Front roller TO DECREASE THE TENSION ON THE RUNNING BELT, TURN BOTH BOLTS COUNTER- CLOCKWISE THE SAME NUMBER OF TRUNS. Centering the running belt: When you run, you may push off harder with one foot than with another. The severity of the deflection depends on the amount of force4 that one foot exerts in the relation to the other.
- Page 23 5. STORAGE: Store you treadmill in a clean and dry environment. Ensure the master power switch is off and is un-plugged from the electrical wall outlet. ...
- Page 24 EXPLODING DRAWING...
- Page 25 DETAIL OF ASSEMBLY N° DESCRIPTION Qty. N° DESCRIPTION Qty. Base fame Philip full thread screw M8*25 Platform frame Philip full thread screw M6*25 Incline frame Cross Allen full thread screw M5*20 Motor base frame Cross Allen full thread screw M5*10 Left Upright frame Cross Allen full thread screw M4*10 Right Upright frame...
- Page 26 N° DESCRIPTION Qty. N° DESCRIPTION Qty. Motor cover right Controller PCB board Power wire Speaker cover left Filter Speaker cover right Speed sensor Transformer Wire cover Motor Washer Incline motor Feet cover magnet ringΦ33*Φ14*33 Wire magnet ringΦ20*Φ9*32 Side rail Cylinder End cover left Running board End cover right...
- Page 28 1. NECK EXERCISES Tilt your head to the right and feel the tension in your neck. Slowly drop your head down to your chest in a semi-circle and then turn your head to the left. You will feel a comfortable tension in your neck again.
- Page 29 5. INSIDE UPPER THIGH Sit on the floor and place your feet in such a way that your knees are facing outwards. Pull your feet as close as possible to your groin. Now press your knees carefully downwards. Maintain this position for 30-40 seconds if possible.
- Page 30 MODE D’EMPLOI – TAPIS DE COURSE RUN1000 Merci d’avoir acquis un produit TECHNESS. Ce produit a été conçu pour vous garantir une entière satisfaction lors de vos entraînements et dans un but d’améliorer votre forme physique.
- Page 31 GARANTIE L'importateur de cette machine assure que ce dispositif a été fabriqué à partir de matériaux de qualité et correspondant aux normes en vigueur. Prérequis pour la garantie : Un montage et une bonne utilisation en conformité avec les instructions de montage et de fonctionnement. Une mauvaise utilisation et/ou un transport incorrect peut exclure la prise en charge sous garantie.
- Page 32 CONSIGNES GÉNÉRALES DE SÉCURITÉ Nous mettons l’accent sur la sécurité dans la conception et la fabrication de cet appareil de fitness. Il est très important que vous respectiez rigoureusement les instructions de sécurité. Nous ne serons pas responsables des accidents qui ont été causés par négligence ou par mauvaise utilisation.
- Page 33 INFORMATIONS DE SECURITE Alimentation: Choisissez un endroit proche d’une prise pour votre tapis. Branchez l’appareil sur une seule prise équipée de prise terre. N’utilisez pas de rallonge. Un branchement défectueux peut entraîner des risques d’électrochocs et de dysfonctionnements.
- Page 34 MONTAGE Avant de commencer l'assemblage de cet appareil de fitness, lisez attentivement la mise en place des mesures. Nous vous recommandons de regarder les schémas attentivement avant l'assemblage. Retirez tous les matériaux d'emballage et placez les pièces individuellement sur une surface libre.
- Page 35 DEBALLER ET VERIFIER LE CONTENU DE LA BOITE: Soulevez et retirez la boîte qui entoure le tapis roulant. Vérifiez si les éléments suivants sont présents. Si l'une des pièces est manquante, veuillez contacter le service après-vente. Cadre principal et base Console Pieds de support Caches...
- Page 36 PARTIES PRINCIPALES DU TAPIS: Rouleau avant Rouleau arrière Rail de décoration Rail latéral Capot moteur Console Poignées Protections pour la base Moteur Moteur d’incinaison Planche de course Bande de course...
- Page 37 Cache arrière (gauche) Cache arrière (droit) Pied Système d’ouverture...
- Page 38 SCHEMA D’ASSEMBLAGE Poignée Console Clé de sécurité Pied de support Cache moteur Rail latéral Cache Roue Caches Cadre arrière principal Bande de course...
- Page 39 INSTRUCTIONS DE MONTAGE Étape 1 : Retirez l’appareil de la boîte et posez-le sur une surface stable et plane. Utilisez 4 vis M8*15 et 6 vis M8*55*20 (voir la liste des accessoires à la fin du guide) pour assembler les pieds de support (droit et gauche). Ne serrez pas trop les Vis. Étape 2: Placez le cache côté...
- Page 40 Étape 3 : Utilisez 4 vis M8*50*20 pour assembler la console et les pieds de support. Étape 4: Utilisez 4 vis M3*28 pour assembler les poignées avec la poignée avec mousse. Serrez les vis.
- Page 41 INSTALLATION DU TAPIS DE COURSE 1. PLIER / DEPLIER / DEPLACER VOTRE TAPIS PLIER / DEPLIER VOTRE TAPIS: 1. Débranchez l’appareil avant toute manipulation. 2. Soulevez le tapis jusqu’à sa position vertical. 3. Vérifiez que la sécurité soit en place. 4.
- Page 42 FONCTIONS GENERALES Une fois les réglages effectuées, vous pouvez démarrer le tapis en appuyant sur START. Si vous appuyez sur STOP pendant l’entraînement, le tapis s’arrêtera. Si l’utilisateur appuie une 2ème fois sur STOP, le tapis va s’arrêter et la machine reviendra à...
- Page 43 USE INSTUCTIONS CONSOLE Incline + Incline - Speed + Speed - Programme Start/Stop Mode 1. Démarrez le tapis: Lorsque le tapis est branché, l’affichage est le suivant (photo 1):...
- Page 44 Si vous n’avez pas mis la clé de sécurité, l’affichage sera (photo 2): Si vous avez inséré la clé, vous verrez (photo 3): 2. Écran LCD L’écran LCD 10” affiche le programme et les chiffres. Le programme et le pouls seront dans la même fenêtre.
- Page 45 3. Informations sur les touches Clé de sécurité Retirez la clé de sécurité et l’affichage sera “----”, une petite alarme sonnera toutes les 2 secondes et le tapis s’arrêtera complètement. L’alarme ne s’arrêtera que lorsque vous aurez réinséré la clé. L’ordinateur s’allumera alors pendant 2 secondes puis toutes les données seront effacées.
- Page 46 10-99 Hauteur 170CM 100-220 Poids 70KG 20-150 D’après la moyenne, le paramètre FAT indique : 19 > vous êtes plutôt maigre Entre 20-25 > vous êtes dans la moyenne Entre 26-29 > vous êtes en léger surpoids Au-dessus de 30 > vous êtes en surpoids. ...
- Page 47 LISTE DES PROGRAMMES TIME PROGRAM SPEED INCLINE SPEED INCLINE SPEED INCLINE SPEED INCLINE SPEED INCLINE SPEED INCLINE SPEED INCLINE SPEED INCLINE SPEED INCLINE SPEED INCLINE SPEED INCLINE SPEED INCLINE SPEED INCLINE SPEED INCLINE SPEED INCLINE SPEED INCLINE SPEED...
- Page 48 INCLINE SPEED INCLINE SPEED INCLINE SPEED INCLINE SPEED INCLINE SPEED INCLINE SPEED INCLINE SPEED INCLINE MESSAGES D’ERREURS ET SOLUTIONS MESSAGE DESCRIPTION SOLUTION Problème de console La console ne peut pas démarrer le tapis. Affichage clignotant de “E01” et 3 bips d’alerte.
- Page 49 Le tapis ne peut pas démarrer. Affichage du Pas de signal du capteur message “E03” + bips répétés de vitesse. Solution: Vérifiez le capteur de vitesse et Le panneau de contrôle a rebranchez-le ou changer de vitesse. envoyé signal Si le tapis redémarre, l’état de la machine moteur, mais le moteur est ok.
- Page 50 ENTRETIEN DU TAPIS Un bon entretien est très important pour assurer un fonctionnement optimal du tapis de course. Un entretien inadéquat peut endommager le tapis roulant ou raccourcir la durée de vie du produit. Toutes les pièces du tapis doivent être vérifiées et resserrées régulièrement. Les Pièces usées doivent être remplacées immédiatement.
- Page 51 4. RÉGLAGE DE LA BANDE DE COURSE: Vous pouvez avoir besoin d'ajuster la bande de course pendant les premières semaines d'utilisation. Toutes les bandes sont réglées à l'usine. Elle peut se détendre et se décentrer après utilisation. Un manque de tension est normal pendant la période de rodage.
- Page 52 Centrage de la bande de course: Lorsque vous courrez, vous pouvez pousser plus fort avec un pied et décaler la bande. Ce décalage est normal et la bande se recentrera en tournant à vide. Si la bande reste décentrée, il faudra l’ajuster manuellement. Démarrez le tapis roulant sans personne sur le tapis de course, réglez-vous sur 6 km/h.
- Page 53 REMARQUES IMPORTANTES L'appareil correspond aux normes de sécurité actuelles. L'appareil ne convient que pour un usage domestique. Nous nous dégageons de toute responsabilité en cas d’usage non adaptée. Consultez votre médecin avant de commencer votre entraînement. Il pourra vous aider à...
- Page 54 VUE EXPLOSEE...
- Page 55 LISTE DES PIECES DETACHEES N° DESCRIPTION N° DESCRIPTION Cadre de base Vis Philip filetée M8*25 Cadre de la plateforme Vis Philip filetée M6*25 Cadre d’inclinaison Vis Cross Allen filetée M5*20 Cadre base moteur Vis Cross Allen filetée M5*10 Cadre support (gauche) Vis Cross Allen filetée M4*10 Cadre support (droit) Vis Cross Allen filetée ST4*15...
- Page 56 DESCRIPTION DESCRIPTION Cache moteur droit Contrôleur Câble d’alimentation Cache haut-parleur gauche Filtre Cache haut-parleur droit Capteur vitesse Ventilateur Transformateur Cache fils Moteur Moteur d’inclinaison rondelle Rondelle aimantée Φ33*Φ14*33 Cache pied Rondelle aimantée Φ20*Φ9*32 Câble Rail latéral Cylindre Cache fin de rail gauche Planche de course Cache fin de rail droit Rouleau avant...
- Page 57 CONSEILS GENERAUX Commencez votre programme d'exercice lentement, tous les 2 jours. Augmentez l’intensité de votre séance d'exercices semaine après semaine. Commencez par de courtes périodes et ensuite augmentez-les continuellement. Ne vous fixez pas des objectifs impossible. Échauffez-vous toujours avant de commencer un exercice. Pour ce faire, effectuer au moins cinq minutes d'exercices d'étirement ou de gymnastique pour éviter les tensions musculaires et les blessures.
- Page 58 1. EXERCISES POUR LE COUP Inclinez votre tête vers la droite pour étier votre cou. Baissez lentement la tête vers le bas vers votre poitrine dans un demi-cercle, puis tournez votre tête vers la gauche. Répétez cet exercice plusieurs fois dans un sens puis dans l’autre.
- Page 59 5. EXERCICES POUR LES ABDUCTEURS Assez-vous sur le sol et placez vos pieds l’un contre l’autre, genoux vers l'extérieur. Placez vos pieds le plus près possibles du corps. Maintenant, appuyez sur vos genoux vers le bas. Maintenez cette position pendant 30-40 secondes, si possible.
- Page 60 MANUAL – CINTA DE CORRER RUN1000 Gracias por haber adquirido un producto TECHNESS. Este producto ha sido concebido para garantizarle entera satisfacción en el momento de sus entrenamientos y en el fin de mejorar su forma física.
- Page 61 GARANTIA El importador de este equipo asegura que este dispositivo ha sido fabricado con materiales de alta calidad. El requisito previo para la garantía es la instalación correcta de acuerdo con las instrucciones de funcionamiento. El uso indebido y / o el transporte incorrecto pueden anular la garantía.
- Page 62 INSTRUCCIONES GENERALES DE SEGURIDAD Un gran énfasis se puso sobre la seguridad en el diseño y la fabricación de este aparato de fitness. De todos modos, es muy importante que usted se adhiera estrictamente a las instrucciones de seguridad. No podemos ser responsables por los accidentes que se producirían debido a la indiferencia.
- Page 63 PRECAUTCIONES ESPECIALES DE SEGURIDAD Fuente de alimentación: Escoja un lugar cerca de una toma de corriente para colocar la cinta. Siempre conecte el aparato a un enchufe con un circuito de toma de conexión a tierra con no otro aparato conectado. Se recomienda no utilizar cables de extensión. ...
- Page 64 ASAMBLEA Antes del comienzo de la asamblea de este aparato de fitness, con cuidado, lea rápidamente los pasos de instalación. También recomendamos que usted vea el dibujo de asamblea antes de la asamblea. Quitar todo el material de su embalaje y colocar las partes individuales sobre una superficie libre.
- Page 65 DESEMPAQUETE Y VERIFIQUE EL CONTENIDO DE LA CAJA: Levante y quite la caja que cobra la cinta de correr. Verifique la presencia de los artículos siguientes. Si cualquiera de las partes fallan, póngase en contacto con el distribuidor. Cuadro principal y base Consola Pies de soporte Cubiertas...
- Page 66 PARTES PRINCIPALES DE LA CINTA: Rodillo delantero Rodillo trasero Riel decorativo Riel lateral Tapa motor Consola Puñados Cubierta para la base Motor Motor de inclinación Placa de carrera Banda de carrera...
- Page 67 Cubierta trasera Cubierta trasera Pies (izquierda) (derecha) Sistema de apertura...
- Page 68 DIAGRAMA DE ASAMBLEA Puñado Consola Llave de seguridad Pies de soporte Cubierta motor Riel lateral Tapa ruedas Cubiertas Cuadro traseras principal Banda de carrera...
- Page 69 INSTRUCCIONES DE ASAMBLEA Paso 1: Retire el aparato de la caja y póngalo sobre una superficie estable y plana. Utilice 4 tornillos M8*15 y 6 tornillos M8*55*20 (ver la lista de los accesorios al fin del guía) para ensamblar los pies de soporte (derechos e izquierdos). No apriete demasiado los tornillos.
- Page 70 Étape 3 : Utilisez 4 vis M8*50*20 pour assembler la console et les pieds de support. Paso 4: Utilice 4 tornillos M3*28 para ensamblar las empuñadoras con los puñados de espuma. Apriete los tornillos.
- Page 71 INSTALACIÓN DE LA CINTADE CORRER 1. PLEGAR / DESPLEGAR Y MOVER LA CINTA PLEGAR / DESPLEGAR LA CINTA: 1. Desconecte el aparato antes de toda manipulación. 2. Levante la cinta hasta su posición vertical. 3. Verifique que la seguridad esté empleada. 4.
- Page 72 FUNCIONES GENERALES Una vez los arreglos efectuados, usted puede poner la cinta de correr en marcha pulsando la tecla START. Si usted pulsa la tecla STOP durante el entrenamiento, la cinta se parará. Si pulsa una segunda vez la tecla STOP, la cinta se parara y la máquina volverá a su posición inicial.
- Page 73 INSTRUCCIONES DE UTILIZACION CONSOLA Incline + Incline - Speed + Speed - Programme Start/Stop Mode 1. Encienda la cinta: Foto 1: Cuando pone la cinta en marcha puede ver la ventana siguiente:...
- Page 74 Foto 2: Sin la llave de seguridad podrá ver la ventana siguiente Foto 3: Con la llave de seguridad podrá ver la ventana siguiente: 2. Pantalla LCD La pantalla LCD 10" muestra el programa y las cifras. El programa y el pulso estarán en la misma ventana.
- Page 75 4. Informaciones sobre las teclas Llave de seguridad Retire la llave de seguridad y la ventana indicara "--- ", una pequeña alarma tocará cada 2 segundo y la cinta se parará completamente. La alarma se parará solamente cuando usted habrá reinsertado la llave. El ordenador se encenderá entonces durante 2 segundos luego todos los datos serán borrados.
- Page 76 Datos medios Diferencia Edad 10-99 Altura 170CM 100-220 Peso 70KG 20-150 Según la media, el parámetro FAT indica: 19> Usted está un poco flaco Entre 20-25> Usted está en la media Entre 26-29> Usted tiene un ligero exceso ponderal Por encima de 30> Usted tiene en exceso ponderal. ...
- Page 77 LISTA DE LOS PROGRAMAS TIME PROGRAM SPEED INCLINE SPEED INCLINE SPEED INCLINE SPEED INCLINE SPEED INCLINE SPEED INCLINE SPEED INCLINE SPEED INCLINE SPEED INCLINE SPEED INCLINE SPEED INCLINE SPEED INCLINE SPEED INCLINE SPEED INCLINE SPEED INCLINE SPEED INCLINE SPEED...
- Page 78 INCLINE SPEED INCLINE SPEED INCLINE SPEED INCLINE SPEED INCLINE SPEED INCLINE SPEED INCLINE SPEED INCLINE MENSAJES DE ERROR Y SOLUCIONES MENSAJE DESCRIPCION SOLUCION Problema de consola La consola no pone la cinta en marcha. Visualización intermitente de “E01” y 3 bips de alarma.
- Page 79 La cinta no se pone en marcha. Visualización Ninguna señal del sensor del mensaje " E03 " + bips repetidos de velocidad. El tablero de control envió Solución: verifique el sensor de velocidad y la señal al motor, pero el descuélguelo o cambie de velocidad.
- Page 80 MANTENIMIENTO DE LA CINTA Un mantenimiento adecuado es muy importante para asegurar una condición impecable y el funcionamiento de la cinta. Un mantenimiento inadecuado puede causar daños en la cinta o acortar la vida útil del aparato. Todas las partes de la cinta deben ser revisadas y apretadas con regularidad. Las piezas desgastadas deben ser sustituidas inmediatamente.
- Page 81 Cada semana: para facilitar la limpieza, se recomienda utilizar una estera en la cinta de correr. Los zapatos pueden dejar suciedades en la cinta y caer por debajo de la cinta. Limpiar la estera en la cinta una vez por semana. 4.
- Page 82 PARA DISMINUIR LA TENSIÓN DE LA BANDA DE CARRERA, GIRE AMBOS TORNILLOS EN SENTIDO CONTRARIO A LAS AGUJAS DEL RELOJ Y EL MISMO NÚMERO DE VUELTAS. Centrar la banda de carrera: Durante la carrera, usted puede apretar más con un pie que con el otro. La intensidad de la desviación depende de la fuerza que un pie ejerce en relación al otro.
- Page 83 NOTAS IMPORTANTES El aparato corresponde a las normas de seguridad en vigencia. El aparato sólo es adecuado para un uso doméstico. Cualquier otro uso es inadmisible y, posiblemente peligroso. No podemos ser responsables por los daños que serían causados por un uso inadecuado.
- Page 84 DETALLE DEL MONTAJE...
- Page 85 LISTA DE LAS PIEZAS N° DESCRIPCION Ctd. N° DESCRIPCION Ctd. Cubierta de base Tornillo Philip M8*25 Armadura de la plataforma Tornillo Philip M6*25 Armadura de inclinación Tornillo Cross Allen M5*20 Cubierta de base motor Tornillo Cross Allen M5*10 Armadura soporte Tornillo Cross Allen f M4*10 (izquierda) Armadura soporte...
- Page 86 N° DESCRIPCION Ctd. N° DESCRIPCION Ctd. Tapa motor derecho Controlador Cable eléctrico Tapa altavoz izquierda Filtro Tapa altavoz derecho Captador de velocidad Ventilador Transformador Tapa hilos Motor Arandela Motor de inclinación Arandela imantada Φ33*Φ14*33 Tapa Pies Arandela imantada Φ20*Φ9*32 Cable Riel lateral Cilindro Tapa fin de riel izquierdo...
- Page 87 CONSEJOS GENERALES DE APTITUD Inicie su programa de ejercicio lentamente, es decir, un ejercicio cada dos días. Aumentar su sesión de ejercicio semana a semana. Comience con ejercicios de breve período y aumentar el nivel regularmente. Comience poco a poco con las sesiones de ejercicio y no fijarse metas imposibles.
- Page 88 1. EJERCICIOS DE CUELLO Incline su cabeza a la derecha y sienta la tensión en su cuello. Lentamente deje caer su cabeza abajo hacia su pecho en un semicírculo y luego gire su cabeza a la izquierda. Usted sentirá una ligera tensión otra vez en su cuello.
- Page 89 5. EJERCICIO DE LA PARTE INTERIOR / SUPERIOR DEL MUSLO Siéntese en el piso y coloque los pies de tal manera que las rodillas estén hacia afuera. Levantar el pie lo más cerca posible de la ingle. Ahora, presione las rodillas hacia abajo con cuidado.
Need help?
Do you have a question about the RUN1000 and is the answer not in the manual?
Questions and answers