Table of Contents
Advertisement
Quick Links
Download this manual
See also:
User Manual
Advertisement
Table of Contents

Related Manuals for Planet WRT-416


Summary of Contents for Planet WRT-416
- Page 1 802.11g Wireless Broadband Router WRT-416 User’s Manual...
-
Page 2: Federal Communication Commission Interference Statement
"as is". Should the programs prove defective following their purchase, the buyer (and not PLANET, its distributor, or its dealer) assumes the entire cost of all necessary servicing, repair, and any incidental or consequential damages resulting from any defect in the software. - Page 3 Do not dispose of WEEE as unsorted municipal waste and have to collect such WEEE separately. Revision User’s Manual for PLANET Wireless Broadband Router Model: WRT-416 Rev: 1.0 (July, 2009)
-
Page 4: Table Of Contents
Table of Contents Chapter 1 Introduction ................5 1.1 Package Content........................5 1.2 Features ............................. 5 1.3 Specification..........................5 1.4 Wireless Performance ....................... 6 Chapter 2 Hardware Installation ..............7 2.1 System Requirement ......................... 7 2.2 Hardware Connection........................ 7 2.3 LED Indicators.......................... 8 2.4 Back View.......................... -
Page 5: Chapter 1 Introduction
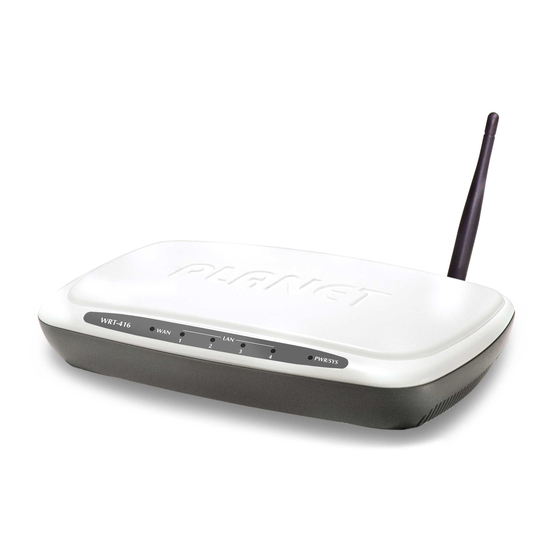
Chapter 1 Introduction Thank you for purchasing WRT-416. This device features the latest innovation wireless technology making the wireless networking world happened. This manual guides you on how to install and properly use the WRT-416 in order to take full advantage of its features. -
Page 6: Wireless Performance
Keep the number of walls, or ceilings between AP and clients as few as possible; otherwise the signal strength may be seriously reduced. Place WRT-416 in open space or add additional Access Point as needed to improve the coverage. -
Page 7: Chapter 2 Hardware Installation
2. Connect the power adapter to the receptor at the rear panel of the WRT-416, and plug the other end of the power adapter to a wall outlet or power strip. The Power LED will light up to indicate proper operation. -
Page 8: Led Indicators
Note: ONLY use the power adapter supplied with the WRT-416. Otherwise, the product may be damaged. Note: If you want to reset WRT-416 to default settings, press and hold the Reset button over 5 seconds. And then wait for 10 seconds for WRT-416 restart. -
Page 9: Back View
STATE MEANING Power is on Flashing The device is working WAN link is on Flashing WAN activity No connection LAN 1~4 Link is established Flashing Packets are transmitting or receiving No connection 2.4 Back View Power (DC 9V): The power socket is where you plug in the power adapter. Please use the power adapter provided with this wireless broadband router. -
Page 10: Chapter 3 Configuring Local Networking
Chapter 3 Configuring Local Networking After you install your WRT-416, the TCP/IP settings should be set to obtain an IP address from a DHCP server (WRT-416) automatically. To verify your IP address, please follow the steps below: Click on Start > Run. - Page 11 LAN IP address on your router. Example: If LAN IP address of WRT-416 is 192.168.0.1, make your IP address 192.168.0.X where X is a number between 2 and 99. Make sure that the number you choose is not in use on the network. Set Default Gateway the same as the LAN IP address of your router (192.168.0.1).
-
Page 12: Chapter 4 Web Configuration
Chapter 4 Web Configuration 4.1 Web Login WRT-416 with an assigned IP address allows you to monitor and configure via web browser (e.g., MS Internet Explorer or Netscape). Open your web browser. Enter the IP address of your WRT-416 in the address field (default IP address is http://192.168.0.1). -
Page 13: Convenient Setup
4.2 Convenient Setup The Convenient Setup will guide you to configure access point for first time. Please follow the Convenient Setup step by step. -
Page 14: Operation Mode
4.2.1 Operation Mode Gateway In this mode, the device is supposed to connect to internet via ADSL/Cable Modem. The NAT is enabled and PCs in four LAN ports share the same IP to ISP through WAN port. The connection type can be setup in WAN page by using PPPOE, DHCP client, PPTP client or static IP. Bridge In this mode, all ethernet ports and wireless interface are bridged together and NAT function is disabled. -
Page 15: Lan
Time Zone Select Select the time zone of the country you are currently in. The router will set its time based on your selection. NTP Server Address You can manually assign time server address if the default time server dose not works. 4.2.3 LAN The LAN Port screen below allows you to specify a private IP address for your router’s LAN ports as well as a subnet mask for your LAN segment. -
Page 16: Wan
4.2.4 WAN Use the WAN Settings screen if you have already configured the Quick Setup Wizard section and you would like to change your Internet connection type. The WAN Settings screen allows to specify the type of WAN port connect you want to establish with your ISP. The WAN settings offer the following selections for the router’s WAN port, Static IP, PPPoE, PPTP and DHCP Client. -
Page 17: Wireless Encryption
Mode It allows you to set the AP to AP, Client, WDS or AP+WDS mode. The default is AP. Network Type There are two type, infrastructure and hoc, the default is infrastructure SSID This is the name of the wireless LAN. All the devices in the same wireless LAN should have the same SSID, the default is default. -
Page 18: Lan Setup
Encryption Mode ”None” means do not encrypt wireless data. There are two basic levels of WEP encryption, 64 bits and 128 bits, the more bits password have, the better security wireless network is, at the same time the speed of wireless is more slower. If you select WEP to encrypt your data, choose the bits of password, it should be 64 bits or 128 bits. -
Page 19: Internet Setup
Subnet Mask Specify a Subnet Mask for your LAN segment Default Gateway The IP address of Default gateway you obtained after connect to the Internet, if you haven’t connected to Internet yet, this field is blank. DHCP Server You can enable or disable the DHCP server. By enabling the DHCP server the router will automatically give your LAN clients an IP address. - Page 20 WAN Access Type: 1. Static IP address Your ISP has given you an IP address already 2. DHCP Client Your ISP will automatically give you an IP address. 3. PPPoE Your ISP requires PPPoE connection. 4. PPTP Your ISP requires you to use a Point-to-Point Tunneling Protocol (PPTP) connection. The MTU (Maximum Transmission Unit) setting specifies the largest packet size permitted for network transmission.
-
Page 21: Chapter 5 Web Configuration
Chapter 5 Web Configuration 5.1 Web Login The wireless router supplies the function of act as two AP simultaneously, but because the difference of privilege, besides normal function of AP, the primary AP also has extra function for some advanced settings and right management. -
Page 22: Advanced Setting
Associated Clients Click “Show Active Clients” button, then an “Active Wireless Client Table” will pop up. You can see the status of all active wireless stations that are connecting to the access point. Enable Mac Clone Click the “Enable MAC Clone” button will copy the MAC address of your PC, that you are using to configure the AP, to the WLAN MAC. -
Page 23: Security
Fragment Threshold "Fragment Threshold" specifies the maximum size of packet during the fragmentation of data to be transmitted. RTS Threshold When the packet size is smaller the RTS threshold, the wireless router will not use the RTS/CTS mechanism to send this packet. Beacon Interval The interval of time that this wireless router broadcast a beacon. -
Page 24: None
5.3.1 None 5.3.2 WEP only When you select 64-bit or128-bit WEP key, you have to enter WEP keys to encrypt data. You can generate the key by yourself and enter it. You can enter four WEP keys and select one of them as default key. Then the router can receive any packets encrypted by one of the four keys... -
Page 25: 802.1X&Wep
Key Length You can select the WEP key length for encryption, 64-bit or 128-bit. Larger WEP key length will provide higher level of security, but the throughput will be lower. Key Format You may to select ASCII Characters (alphanumeric format) or Hexadecimal Digits (in the "A-F", "a-f" and "0-9"... -
Page 26: Wpa
5.3.4 WPA Wi-Fi Protected Access (WPA) is an advanced security standard. You can use a pre-shared key to authenticate wireless stations and encrypt data during communication. It uses TKIP or CCMP (AES) to change the encryption key frequently. So the encryption key is not easy to be broken by hackers. This can improve security very much. -
Page 27: Access Control
5.4 Access control This wireless router provides MAC Address Control, which prevents the unauthorized MAC Addresses from accessing your wireless network. Disable Disable wireless access control Allow listed & Deny listed Fill in the "MAC Address" and "Comment" of the wireless station to be added and then click "Add". Then this wireless station will be added into the "Current Access Control List"... -
Page 28: Site Survey
Note: First, you should set this router work mode is “WDS” at “Wireless-basic settings”, then click “Enable WDS”, pay attention, you must fill the MAC Address of another WDS working router. 5.6 Site survey This function provides tool to scan the wireless network. If any Access Point or IBSS is found, you could choose to connect it manually when client mode is enabled. -
Page 29: Chapter 6 System Information
Chapter 6 System Information 6.1 Status This page shows the current status and some basic settings of evice. 6.2 Statistic This page shows the packet counters for transmission and reception regarding to wireless, Ethernet LAN and Ethernet WAN networks. -
Page 30: System Log
Item Description It shows the statistic count of sent packets on the wireless LAN interface. Wireless LAN Sent Packets It shows the statistic count of received packets on the wireless LAN interface. Wireless LAN Received Packets It shows the statistic count of sent packets on the Ethernet LAN interface. Ethernet LAN Sent Packets It shows the statistic count of received packets on the Ethernet LAN interface. -
Page 31: Chapter 7 Application & Gaming
Chapter 7 Application & Gaming 7.1 Virtual Service Use the Virtual Server function when you want different servers/clients in your LAN to handle different service/Internet application type (e.g. Email, FTP, Web server etc.) from the Internet. Computers use numbers called port numbers to recognize a particular service/Internet application type. The Virtual Server allows you to re-direct a particular service port number (from the Internet/WAN Port) to a particular LAN private IP address and its service port number. -
Page 32: Dmz
7.2 DMZ If you have a local client PC that cannot run an Internet application (e.g. Games) properly from behind the NAT firewall, then you can open the client up to unrestricted two-way Internet access by defining a DMZ Host. The DMZ function allows you to re-direct all packets going to your WAN port IP address to a particular IP address in your LAN. -
Page 33: Chapter 8 Security Management
Chapter 8 Security management 8.1 Port Filtering You can filter wired users by enabling this function; thus unauthorized users can not access the network. Enable Port Filtering Enable port filtering Port Range Add ports you want to control Protocol Select the port number protocol type (TCP, UDP or both). If you are unsure, then leave it to the default both protocol Comment The description of this setting... -
Page 34: Mac Filtering
Enable IP Filtering Enable IP filtering Local IP Address Add LAN IP address you want to control Protocol Select the port number protocol type (TCP, UDP or both). If you are unsure, then leave it to the default both protocol Comment The description of this setting 8.3 MAC Filtering... -
Page 35: Url Filtering
Enable MAC Filtering Enable MAC filtering MAC Address Add MAC address you want to control Comment The description of this setting 8.4 URL Filtering URL filter is used to deny LAN users from accessing the internet. Block those URLs which contain keywords listed below. -
Page 37: Ddns
8.6 DDNS DDNS allows you to map the static domain name to a dynamic IP address. You must get an account, password and your static domain name from the DDNS service providers. This router supports DynDNS, TZO and other common DDNS service providers. Enable DDNS Enable/Disable the DDNS function of this router Service Provider... -
Page 38: Chapter 9 System Management
Chapter 9 System Management 9.1 Time Zone Setting You can maintain the system time by synchronizing with a public time server over the Internet. Note: For this settings, please refer to section 4.2.2 - “Time zone”. 9.2 Upgrade Firmware This page allows you to upgrade the router’s firmware. - Page 39 Select File This tool allows you to upgrade the Broadband router’s system firmware. To upgrade the firmware of your Broadband router, you need to download the firmware file to your local hard disk, and enter that file name and path in the appropriate field on this page. You can also use the Browse button to find the firmware file on your PC.
- Page 40 9.5 Logout This function is used to logout. Click “Save Settings” at the bottom of the screen to logout.
Need help?
Do you have a question about the WRT-416 and is the answer not in the manual?
Questions and answers