
Related Manuals for Sunbeam StickMaster SM8700


Summary of Contents for Sunbeam StickMaster SM8700
- Page 1 StickMaster Cordless ® Stick Blender Instruction Booklet SM8700 Please read these instructions carefully and retain for future reference.
-
Page 2: Table Of Contents
Contents Important Safeguards Features of your StickMaster ® Cordless Stick Blender Charging your StickMaster ® Cordless Stick Blender Using your StickMaster ® Cordless Stick Blender A Guide to your StickMaster ® Cordless Stick Blender Care and Cleaning Recipes Important instructions – retain for future use. -
Page 3: Important Safeguards
• Do not blend hot ingredients. Always allow ingredients to cool to room temperature before blending. Sunbeam is very safety conscious when • Do not use an appliance for any purpose other than designing and manufacturing consumer products, but its intended use. it is essential that the product user also exercise care • Do not place an appliance on or near a hot gas when using an electrical appliance. Listed below are flame, electric element or on a heated oven. -
Page 4: Features Of Your Stickmaster Cordless Stick Blender
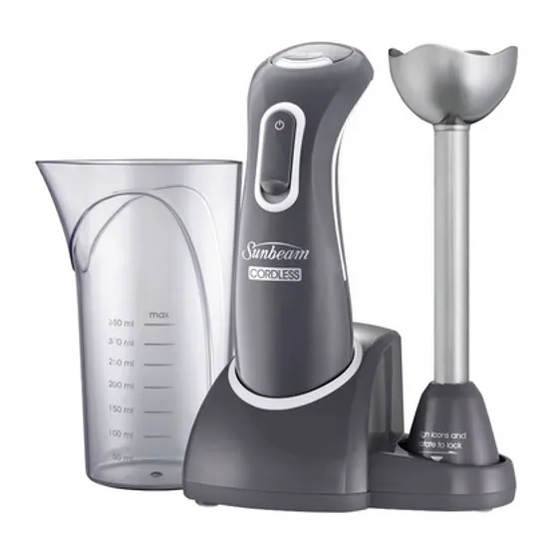
Features of your StickMaster ® Cordless Stick Blender Battery light indicator Three blue LED lights indicate the battery status (low, mid, high). Left LED turns red when the batteries are running flat. Power button Motor housing Powerful motor with 11 000 rpm speed fulfils the most demanding blending tasks. Detachable stainless shaft The stainless shaft detaches from the motor housing when turning it as indicated on the product. Power adaptor... - Page 5 Beaker 350mL beaker is ideal for taking measurements and preparing small quantities of processed foods. Dishwasher-safe components The detachable shaft and beaker are dishwasher-safe for easy cleaning. Charging stand Stores the motor housing and stainless shaft when not in use. Adaptor inlet...
- Page 6 Features of your StickMaster Stick Blender (continued) Wall mounting feature Insert wall plugs, then screw the screws provided until the thread is hidden. If mounting the charging stand on a wall, please follow procedure below: See figure 1.2. WARNING: Always ensure you are not drilling into the wall adjacent to any electrical wires or pipes such as water or gas. Do not mount the charging stand over or near any portion of a heating or cooking appliance or a sink or basin.
- Page 7 Features of your StickMaster Stick Blender (continued) 4. The charging stand should be mounted on the wall as pictured. See figure 3. 3.2.If fixing to a wood or cupboard surface, drill a 2mm pilot hole to a depth of 20mm. Insert screws until the screw head is protruding by approximately 5mm to allow the charging stand to hang. See figures 2.1, 2.2 and 2.3. Figure 2.1 Figure 3 Figure 2.2 Wall Figure 2.3...
-
Page 8: Charging Your Stickmaster Cordless Stick Blender
Charging your StickMaster ® Cordless Stick Blender The stick blender will be partly charged When you charge the appliance for the first during production. Sunbeam recommend that time or after a long period of disuse, let the you charge your stick blender before you use battery fully recharge. When charging the the appliance for the first time, or when the battery from a flat condition, the left LED left LED lights up red and starts flashing to will start flashing blue. See Figure 4. indicate that the batteries are low. As the charging process continues, the left The charging time from a flat to a fully LED will stop flashing and light up blue charged battery is approximately 90 minutes. continuously with the middle LED flashing blue. See Figure 5. 1.Insert the adaptor into the adaptor inlet and plug the adaptor into a suitable mains outlet and switch on. 2. Place the motor housing in the charging stand. Make sure the left LED starts flashing blue to indicate that the appliance is charging. The adapter feels warm during charging. This is normal. Figure 5 Figure 4... - Page 9 Charging your StickMaster Cordless Stick Blender continued ® Remaining battery capacity Next the left and middle LEDs will light up blue continuously and the right LED will start The number of charging lights indicates the flashing blue. See Figure 6. amount of power left in the batteries. The appliance features three LED lights: low, medium, and high battery capacity. When the left LED changes from blue to red and starts flashing, this indicates that the batteries are very low and need charging immediately. Figure 6 When the battery is fully charged, all three LEDs will light up blue continuously on for approximately 2 minutes and 20 seconds, then all LEDs will turn off. This indicates that the charging process is complete. When the appliance is fully charged, it has a cordless operating time of up to 20 minutes, depending on the load. If required, the appliance can be stored in the charging stand while continuously plugged in.
-
Page 10: Using Your Stickmaster Cordless Stick Blender
Using your StickMaster ® Cordless Stick Blender Important: 3. L ower the stick blender into food, then slide the power button downwards, and 1. T his appliance must be fully charged press to operate. See Figure 8. before using for the first time. 2. I nsert the motor housing into the hole on the top of the shaft by aligning the arrows marked on the shaft and motor housing See Figure 7. Figure 8 Figure 7 Note: The StickMaster Cordless Stick ® Then, rotate stainless shaft to lock as Blender is designed to operate only when the indicated. power button remains pulled downwards. 4. T o detach the shaft, rotate the stick blender shaft until the two pieces separate. -
Page 11: A Guide To Your Stickmaster
A Guide to your StickMaster ® Stick Blender Attachment Processing Food Suggested Processing Task Procedure Aerating Milkshakes, Smoothies, Use chilled milk. Blend until Cocktails, Fruit Frappes desired consistency is achieved. Pureeing S oups, Sauces, Dips, Blend until smooth. Baby Food Emulsifying Salad Dressing Blend until well combined. -
Page 12: Care And Cleaning
Care and Cleaning After each use For a quick wash up 1. Always remove the detachable shaft of the Between processing tasks, hold the stick stick blender. blender in the beaker half filled with water and depress the power button for a few Note: Do not immerse, that is, soak the seconds. detachable shaft of the stick blender in water because over time the lubrication on the Dishwasher Use bearings can wash away. All plastic components deteriorate through 2. Wash the detachable shaft under running prolonged dishwasher use. However, the water, without use of abrasive detergents. beaker is tolerant to dishwasher use. 3. When you have finished cleaning the Note: Place only on the top rack of the detachable shaft of the stick blender, place dishwasher. it upright so that any water which may Important: Motor housing and charging stand have got in, can drain out. are not dishwasher safe. 4. The beaker can be washed in hot soapy water. Motor Housing 5. Dry thoroughly. -
Page 13: Recipes
Recipes Banana Smoothie Breakfast Smoothie Serves: 2 Serves: 2 1 ripe banana, peeled, chopped 1 cup chilled milk ½ cup natural yoghurt 150g strawberries, hulled, chopped 1 cup chilled milk 1 tablespoon wheat germ 1 tablespoon honey ¹⁄ ³ cup natural yogurt 1. P lace all ingredients into the beaker. 2 tablespoons honey 2. U sing the StickMaster Cordless stick 1. P lace all ingredients into the beaker. blender, blend until smooth and frothy. 2. U sing the StickMaster Cordless stick blender, blend until smooth and frothy. - Page 14 Recipes continued Iced Mocha Milkshakes Serves: 2 Serves: 2 Preparation: 5 minutes 3 teaspoons instant coffee, dissolved in 1 cup chilled milk 1 tablespoon hot water 2 scoops vanilla or chocolate ice-cream 1 cup chilled milk 1. P lace all ingredients into the beaker. 2 scoops chocolate ice-cream 2. U sing the StickMaster Cordless stick Whipped cream to serve blender, blend until frothy. 1. P lace all ingredients except for cream in the beaker. Using the StickMaster Cordless stick blender, blend until creamy and smooth. 2. P our into glasses and top with whipped cream and dust with chocolate.
- Page 15 Recipes continued Pasta with Classic Tomato Sauce Mixed Mushroom & Thyme Soup Serves: 4 Serves: 4 Cooking: 40 mins Cooking: 25 mins 1 tablespoon olive oil 1 tablespoon olive oil 1 large brown onion, chopped 20g butter, chopped 1 kg vine-ripened tomatoes, chopped 1 large brown onion, chopped 2 cloves garlic, finely chopped 2 cloves garlic, crushed 1 tablespoon brown sugar 1kg small button mushrooms 1 tablespoon red wine or balsamic vinegar 100g shiitake mushrooms, sliced 2 tablespoons finely chopped fresh oregano 3 cups vegetable stock leaves 2 cups water 400g dried spaghetti 200g oyster mushrooms, sliced Salt and pepper, to taste ½ cup extra light sour cream 1. H eat oil in a large saucepan over medium- 1 tablespoon chopped fresh thyme leaves high heat. Add onion and cook for 3 Salt and pepper, to taste minutes or until soft. Add tomato and...
- Page 16 Recipes continued Potato and Leek Soup Roast Pumpkin Soup Serves: 4 Serves: 4 Cooking: 40 minutes Cooking: 1 hour 1 tablespoon olive oil 1.5 kg pumpkin 2 small rashers bacon, chopped 2 tablespoons olive oil 3 medium leeks, sliced thinly 20g butter 1 kg potatoes, peeled and roughly chopped 1 onion, chopped 2 litres chicken or vegetable stock 1 litre low salt chicken stock ½ cup grated parmesan cheese ¹⁄ ³ cup cream or sour cream to serve Salt and pepper, to taste (optional) 1. H eat oil in a large saucepan over medium Salt and pepper, to taste heat. Add bacon and cook, stirring 1. P reheat oven to 200°c. occasionally, until crisp. Remove from pan. 2. R emove skin and seeds from pumpkin and 2. A dd leeks to pan and cook for 4-5 minutes cut into even sized chunks.
- Page 17 Recipes continued Spicy Sweet Potato Soup Chicken, Sweet Corn & Bacon Soup Serves: 4 Serves: 4 Cooking: 25 minutes Cooking: 25 mins 1 tablespoon vegetable oil 3 rashers bacon, rind and fat trimmed, finely 1 onion, chopped chopped 2 cloves garlic, crushed 1 medium brown onion, chopped 1-2 tablespoons red curry paste 2 cloves garlic, crushed 1 kg sweet potato (kumara), peeled and 2 x 420g cans sweet corn kernels, rinsed, roughly chopped drained 1 litre chicken stock 2 trimmed celery sticks, finely chopped ½ cup light coconut milk 1L chicken stock Chopped coriander, to serve 1 cup water 1. H eat oil in a large saucepan over medium- 2 small (280g) single chicken breast fillets high heat. Cook onion for 2-3 minutes or 3 green onions, thinly sliced until soft. Add garlic and red curry paste 2 eggwhites, lightly beaten and cook for 1 minute.
- Page 18 Recipes continued Pumpkin and Vegetable Soup Serves: 4 Cooking: 35 minutes 1 tablespoon olive oil 1 onion, chopped 2 cloves garlic, crushed 1kg pumpkin, peeled and roughly chopped 400g sweet potato (kumara), peeled and roughly chopped 2 potatoes, peeled and roughly chopped 1 large carrot, peeled and sliced 1.5 Litres chicken or vegetable stock 1. H eat oil in a large saucepan over medium- high heat. Cook onion for 2-3 minutes or until soft. Add garlic and cook for 1 minute. 2. A dd pumpkin, sweet potato, potatoes, carrot and chicken stock. Bring to the boil. Reduce heat to low. Cover and simmer for 25-30 minutes or until vegetables are soft. Remove from heat. Set aside until cool. 3. U sing the StickMaster Cordless stick blender, blend soup until smooth. Return soup to heat and stir until heated through. Season with salt and pepper.
- Page 19 12 months of purchase (3 months commercial use) due to faulty materials or manufacture, we will replace it for you free of charge. Should you experience any difficulties with In Australia you are entitled to a your appliance, please phone our customer replacement or refund for a major failure and service line for advice on 1300 881 861 in for compensation for any other reasonably Australia, or 0800 786 232 in New Zealand. foreseeable loss or damage. You are also Alternatively, you can send a written claim entitled to have the goods repaired or to Sunbeam at the address listed below. replaced if the goods fail to be of acceptable On receipt of your claim, Sunbeam will quality and the failure does not amount to seek to resolve your difficulties or, if the a major failure. appliance is defective, advise you on how Should your appliance require repair or to obtain a replacement or refund. service after the guarantee period, contact Your Sunbeam 12 Month Replacement your nearest Sunbeam service centre. Guarantee naturally does not cover misuse For a complete list of Sunbeam’s authorised...
- Page 20 Sunbeam Corporation Limited 2011. ABN 45 000 006 771 Units 5 & 6, 13 Lord Street Botany NSW 2019 Australia Unit 3, Building D 26 Vestey Drive Mt Wellington Auckland New Zealand Sunbeam Corporation is a division of GUD Holdings Ltd. 9/11...
Need help?
Do you have a question about the StickMaster SM8700 and is the answer not in the manual?
Questions and answers