Vision Fitness T80 Owner's Manual
Treadmill
Hide thumbs
Also See for T80:
- Owner's manual (52 pages) ,
- Service manual (35 pages) ,
- Owner's manual (18 pages)
Table of Contents
Advertisement
Available languages
Available languages
T 80
TREADMILL OWNER'S MANUAL
MANUEL DU PROPRIÉTAIRE DU TAPIS ROULANT
MANUAL DEL PROPIETARIO DE LA CAMINADORA
Read the TREADMILL GUIDE before using this OWNER'S MANUAL.
Lisez le GUIDE DU TAPIS ROULANT avant de vous référer au MANUEL DU PROPRIÉTAIRE.
Lea la GUÍA DE LA CAMINADORA antes de utilizar este MANUAL DEL PROPIETARIO.
Advertisement
Table of Contents

Related Manuals for Vision Fitness T80


Summary of Contents for Vision Fitness T80
- Page 1 T 80 TREADMILL OWNER’S MANUAL MANUEL DU PROPRIÉTAIRE DU TAPIS ROULANT MANUAL DEL PROPIETARIO DE LA CAMINADORA Read the TREADMILL GUIDE before using this OWNER’S MANUAL. Lisez le GUIDE DU TAPIS ROULANT avant de vous référer au MANUEL DU PROPRIÉTAIRE. Lea la GUÍA DE LA CAMINADORA antes de utilizar este MANUAL DEL PROPIETARIO.
- Page 2 ENGLISH FRANÇAIS ESPAÑOL...
- Page 3 IMPORTANT PRECAUTIONS SAVE THESE INSTRUCTIONS When using an electrical product, basic precautions should always be followed, including the following: Read all instructions before using this treadmill. It is the responsibility of the owner to ensure that all users of this treadmill are adequately informed of all warnings and precautions.
- Page 4 DANGER TO REDUCE THE RISK OF ELECTRICAL SHOCK: Always unplug the treadmill from the electrical outlet immediately after using, before cleaning, performing maintenance and putting on or taking off parts. CAUTION If you experience any kind of pain, including but not limited to chest pains, nausea, dizziness, or shortness of breath, stop exercising immediately and consult your physician before continuing.
- Page 5 WARNING (CONT.) • At NO time should children under the age of 13 or pets be within 10 feet of the machine. • At NO time should children under the age of 13 use the treadmill. • Children over the age of 13 or disabled persons should not use the treadmill without adult supervision. •...
-
Page 6: Electrical Requirements
ELECTRICAL REQUIREMENTS For your safety and to ensure good treadmill performance, the ground on this circuit must be non-looped. Please refer to NEC article 210-21 and 210-23. Your Treadmill is provided with a power cord with a plug listed below and 120 NEMA 5-20R 120 NEMA 5-20R requires the listed outlet. -
Page 7: Grounding Instructions
120V UNITS The T80 treadmill is for use on a nominal 120-volt circuit and has a non-looped grounding plug. Make sure that the 110-volt treadmill is connected to an outlet, NEMA 5-20R, having the same configuration as the plug. No adapter should be used with this product. - Page 9 BASIC OPERATION...
- Page 10 LOCATION OF THE TREADMILL LOCATION OF THE TREADMILL 12" 305 mm Place the treadmill on a level and stable surface. Place the treadmill on a level and stable surface. Please leave a clear zone behind the treadmill that Please leave a clear zone behind the treadmill that is at least the width of the treadmill and at least 79”...
-
Page 11: Proper Usage
PROPER USAGE Your treadmill is capable of reaching high speeds. Always start off using a slower speed and adjust the speed in small increments to reach a higher speed level. Never leave the treadmill unattended while it is running. When not in use turn the on/off switch to off and unplug the power cord. -
Page 12: Tensioning The Running Belt
TENSIONING THE RUNNING BELT For more information and/or how-to videos, visit our Customer Support section on our website. Contact information is located on the back panel. CAUTION Running belt should NOT be moving during tensioning. Over-tightening the running belt can cause excessive wear on the treadmill as well as its components. - Page 13 CENTERING THE RUNNING BELT For more information and/or how-to videos, visit our Customer Support section on our website. Contact information is located on the back page of the OWNER’S MANUAL. CAUTION Do not run belt faster than 3 mph/4 kmh while centering. Keep fingers, hair and clothing away from belt at all times.
- Page 14 USING THE HEART RATE FUNCTION Place the palm of your hands directly on the grip pulse handlebars. Both hands must grip the bars for your heart rate to register. It takes 5 consecutive heart beats (15-20 seconds) for your heart rate to register. When gripping the pulse handlebars, do not grip tightly.
- Page 15 WIRELESS HEART RATE RECEIVER When used in conjunction with a wireless chest transmitter, your heart rate can be transmitted wirelessly to the treadmill and displayed on the console. All but the CLASSIC console include a wireless chest transmitter. Prior to wearing the wireless chest transmitter on your chest, moisten the two rubber electrodes with water. Center the chest strap just below the breast or pectoral muscles, directly over your sternum, with the logo facing out.
- Page 17 TROUBLESHOOTING & MAINTENANCE...
-
Page 18: Recommended Cleaning Tips
Be sure to remove any obstructions from the path of the The deck can be flipped and reinstalled or replaced by an elevation wheels including power cords. authorized service technician. Please contact Vision Fitness for more information. Monthly, unplug the treadmill and remove the motor cover. -
Page 19: Care And Maintenance
Ensure that any person(s) making adjustments or performing maintenance or repair of any kind is qualified to do so. Vision Fitness will provide service and maintenance training at our corporate facility upon request or in... - Page 20 SERIAL NUMBER LOCATION Before proceeding, find your treadmill’s serial number located on a white barcode sticker on the base frame as shown in this image. ENTER YOUR SERIAL NUMBER IN THE BOX BELOW: SERIAL NUMBER: VISION T80 TREADMILL MODEL NAME:...
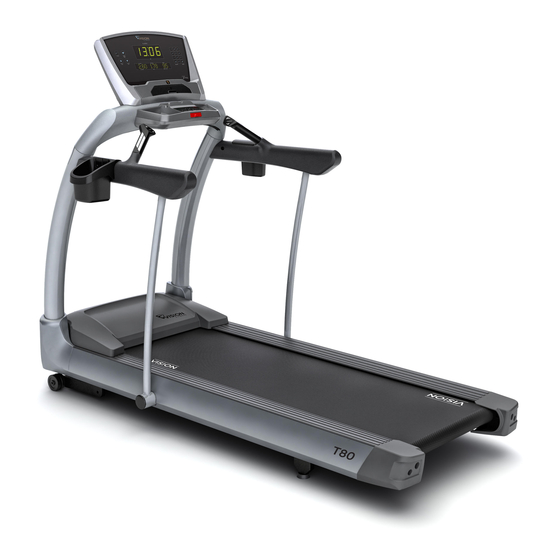
- Page 21 CONSOLE (TOUCH CONSOLE SHOWN) USB PORT AND IPOD CORD (TOUCH CONSOLE ONLY) IN REACH CONTROLS SAFETY KEY PLACEMENT WATER BOTTLE HOLDER CONSOLE MAST GRIP PULSE BARS ON/OFF SWITCH CIRCUIT BREAKER CAUTION ATTENTION PRECAUCIÓN RISK OF INJURIES TO PERSONS! TO AVOID INJURY, STAND RISQUE DE FRACTURE AUX GENS ! POUR ÉVITER TOUTES BLESSURES, ¡RIESGO DE FRACTURA A PERSONA!
- Page 22 If you have questions or if there partially threaded in before completely tightening any ONE bolt. are any missing parts, contact your authorized Vision Fitness NOTE: A light application of grease may aid in the installation of hardware. Any grease, retailer.
-
Page 23: Assembly Step
ASSEMBLY STEP 1 Open HARDWARE FOR STEP 1. HARDWARE FOR STEP 1: Attach LEAD WIRE to CONSOLE CABLE and pull BOLT (A) SPRING WASHER (B) ARC WASHER (C) LEAD WIRE through RIGHT CONSOLE MAST. After 20 mm 8.2 mm 8.4 mm Qty: 6 Qty: 6 Qty: 6... - Page 24 ASSEMBLY STEP 2 Open HARDWARE FOR STEP 2. HARDWARE FOR STEP 2: Guide CONSOLE CABLES from HANDLEBARS SPRING FLAT BOLT (A) through and out of the tops of the CONSOLE WASHER (B) WASHER (C) WASHER (D) 20 mm 8.2 mm 8.4 mm 8.2 mm Qty: 6...
- Page 25 ASSEMBLY STEP 3 Open HARDWARE FOR STEP 3. HARDWARE FOR STEP 3: Attach the right SUPPORT BAR to the BASE BOLT (F) 95 mm SPRING WASHER (E) Qty: 2 FRAME using 1 ARC WASHER (E), 1 SPRING WASHER (B) 8.4 mm 8 mm Qty: 4 Qty: 4...
- Page 26 ASSEMBLY STEP 4 Open HARDWARE FOR STEP 4. HARDWARE FOR STEP 4: Gently place CONSOLE BASE on top of SPRING BOLT (A) SCREW (G) WASHER (E) CONSOLE MASTS. WASHER (B) 20 mm 12 mm 8.4 mm 8.2 mm Qty: 6 Qty: 8 Qty: 6 Qty: 6...
- Page 27 ASSEMBLY STEP 5 Open HARDWARE FOR STEP 5. HARDWARE FOR STEP 5: Remove 2 PRE-INSTALLED SCREWS to FLAT SPRING BOLT (I) WASHER (H) NUT (K) remove CONSOLE REAR COVER from the WASHER (J) 45 mm 8.4 mm Qty: 2 8.2 mm Qty: 2 Qty: 4 CONSOLE.
- Page 28 ASSEMBLY STEP 6 Open HARDWARE FOR STEP 6. HARDWARE FOR STEP 6: Attach the CONSOLE BASE COVER to the BOLT (L) BOLT (M) CONSOLE BASE using 4 BOLTS (L). 20 mm 20 mm Qty: 4 Qty: 6 Attach WATER BOTTLE HOLDER and ACCESSORY HOLDER to left and right HANDLEBARS using 6 BOLTS (M).
-
Page 29: Console Operation
CONSOLE OPERATION See CONSOLE MANUAL for instructions on the following: • CONSOLE OPERATION • CONSOLE DISPLAY INFORMATION • PROGRAM INFORMATION • NIKE + IPOD OPERATION ™ • PASSPORT PLAYER INFORMATION... - Page 30 Any other materials for a period of seven years from the date of use of the device shall void this warranty. VISION FITNESS original purchase, so long as the device remains in the hereby extends the following limited warranties for the following possession of the original owner.
-
Page 31: Warranty Registration
Fitness Product as sold. The warranty does not apply to damage or failure due to accident, abuse, corrosion, discoloration of paint or plastic, or neglect. VISION FITNESS shall not be responsible for incidental or consequential damages. Parts and Electronic components reconditioned to As New Condition by VISION FITNESS or its vendors may sometimes be supplied as warranty replacement parts and constitute fulfillment of warranty terms. - Page 32 LABOR - TWO YEARS original warranty term. VISION FITNESS shall cover the labor cost for the repair of the device for a period of TWO year from the date of original purchase, VISION FITNESS expressly disclaims all other warranties, express so long as the device remains in the possession of the original owner.
- Page 33 FRANÇAIS...
- Page 34 PRÉCAUTIONS IMPORTANTES CONSERVEZ CES DIRECTIVES Lorsque vous utilisez un produit électrique, des précautions de base doivent toujours être respectées, y compris les suivantes : Lisez toutes les directives avant d’utiliser ce tapis roulant. Il incombe au propriétaire de veiller à ce que tous les utilisateurs de tapis roulant soient adéquatement informés de tous les avertissements et précautions.
- Page 35 DANGER POUR RÉDUIRE LE RISQUE DE CHOC ÉLECTRIQUE : Débranchez toujours le tapis roulant de la prise électrique immédiatement après l’avoir utilisé, avant de le nettoyer et d’effectuer un entretien ainsi qu’avant d’ajouter ou d’enlever des pièces. MISE EN GARDE Si vous éprouvez une douleur quelconque, notamment une douleur à...
- Page 36 AVERTISSEMENT (SUITE) • En AUCUN temps, les enfants de moins de 13 ans et les animaux de compagnie ne devraient se tenir à moins de 3 m (10 pi) du tapis roulant. • En AUCUN temps, les enfants de moins de 13 ans ne devraient utiliser le tapis roulant. •...
- Page 37 RACCORDEMENTS ÉLECTRIQUES Pour votre sécurité et pour assurer la bonne performance du tapis roulant, la mise à la terre sur ce circuit doit être sans boucles. Veuillez vous référer à l’article 210-21 et 210-23 du Code national de l’électricité (NEC). Votre tapis roulant comprend un cordon d’alimentation avec une fiche telle que listée ci-dessous 120 NEMA 5-20R 120 NEMA 5-20R...
- Page 38 UNITÉS 120 V Les tapis roulants T80 sont conçus pour usage sur un circuit nominal de 120 V et possède une fiche de mise à la terre sans boucle. Assurez-vous que le tapis roulant à 110 V est branché à une prise NEMA 5-20R, dont la configuration est identique à la fiche. Aucun adaptateur doit être utilisé...
- Page 40 FONCTIONNEMENT DE BASE...
- Page 41 EMPLACEMENT DU TAPIS ROULANT EMPLACEMENT DU TAPIS ROULANT Placez le tapis roulant sur une surface plane. Placez le tapis roulant sur une surface plane. Il doit y avoir un espace derrière le tapis roulant d’au moins la largeur Il doit y avoir un espace derrière le tapis roulant d’au moins la largeur 12 po 305 mm du tapis et d’un minimum de 2 000 mm (79 po).
- Page 42 USAGE CORRECT Votre tapis roulant peut atteindre des vitesses élevées. Commencez toujours à utiliser le tapis roulant en vitesse plus lente et réglez la vitesse par petits incréments pour atteindre un niveau de vitesse plus élevé. Ne laissez jamais le tapis roulant sans surveillance lorsqu’il fonctionne.
- Page 43 TENSIONNEMENT DE LA BANDE Pour de plus amples informations et/ou les vidéos pratiques, visitez la section de soutien à la clientèle de notre site Web. Les coordonnées figurent au verso de ce manuel. MISE EN GARDE La bande ne doit PAS être en mouvement lors du réglage. Un serrage excessif de la bande use le tapis roulant et ses composants.
- Page 44 CENTRAGE DE LA BANDE Pour de plus amples informations et/ou les vidéos pratiques, visitez la section de soutien à la clientèle de notre site Web. Les informations nécessaires pour atteindre cette section figurent au verso du MANUEL DU PROPRIÉTAIRE. MISE EN GARDE Ne faites pas tourner la bande à...
- Page 45 UTILISATION DU CARDIO-FRÉQUENCEMÈTRE Placez la paume des mains directement sur les poignées du cardio-fréquencemètre. Il est nécessaire de saisir les poignées des deux mains pour l’enregistrement de la fréquence cardiaque. Cinq battements cardiaques (15 à 20 secondes) sont nécessaires pour enregistrer la fréquence cardiaque.
- Page 46 RÉCEPTEUR DE FRÉQUENCE CARDIAQUE SANS FIL Lorsque ce récepteur est utilisé avec un capteur-émetteur de plastron sans fil, la fréquence cardiaque peut être transmise sans passer par un fil au tapis roulant et affichée par la console. Toutes les consoles possèdent un capteur-émetteur de plastron sauf le modèle CLASSIC. Avant de porter le capteur-émetteur de plastron sans fil sur la poitrine, humidifiez les deux électrodes caoutchoutées avec de l’eau.
- Page 48 DÉPANNAGE ET ENTRETIEN :...
- Page 49 à l’occasion jusqu’à ce que toute la cire s’introduise dans le matériel de la courroie. La plateforme peut être renversée et réinstallée ou remplacée par un technicien autorisé. Veuillez communiquer avec Vision Fitness pour plus Assurez-vous d’enlever tout obstacle qui pourrait nuire aux roues d’informations.
- Page 50 Assurez-vous que toute personne qui procède aux réglages, à l’entretien ou à des réparations de quelque nature que ce soit est qualifiée pour le faire. Vision Fitness offrira la formation pour le service et l’entretien à leur installation sur demande ou sur le champ si...
- Page 51 Avant de continuer, recherchez le numéro de série et le nom du modèle du tapis roulant qui figurent sur un autocollant de code à barres blanc, sur le bâti tel que montré dans cette figure. INSCRIVEZ VOTRE NUMÉRO DE SÉRIE DANS LA CASE CI-DESSOUS : NUMÉRO DE SÉRIE : TAPIS ROULANT VISION T80 NOM DU MODÈLE :...
- Page 52 CONSOLE (CONSOLE TACTILE ILLUSTRÉE) PORT USB ET CORDON IPOD (CONSOLE TACTILE SEULEMENT) COMMANDES À PORTÉE PLACEMENT DE LA CLÉ DE SÉCURITÉ PORTE-BOUTEILLE GUIDONS DE LA CONSOLE POIGNÉES DU CARDIO-FRÉQUENCEMÈTRE INTERRUPTEUR ON/OFF (MARCHE/ARRÊT) BOÎTIER CAUTION ATTENTION PRECAUCIÓN DE DISJONCTEUR CORDON RISK OF INJURIES TO PERSONS! RISQUE DE FRACTURE AUX GENS ! ¡RIESGO DE FRACTURA A PERSONA! TO AVOID INJURY, STAND...
- Page 53 OUTILS COMPRIS: PRÉ-ASSEMBLAGE Clé à manche en T, de 8 mm Clé à manche en T, de 6 mm Clé à manche en T, de 5 mm DÉBALLAGE Clé à manche en L, de 5 mm Clé à manche en L, de 4 mm Placez l’emballage du tapis roulant sur une surface plane.
- Page 54 ASSEMBLAGE ÉTAPE 1 Ouvrez la TROUSSE DE QUINCAILLERIE POUR QUINCAILLERIE POUR ÉTAPE 1 : L’ÉTAPE 1. Fixez le FIL DE GUIDAGE au CÂBLE DE LA CONSOLE et BOULON (A) RONDELLE À RONDELLES 20 mm RESSORT (B) EN ARC (C) tirez le FIL DE GUIDAGE par le MÂT DE CONSOLE DE Qté...
- Page 55 ASSEMBLAGE ÉTAPE 2 Ouvrez la TROUSSE DE QUINCAILLERIE QUINCAILLERIE POUR ÉTAPE 2 : POUR L’ÉTAPE 2. RONDELLE À RONDELLE RONDELLE BOULON (A) Guidez les CÂBLES DE CONSOLE des GUIDONS dans RESSORT (B) EN ARC (C) PLATE (D) 20 mm 8,2 mm 8,4 mm 8,2 mm Qté...
- Page 56 ASSEMBLAGE ÉTAPE 3 Ouvrez la TROUSSE DE QUINCAILLERIE QUINCAILLERIE POUR ÉTAPE 3 : POUR L’ÉTAPE 3. BOULON (F) RONDELLES 95 mm RONDELLE À EN ARC (E) Qté : 2 Fixez la BARRE DE SOUTIEN de droite au RESSORT (B) 8.4 mm 8 mm Qté...
- Page 57 ASSEMBLAGE ÉTAPE 4 Ouvrez la TROUSSE DE QUINCAILLERIE QUINCAILLERIE POUR ÉTAPE 4 : POUR L’ÉTAPE 4. RONDELLES RONDELLE À Placez délicatement la BASE DE CONSOLE BOULON (A) VIS (G) EN ARC (E) RESSORT (B) 20 mm 12 mm 8,4 mm 8,2 mm sur les MÂTS DE CONSOLE.
- Page 58 ÉTAPE D’ASSEMBLAGE 5 Ouvrez la TROUSSE DE QUINCAILLERIE ASSEMBLAGE ÉTAPE 5 : POUR L’ÉTAPE 5. RONDELLE À RONDELLE À BOULON (I) RESSORT (H) RESSORT (J) ÉCROU (K): Retirez les 2 VIS PRÉINSTALLÉES pour 45 mm 8,4 mm Qté : 2 8,2 mm Qté...
- Page 59 ASSEMBLAGE ÉTAPE 6 Ouvrez la TROUSSE DE QUINCAILLERIE QUINCAILLERIE POUR ÉTAPE 6 : POUR L’ÉTAPE 6. BOULON (L) BOULON (M) Fixez le COUVERCLE DE LA CONSOLE 20 mm 20 mm Qté : 4 Qté : 6 à la BASE DE CONSOLE à l’aide de 4 BOULONS (L).
- Page 60 FONCTIONNEMENT DE LA CONSOLE Voir le MANUEL DE LA CONSOLE pour des directives sur les points suivants : • FONCTIONNEMENT DE LA CONSOLE • RENSEIGNEMENTS SUR L’AFFICHAGE DE LA CONSOLE • RENSEIGNEMENTS SUR LE PROGRAMME • FONCTIONNEMENT NIKE + IPOD •...
- Page 61 MAIN D OEUVRE - DEUX AN pendant la période indiquée : VISION FITNESS couvrira les frais de main d oeuvre pour la réparation de l appareil pendant une période de deux ans CADRE - À VIE à...
- Page 62 La garantie ne s applique pas aux dommages ou pannes causés par un accident, de l abus, la corrosion, la décoloration de la peinture ou du plastique ou la négligence. VISION FITNESS ne sera pas responsable des dommages consécutifs ou indirects.
- Page 63 CADRE - À VIE VISION FITNESS garantit le cadre contre les défauts ou l installation de pièces ou d accessoires non originalement de main d oeuvre et de matériaux pendant la durée du produit, tant que conçus pour ou compatibles au produit d exercice tel que vendu.
- Page 64 ESPAÑOL...
- Page 65 PRECAUCIONES IMPORTANTES CONSERVE ESTAS INSTRUCCIONES Cuando se usa un producto eléctrico, se deben tener precauciones básicas, incluidas las siguientes: lea las instrucciones antes de utilizar esta caminadora. Es responsabilidad del propietario asegurarse de que todos los usuarios de esta caminadora estén informados adecuadamente de todas las advertencias y las precauciones.
- Page 66 PELIGRO PARA REDUCIR EL RIESGO DE DESCARGA ELÉCTRICA: Desconecte siempre la caminadora del tomacorriente inmediatamente después de su uso, antes de limpiarla, al realizar trabajos de mantenimiento y al añadirle o quitarle piezas. PRECAUCIÓN Si experimenta algún tipo de dolor, de manera enunciativa mas no limitada: dolores de pecho, náusea, mareos o dificultad para respirar, pare el ejercicio de inmediato y consulte a su médico antes de continuar.
- Page 67 ADVERTENCIA (CONT.) • Las mascotas o los niños menores de 13 años no deben acercarse en NINGÚN momento a una distancia menor de 10 pies (3,05 metros) de la caminadora. • Los niños menores de 13 años NUNCA deben utilizar la caminadora. •...
- Page 68 REQUISITOS ELÉCTRICOS Para su seguridad y para asegurar el buen rendimiento de la caminadora, la conexión a tierra en este circuito no debe ser de bucle. Consulte los artículos 210-21 y 210-23 del NEC (Código Eléctrico Nacional). Su caminadora se entrega con un cable de 120 NEMA 5-20R 120 NEMA 5-20R corriente con un enchufe indicado a continuación y requiere el...
- Page 69 UNIDADES DE 120 V La caminadora T80 es para el uso en un circuito nominal de 120 voltios y tiene un enchufe de conexión a tierra sin bucle. Asegúrese de que la caminadora de 110 voltios esté conectada a un tomacorriente NEMA 5-20R que tenga la misma configuración que el enchufe. No utilice un adaptador con este producto.
- Page 71 FUNCIONAMIENTO BÁSICO...
- Page 72 UBICACIÓN DE LA CAMINADORA UBICACIÓN DE LA CAMINADORA 12" 305 mm Coloque la caminadora sobre una superficie plana y estable. Coloque la caminadora sobre una superficie plana y estable. Deje un área despejada detrás de la caminadora Deje un área despejada detrás de la caminadora que tenga el ancho de la caminadora y 79"...
- Page 73 USO APROPIADO Su caminadora puede alcanzar altas velocidades. Siempre comience usando una velocidad más baja y ajuste la velocidad en pequeños incrementos para alcanzar un nivel de velocidad superior. Nunca deje la caminadora desatendida mientras está funcionando. Cuando no utilice la caminadora, coloque el interruptor de encendido/apagado en la posición "Off" [apagado] y desconecte el cable de corriente. Asegúrese de seguir el programa de MANTENIMIENTO en esta guía para mantener un rendimiento óptimo y evitar fallas electrónicas prematuras.
- Page 74 CÓMO TENSAR LA BANDA PARA CORRER Para obtener más información y videos instructivos, visite nuestra sección Asistencia al cliente de nuestro sitio web. La información de contacto se encuentra ubicada en la contratapa. PRECAUCIÓN La banda para correr NO debe moverse mientras se esté tensando. Si la banda para correr se tensa demasiado, se puede ocasionar desgaste excesivo en la caminadora y en sus componentes.
- Page 75 CÓMO CENTRAR LA BANDA PARA CORRER Para obtener más información y videos instructivos, visite nuestra sección Asistencia al cliente de nuestro sitio web. La información de contacto encuentra en la página trasera del MANUAL DEL PROPIETARIO. PRECAUCIÓN No active la banda a mayor velocidad que 3 millas por hora (4,8 kilómetros por hora) mientras está...
- Page 76 USO DE LA FUNCIÓN DE RITMO CARDÍACO Coloque las palmas de las manos directamente sobre las barras de sujeción con empuñaduras con sensor de pulso. Para que se registre su ritmo cardíaco, ambas manos deben tomar las empuñaduras. Su ritmo cardíaco se registra después de 5 latidos cardíacos consecutivos (15-20 segundos).
- Page 77 RECEPTOR INALÁMBRICO DE RITMO CARDÍACO Cuando se utiliza junto con un transmisor inalámbrico de pecho, su ritmo cardíaco puede transmitirse de manera inalámbrica a la caminadora y visualizarse en la consola. Todas las consolas menos el modelo CLASSIC incluyen un transmisor de correa inalámbrico. Antes de ponerse un transmisor inalámbrico de pecho, humedezca los dos electrodos de goma con agua.
- Page 79 RESOLUCIÓN DE PROBLEMAS Y MANTENIMIENTO...
- Page 80 Para obtener más información, comuníquese con Vision Fitness. Mensualmente, desenchufe la caminadora y retire la cubierta del motor. Verifique la existencia de desechos y limpie con un paño seco o una pequeña boquilla de aspiradora.
- Page 81 Ellas contienen información importante. Si faltan o están ilegibles, mantenimiento preventivo. comuníquese con Vision Fitness para obtener una etiqueta de sustitución o los datos de un proveedor de servicio autorizado. A DIARIO REALICE EL MANTENIMIENTO DE TODO EL EQUIPO El •...
- Page 82 Antes de seguir adelante busque el número de serie de la caminadora, que se encuentra ubicado DE SERIE en una etiqueta adhesiva blanca con código de barras en el bastidor base como se muestra en la imagen. INTRODUZCA SU NÚMERO DE SERIE EN EL SIGUIENTE CUADRO: NÚMERO DE SERIE: CAMINADORA VISION T80 NOMBRE DE MODELO:...
- Page 83 CONSOLA (SE MUESTRA LA CONSOLA TOUCH) PUERTO USB Y CABLE DE IPOD (CONSOLA TOUCH SOLAMENTE) CONTROLES AL ALCANCE UBICACIÓN DE LA LLAVE DE SEGURIDAD SOPORTE PARA BOTELLA DE AGUA POSTE DE LA CONSOLA BARRAS CON EMPUÑADURAS CON SENSOR DE PULSO INTERRUPTOR DE ENCENDIDO/APAGADO CAUTION...
- Page 84 CUALQUIERA de ellos. faltantes, comuníquese con su vendedor minorista autorizado de NOTA: Una ligera capa de grasa podría facilitar la instalación de la tornillería. Se recomienda Vision Fitness. cualquier tipo de grasa, como la grasa de litio para bicicletas.
- Page 85 ENSAMBLAJE PASO 1 Abra la BOLSA DE TORNILLERÍA PARA EL PASO 1. TORNILLERÍA PARA EL PASO 1: Una el CABLE CONDUCTOR al CABLE DE LA CONSOLA y jale del CABLE CONDUCTOR a través del POSTE PERNO (A) ARANDELA ARANDELA 20 mm ELÁSTICA (B) DE ARCO (C) DERECHO DE LA CONSOLA.
- Page 86 ENSAMBLAJE PASO 2 Abra la BOLSA DE TORNILLERÍA PARA EL TORNILLERÍA PARA EL PASO 2: PASO 2. ARANDELA ARANDELA ARANDELA PERNO (A) Guíe los CABLES DE LA CONSOLA desde las BARRAS ELÁSTICA (B) DE ARCO (C) PLANA (D) 20 mm 8,2 mm 8,4 mm 8,2 mm...
- Page 87 ENSAMBLAJE PASO 3 Abra la BOLSA DE TORNILLERÍA PARA EL TORNILLERÍA PARA EL PASO 3: PASO 3. PERNO (F) ARANDELA 95 mm ARANDELA DE ARCO (E) Cant.: 2 Una la BARRA DE APOYO derecha al ELÁSTICA (B) 8,4 mm 8 mm Cant.: 4 Cant.: 4 BASTIDOR BASE usando 1 ARANDELA DE...
- Page 88 ENSAMBLAJE PASO 4 Abra la BOLSA DE TORNILLERÍA PARA EL TORNILLERÍA PARA EL PASO 4: PASO 4. ARANDELA ARANDELA Coloque suavemente la BASE DE LA CONSOLA PERNO (A) TORNILLO (G) DE ARCO (E) ELÁSTICA (B) 20 mm 12 mm 8,4 mm 8,2 mm encima de los POSTES DE LA CONSOLA.
- Page 89 ENSAMBLAJE PASO 5 Abra la BOLSA DE TORNILLERÍA PARA EL TORNILLERÍA PARA EL PASO 5: PASO 5. ARANDELA ARANDELA PERNO (I) PLANA (H) ELÁSTICA (J) TUERCA (K) Quite los 2 TORNILLOS PREINSTALADOS 45 mm 8,4 mm 8,2 mm Cant.: 2 Cant.: 2 Cant.: 4 para extraer la CUBIERTA TRASERA DE LA...
- Page 90 ENSAMBLAJE PASO 6 Abra la BOLSA DE TORNILLERÍA PARA EL TORNILLERÍA PARA EL PASO 6: PASO 6. PERNO (L) PERNO (M) Una la CUBIERTA DE LA BASE DE 20 mm 20 mm Cant.: 4 Cant.: 6 CONSOLA al BASTIDOR BASE usando 4 PERNOS (L).
- Page 91 FUNCIONAMIENTO DE LA CONSOLA Consulte el MANUAL DE LA CONSOLA para ver las instrucciones sobre lo siguiente: • FUNCIONAMIENTO DE LA CONSOLA • INFORMACIÓN DE LA PANTALLA DE LA CONSOLA • INFORMACIÓN DE LOS PROGRAMAS • FUNCIONAMIENTO DE NIKE + IPOD ™...
- Page 92 MANO DE OBRA: DOS AÑOS siguientes garantías limitadas para los siguientes componentes VISION FITNESS cubrirá el costo de Mano de obra para la del dispositivo, por el período de tiempo indicado: reparación del dispositivo por un período de dos año desde...
- Page 93 La garantía no es aplicable a daños y fallas debidas a accidente, maltrato, corrosión, decoloración de la pintura o plástico y de negligencia. VISION FITNESS no se responsabiliza por daños incidentales o procedentes. Las piezas y los componentes electrónicos reacondicionados a un estado semejante a nuevo por parte de VISION FITNESS o sus distribuidores a veces pueden suministrarse como piezas de sustitución de garantía y constituyen la...
- Page 94 MANO DE OBRA: DOS AÑOS suministrarse como piezas de sustitución de garantía y constituyen VISION FITNESS cubrirá el costo de Mano de obra para la reparación del la satisfacción de los términos de la garantía. Cualquier pieza de dispositivo por un período de dos años desde la fecha de la compra original, sustitución de la garantía contará...
- Page 97 T80 Rev. 1.9 | © 2012 Vision Fitness Designed & Engineered in the U.S.A. • Made in China | Conçu et développé aux États-Unis. • Fabriqué en Chine | Diseño y tecnología de los EE.UU. • Hecho en China...
Need help?
Do you have a question about the T80 and is the answer not in the manual?
Questions and answers