Health O Meter 2600KL Operation Manual
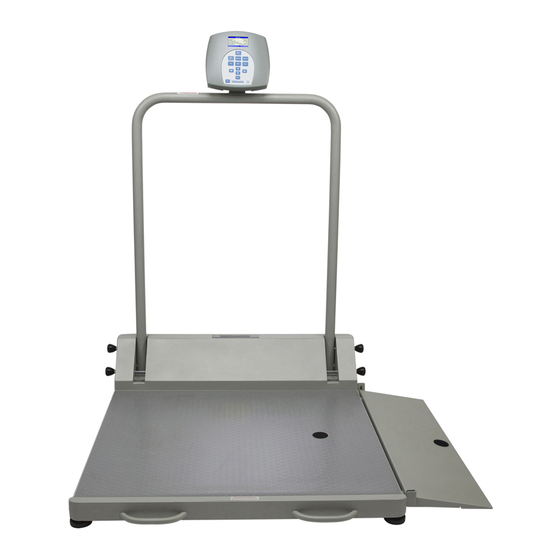
Electronic folding wheelchair scale
Hide thumbs
Also See for 2600KL:
- Use instruction (84 pages) ,
- User instructions (28 pages) ,
- User manual (24 pages)
Advertisement
Available languages
Available languages
Advertisement
Chapters

Related Manuals for Health O Meter 2600KL


Summary of Contents for Health O Meter 2600KL
- Page 1 PRO PLUS ELECTRONIC FOLDING WHEELCHAIR SCALE MODEL 2600KL BALANCE ELECTRONIQUE PLIANTE PRO PLUS POUR FAUTEUIL ROULANT MODELE 2600KL BALANZA ELECTRONICA PLEGABLE PRO PLUS PARA SILLA DE RUEDAS MODELO 2600KL OPERATION MANUAL MODE D'EMPLOI MANUAL DE OPERACIÓN...
-
Page 2: Table Of Contents
PRO PLUS ELECTRONIC FOLDING WHEELCHAIR SCALE MODEL 2600KL Thank you for your purchase of this product. Please read this manual carefully and keep it handy for ready reference. Merci d'avoir acheté ce produit. Veuillez lire attentivement ce manuel et le garder à portée de main pour pouvoir le consulter à... -
Page 3: Caution And Warning
SPECIFICATIONS GENERAL Health o meter’s Pro Plus Electronic Folding Wheelchair Scale Model 2600KL uses highly sophisticated microprocessor technology. Each precision instrument is designed to provide accurate, reliable and repeatable weight measurements and features that make the weighing process simple, fast and convenient. -
Page 4: Assembly Instructions
ASSEMBLY INSTRUCTIONS Parts List: (1) Platform Assembly (includes ramp and handrail) (1) Small Back Cover (1) Display Assembly (1) Front Cover (4) Plastic Feet Assemblies (1) Rear Cover (1) AC Adapter Holder (6) Screws for Display (3) Cable Holder Clips (2) Screws for AC Holder Tools required: Phillips head screwdriver, Allen wrenches (included). - Page 5 ASSEMBLY INSTRUCTIONS Slide the display assembly onto the display support by inserting the two metal supports into the two slots in the rear display assembly. Tuck the excess load cell cable into the handrail tube. NOTE: The load cell cable should now be secured in the channel between the display assembly and the display support.
- Page 6 ASSEMBLY INSTRUCTIONS Ramp - Moving Instructions Remove the guardrail at the end of the platform by unscrewing 4 screws. (see Figure 3) Fold the ramp on the platform surface. Gently tip the scale over and place with handrail on the floor. Remove the screws attaching 2 rubber bumpers on the side of the platform under the ramp attachment.
-
Page 7: Set Up
SET UP You can fold the scale for moving and storage purposes and then open the scale to operational position. Scale - Opening and Folding Procedures Figure 4a Figure 4b Scale opening: Begin with the scale in the folded upright position resting on its wheels, as in Figure 4b. Holding the raising handles and the top of the handrail, place the platform flat on the floor. - Page 8 Place batteries in the battery holder (see “Replacing Batteries”). Plug the scale’s AC adapter into the power source. Press the ON/OFF button to turn the scale on. The display will show “Health o Meter Pro Plus” and then ”000 ”.
-
Page 9: Operation Instructions
OPERATION INSTRUCTIONS Press the ON/OFF button to turn the scale on. Wait until ”000 ” and “ZERO” on the left side of the display will appear. If the wheelchair weight is known, enter the TARE value according to instructions in the “Menu”, para 02. - Page 10 OPERATION INSTRUCTIONS Figure 6. Keypad ITEM DESCRIPTION FUNCTION POWER Turns scale ON and OFF. ZERO Zeros the scale prior to weighing. Holds the value of the weighed object on the display until HOLD/RELEASE the button is pressed again to clear the value. Also used to scroll down in the menu.
- Page 11 OPERATION INSTRUCTIONS MENU In the menu screen the user can set preferences and/or instruct the scale how to handle stored data. The menu can be navigated using the up and down keys ( ) or by entering the associated menu position number with the keypad. The menu has a “roll-over” way of working: when the user scrolls to the bottom of the menu and presses the down button, it will return to the top of the menu.
- Page 12 OPERATION INSTRUCTIONS TARE WEIGHT NOTE: Due to the scale’s sensitivity, we recommend using the REWEIGH function prior to setting the TARE weight, in order to eliminate any operator interference with the item to be tared out. There are two ways to manually enter a tare weight (such as the weight of a wheelchair, shoes, etc): press MENU (1) and select option 02-Tare Weight or press TARE (9).
- Page 13 OPERATION INSTRUCTIONS 3. The scale will prompt you to enter the patient’s height. Use the keypad to enter the height in 1/4" (1=1/4, 2=1/2, 3=3/4) or 1 cm increments (use inches for weight in lb, cm for kg). Press ENTER. 4.
- Page 14 OPERATION INSTRUCTIONS Transfer now All the values stored in memory are transferred to the PC and the scale memory is cleared of all values. If the transfer was unsuccessful, the values are kept in memory until successfully transferred or cleared. Clear memory All the values stored in memory will be cleared.
- Page 15 OPERATION INSTRUCTIONS Auto Off Time The user can determine how long the scale will operate before turning off automatically due to inactivity. Default time is 10 minutes. If the value is set to zero, the auto off function is disabled. Tone Volume There is an option to adjust the beeping tone of the scale.
- Page 16 OPERATION INSTRUCTIONS Display Backlight The user can set the brightness of the backlight. Display Contrast The user can set the brightness of the LCD. Live Weight By selecting “Yes” the user can set the Live Weight mode to deactivate the motion-sensing mode. In the Live Weight mode the weight displayed will fluctuate with the patient’s movement;...
- Page 17 OPERATION INSTRUCTIONS Set the date using the up and down keys and enter the values on the keypad. About This screen displays the software version of the scale. SYSTEM TEST Battery Test The scale will display the estimated amount of battery life remaining until the batteries will have to be replaced.
- Page 18 OPERATION INSTRUCTIONS UI Test The scale has a diagnostic routine where it tests the User Interface (UI) hardware functionality (LCD, keypad). In order to do this the user has to press all the keys according to the messages displayed on the screen. If the requested command was not received or wrong button was pressed, the following message will be displayed.
- Page 19 OPERATION INSTRUCTIONS Disp Height & ID When the user selects to display the height and ID of the user, it will be displayed at the bottom of the screen. We recommend the use of this function to ensure that the patient’s correct ID and height have been entered.
-
Page 20: Maintenance
GENERAL This section provides instructions for maintenance, cleaning, troubleshooting and operator replaceable parts for the Pro Plus Electronic Folding Wheelchair Scale Model 2600KL. Maintenance operations other than those described in this section should be performed by qualified service personnel. MAINTENANCE Before first use and after periods of non-use, check the scale for proper operation and function. -
Page 21: Troubleshooting
TROUBLESHOOTING Refer to the following instructions to check and correct any failure before contacting service personnel. SYMPTOM POSSIBLE CAUSE CORRECTIVE ACTION Scale does not turn on Dead Battery Replace batteries Faulty electrical outlet Use a different outlet Bad power supply Replace adapter Questionable weight or External object... -
Page 22: Calibration Path
X.XXXXX Press ENTER Calibration Please clear the scale Please remove weight from the scale platform Rebooting Please wait 10. Please wait until the scale resumes normal Health O Meter operation Pro Plus EXPLODED VIEW OF SCALE... - Page 23 EXPLODED VIEW OF SCALE (continue) View of Scale in Folded Position...
-
Page 24: Parts List
3822701-0 REAR COVER 3822601-0 BACK BASE COVER 401305 CABLE CLIP 3822501-0 BASE COVER PLASTIC TUBE COVER DIA. 38 HEALTH O METER LABEL HANDRAIL 420988 ADAPTER UNIT 6VDC 120VAC 3817001-0 ADAPTER HOLDER HANDRAIL OPEN RUBBER STOPPER HANDRAIL CLOSED RUBBER STOPPER 2267601-0... -
Page 25: Warranty
7400 West 100th Place, Bridgeview IL 60455 • 1-800-638-3722 or 1-708-598-9100 www.healthometermedical.com Health o meter ProPlus products are manufactured, designed and owned by Pelstar LLC. Health o meter® is a registered trademark of Sunbeam Products Inc., Boca Raton, FL 33431. ProPlus is a trademark of Pelstar LLC... - Page 26 BALANCE ELECTRONIQUE PLIANTE PRO PLUS POUR FAUTEUIL ROULANT MODELE 2600KL TABLE DES MATIERES PRECAUTION ET PREVENTION ..................26 SPECIFICATIONS.........................26 MODE D'ASSEMBLAGE ....................... 27 INSTALLATION ........................30 MODE DE FONCTIONNEMENT ................... 32 MAINTENANCE........................43 LOCALISATION DES PANNES .................... 44 CALIBRAGE .......................... 45 SCHEMA DE LA BALANCE EN PIECES DETACHEES ............
-
Page 27: Precaution Et Prevention
La balance électronique pliante Pro Plus pour fauteuil roulant de Health o meter, modèle 2600KL utilise une technologie très sophistiquée de microprocesseur. Chaque instrument de précision est conçu pour donner la mesure exacte, fiable et répétable du poids et présente des caractéristiques qui font de la pesée un processus simple, rapide et pratique. -
Page 28: Mode D'assemblage
MODE D'ASSEMBLAGE Liste des pièces : (1) Ensemble plateforme (avec rampe d'accès et barre (1) Petit cache arrière d'appui) (1) Bloc d'affichage (1) Couvercle frontal (4) Ensembles de pieds en plastique (1) Couvercle arrière (1) Support de l'adaptateur CA (6) Vis de l'affichage (3) Serre-câbles (2) Vis du support de l'adaptateur CA Outils nécessaires : tournevis à... - Page 29 MODE D'ASSEMBLAGE Faites glisser le bloc d'affichage sur son support en introduisant les deux supports métalliques dans les deux fentes prévues à cet effet à l'arrière du bloc. Repliez l'excédent de câble de la cellule de charge à l'intérieur du tube de la barre d'appui. REMARQUE: Le câble de la cellule de charge doit à...
- Page 30 MODE D'ASSEMBLAGE Rampe d'accès – Instructions de retrait Retirez le contre-rail situé au bout de la plateforme en desserrant les 4 vis (cf. Figure 3). Rabattez la rampe d'accès sur la surface de la plateforme. Faites doucement basculer la balance pour la retourner, barre d'appui au sol. Retirez les vis qui fixent 2 pare-chocs en caoutchouc sur le côté...
-
Page 31: Installation
INSTALLATION Vous pouvez plier la balance pour la déplacer ou la ranger et ensuite la rouvrir le moment venu. Balance – Instructions d'ouverture et de pliage Figure 4a Figure 4b Ouverture de la balance : Mettez tout d'abord la balance en position pliée verticale, reposant sur ses roues comme l'indique la Figure 4b. - Page 32 Branchez l'adaptateur CA de la balance à la source d'alimentation électrique. Appuyez sur la touche de Marche/Arrêt (ON/OFF) pour allumer l'appareil. L'écran affiche le nom « Health o Meter Pro Plus » suivi de la mention « 000 ». Placez un poids [ne dépassant pas 800 Lb (360 Kg)] sur la bascule. L'écran de visualisation affiche la mention «...
-
Page 33: Mode De Fonctionnement
MODE DE FONCTIONNEMENT Appuyez sur l'interrupteur de Marche/ Arrêt (ON/OFF) pour allumer l'appareil. Attendez que les mentions « 000 » et « ZERO » apparaissent sur le côté gauche de l'écran de visualisation. Si le poids du fauteuil roulant est connu, introduisez la valeur de la TARE en suivant les «... - Page 34 MODE DE FONCTIONNEMENT Figure 6. Clavier TOUCHE DESCRIPTION FONCTION POWER Allume (ON) et éteint (OFF) l'appareil. ZERO Met la balance à zéro avant la pesée. Maintient l'affichage du poids de l'objet pesé, et ce, jusqu'à la HOLD/RELEASE pression suivante de la touche qui effacera cette valeur de l'écran. Sert aussi à...
- Page 35 MODE DE FONCTIONNEMENT MENU Sur l'écran du menu, l'utilisateur peut régler ses préférences et/ou déterminer le mode de traitement des données enregistrées à appliquer par la balance. Il peut feuilleter le menu par le biais des touches indiquant les flèches ascendante et descendante ( ) ou en tapant à...
- Page 36 MODE DE FONCTIONNEMENT POIDS DE LA TARE REMARQUE: Etant donné le degré de sensibilité de la balance, nous recommandons d'utiliser la fonction de repesée (REWEIGH) avant de régler le poids de la TARE, afin d'éliminer toute interférence éventuelle de l'opérateur avec l'objet à tarer. Il existe deux manières d'introduire manuellement le poids de la tare (par ex.
- Page 37 MODE DE FONCTIONNEMENT Cette bascule calcule également l'Indice de Masse Corporelle (IMC) (BMI = Body Mass Index). CALCUL de l'IMC : 1. Installez le patient sur la plateforme de la balance. 2. Appuyez sur la touche IMC (BMI) (2). 3. Suivez les instructions données à l'écran pour introduire la hauteur du patient à l'aide du clavier, suivant des écarts de 1/4"...
- Page 38 MODE DE FONCTIONNEMENT Transfert immédiat Toutes les valeurs mémorisées sont transférées au PC et la mémoire de la balance est ainsi complètement dégagée. Si le transfert échoue, les valeurs sont maintenues en mémoire jusqu'au succès du transfert ou jusqu'à l'ordre d'effacement. Effacement des données en mémoire Toutes les valeurs stockées en mémoire sont effacées.
- Page 39 MODE DE FONCTIONNEMENT Arrêt automatique L'utilisateur peut définir le temps d'attente de la balance avant que celle-ci ne s'éteigne automatiquement suite à son inutilisation prolongée. Le temps réglé par défaut est de 10 minutes. Le réglage de cette valeur sur zéro désactive la fonction d'arrêt automatique.
- Page 40 MODE DE FONCTIONNEMENT Luminosité de fond de l'affichage L'utilisateur peut régler la luminosité du rétroéclairage. Contraste L'utilisateur peut régler la luminosité de l'affichage à cristaux liquides (LCD). Poids Vif « En appuyant sur Yes » (Oui), l'utilisateur sélectionne le mode Poids Vif et désactive le mode de lecture du poids par sensibilité...
- Page 41 MODE DE FONCTIONNEMENT Réglez la date en utilisant les touches fléchées et tapez les valeurs sur le clavier. Version Cet écran affiche la version du logiciel installé sur la balance. TEST DE SYSTEME Test des Piles La balance fait figurer la durée de vie estimée restante avant que les piles actuelles n'aient besoin d'être remplacées.
- Page 42 MODE DE FONCTIONNEMENT Test UI La balance dispose d'une routine de diagnostic où elle teste la fonctionnalité du matériel (LCD, clavier) de l'Interface de l'Utilisateur (UI). Pour mettre cette routine en marche, l'utilisateur doit appuyer sur les touches indiquées au fur et à mesure par les divers messages affichés à...
- Page 43 MODE DE FONCTIONNEMENT Affichage Hauteur et ID Quand l'utilisateur choisit d'afficher la hauteur et le numéro d'identification ID du patient, celui-ci s'affichera au bas de l'écran. Nous recommandons l'application de cette fonction pour vérifier l'exactitude du numéro ID et de la hauteur enregistrés pour le patient.
-
Page 44: Maintenance
Ce chapitre fournit les instructions pour la maintenance, le nettoyage, la localisation des pannes et indique les pièces remplaçables par l'opérateur, pour la balance électronique pliante Pro Plus pour fauteuil roulant, modèle 2600KL. Toutes opérations de maintenance autres que celles décrites dans ce chapitre doivent être exécutées par un technicien qualifié. MAINTENANCE Avant la première utilisation et après de longues périodes d'inutilisation, vérifiez le bon état de... -
Page 45: Localisation Des Pannes
LOCALISATION DES PANNES Reportez-vous aux instructions suivantes pour vérifier et rectifier une panne avant de contacter un technicien qualifié. SYMPTOME CAUSE POSSIBLE ACTION CORRECTIVE La balance ne s'allume pas. Les piles sont mortes. Remplacez les piles. Prise électrique Utilisez une autre prise. défectueuse Mauvaise alimentation Remplacez l'adaptateur. -
Page 46: Calibrage
Veuillez libérer la balance. Retirez le poids de la plateforme de la balance. Rebooting (Réamorçage) Veuillez patienter. 10. Veuillez patienter jusqu'à ce que la balance Health O Meter recouvre son fonctionnement normal. Pro Plus SCHEMA DE LA BALANCE ELECTRONIQUE EN PIECES DETACHEES... - Page 47 SCHEMA DE LA BALANCE ELECTRONIQUE EN PIECES DETACHEES (suite) Vue de la balance pliée...
-
Page 48: Liste Des Pieces
CACHE ARRIERE DE LA BASE 401305 SERRE-CABLE 3822501-0 COUVERCLE DE LA BASE CACHE-TUBE EN PLASTIQUE, DIA. 38 FICHE SIGNALETIQUE HEALTH O METER BARRE D4APPUI 420988 ADAPTATEUR 6VDC 120VAC 3817001-0 SUPPORT DE L'ADAPTATEUR BUTEE EN PLASTIQUE DE LA BARRE D'APPUI EN POSITION OUVERTE... -
Page 49: Garantie
Les produits Health o meter sont fabriqués, conçus et la propriété de Pelstar LLC. Health o meter® est une marque déposée de of Sunbeam Products Inc., Boca Raton, FL 33431 ProPlus is est une marque déposée de of Pelstar LLC... - Page 50 BALANZA ELECTRONICA PLEGABLE PRO PLUS PARA SILLA DE RUEDAS MODELO 2600KL ÍNDICE PRECAUCIÓN Y ADVERTENCIA ..................50 ESPECIFICACIONES......................50 INSTRUCCIONES DE MONTAJE ..................51 CONFIGURACIÓN ........................ 54 INSTRUCCIONES DE OPERACIÓN..................56 MANTENIMIENTO......................... 67 SOLUCIÓN DE PROBLEMAS....................68 TRAYECTORIA DE CALIBRACIÓN ..................69 VISTA DETALLADA DE LA BALANZA..................
-
Page 51: Precaución Y Advertencia
ESPECIFICACIONES GENERAL La Balanza Electrónica Plegable Pro Plus de Health o meter, Modelo 2600KL usa tecnología de microprocesador altamente sofisticada. Cada instrumento de precisión es proyectado para proveer medidas de peso exactas, confiables, repetibles y características que hacen el proceso de pesaje simple, rápido y conveniente. -
Page 52: Instrucciones De Montaje
INSTRUCCIONES DE MONTAJE Lista de las Partes: (1) Unidad de la Plataforma (incluye Rampa y Barra de Apoyo) (1) Pequeña Tapa Posterior (1) Unidad del Display (1) Tapa Delantera (4) Unidades de Pies de Plástico (1) Tapa Trasera (1) 1) Soporte para Adaptador CA (6) Tornillos para Display (3) Clips del Soporte del Cable (2) Tornillos para Soporte CA... - Page 53 INSTRUCCIONES DE MONTAJE Deslice la unidad de display al soporte de display insertando los dos soportes de metal en las dos ranuras en la parte posterior de la unidad de display. Ponga el exceso del cable de la célula de carga en el tubo de la barra de apoyo. NOTA: El cable de la célula de carga debe ahora ser asegurado en el canal entre la unidad de display y el soporte del display.
- Page 54 INSTRUCCIONES DE MONTAJE Rampa – Instrucciones de Movimiento Remueva la barandilla al final de la plataforma desatornillando 4 tornillos.(ver Figura 3) Doble la rampa en la superficie de la plataforma. De vuelta la balanza con cuidado y colóquela con la barra de apoyo en el piso. Saque los tornillos que prenden los 2 topes de goma en el lado de la plataforma, debajo del dispositivo de la rampa.
-
Page 55: Configuración
CONFIGURACIÓN Usted puede doblar la balanza para fines de transporte y almacenaje y después abrirla en la posición operacional. Balanza – Procedimientos de Apertura y Plegamiento Figura 4a Figura 4b Apertura de la Balanza: Empezar con la balanza en la posición vertical doblada apoyada en sus ruedas, como en la Figura 4b. - Page 56 Coloque las baterías en el soporte de baterías (ver “Cambiando las Baterías”). Enchufe el adaptador CA de la balanza en la fuente de energía. Presione el botón ON/OFF para activar la balanza. El display muestra “Health o Meter Pro Plus” y después ”000 ”.
-
Page 57: Instrucciones De Operación
INSTRUCCIONES DE OPERACIÓN Presione el botón ON/OFF para activar la balanza. Espere hasta que aparezca ”000 ” y “ZERO” en el lado izquierdo del display. Si el peso del sillón de ruedas es conocido, entre el valor TARA según las instrucciones en el “Menú”, párrafo 02. - Page 58 INSTRUCCIONES DE OPERACIÓN Figura 6. El Teclado ÍTEM DESCRIPCIÓN FUNCIÓN POWER Conecta (ON) y desconecta (OFF) la balanza. ZERO Cera la balanza antes del pesaje. Mantiene el valor del objeto pesado en el display hasta que se HOLD/RELEASE presione el botón otra vez para limpiar el valor. También usado para moverse hacia abajo en el menú.
- Page 59 INSTRUCCIONES DE OPERACIÓN MENÚ En la pantalla del menú el usuario puede establecer preferencias y/o instruir la balanza como manejar datos almacenados. Puede-se navegar por el menú usando-se las teclas ( ) para arriba o para abajo, o introduciendo el número del menú asociado al teclado. El menú tiene una manera de trabajar “roll-over”: cuando el usuario va hasta el final del menú...
- Page 60 INSTRUCCIONES DE OPERACIÓN PESO TARA NOTA: Debido a la sensibilidad de la balanza, recomendamos usar la función REWEIGH antes de establecer el peso TARA, a fin de eliminar cualquier interferencia del operador en el ítem a tener el peso disminuido. Existen dos maneras de introducir manualmente un peso tara (así...
- Page 61 INSTRUCCIONES DE OPERACIÓN Esta balanza calculará también el Índice de Masa del Cuerpo (Body Mass Index - BMI). CALCULANDO EL BMI: 1. Coloque el paciente en la plataforma de la balanza. 2. Presione el botón BMI (2). 3. La balanza le solicita entrar la altura del paciente. Use el teclado para entrar la altura en 1/4" (1=1/4, 2=1/2, 3=3/4) o incrementos de 1 cm (use pulgadas para peso en lb, cm para kg).
- Page 62 INSTRUCCIONES DE OPERACIÓN Transferir ahora Todos los valores almacenados en la memoria son transferidos al PC y la memoria de la balanza está limpia de todos los valores. Si la transferencia no tuvo éxito, los valores son guardados en la memoria hasta una transferencia exitosa o hasta que sean borrados.
- Page 63 INSTRUCCIONES DE OPERACIÓN Apagar Automático El usuario puede determinar cuanto tiempo la balanza operará antes de automáticamente apagarse debido a inactividad. El tiempo predeterminado es de 10 minutos. Si el valor es establecido como cero, la función Apagar Automático es desactivada. Volumen del Tono Existe una opción para ajustar el tono del beep de la balanza.
- Page 64 INSTRUCCIONES DE OPERACIÓN Luz de Fondo del Display El usuario puede establecer el brillo de la luz de fondo. Contraste del Display El usuario puede establecer el brillo del LCD. Peso Vivo Al seleccionar “Yes” el usuario puede establecer el modo Peso Vivo para desactivar el modo Sensible a Movimientos.
- Page 65 INSTRUCCIONES DE OPERACIÓN Fije la fecha usando las teclas para arriba y para abajo introduzca los valores en el teclado. Sobre Esta pantalla muestra la versión del software de la balanza. PRUEBA DEL SISTEMA Prueba de la Batería La balanza presentará la estimada cantidad restante de vida de la batería hasta que las baterías tengan que ser reemplazadas.
- Page 66 INSTRUCCIONES DE OPERACIÓN Prueba UI La balanza tiene una rutina de diagnóstico donde prueba la funcionalidad del hardware (LCD, teclado) del Interfaz del Usuario (UI). Con el fin de realizar esto, el usuario tiene que presionar todas las teclas según los mensajes que aparecen en la pantalla.
- Page 67 INSTRUCCIONES DE OPERACIÓN Exhibir Altura e ID Cuando el usuario elige presentar la altura y el ID del paciente, estos serán exhibidos en la parte inferior de la pantalla. Recomendamos usar esta función para asegurarse que el ID y altura correctos fueron introducidos.
-
Page 68: Mantenimiento
Esta sección provee instrucciones para mantenimiento, limpieza, solución de problemas y piezas reemplazables por el operador para la Balanza Electrónica Plegable Pro Plus Para Silla de Ruedas Modelo 2600KL. Otras operaciones de mantenimiento aparte de las descritas en esta sección deben ser realizadas por el personal de servicio calificado. MANTENIMIENTO Antes de usarla por primera vez y después de periodos sin usarla, confiera la balanza para una... -
Page 69: Solución De Problemas
SOLUCIÓN DE PROBLEMAS Refiera-se a las siguientes instrucciones para verificar y corregir cualquier falla antes de contactar el personal de servicio. SÍNTOMA POSIBLE CAUSA ACCIÓN CORRECTIVA La balanza no se prende Batería terminada Cambie las baterías Toma de corriente Use una toma de corriente defectuosa distinta Mala fuente de energía... -
Page 70: Trayectoria De Calibración
Por favor limpie la balanza Remueva el peso de la plataforma de la balanza Rebooting (Reiniciando el sistema) Por favor espere 10. Espere hasta que la balanza reasuma operación Health O Meter normal Pro Plus VISTA DETALLADA DE LA BALANZA... - Page 71 VISTA DETALLADA DE LA BALANZA (continuación) Vista de la Balanza en Posición Plegada...
-
Page 72: Lista De Piezas
TAPA DE LA BASE TRASERA 401305 CLIP DEL CABLE 3822501-0 TAPA DE LA BASE TAPA DEL TUBO PLÁSTICO DIA. 38 ETIQUETA HEALTH O METER BARRA DE APOYO 420988 UNIDAD DEL ADAPTADOR 120VAC 3817001-0 SOPORTE DEL ADAPTADOR TAPÓN DE GOMA ABIERTO DE LA BARRA DE APOYO TAPÓN DE GOMA CERRADO DE LA BARRA DE APOYO... -
Page 73: Garantía
7400 West 100th Place, Bridgeview IL 60455 • 1-800-638-3722 or 1-708-598-9100 www.healthometermedical.com Los productos Health o meter ProPlus son fabricados, proyectados y de propiedad de Pelstar LLC. Health o meter® es una marca registrada de Sunbeam Products Inc., Boca Raton, FL 33431...
Need help?
Do you have a question about the 2600KL and is the answer not in the manual?
Questions and answers