Motorola CP160 User Manual
Commercial series
Hide thumbs
Also See for CP160:
- Detailed service manual (242 pages) ,
- Basic user's manual (16 pages) ,
- Basic service manual (104 pages)
Table of Contents
Advertisement
Quick Links
Advertisement
Table of Contents

Related Manuals for Motorola CP160


Summary of Contents for Motorola CP160
- Page 1 Commercial Series Radio CP160 User Guide 6866550D05-O Issue: December 2003...
-
Page 3: Table Of Contents
Turning the Radio On or Off ...18 CONTENTS Radio On Message ....18 Computer Software Copyrights ..2 Adjusting the Volume. -
Page 4: Computer Software Copyrights
Laws in the United States of America and other countries preserve for Motorola Europe Call Tone Tagging ....38 and Motorola Inc. -
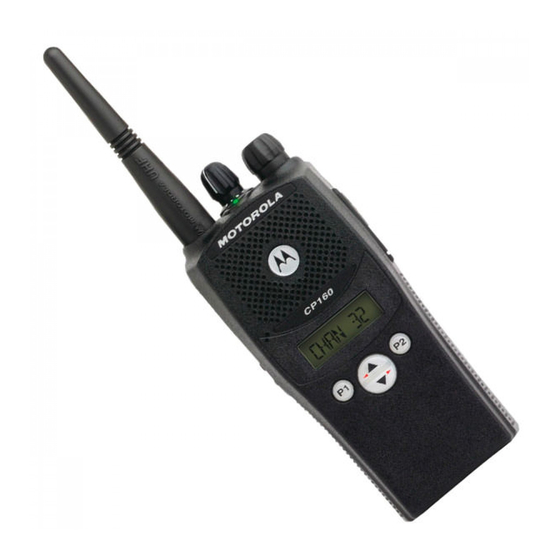
Page 5: Radio Overview
RADIO OVERVIEW 3. Channel Selector Knob Used to switch the radio to different channels. 4. LED Indicators This user guide covers the operation of the CP160 Indicate radio status: Portable Radios. Green: Solid during power up routine; off after Before using this product, read the successful power up;... -
Page 6: Programmable Buttons
Programmable Buttons The following table is a summary of programmable radio features and corresponding page references. Your radio has four programmable buttons. Your In the “Button” column, have your dealer record the dealer can program these buttons as shortcuts to name of the programmable button next to the various radio features. - Page 7 Feature Indicator Short Press Long Press Hold Down Page Button Checks the Battery — — battery charge Indicator status. button enters Menu Mode and selects menu options. Once in Menu Menu Mode — — Mode, button is automaticall † re-assigned to exit Menu Mode. Sounds a tone for adjusting the Volume Set...
- Page 8 Feature Indicator Short Press Long Press Hold Down Page Button Voice Operated † Transmission — Toggle VOX on and off. — (VOX) Toggle keypad Keypad Lock/ between locked Unlock and unlocked. † Radio Call — Directly access radio call menu. —...
- Page 9 Feature Indicator Short Press Long Press Hold Down Page Button † Option Board Toggle the option board on and off. — Toggle keypad and display backlights Lights — — † on and off. † This function is activated by EITHER a short OR a long press, but not both. English...
-
Page 10: Indicator Tones
Indicator Tones Positive Negative Programmable High pitched tone Low pitched tone Indicator Tone Indicator Tone Buttons Scan Start Stop Self Test Pass Tone Power Level High Squelch Tight Normal Repeater/ Does not use Uses repeater Self Test Fail Tone Talkaround repeater Enabled Disabled... -
Page 11: Battery Charge Status
Battery Charge Status LED Indicator You can check battery charge status if your dealer The LED shows radio status as follows: has preprogrammed one of the programmable buttons. Hold down the preprogrammed Battery State Indication Indicator button. The charge status is shown on the display. -
Page 12: Lcd Display And Icons
LCD DISPLAY AND ICONS Symbol Name and Description Scan Indicator CHAN 32 Indicates that the scan feature is activated. Priority Scan Indicator Indicates that the scan feature is Displays radio Status, Addresses or Channel, on activated. The dot is flashing during one line of 8 characters. -
Page 13: Menu Buttons
MENU BUTTONS Menu Scroll Buttons Used to scroll while in Menu Mode. Menu Button Refer to the menu navigation chart for menu If preprogrammed by your dealer, the two front selectable features. buttons ( ) can be used, in conjunction Navigate the Menu with other programmble features, to access and select menu options (... -
Page 14: Menu Navigation Chart
MENU NAVIGATION CHART (Refer to Menu Navigation guidelines— lower, left-hand corner of this page) Radio Phone Repeater/ Program Utilities System Tones Calls Talkround Scan Lists Squelch On/Off Reptr mode / Tone Talkrnd mode Normal/Tight On/Off Power Level Selective Scan List Call Alert Call Tone Tag... -
Page 15: Getting Started
Charging a hot battery (above 35°C [95°F]) results in reduced discharge capacity, affecting the performance of the radio. Motorola rapid-rate battery chargers contain a temperature-sensing circuit to ensure that batteries are charged within the temperature limits stated above. -
Page 16: Desktop Rapid Charger
Desktop Rapid Charger LED color Status To Charge the Battery No LED Indication Battery inserted incorrectly Turn the radio off. or battery not detected. Single Green Flash Successful charger Place the battery, with or without the radio, in power-up. the charger pocket. Flashing Red Battery unchargeable or not •... -
Page 17: Accessory Information
ACCESSORY INFORMATION Removing the Battery Attaching the Battery Battery Latch Locked Un-locked Turn off the radio if it is turned on. Slide the battery latch into the unlock position. Align the battery to the battery rails on the Disengage by pushing downward and holding back of the radio (approximately 1 cm from the the latch towards the front of the radio. -
Page 18: Attaching The Antenna
Attaching the Antenna Removing the Antenna Turn the antenna clockwise to attach it. Turn the antenna counter-clockwise to remove it. English... -
Page 19: Attaching The Belt Clip
Attaching the Belt Clip Removing the Belt Clip Belt Clip Tab Align the grooves of the belt clip with those of Use a key to press the belt clip tab away from the battery. the battery to unlock the belt clip. Press the belt clip downward until you hear a Slide the belt clip upward to remove it. -
Page 20: Turning The Radio On Or Off
TURNING THE RADIO ON OR OFF RADIO ON MESSAGE At power up the radio may display a message customised by your dealer, e.g.: RADIO ON After this text has been displayed, the radio performs a self test routine. During the routine the Green LED lights. -
Page 21: Selecting A Radio Channel
SELECTING A RADIO CHANNEL HOME REVERT MEMORY CHANNEL (1 & 2) Your radio offers 32 channels. Note: Due to government regulations, some The Home Revert feature allows you to instantly access up to two of your favorite channels at the channels may not be programmed. -
Page 22: Receiving A Call
RECEIVING A CALL SENDING A CALL Turn your radio on. Turn your radio on. Adjust the radio’s volume. Select the desired channel. Select the desired channel. Monitor for traffic (using the pre-programmed Monitor button) before transmitting to ensure Listen for voice activity. The LED indicator that you do not ‘talk over’... -
Page 23: Monitoring
MONITORING VOX OPERATION It is important to monitor traffic before transmitting to When hands-free operation is desired, your radio ensure that you do not “talk over” someone who is can be activated by voice alone using the VOX already transmitting. feature when you speak through an accessory that is connected to your radio. -
Page 24: Enable/Disable Headset Sidetone
ENABLE/DISABLE HEADSET KEYPAD LOCK/UNLOCK SIDETONE To lock or unlock the keypad, long press the pre- programmed Keypad Lock/Unlock button. Your dealer can program your radio to hear your Note: The L symbol appears on the display when voice through the headset during transmit. the keypad is locked. -
Page 25: Radio Calls
RADIO CALLS SENDING A SELECTIVE CALL You can send a Selective Call to a particular radio or RECEIVING A SELECTIVE CALL to a group of radios, as programmed by your dealer. Press the preprogrammed Radio Call button and When you receive a selective call: proceed to step 4. -
Page 26: Receiving A Call Alert Page
RECEIVING A CALL ALERT PAGE SENDING A CALL ALERT PAGE When you receive a Call Alert page: You can alert another person by sending a Call Alert page. The display shows F and the preprogrammed • Press the preprogrammed Radio Call button and name or ID of the calling radio. -
Page 27: Repeater Or Talkaround Mode
REPEATER OR TALKAROUND MODE Talkaround Mode enables you to communicate with another radio when either: • the repeater is not operating —or— • your radio is out of the repeater’s range but within communicating distance of another radio. Note: The J symbol appears on the display when Talkaround Mode is selected. - Page 28 Notes: English...
-
Page 29: Scan
SCAN START SYSTEM SCAN Press the preprogrammed Scan button to start Your radio is equipped with the Scan feature, which scan. allows you to monitor multiple channels for voice – or – activity. The radio will stop on a channel when it detects activity on it. -
Page 30: Stop System Scan
STOP SYSTEM SCAN START AUTO SCAN Press the preprogrammed Scan button to stop Auto Scan automatically starts scanning once a System Scan. channel with Auto Scan enabled is selected. – or – Select a channel that has been preprogrammed for Auto Scan by your dealer/programmer. -
Page 31: Delete A Nuisance Channel
DELETE A NUISANCE CHANNEL Press the preprogrammed Scan button to stop the scan. Note: Your dealer/programmer must preprogram a button to access this feature. Press the preprogrammed Scan button again to start scanning again. The Deleted Nuisance If a channel continually generates unwanted calls or Channels are restored to the scan list. -
Page 32: Add Or Delete Channels
ADD OR DELETE CHANNELS If you delete a channel, DELETE 1 Select a channel that contains a Scan list you you see: want to edit. to confirm the deletion. to enter menu mode. DELETED you see: PROG LST until ADD ITEM to return to PROG LST to select... -
Page 33: Prioritize A Channel In A Scan List
PRIORITIZE A CHANNEL IN A SCAN Set Priority Channels LIST Note: You cannot assign the same priority to two different channels. You may want to check the activity on one or two channels more frequently than others. You can do to enter menu mode. - Page 34 until you see the channel you want to prioritize. SELECTED – or – until to select the current channel the radio is DISABLED – or – until to de-prioritize the current channel the radio is on. to prioritize that channel. SAVED you see: EDIT PRI...
-
Page 35: Phone
PHONE RECEIVE A PHONE CALL When a phone call is received, a ringing tone Your radio allows you to place and receive sounds, alerting you to answer the phone call. telephone calls through a repeater (depending on Press the preprogrammed Phone button and skip to phone line availability). -
Page 36: Disconnect A Phone Call
DISCONNECT A PHONE CALL When you hear a dial tone: XXXXXXXX 1 To disconnect a phone call if your radio has select a number from Immediate Auto or Delayed Auto the phone list. programmed, exit Phone Mode. Note: To redial the last number dialed, press Press the preprogrammed Phone button. -
Page 37: Tone Preferences
TONE PREFERENCES You can use the radio’s menu to access user- adjustable settings to customize the tones on your radio. to enter menu mode. TONES until TONES to select until you see the feature you want to change (see the table on below). to select the feature. - Page 38 Tone Settings Feature What it Does Settings TONE Turns all alert tones on or off. KPD TONE Turns the keypad tones on or off. TONE TAG STANDARD Assigns a specific tone when receiving a specific type of ALERT 1 – 6 radio call.
-
Page 39: Tones On/Off
TONES ON/OFF KEYPAD ON/OFF TONES You can program your radio to enable or disable all You can program your radio to enable or disable all alert tones. keypad tones. Note: Tones for the programmable buttons to enter Menu mode. and Side Buttons 1 and 2 can not be disabled. -
Page 40: Call Tone Tagging
CALL TONE TAGGING ESCALERT You can program your radio to sound a particular You can program your radio to increase the volume alert tone when receiving Selective Call or Call Alert of the alarm tones when a radio call is not (call tone tagging). -
Page 41: User Settings
USER SETTINGS You can use the radio’s menu to access user- adjustable settings to customize some of your radio features. to enter menu mode. UTILITY until UTILITY to select until you see the feature you want to change (see table on page 40). to select the feature. - Page 42 Utilities Features Feature What it Does Settings SQUELCH TIGHT Changes the squelch of the radio to tight or normal. NORMAL PWR LVL HIGH Changes the power level of the radio to high or low. OPT BRD Enables or disables an option board. LIGHT Enables or disables the radio’s keypad and display back- light.
-
Page 43: Set Squelch Level
SET SQUELCH LEVEL SET POWER LEVEL Use this feature to filter out (unwanted) calls and/or Each channel in your radio has a predefined background noise. However, tightening squelch transmit power level that can be changed. could cause calls from remote locations to be •... -
Page 44: Option Board On/Off
OPTION BOARD ON/OFF SET THE LIGHTS Use this feature to enable or disable an option Use this feature to enable or disable the radio’s board. keypad and display backlight. • symbol appears on the display when to enter menu mode. the option board feature is On. -
Page 45: Display The Software Version
DISPLAY THE SOFTWARE VERSION Use this feature to view the current software version of your radio. to enter menu mode. UTILITY until UTILITY to select SOFTWARE until to view the software version. until you exit menu mode. English... - Page 46 English...
Need help?
Do you have a question about the CP160 and is the answer not in the manual?
Questions and answers