Table of Contents
Advertisement
Smart Seat
TM
ALL-IN-ONE CARSEAT
featuring
Child Restraint
Owner's Manual
READ THIS MANUAL.
Do not install or use this child restraint until you read
and understand the instructions in this manual.
FAILURE TO PROPERLY USE THIS CHILD
RESTRAINT INCREASES THE RISK OF SERIOUS
INJURY OR DEATH IN A SUDDEN STOP OR CRASH.
PD238744A
© 2013 Graco
3/13 US
Advertisement
Table of Contents

Related Manuals for Graco Smart Seat


Summary of Contents for Graco Smart Seat
-
Page 1: Child Restraint
Smart Seat ALL-IN-ONE CARSEAT featuring Child Restraint Owner’s Manual READ THIS MANUAL. Do not install or use this child restraint until you read and understand the instructions in this manual. FAILURE TO PROPERLY USE THIS CHILD RESTRAINT INCREASES THE RISK OF SERIOUS INJURY OR DEATH IN A SUDDEN STOP OR CRASH. -
Page 2: Table Of Contents
Before you begin 6.0 Height and Weight 1.0 Warnings to Parents and Limitations Other Users 6.1 Rear-Facing with base 2.0 Registration Information 6.2 Forward-Facing with base 2.1 Register Your Child 6.3 Booster WITHOUT base Restraint 7.0 Choosing an Appropriate 2.2 For Recall Information Vehicle Seat Location 2.3 If You Need Help 7.1 Vehicle Seat Location... - Page 3 Installation 17.0 Using Recline 18.0 Securing Child in Child 9.0 Installing Base Using Restraint Vehicle Seat Belt 18.1 Placing Child in Child 10.0 Installing Base Using Restraint LATCH 18.2 Check Harness System 11.0 REAR-FACING 18.3 Adjusting Head INSTALLATION Support/Harness Straps 12.0 FORWARD-FACING 19.0 Booster Installation INSTALLATION...
-
Page 4: Warnings To Parents And Other Users
1.0 Warnings to Parents and Other Users NEVER PLACE THIS CHILD RESTRAINT IN A VEHICLE SEATING LOCATION THAT HAS A FRONT AIR BAG. If an air bag inflates, it can hit the child and child restraint with great force and cause serious injury or death to your child. - Page 5 FAILURE TO PROPERLY USE THIS CHILD RESTRAINT increases the risk of serious injury or death in a sharp turn, sudden stop or crash. Your child’s safety depends on you installing and using this child restraint correctly. Failure to follow these instructions and child restraint labels can result in child striking the vehicle’s interior during a sudden stop or crash.
- Page 6 4. PROPERLY SECURING THE CHILD RESTRAINT IN THE VEHICLE using a seat belt designed to restrain a child restraint or by using LATCH. Many seat belts are NOT safe to use with this child restraint, even though they can easily be threaded through or around the child restraint! Vehicle seat belt system MUST hold child restraint securely.
- Page 7 SERIOUS CRIPPLING INJURY OR DEATH can result if infant faces front of vehicle. The American Academy of Pediatrics (AAP) recommends that children until age 2 or until they reach the maximum height and weight rating for their seat. SOME SPECIAL NEEDS CHILDREN, such as pre-term babies or those who have tested positive for positional apnea, may be at increased risk of suffering we recommend that you have your physician or hospital staff evaluate your child and recommend the proper child restraint or car bed before using this product.
- Page 8 DO NOT INSTALL OR USE THIS CHILD RESTRAINT AND BASE UNTIL YOU READ AND UNDERSTAND THE INSTRUCTIONS IN THIS MANUAL AND IN YOUR VEHICLE OWNER’S MANUAL. DO NOT let others install or use the child restraint unless they understand how to use it. IF CHILD RESTRAINT IS IN A CRASH, it must be replaced.
- Page 9 DO NOT use accessories or parts other than those provided by Graco. Their use could alter the performance of the child restraint. NEVER USE A SECOND-HAND CHILD RESTRAINT or a child restraint whose history you do not know. DO NOT MODIFY YOUR CHILD RESTRAINT or use any accessories or parts supplied by other manufacturers.
-
Page 10: Registration Information
Send your name, address, and the restraint’s model number and date of manufacture Graco Children’s Products Inc. Attn: Customer Service, 3 Glenlake Parkway, Atlanta, GA 30328 or call 1-800-345-4109 or register online at: http://www.gracobaby.com/carseatregistration... -
Page 11: If You Need Help
Date of Manufacture year month is certified for use in GRACO CHILDREN'S PRODUCTS, INC. motor vehicles. ATLANTA, GA 30328 1-800-345-4109 Made in China 3.3 Second Hand Child Restraint Graco Children’s Products Inc. advises against loaning or passing along a child restraint. -
Page 12: Assembly
4.1 Attaching LATCH Storage Compartment NEVER use without LATCH storage compartment or cupholder attached. LATCH storage compartment under metal tube into bottom of base as shown A. LATCH storage compartment with openings in child restraint B. 4.2 Attaching Cupholder NEVER place sharp or pointed objects in a cupholder. - Page 13 CLICK! CLICK!
-
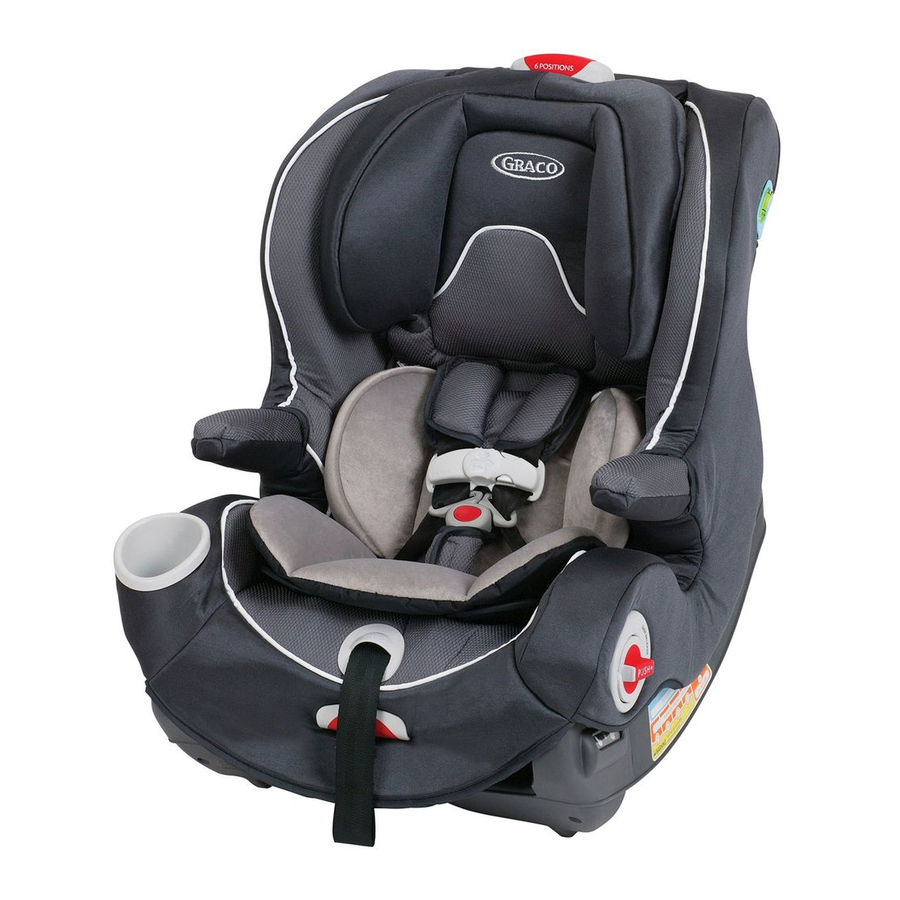
Page 14: Features
5.1 Child Restraint... - Page 15 Harness slots Harness buckle Crotch strap Cupholder Harness release lever Harness adjustment strap Recline handle Lock knobs Armrest *Vehicles are now (or can Chest clip be) equipped with tether Harness strap anchor points behind Level indicator some seats. A tether Head support anchors the top of the Head support release...
-
Page 16: Base
5.2 BASE NOTE: Only use base with Smart Seat™ All-In-One Carseat. - Page 17 **United States Federal Motor Vehicle Vehicle belt/LATCH path Safety Standards have defined a system Child restraint pin guides for installing child restraints in vehicles. Lock identification window The system is called LATCH. LATCH may LATCH connector ONLY be used IN PLACE of vehicle belt if LATCH adjustment belt vehicle is equipped with LATCH anchor LATCH belt **...
- Page 18 FAILURE TO USE CHILD RESTRAINT IN A MANNER APPROPRIATE FOR YOUR CHILD’S SIZE MAY INCREASE THE RISK OF SERIOUS INJURY OR DEATH. Instructions for the use of this child restraint differ greatly depending on the size of your child. Be sure you are using the child restraint in the correct mode and with the correct features for your child.
-
Page 19: Height And Weight
According to the American Academy of Pediatrics, these infants may suffer Graco advises that you have your physician or hospital staff evaluate your infant and recommend the proper child restraint or car bed before you and your infant leave the... -
Page 20: Forward-Facing With Base
WITH BUILT-IN HARNESS SYSTEM: of sitting upright unassisted may be . If unable to sit upright unassisted, use when below 40 lbs. ( (127 cm) tall MUST be BELOW top harness slot/head support height. If shoulders are above harness slots, child is too large with built-in harness. -
Page 21: Booster Without Base
WITHOUT BUILT-IN HARNESS SYSTEM: Harness MUST be stored during Booster mode, see “19.1 Storing Harness, p. 52”. MUST lie across child’s shoulder as shown and the lap portion of the belt is positioned low on the child’s hips. BELOW top of head support. If tops of ears are above top of head support, child is too large for booster seat. -
Page 22: Vehicle Seat Location Requirements
If you are not sure where to place the child restraint in your vehicle, consult your vehicle owner’s manual or call Graco Children’s Products Inc., at 1-800-345-4109. -
Page 23: Vehicle Seat Belt Requirements
CHANGES LENGTH WHILE DRIVING. Pay careful attention to these systems; some of the seat belts that are not safe to use look very much like seat belts that are safe to use. If you are unsure, consult your vehicle owner’s manual or call Graco Children’s Products Inc., at 1-800-345-4109. -
Page 24: For Built-In Harness Only
7.4 For Built-in Harness Only Lap Belts - Manually adjusted when Lap Belts with Automatic Locking buckled, the belt is tightened Retractor (ALR) - The automatic locking manually by pulling on the free end. retractor will not permit the lap belt to lengthen once it is buckled. -
Page 25: Unsafe Vehicle Belt Systems
7.6 UNSAFE Vehicle Belt Systems DO NOT USE ANY OF THE FOLLOWING SYSTEMS TO SECURE THE CHILD RESTRAINT. LATCH can be used IN PLACE OF the following unsafe belt systems if your vehicle is equipped with LATCH anchor points. Please refer to the vehicle owners manual for LATCH locations. - Page 26 Passive Restraint - Lap Belt with Motorized Shoulder Belt DO NOT use vehicle belts that are attached to the door in any way or that move along a track to automatically surround the passenger when the door is closed. Lap Belts Forward of Seat Crease Vehicle seat belts located forward of seat crease may not securely hold child restraint.
-
Page 27: Latch
8.1 What is LATCH? United States Federal Motor Vehicle Safety Standards have defined a system for installing child restraints in vehicles. The system is called LATCH. LATCH Lower Anchors and Tethers for CHildren. LATCH in the vehicle consists of a top tether anchor point and two lower anchor points. - Page 28 NOTE: Some vehicle manufacturers have lower maximum weight ratings for LATCH anchors, so you must consult your vehicle owner’s manual or call the vehicle manufacturer to confirm the limits on your vehicle’s LATCH anchors. Use vehicle belt (not LATCH connectors) for installations with children weighing more than 48 pounds (21.7 kg).
-
Page 29: Latch System
8.2 LATCH System LATCH consists of a permanently LATCH lower vehicle anchor points are attached lower anchor belt and a top defined as 11 inches from the center of tether strap. one LATCH anchor to the center of ONLY use LATCH in a seating position another LATCH anchor. -
Page 30: Vehicle Seat Belt
You must carefully follow the instructions provided by your vehicle manufacturer, in addition to the information in this manual. Before proceeding be sure you have read and understood, Make sure vehicle is on level ground and not like in picture If a front passenger seat is used , slide the vehicle seat rearward as far as possible from the dashboard. - Page 31 Vehicle Belt Lap Belt Lap/Shoulder Belt...
- Page 32 9. Check that the LATCH stays tight and does not slip from the tightened position. If it does not stay tight, try another seating position or contact Graco at 1-800-345-4109. 10. To remove LATCH lift up on metal tongue of buckle and remove LATCH as...
- Page 34 1. Test base for secure installation. See 2. Push in and rotate knobs on both sides of child restraint at the same time to unlock position. 3. Place child restraint on base in rear-facing position 4. Rotate knobs on both sides of child restraint to lock it into base .
- Page 35 LOCKED UNLOCKED...
- Page 36 1. Test base for secure installation. See 2. Push in and rotate knobs on both sides of child restraint to unlock position. 3. Place on base in forward-facing position 4. Rotate knobs on both sides to lock seat to base You will see lock symbols in windows on side of base as shown 5.
- Page 37 Tether LOCKED UNLOCKED...
-
Page 38: Installation
All LATCH seating positions have tether anchors. Always use tether if a vehicle tether anchor is available in forward-facing mode with harness. Check your vehicle owner’s manual for the tether anchor location(s). If your vehicle is not equipped with a tether anchor, it may be possible to install one. -
Page 39: Tether And Latch Storage
14.1 Tether Storage Tether must be stored to child restraint for rear-facing use. slack. a rubber band. 14.2 LATCH Storage LATCH belt, insert into LATCH storage compartment on back of seat... -
Page 40: Harness System
15.1 Harness Straps while pulling shoulder harness straps Harness Strap 15.2 Chest Clip . Make sure the chest clip is locked by pulling out on each half. Chest Clip Buckle Crotch Strap Harness Adjustment Strap... -
Page 42: Buckle
15.3 Buckle tongues into buckle. Pull up on tongues to be sure they are locked adjustment strap lifting lever and pulling shoulder harness straps . Tilt top of buckle toward seat and press in at the top of the red button and pull tongues out of buckle... -
Page 43: Crotch Strap
15.4 Crotch Strap Bottom of Bottom of to but not under your child. child restraint child restraint bottom of seat and pull out through the seat and seat cover through seat cover and seat CHECK buckle is securely installed by pulling up on crotch strap. -
Page 44: Accessories
16.1 Body Support (on certain models) To prevent ejection in sudden stop or crash: lowest harness setting. DO NOT use with children over 20lbs. Strap Flip body support and head pillow over. Slide head pillow under elastic strap on back of body support as shown Do not use head pillow and body support with any other product. -
Page 45: Harness Covers & Crotch Strap Cover (On Certain Models)
16.2 Harness Covers & Crotch Strap Cover (on certain models) To prevent serious head injury in sudden stop or crash: at armpit level. DO NOT use with children over 20lbs. Pull buckle through Wrap harness covers around crotch strap cover the harness straps. -
Page 46: Using Recline
FAILURE TO PROPERLY recline the infant restraint on the vehicle seat increases the risk of serious injury or death. Recline only works in modes where child restraint is attached to the base. REAR-FACING FORWARD-FACING 1. Pull up on recline button on front of child restraint 2. - Page 47 REAR FACING FORWARD-FACING NOT LEVEL NOT LEVEL...
-
Page 48: Restraint
18.1 Placing Child in Child Restraint 1. Place child in child restraint with child’s back flat against back of child restraint. Avoid bulky clothing. 2. Place harness straps over child’s shoulders and insert tongue(s) into buckle 3. Pull up on tongue(s) to be sure they are locked. 4. - Page 49 Chest Clip Buckle Harness adjustment strap...
-
Page 50: Check Harness System
18.2 Check Harness System To prevent serious injury or death: shoulders with chest clip at arm pit level. padding under harness straps or child unless provided by Graco. interfere with buckling the harness. REAR-FACING FORWARD-FACING 4-40 lbs (1.8-18.1 kg) 20-65 lbs (9.1-29.5 kg) -
Page 51: Adjusting Head Support/Harness Straps
18.3 Adjusting Head Support/ Harness Straps Failure to properly adjust the harness straps for your child increases the risk of serious injury or death in the event of a sharp turn, sudden stop or crash. BEFORE adjusting the head support height, have your child lean forward slightly. -
Page 52: Booster Installation
19.1 Storing Harness Harness must be stored during Booster Mode. 1. Push the clip at the end of crotch strap through bottom of seat and pull out through the seat and seat cover 2. Rotate bottom of head support pad up and attach to back of head support pad with hook and loop tape 3. - Page 53 Bottom of child restraint...
-
Page 54: Using Child Restraint In Booster Mode
19.2 Using Child Restraint in Booster Mode Failure to properly secure your child in the child restraint increases the risk of serious injury or death in the event of a sharp turn, sudden stop or crash. In a crash, the child restraint provides NO protection for your child unless the vehicle lap/shoulder belt is properly secured. -
Page 56: Securing Child In Booster Seat And Vehicle
19.3 Securing Child in Booster Seat and Vehicle USE ONLY the vehicle lap and shoulder belt system when restraining the child in the booster seat. 1. Remove base from vehicle seat 2. Place booster seat firmly against the back of a forward-facing vehicle seat equipped with a lap/shoulder belt only 3. - Page 57 Armrest Shoulder belt Lap belt...
-
Page 58: Adjusting Head Support In Booster Mode
19.4 Adjusting Head Support in Booster Mode When using in booster mode always use one of the top 4 height positions BEFORE adjusting the head support height, have your child lean forward slightly. top of seat and pull head support up until it snaps into one of the 4 height positions. -
Page 59: Additional Information
20.1 Adjusting Armrest Armrest can be adjusted by pushing up or down on it... -
Page 60: Removing Seat Cover
20.2 Removing Seat Cover 1. Store harness see Elastic loops 2. Remove elastic loops from seat as indicated in 3. Pull off cover taking care around the lock knobs, recline handle, level indicator and cup holder. 4. Machine wash cover in cold water on delicate cycle and drip-dry. -
Page 61: Airplane Use
20.3 Airplane Use Federal Motor Vehicle Safety Standards. NOT Certified for Use in Aircraft. 20.4 Care and Maintenance restraint mat, towel or thin blanket to protect upholstery. detergents. LATCH straps in water. Doing so may weaken the straps. such as food, dirt, etc. Remove objects with tweezers and/or clean with a cotton swab. - Page 62 Buckle Cleaning Process: Bottom of child restraint WARNING Prevent serious injury or death: objects or debris that could prevent latching. 1. Turn restraint over, push retainer through crotch strap slot (a). 2. To clean buckle - place in a cup of warm water and gently agitate the buckle, press the red button several times while in the water (b).
- Page 63 Notes...
- Page 64 To purchase parts or accessories or for warranty information in the United States, please contact us at the following: www.gracobaby.com 1-800-345-4109 Store instruction manual in the space ALL-IN-ONE CARSEAT ALL-IN-ONE CARSEAT provided on back of seat.
Need help?
Do you have a question about the Smart Seat and is the answer not in the manual?
Questions and answers