Table of Contents
Advertisement
Available languages
Available languages
Advertisement
Table of Contents

Related Manuals for Horizon Fitness CT9.1


Summary of Contents for Horizon Fitness CT9.1
- Page 1 TREADMILL OWNER’S MANUAL MANUEL DU PROPRIÉTAIRE DU TAPIS ROULANT Read the TREADMILL gUIDE before using this OWNER’S MANUAL. Lire le gUIDE D’UTILISATION DU TAPIS ROULANT avant de se servir du présent MANUEL DU PROPRIÉTAIRE.
- Page 2 ENgLISH FRANçAIS...
- Page 3 If the assembly instructions are not followed correctly, the treadmill could have frame parts that are not tightened and will seem loose and may cause irritating noises. To prevent damage to the treadmill, the assembly instructions must be reviewed and corrective actions should be taken.
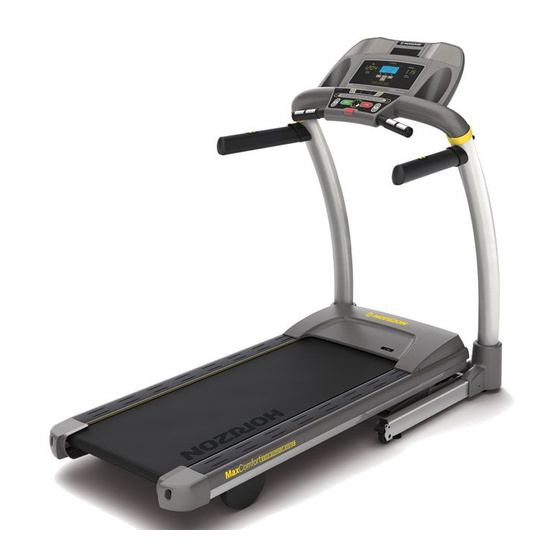
- Page 4 SPEAKERS WATER BOTTLE HOLDER GRIP PULSE HANDRAILS SPEED/INCLINE TOGGLES ON/OFF SWITCH CIRCUIT BREAKER POWER CORD TRANSPORT WHEEL WHEEL LOCK FOOT LOCK LATCH (UNDERNEATH DECK) TOUCH PAD PANEL AND DISPLAY WINDOWS CONSOLE SAFETY KEY PLACEMENT CONSOLE MAST MOTOR COVER RUNNING BELT / RUNNING DECK SIDE RAIL ROLLER END CAP REAR ROLLER...
- Page 5 Unpack the unit where it will be used. The enclosed treadmill is equipped with high-pressure shocks and may spring open if mishandled. Never grab hold of any portion of the incline frame and attempt to lift or move the treadmill. WArninG DO NOT ATTEMPT TO LIFT THE TREADMILL! Do not move or lift treadmill from packaging until specified to do so in the assembly instructions.
-
Page 6: Assembly Step
ASSEMBLY STEP 1 HArDWArE BAG 1 CONTENTS : BOLT (A) SPRING WASHER (B) 20 mm 8.2 mm Qty: 6 Qty: 6 CONSOLE MAST MAIN FRAME BOOT BOLTS (A) SPRING WASHERS (B) ARC WASHERS (C) MAIN FRAME BRACKET ARC WASHER (C) 8.2 mm Qty: 6 LEAD WIRE... -
Page 7: Open Hardware Bag
NOTE: The console mast caps are marked with an L if they are to be used on the left-hand side of the treadmill or an R if they are to be used on the right- hand side of the treadmill. If the console mast caps are assembled on the incorrect side of the treadmill, the unit will not assemble correctly. - Page 8 ASSEMBLY STEP 3 HArDWArE BAG 3 CONTENTS : BOLT (A) SPRING WASHER (B) 20 mm 8.2 mm Qty: 4 Qty: 4 ARC WASHERS (C) SPRING WASHERS (B) BOLTS (A) CONSOLE MAST Open HArDWArE BAG 3. Slide ConSoLE through the ConSoLE ARC WASHER (C) MAST BooTS.
- Page 9 ASSEMBLY STEP 4 HArDWArE BAG 4 CONTENTS : SCREW (D) 20 mm Qty: 4 Open HArDWArE BAG 4. Attach MAin frAME BooTS using 4 SCrEWS (D). SCREWS (D) MAIN FRAME BOOT YOU ARE FINISHED!
- Page 11 TREADMILL OPERATION This section explains how to use your treadmill’s console and programming. The BASIC OPERATION section in the TREADMILL gUIDE has instructions for the following: • LoCATion of THE TrEADMiLL • USinG THE SAfETY KEY • foLDinG THE TrEADMiLL •...
- Page 12 Attacher la pince de la clé de sécurité aux vêtements avant de commencer. Pour éviter toutes blessures, se tenir sur les starting treadmill. Read and follow all instructions before operating. Keep children away from ridelles avant de démarrer le tapis roulant. Avant usage, lire le Guide d’Utilisateur. Ne pas laisser cet équipement à la portée this equipment.
-
Page 13: Console Operation
Note: when headphones are plugged into the headphone jack the sound will no longer come out through the speakers. r) MP3 PLAYEr PoCKET: used to store your MP3 player. S) WATEr BoTTLE PoCKETS: holds personal workout equipment. rEADinG rACK: holds reading material. U) SAfETY KEY PoSiTion: enables treadmill when safety key is inserted. display settings. ™... -
Page 14: Display Windows
DiSPLAY WinDoWS • TiME: Shown as minutes : seconds. View the time remaining or the time elapsed in your workout. • DiSTAnCE: Shown as miles. Indicates distance traveled. • inCLinE: Shown as percent. Indicates the incline of your walking or running surface. •... -
Page 15: Getting Started
1) Check to make sure no objects are placed on the belt that will hinder the movement of the treadmill. 2) Plug in the power cord and turn the treadmill ON. 3) Stand on the side rails of the treadmill. -
Page 16: Program Information
ProGrAM inforMATion 1) MAnUAL: Allows ‘on the fly’ manual speed and incline changes. 2) SPEED inTErVALS: Improves your strength, speed and endurance by increasing and decreasing the speed throughout your workout to involve your heart and other muscles. Speed changes and segments repeat 90 seconds and 30 seconds. - Page 17 4) WEiGHT LoSS: Promotes weight loss by increasing and decreasing the speed and incline, while keeping you in your fat burning zone. Speed and Incline changes, segments repeat every 30 seconds. 5) roLLinG HiLLS: Simulates running up and down hills to improve stamina, muscle tone, and promote weight loss.
- Page 18 Incline changes and segments repeat every 30 seconds. 8-9) 5K/10K: Programs that allow you to set and work toward a distance goal. Treadmill automatically adjusts incline to simulate running on an actual course. Incline changes and all segments are 0.16 Km.
- Page 19 10) PACEr: Trains you to run at a steady “race pace”. Enter in the distance plus the time limit, and the program calculates a steady pace. 11-12) CUSToM 1/CUSToM 2: Lets you create and reuse a perfect workout for you with specific speed, incline and time combination.
- Page 20 Congratulations! Research shows that those who journal their fitness routines or workouts, on average, achieve greater success than those who do not. Because your new treadmill is equipped with the exclusive ETRAK Fitness Journal System, you’ve taken an important step towards achieving your fitness goals.
- Page 21 ACCUMULATED DATA With the ETRAK fitness journal system, you can scroll through your accumulated data in multiple formats by pressing ™ the ETRAK ™ buttons. A workout is saved when: the program ends, the console is paused and not resumed within 10 minutes, or the STOP button is held to reset the console.
-
Page 22: Using Your Cd / Mp3 Player
USinG YoUr CD / MP3 PLAYEr 1) Connect the included AUDIO ADAPTOR CABLE to the AUDIO IN JACK on the top right of the console and the headphone jack on your CD / MP3 player. 2) Use your CD / MP3 player buttons to adjust song settings. 3) Remove the AUDIO ADAPTOR CABLE when not in use. - Page 23 LIMITED HOME-USE WARRANTY...
- Page 24 LABOR • 1 YEAR Horizon Fitness shall cover the labor cost for the repair of the device for a period of one year from the date of the original purchase, so long as the device remains in the possession of the original owner.
- Page 25 • Any attempt to repair this equipment creates a risk of injury. Horizon Fitness is not responsible or liable for any damage, loss or liability arising from any personal injury incurred during the course of, or as a result of any repair or attempted repair of your fitness equipment by other than an authorized service technician.
- Page 26 FRANçAIS...
- Page 27 INSCRIRE LE NUMÉRO DE SÉRIE DANS LA CASE CI-DESSOUS : NUMÉRO DE SÉRIE : TAPiS roULAnT Horizon CT9.1 MODÈLE : » Indiquer le NUMÉRO DE SÉRIE et le MODÈLE lors de tout appel de service.
- Page 28 HAUT-PARLEURS PORTE-BIDON MAINS COURANTES DU CARDIO-FRÉQUENCEMÈTRE INTERRUPTEURS À BASCULE DE VITESSE/D’INCLINAISON INTERRUPTEUR MARCHE-ARRÊT COUPE-CIRCUIT CORDON D’ALIMENTATION ROULETTE DE TRANSPORT DISPOSITIF DE BLOCAGE DES ROULETTES PÉDALE DE VERROUILLAGE (SOUS LA PLATE-FORME) CLAVIER TACTILE ET FENÊTRES D’AFFICHAGE CONSOLE EMPLACEMENT DE LA CLÉ DE SÉCURITÉ MONTANT DE CONSOLE COUVERCLE DU MOTEUR BANDE/PLATE-FORME...
- Page 29 oUTiLS inCLUS : F Clé à manche en T, de 6 mm F Clé à manche en T, de 5 mm F Tournevis PiÈCES inCLUSES : F 1 ensemble console F 2 montants de console F 2 chapeaux de montant de console F 2 gaines de montant de console F 2 gaines de cadre de console F 4 sacs de visserie...
- Page 30 ÉTAPE 1 DE L’ASSEMBLAgE CONTENU DU SAC DE ViSSEriE 1 : BOULON (A) 20 mm Quantité : 6 MONTANT DE CONSOLE GAINE DU CARTER BOULONS RONDELLES ÉLASTIQUES (B) RONDELLES EN ARC (C) SUPPORT DE CARTER RONDELLE RONDELLE ÉLASTIQUE (B) EN ARC (C) 8,2 mm 8,2 mm Quantité...
- Page 31 ÉTAPE 2 DE L’ASSEMBLAgE CONTENU DU SAC DE ViSSEriE 2 : BOULON (E) RONDELLE ÉLASTIQUE (B) 15 mm 8,2 mm Quantité : 4 Quantité : 4 BOULONS (E) RONDELLES ÉLASTIQUES (B) CONSOLE (SENS DESSUS-DESSOUS) CHAPEAU DE MONTANT DE CONSOLE Ouvrir le sac de visserie 2. console sens dessus-dessous, y fixer les chapeaUX de montant de console avec 4 boUlons (e) et 4 rondelles...
- Page 32 ÉTAPE 3 DE L’ASSEMBLAgE CONTENU DU SAC DE ViSSEriE 3 : BOULON (A) 20 mm Quantité : 4 RONDELLES EN ARC (C) RONDELLES ÉLASTIQUES (B) BOULONS (A) MONTANT DE CONSOLE RONDELLE RONDELLE ÉLASTIQUE (B) EN ARC (C) 8,2 mm 8,2 mm Quantité...
- Page 33 ÉTAPE 4 DE L’ASSEMBLAgE CONTENU DU SAC DE ViSSEriE 4 : VIS (D) 20 mm Quantité : 4 Ouvrir le sac de visserie 4. Fixer les gaines dU carter avec 4 vis (d). VIS (D) GAINE DU CARTER TRAVAIL TERMINÉ.
- Page 35 FONCTIONNEMENT DU TAPIS ROULANT La présente section explique comment utiliser et programmer la console du tapis roulant. La section FONCTIONNEMENT DE BASE du gUIDE D’UTILISATION DU TAPIS ROULANT comporte des instructions relatives à ce qui suit : • EMPLACEMEnT DU TAPiS roULAnT •...
- Page 36 Attacher la pince de la clé de sécurité aux vêtements avant de commencer. Pour éviter toutes blessures, se tenir sur les starting treadmill. Read and follow all instructions before operating. Keep children away from ridelles avant de démarrer le tapis roulant. Avant usage, lire le Guide d’Utilisateur. Ne pas laisser cet équipement à la portée this equipment.
- Page 37 fonCTionnEMEnT DE LA ConSoLE Remarque : Avant d’utiliser la console, il faut enlever la fine pellicule protectrice en plastique qui la recouvre. A) fEnÊTrES D’AffiCHAGE À DEL : Durée, distance, calories, fréquence cardiaque, vitesse et inclinaison. B) AffiCHEUr ACL DE L’ETrAK™ : Affiche les données du système de suivi du conditionnement physique ETRAK™.
- Page 38 fEnÊTrES D’AffiCHAGE • TiME (DUrÉE) : Indiquée en minutes et secondes. Affichage de la durée restante ou écoulée des exercices. • DiSTAnCE : Indiquée en milles. Affichage de la distance parcourue ou de la distance restante à parcourir durant la séance d’entraînement. •...
- Page 39 PoUr CoMMEnCEr 1) S’assurer que rien n’est sur le tapis roulant ou ne risque d’en entraver le mouvement. 2) Brancher le cordon d’alimentation et mettre le tapis roulant sous tension. 3) Se tenir sur les rails latéraux du tapis roulant. 4) Fixer l’attache de la clé...
- Page 40 inforMATionS rELATiVES AUX ProGrAMMES 1) MAnUAL (MAnUEL): Permet des changements manuels de la vitesse et de l’inclinaison en cours d’exercice. 2) SPEED inTErVALS (inTErVALLES DE ViTESSE) : Accroît la force, la vitesse et l’endurance en élevant et en réduisant la vitesse tout au long de la séance d’entraînement, pour faire travailler tant le cœur que les muscles.
- Page 41 4) WEiGHT LoSS (PErTE DE PoiDS) : Favorise la perte de poids en élevant et en réduisant la vitesse et l’inclinaison, tout en maintenant dans la zone où l’on brûle les graisses. Les changements de vitesse et d’inclinaison, ainsi que les segments se répètent toutes les 30 secondes.
- Page 42 6) fooT HiLLS (ConTrEforTS) : Simule l’ascension d’une colline et la descente. Ce programme aide à augmenter la tonicité musculaire et à améliorer la capacité cardiovasculaire. Les changements d’inclinaison et les segments se répètent toutes les 30 secondes. 7) MoUnTAin CLiMB (MonTAGnE) : Version plus intense de CONTREFORTS.
- Page 43 10) PACEr (CHrono-rÉGULATEUr) : Entraîne à courir à allure régulière. Lorsqu’on entre la distance et la limite de temps, le programme calcule une allure de course régulière. 11-12) CUSToM 1/CUSToM 2 (PErSonnALiSATion 1 / PErSonnALiSATion 2) : Permet de créer et de réutiliser une séance d’entraînement parfaite pour répondre à...
- Page 44 SYSTÈME DE SUiVi DU ConDiTionnEMEnT PHYSiQUE ETrAK™ Toutes nos félicitations ! Des recherches ont permis de conclure que ceux qui se fixent des objectifs d’entraînement physique et s’y tiennent obtiennent en moyenne de meilleurs résultats que ceux qui ne le font pas. L’acquisition de ce nouveau tapis roulant équipé...
- Page 45 DonnÉES CUMULÉES grâce au système de suivi du conditionnement physique ETRAK™, les utilisateurs peuvent faire défiler leurs données cumulées en formats multiples en appuyant sur les touches de l’ETRAK™. Une séance d’entraînement est mise en mémoire quand : le programme se termine, la console est mise en pause et non réactivée dans les 10 minutes qui suivent, ou lorsqu’on appuie sur la touche STOP et qu’on la tient pour réinitialiser la console.
- Page 46 UTiLiSATion D’Un LECTEUr DE CD / BALADEUr MP3 1) Connecter le CÂBLE D’ADAPTATEUR AUDIO fourni à la PRISE D’ENTRÉE AUDIO à la partie supérieure droite de la console et à la prise pour casque d’écoute du lecteur de CD / baladeur MP3. 2) Utiliser les touches du lecteur de CD / baladeur MP3 pour régler les caractéristiques de la diffusion.
- Page 47 gARANTIE LIMITÉE – USAgE DOMESTIQUE...
- Page 48 MAIN-D’ŒUVRE • 1 AN Horizon Fitness prend à sa charge les frais de main-d’œuvre pour la réparation de l’appareil pendant un an à compter de la date de l’achat, tant que le propriétaire initial possède l’appareil.
- Page 49 • Tout retour doit être pré-approuvé par Horizon Fitness. • Les obligations de Horizon Fitness en vertu de cette garantie se limitent à la réparation ou au remplacement de l’équipement, à la discrétion de Horizon Fitness, par le même modèle ou un modèle comparable dans l’un de ses...
- Page 52 CT9.1 Rev. 1.2 | © 2009 Horizon Fitness | Designed & Engineered in the U.S.A. | Made in China | Conçu et développé aux États-Unis. | Fabriqué en Chine En cas de difficulté lors de l’assemblage ou si des pièces manquent,...
Need help?
Do you have a question about the CT9.1 and is the answer not in the manual?
Questions and answers