Table of Contents
Advertisement
Available languages
Available languages
MANUEL DU PROPRIÉTAIRE DU TAPIS ROULANT
MANUAL DEL PROPIETARIO DE LA CAMINADORA
Read the TREADMILL GUIDE before using this OWNER'S MANUAL.
Lisez le GUIDE DU TAPIS ROULANT avant de vous référer au présent MANUEL DU PROPRIÉTAIRE.
Lea la GUÍA DE LA CAMINADORA antes de utilizar este MANUAL DEL PROPIETARIO.
TREADMILL OWNER'S MANUAL
T303
CT9.3
Advertisement
Table of Contents

Related Manuals for Horizon Fitness T303


Summary of Contents for Horizon Fitness T303
- Page 1 T303 CT9.3 TREADMILL OWNER’S MANUAL MANUEL DU PROPRIÉTAIRE DU TAPIS ROULANT MANUAL DEL PROPIETARIO DE LA CAMINADORA Read the TREADMILL GUIDE before using this OWNER’S MANUAL. Lisez le GUIDE DU TAPIS ROULANT avant de vous référer au présent MANUEL DU PROPRIÉTAIRE.
- Page 2 ENGLISH FRANÇAIS ESPAÑOL...
-
Page 3: Important Precautions
IMPORTANT PRECAUTIONS SAVE THESE INSTRUCTIONS When using an electrical product, basic precautions should always be followed, including the following: Read all instructions before using this treadmill. It is the responsibility of the owner to ensure that all users of this treadmill are adequately informed of all warnings and precautions. - Page 4 DANGER TO REDUCE THE RISK OF ELECTRICAL SHOCK: Always unplug the treadmill from the electrical outlet immediately after using, before cleaning, performing maintenance and putting on or taking off parts. WARNING TO REDUCE THE RISK OF BURNS, FIRE, ELECTRICAL SHOCK OR INJURY TO PERSONS: •...
- Page 5 WARNING TO REDUCE THE RISK OF BURNS, FIRE, ELECTRICAL SHOCK OR INJURY TO PERSONS: • At NO time should children under the age of 13 or pets be within 10 feet of the machine. • At NO time should children under the age of 13 use the treadmill. •...
-
Page 6: Grounding Instructions
GROUNDING INSTRUCTIONS This product must be grounded. If a treadmill should malfunction or breakdown, grounding provides a path of least resistance for electrical current to reduce the risk of electrical shock. This product is equipped with a cord having an equipment-grounding conductor and a grounding plug. - Page 7 ENTER YOUR SERIAL NUMBER AND MODEL NAME IN THE BOXES BELOW: SERIAL NUMBER: HORIZON TREADMILL MODEL NAME: » Refer to the SERIAL NUMBER and MODEL NAME when calling for service.
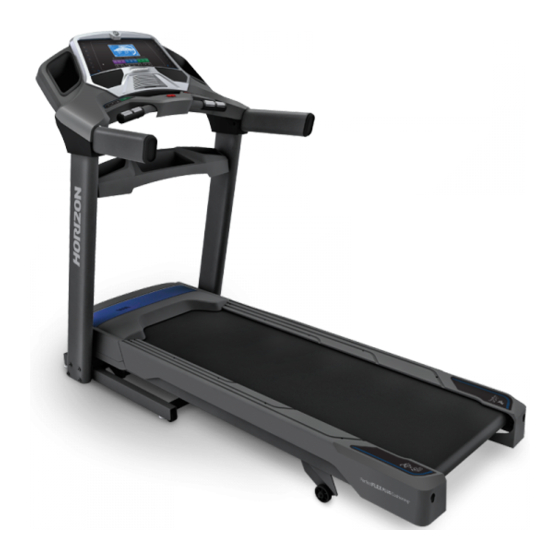
- Page 8 CONSOLE DISPLAY AND CONTROLS CONSOLE HEART RATE GRIP BARS WATER BOTTLE POCKET HANDLEBARS SPEAKERS SAFETY KEY PLACEMENT ACCESSORY TRAY CONSOLE MAST ON/OFF SWITCH CIRCUIT BREAKER POWER CORD MOTOR COVER RUNNING BELT / RUNNING DECK REAR ROLLER TENSION/ADJUSTMENT BOLTS TRANSPORT WHEEL FOOT LOCK LATCH (UNDERNEATH DECK) SIDE RAIL...
-
Page 9: Tools Required
TOOLS REQUIRED: PRE ASSEMBLY 6 mm T-Wrench 5 mm L-Wrench UNPACKING Screwdriver (not included) Place the treadmill carton on a level flat surface. It is recommended that you place PARTS INCLUDED: a protective covering on your floor. Take CAUTION when handling and transporting ... -
Page 10: Assembly Step
ASSEMBLY STEP 1 Cut the yellow banding straps and lift the HARDWARE FOR STEP 1: running deck upward to remove all contents from underneath the running deck. BOLT (A) 9 mm Qty: 2 Open HARDWARE FOR STEP 1. Insert 2 BOLTS (A) into MAIN FRAME BRACKETS. - Page 11 ASSEMBLY STEP 2 Open HARDWARE FOR STEP 2. HARDWARE FOR STEP 2: Attach LEFT CONSOLE MAST so that BOLT (A) FLAT SPRING BOLT (D) WASHER (B) WASHER (C) 70 mm sits on the NOTCHED HOLE in the bottom of the 8 mm 8 mm Qty: 8...
- Page 12 ASSEMBLY STEP 2 (continued) Pull the CONSOLE CABLE out of the treadmill LEAD WIRE base frame using the LEAD WIRE. Attach CONSOLE CABLE to the CONSOLE CABLE in the bottom of the mast. The other end of the LEFT CONSOLE MAST CONSOLE CABLE should be located at the top of the mast.
- Page 13 ASSEMBLY STEP 3 HARDWARE FOR STEP 3: FLAT SPRING SCREW (E) BOLT (F) WASHER (B) WASHER (C) 8 mm 15 mm 8 mm 8 mm CONSOLE POCKET Qty: 2 Qty: 4 Qty: 4 Qty: 4 SCREWS (E) Open HARDWARE FOR STEP 3. CONSOLE Attach CONSOLE POCKETS to CONSOLE using 2 SCREWS (E).
- Page 14 ASSEMBLY STEP 4 Open HARDWARE FOR STEP 4. HARDWARE FOR STEP 4: Attach the the LEFT OUTER CONSOLE MAST SCREW (G) 15 mm COVER with 2 SCREWS (G). Qty: 8 Attach the LEFT INNER CONSOLE MAST COVER with 2 SCREWS (G). Repeat steps 2 and 3 to attach the RIGHT-SIDE CONSOLE MAST COVERS.
- Page 15 ASSEMBLY STEP 5 HARDWARE FOR STEP 5: FLAT SPRING BOLT (J) WASHER (H) WASHER (I) 15 mm 6.2 mm 6 mm Qty: 4 Qty: 4 Qty: 4 Open HARDWARE FOR STEP 5. CONSOLE MAST Align the ACCESSORY TRAY between the ACCESSORY TRAY CONSOLE MASTS.
-
Page 17: Treadmill Operation
TREADMILL OPERATION This section explains how to use your treadmill’s console and programming. The BASIC OPERATION section in the TREADMILL GUIDE has instructions for the following: • LOCATION OF THE TREADMILL • USING THE SAFETY KEY • FOLDING THE TREADMILL •... -
Page 19: Console Operation
CONSOLE OPERATION Note: There is a thin protective sheet of clear plastic on the overlay of the console that should be removed before use. A) LCD DISPLAY WINDOW: time, distance, speed, calories, incline, and heart rate. B) PROGRAM KEYS: press to select workout. C) CUSTOM 1 &... -
Page 20: Display Windows
DISPLAY WINDOWS • HEART RATE (HR): Shown as BPM (beats • TIME: Shown as minutes : seconds. View the per minute). Used to monitor your heart rate time remaining or the time elapsed in your (displayed when contact is made with both pulse workout. -
Page 21: Getting Started
GETTING STARTED CHANGING YOUR PROGRAM MID-WORKOUT 1) Check to make sure no objects are placed on the belt that will hinder the movement of the treadmill. Anytime during your workout, press any 2) Plug in the power cord and turn the treadmill ON. (The ON/OFF program button to select a new program. -
Page 22: Program Information
PROGRAM INFORMATION MANUAL: Adjust your speed and incline manually during your workout. SPEED INTERVALS ENDURANCE INTERVALS - SPEED ONLY Segment Warm Up Cool Down Segment Warm Up Cool Down Time 4:00 4:00 Time 4:00 Each segment is 30 seconds 4:00 Level 1 Level 1 Level 2... - Page 23 CARDIO BURN Segment Warm Up Cool Down WEIGHT LOSS WORKOUTS Time 4:00 Each segment is 30 seconds 4:00 Incline Level 1 Speed CARDIO BURN: Promotes weight loss by increasing Incline Level 2 Speed and decreasing the speed and incline, while keeping Incline you in your fat burning zone.
- Page 24 PROGRAM INFORMATION PERFORMANCE WORKOUTS 5K & 10K: Programs that allow you 5K / 10K - INCLINE CHANGES to set and work toward a distance Segment Warm Up 15 Cool Down goal. Treadmill automatically adjusts Incline 4:00 Each segment is 0.16 4:00 Level 1 1.0 3.0 1.0 3.0 2.0 3.0 2.0 3.5 2.0 3.0 2.0 3.0 1.0 3.0 1.0...
- Page 25 CUSTOM 1 & 2: Lets you create and reuse a perfect workout for you with specific speed, incline and time combination. The ultimate in personal programming. Time-based goal. 1) Press the CUSTOM 1 or 2 key to select a custom program. Press ENTER to confirm. 2) Set the workout time using and press ENTER.
- Page 26 Research shows that those who create and track their fitness goals, on average, achieve greater success than those who do not. Because your new treadmill is equipped with Horizon’s exclusive GOAL CENTER Performance Tracker, you’ve taken an important step towards achieving your fitness goals. GOAL CENTER is innovative new software, integrated into your console, that will allow you to track your fitness goals over time, without the need for paper journals or logs.
-
Page 27: Limited Home-Use Warranty
LIMITED HOME-USE WARRANTY... -
Page 28: Exclusions And Limitations
Horizon Fitness. LABOR • 1 YEAR Horizon Fitness shall cover the labor cost for the repair • Incidental or consequential damages. Horizon Fitness of the device for a period of one year from the date of the... - Page 29 • Equipment used for commercial purposes or any use • All returns must be pre-authorized by Horizon Fitness. other than a single family or Household, unless endorsed • Horizon Fitness’ obligation under this warranty is limited by Horizon Fitness for coverage.
- Page 30 FRANÇAIS...
-
Page 31: Précautions Importantes
PRÉCAUTIONS IMPORTANTES CONSERVEZ CES DIRECTIVES Lorsque vous utilisez un produit électrique, des précautions de base doivent toujours être respectées, y compris les suivantes : Lisez toutes les directives avant d’utiliser ce tapis roulant. Il incombe au propriétaire de veiller à ce que tous les utilisateurs de tapis roulant soient adéquatement informés de tous les avertissements et précautions. - Page 32 DANGER POUR RÉDUIRE LE RISQUE DE CHOC ÉLECTRIQUE : Débranchez toujours le tapis roulant de la prise électrique immédiatement après l’avoir utilisé, avant de le nettoyer et d’effectuer un entretien ainsi qu’avant d’ajouter ou d’enlever des pièces. AVERTISSEMENT POUR RÉDUIRE LE RISQUE DE BRÛLURES, D’INCENDIE, DE CHOC ÉLECTRIQUE OU DE BLESSURES : •...
- Page 33 AVERTISSEMENT POUR RÉDUIRE LE RISQUE DE BRÛLURES, D’INCENDIE, DE CHOC ÉLECTRIQUE OU DE BLESSURES : • En AUCUN temps, les enfants de moins de 13 ans et les animaux de compagnie ne devraient se tenir à moins de 3 m (10 pi) du tapis roulant.
-
Page 34: Instructions De Mise À La Terre
INSTRUCTIONS DE MISE À LA TERRE Cet appareil doit être mis à la terre. Si le tapis roulant fait défaut ou tombe en panne, la mise à la terre fournit une voie de moindre résistance pour le courant électrique en vue de réduire le risque de choc électrique. Ce tapis roulant est muni d’un cordon avec un conducteur de terre d’équipement et d’une fiche de terre. -
Page 35: Tapis Roulant
INSCRIRE LE NUMÉRO DE SÉRIE ET LE MODÈLE DANS LES CASES CI-DESSOUS : NUMÉRO DE SÉRIE : TAPIS ROULANT DE HORIZON NOM DU MODÈLE : » Indiquer le NUMÉRO DE SÉRIE et le MODÈLE lors de tout appel de service. - Page 36 AFFICHAGE ET COMMANDES DE LA CONSOLE CONSOLE POIGNÉES À FRÉQUENCE CARDIAQUE POCHETTE POUR BOUTEILLE D’EAU GUIDONS HAUT-PARLEURS PLACEMENT DE LA CLÉ DE SÉCURITÉ PLATEAU À ACCESSOIRES MÂTS DE LA CONSOLE INTERRUPTEUR ON/OFF (MARCHE/ARRÊT) DISJONCTEUR CORDON D’ALIMENTATION COUVERCLE DU MOTEUR BANDE/PLATE-FORME DE COURSE TENSION DU ROULEAU ARRIÈRE ET BOULONS D’AJUSTEMENT...
-
Page 37: Outils Requis
OUTILS REQUIS : PRÉ ASSEMBLAGE Clé à manche en T, de 6 mm Clé à manche en L, de 5 mm Tournevis (non inclus) DÉBALLAGE PIÈCES COMPRISES : Placez l’emballage du tapis roulant sur une surface plane. Il est conseillé de placer une toile ... - Page 38 ASSEMBLAGE ÉTAPE 1 Coupez les courroies d’emballage jaune et soulevez la QUINCAILLERIE POUR ÉTAPE 1 : plate-forme de course pour enlever tous le contenu qui se trouvent en-dessous. BOULON (A) 9 mm Qté : 2 Ouvrez la TROUSSE DE QUINCAILLERIE POUR L’ÉTAPE 1.
- Page 39 ASSEMBLAGE ÉTAPE 2 Ouvrir la QUINCAILLERIE POUR ETAPE 2. QUINCAILLERIE POUR ÉTAPE 2 : Aligner le MONTANT DE CONSOLE GAUCHE pour que RONDELLE RONDELLE BOULON (D) le BOULON (A) soit en place en bas du MONTANT DE PLATE (B) À RESSORT (C) 70 mm 8 mm 8 mm...
- Page 40 ASSEMBLAGE ÉTAPE 2 (suite) Tirer soigneusement le CABLE DE CONSOLE à travers le cadre à l’aide du FIL DE GUIDAGE. Connecter le FIL DE GUIDAGE CABLE DE CONSOLE au CABLE DE CONSOLE en bas du montant. L’autre bout du MONTANT DE CONSOLE MÂT DE LA CONSOLE GAUCHE doit être en haut du montant.
- Page 41 ASSEMBLAGE ÉTAPE 3 QUINCAILLERIE POUR ÉTAPE 3 : RONDELLE RONDELLE VIS (E) BOULON (F) PLATE (B) À RESSORT (C) 8 mm 20 mm 8 mm 8 mm Qté : 4 Qté : 2 POCHETTE Qté : 4 Qté : 4 DE LA CONSOLE VIS (E) Ouvrez la TROUSSE DE QUINCAILLERIE POUR...
- Page 42 ASSEMBLAGE ÉTAPE 4 Ouvrez la TROUSSE DE QUINCAILLERIE POUR QUINCAILLERIE POUR ÉTAPE 4 : L’ÉTAPE 4. VIS (G) Attachez la COUVERTURE EXTERIEURE GAUCHE 15 mm Qté : 8 DU MONTANT DE LA CONSOLE avec 2 VIS (G). Attachez la COUVERTURE INTERIEURE GAUCHE DU MONTANT DE LA CONSOLE avec 2 VIS (G) Répéter les étapes 2 et 3 pour attacher les COUVERTURES DROITES DU MONTANT DE LA...
- Page 43 ASSEMBLAGE ÉTAPE 5 QUINCAILLERIE POUR ÉTAPE 5 : RONDELLES RONDELLE BOULON (J) À RESSORT (H) À RESSORT (I) 15 mm 6,2 mm 6 mm Qté : 4 Qté : 4 Qté : 4 Ouvrez la TROUSSE DE QUINCAILLERIE POUR MÂTS DE LA CONSOLE L’ÉTAPE 5.
-
Page 45: Fonctionnement Du Tapis Roulant
FONCTIONNEMENT DU TAPIS ROULANT Cette section explique comment utiliser la console de votre tapis roulant et comment la programmer. La section des FONCTIONNEMENTS DE BASE dans le GUIDE DU TAPIS ROULANT comprend des directives sur les points suivants : • EMPLACEMENT DU TAPIS ROULANT •... -
Page 47: Fonctionnement De La Console
FONCTIONNEMENT DE LA CONSOLE Remarque : Il y a une fine pellicule protectrice en plastique transparent sur la console que vous devez enlever avant d’utiliser la machine. FENÊTRE D’AFFICHAGE ACL : Durée, distance, vitesse, calories, pente, et fréquence cardiaque. TOUCHES DE PROGRAMMES : Appuyez pour sélectionner la séance d’entraînement. TOUCHES PERSONNALISÉES 1ET 2 : Appuyez pour sélectionner un programme personnalisé... - Page 48 FENÊTRES D’AFFICHAGE • FRÉQUENCE CARDIAQUE (HRE) : Indiquée • DURÉE : Indiquée en minutes : secondes. en BPM (battements par minute). Utilisé pour Visualisez le temps restant ou le temps écoulé dans suivre la fréquence cardiaque (s’affiche lorsque votre entraînement. le contact est établi avec les deux poignées du cardiofréquencemètre).
-
Page 49: Pour Commencer
POUR COMMENCER CHANGEMENT DE VOTRE PROGRAMME PENDANT UNE SÉANCE 1) Assurez-vous qu’il n’y aucun objet placé sur la courroie qui pourrait nuire aux D’ENTRAÎNEMENT déplacements du tapis roulant. 2) Branchez le cordon d’alimentation et mettez le tapis roulant sous tension. À... - Page 50 RENSEIGNEMENTS SUR LE PROGRAMME MANUEL: Vous pouvez ajuster la vitesse et l’inclinaison manuellement pendant votre entraînement. INTERVALLES DE VITESSE INTERVALLES D’ENDURANCE – VITESSE SEULEMENT Segment Réchauffement Récupération Segment Réchauffement 8 Récupération Durée 4:00 4:00 Durée 4:00 Chaque segment dure 30 secondes 4:00 Niveau 1 Niveau 1...
- Page 51 CARDIO BURN (Brûler de la graisse par le cardio) Segment Réchauffement Récupération SÉANCES D’ENTRAÎNEMENT POUR LA PERTE Durée 4:00 Chaque segment dure 30 secondes 4:00 DE POIDS Pente Niveau 1 Speed Inclinaison 0.0 CARDIO BURN (BRÛLER DE LA GRAISSE PAR LE Niveau 2 Vitesse CARDIO : Favorise la perte de poids en augmentant et...
- Page 52 RENSEIGNEMENTS SUR LE PROGRAMME ENTRAÎNEMENTS DE PERFORMANCE 5KM ET 10 KM : Programmes qui 5km/10km – CHANGEMENT D’INCLINAISON vous permettent de régler et de Segment Réchauffement 15 Récupération travailler à un objectif de distance. Inclinaison 4:00 Chaque segment est d’une distance de 0,16 4:00 Le tapis roulant ajuste la pente Niveau 1...
- Page 53 TOUCHES PERSONNALISÉES 1 ET 2 : Vous permet de créer et refaire une séance d’entraînement parfaite pour vous avec une vitesse, une pente et une combinaison de durées spécifiques. L’ultime programme personnel. Objectif de durée 1) Appuyez sur la touche CUSTOM 1 ou 2 (PERSONNALISER) pour sélectionner un programme personnalisé. Appuyez sur ENTER (Entrer) pour confirmer.
- Page 54 GOAL CENTER (Centre des objectifs) Les études démontrent que les gens qui créent et qui suivent leurs objectifs de conditionnement physique, sont plus susceptible, en moyenne, d’atteindre un plus grand niveau de succès que ceux qui ne le font pas. Parce que votre nouveau tapis roulant est équipé...
- Page 55 GARANTIE LIMITÉE D’USAGE RÉSIDENTIEL...
- Page 56 CADRE • À VIE • Le propriétaire initial et la garantie n’est pas transférable. Horizon Fitness garanti le cadre contre les vices de fabrication ou de matériau pendant toute la durée de vie de l’acheteur, à Qu’est-ce qui EST couvert : compter de la date de l’achat initial, tant que le propriétaire initial...
- Page 57 Horizon Fitness . consommateur). • Équipement opéré ou dont le propriétaire demeure à l’extérieur • Tous les retours doivent être préautorisés par Horizon Fitness. des États-Unis et le Canada. • Les obligations de Horizon Fitness en vertu de cette •...
- Page 58 ESPAÑOL...
-
Page 59: Precauciones Importantes
PRECAUCIONES IMPORTANTES CONSERVE ESTAS INSTRUCCIONES Cuando se usa un producto eléctrico, se deben tener precauciones básicas, incluidas las siguientes: Lea las instrucciones antes de utilizar esta caminadora. Es responsabilidad del propietario asegurarse de que todos los usuarios de esta caminadora estén informados adecuadamente de todas las advertencias y las precauciones. - Page 60 PELIGRO PARA REDUCIR EL RIESGO DE DESCARGA ELÉCTRICA: Desconecte siempre la caminadora del tomacorriente inmediatamente después de su uso, antes de limpiarla, al realizar trabajos de mantenimiento y al añadirle o quitarle piezas. ADVERTENCIA PARA REDUCIR EL RIESGO DE QUEMADURAS, INCENDIOS, DESCARGA ELÉCTRICA O LESIONES: •...
- Page 61 ADVERTENCIA PARA REDUCIR EL RIESGO DE QUEMADURAS, INCENDIOS, DESCARGA ELÉCTRICA O LESIONES: • Las mascotas o los niños menores de 13 años no deben acercarse en NINGÚN momento a una distancia menor de 10 pies (3,05 metros) de la caminadora. •...
-
Page 62: Instrucciones De Conexión A Tierra
INSTRUCCIONES DE CONEXIÓN A TIERRA Este producto debe conectarse a tierra. En el caso de que una caminadora se averíe o funcione incorrectamente, la conexión a tierra proporciona un camino de menor resistencia para la corriente eléctrica a fin de reducir el riesgo de descarga eléctrica. Este producto está equipado con un cable que tiene un conductor de conexión a tierra del equipo y un enchufe de conexión a tierra. - Page 63 ESCRIBA EL NÚMERO DE SERIE Y EL NOMBRE DE MODELO EN LAS SIGUIENTES CASILLAS: NÚMERO DE SERIE: CAMINADORA HORIZON NOMBRE DE MODELO: » Cuando llame para solicitar servicio haga referencia al NÚMERO DE SERIE y al NOMBRE DE MODELO.
- Page 64 PANTALLA Y CONTROLES DE LA CONSOLA CONSOLA BARRAS DE LAS EMPUÑADURAS BOLSILLO PARA CON SENSOR DE PULSO CARDÍACO BOTELLA DE AGUA BARRAS DE SUJECIÓN ALTAVOCES UBICACIÓN DE LA LLAVE DE SEGURIDAD BANDEJA ACCESORIA POSTE DE LA CONSOLA INTERRUPTOR DE ENCENDIDO/APAGADO DISYUNTOR CABLE DE CORRIENTE CUBIERTA DEL MOTOR...
-
Page 65: Herramientas Requeridas
HERRAMIENTAS PRE ENSAMBLAJE REQUERIDAS: Llave en T de 6 mm Llave en L de 5 mm DESEMPAQUE Destornillador (no incluido) Coloque la caja de la caminadora sobre una superficie plana y nivelada. Se recomienda que coloque una cubierta protectora sobre el piso. Tenga PRECAUCIÓN cuando manipule PIEZAS INCLUIDAS: y transporte la unidad. - Page 66 ENSAMBLAJE PASO 1 Corte las bandas de sujeción amarillas y levante la TORNILLERÍA PARA EL PASO 1: plataforma para correr hacia arriba y retire todo lo que haya debajo de la misma. PERNO (A) 9 mm Abra la BOLSA DE TORNILLERÍA PARA EL PASO 1. Cant.: 2 Inserte 2 PERNOS (A) en las MÉNSULAS DEL BASTIDOR PRINCIPAL.
- Page 67 ENSAMBLAJE PASO 2 (continuación) Abra la BOLSA DE TORNILLERÍA PARA EL PASO 2. TORNILLERÍA PARA EL PASO 2: Alinee el POSTE IZQUIERDA DE LA CONSOLA para ARANDELA ARANDELA PERNO (D) que el perno (A) se siente en el ORIFICIO DENTADO en PLANA (B) ELÁSTICA (C) 70 mm...
- Page 68 ENSAMBLAJE PASO 2 (continuación) Meta el alambre de alimentación del cable a través el bastidor con el ALAMBRE DE GUIA. Ate el ALAMBRE CABLE CONDUCTOR DE LA CONSOLA con el ALAMBRE AL LA PARTE INFERIOR del poste. La otra parte del ALAMBRE DE POSTE IZQUIERDO DE LA CONSOLA ALIMENTACION se localiza a la parte superior del poste.
- Page 69 ENSAMBLAJE PASO 3 TORNILLERÍA PARA EL PASO 3: ARANDELA ARANDELA TORNILLO (E) PERNO (F) PLANA (B) ELÁSTICA (C) 8 mm 20 mm 8 mm 8 mm Cant.: 2 Cant.: 4 BOLSILLO Cant.: 4 Cant.: 4 DE LA CONSOLA TORNILLOS (E) Abra la BOLSA DE TORNILLERÍA PARA EL PASO 3.
- Page 70 ENSAMBLAJE PASO 4 Abra la BOLSA DE TORNILLERÍA PARA EL PASO 4. TORNILLERÍA PARA EL PASO 4: Meta la CUBIERTA EXTERIOR IZQUIERDA DEL TORNILLO (G) 15 mm POSTE DE LA CONSOLA con 2 TORNILLOS (G). Cant.: 8 Meta la CUBIERTA INTERIOR IZQUIERDA DEL POSTE DE LA CONSOLA con 2 TORNILLOS (G).
- Page 71 ENSAMBLAJE PASO 5 TORNILLERÍA PARA EL PASO 5: ARANDELA ARANDELA PERNO (J) PLANA (H) ELÁSTICA (I) 15 mm 6,2 mm 6 mm Cant.: 4 Cant.: 4 Cant.: 4 Abra la BOLSA DE TORNILLERÍA PARA EL PASO 5. POSTE DE LA CONSOLA Conecte la BANDEJA ACCESORIA entre los POSTES DE LA CONSOLA.
- Page 73 FUNCIONAMIENTO DE LA CAMINADORA Esta sección explica cómo utilizar la consola y la programación de la caminadora. La sección de FUNCIONAMIENTO BÁSICO en la GUÍA DE LA CAMINADORA contiene instrucciones para lo siguiente: • UBICACIÓN DE LA CAMINADORA • USO DE LA LLAVE DE SEGURIDAD •...
-
Page 75: Funcionamiento De La Consola
FUNCIONAMIENTO DE LA CONSOLA Nota: Hay una lámina protectora delgada de plástico transparente en el revestimiento de la consola que debe quitarse antes de usarla. VENTANA DE INDICADORES DE LCD: tiempo, distancia, velocidad, calorías, inclinación y ritmo cardíaco. TECLAS DE PROGRAMA: oprima estas teclas para seleccionar su sesión de ejercicio. TECLAS CUSTOM 1 &... - Page 76 VENTANAS DE INDICADORES EN PANTALLA • HEART RATE (HR) (RITMO CARDÍACO, RC): Aparece como latidos/minuto (BPM, por sus siglas en • TIME (TIEMPO): Aparece en minutos: segundos. inglés). Se utiliza para monitorear su ritmo cardíaco Indica el tiempo restante o el que ha pasado en su (se muestra cuando se sujetan ambas empuñaduras sesión de ejercicio.
-
Page 77: Para Empezar
PARA EMPEZAR CÓMO CAMBIAR SU PROGRAMA UNA VEZ INICIADA SU SESIÓN DE 1) Verifique que no haya ningún objeto ubicado en la banda que dificulte el EJERCICIO movimiento de la caminadora. 2) Enchufe el cable de corriente y ENCIENDA la caminadora. (El interruptor En cualquier momento durante su sesión de de ENCENDIDO/APAGADO está... - Page 78 INFORMACIÓN DE LOS PROGRAMAS MANUAL: Ajuste la velocidad y la inclinación de forma manual durante su sesión de ejercicio. INTERVALOS DE VELOCIDAD INTERVALOS DE RESISTENCIA: VELOCIDAD SOLAMENTE Segmento Calentamiento Enfriamiento Segmento Calentamiento Enfriamiento Tiempo 4:00 4:00 Tiempo 4:00 Cada segmento tiene 30 segundos 4:00 Nivel 1 Nivel 1...
- Page 79 CARDIO BURN (QUEMA CARDIO) SESIONES DE EJERCICIO Segmento Calentamiento Enfriamiento DE CONTROL DE PESO Tiempo 4:00 Cada segmento tiene 30 segundos 4:00 Inclinación 0.0 Nivel 1 Velocidad CARDIO BURN (QUEMA CARDIO): Promueve el control Inclinación 0.0 Nivel 2 de peso al aumentar y reducir la velocidad y la inclinación, Velocidad Inclinación 0.5 al tiempo que lo mantiene en su zona óptima para quemar...
- Page 80 INFORMACIÓN DE LOS PROGRAMAS SESIONES DE EJERCICIO DE RENDIMIENTO 5K & 10K (5 KM Y 10 KM): 5 km/10 km: CAMBIOS DE INCLINACIÓN Programas que permiten al usuario Segmento Calentamiento 1 15 Enfriamiento establecer y trabajar para alcanzar un Inclinación 4:00 Cada segmento es de 0,16 4:00...
- Page 81 CUSTOM 1 & 2 (PERSONAL 1 Y 2): Le permite crear y reutilizar una sesión de ejercicio perfecta para usted con una combinación específica de velocidad, inclinación y tiempo. Lo máximo en programación personal. El objetivo se basa en el tiempo. 1) Oprima la tecla CUSTOM 1 o 2 (PERSONAL 1 o 2) para seleccionar un programa personalizado.
- Page 82 GOAL CENTER de Horizon, usted ha dado un paso importante para alcanzar los objetivos relacionados con su estado físico. GOAL CENTER es un nuevo software innovador, integrado a la consola de su caminadora, que le permite dar seguimiento a sus objetivos relacionados con su estado físico con el paso del tiempo, sin necesidad de llenar bitácoras o registros en papel.
- Page 83 GARANTÍA LIMITADA DE USO EN EL HOGAR...
-
Page 84: Exclusiones Y Limitaciones
MANO DE OBRA • 1 AÑO no estén autorizadas o no estén recomendadas por Horizon Horizon Fitness cubrirá el costo de mano de obra para la Fitness. reparación del dispositivo por un período de un año desde la fecha de la compra original, siempre y cuando el dispositivo •... - Page 85 • El equipo utilizado para fines comerciales o cualquier otro uso cliente). distinto del uso de una familia o un hogar, a menos que Horizon Fitness autorice la cobertura. • Todas las devoluciones deben ser autorizadas previamente por Horizon Fitness.
- Page 88 Cottage Grove WI, 53527 T303 / CT9.3 Rev. 1.8 | © 2013 Johnson Health Tech Designed & Engineered in the U.S.A. • Made in China | Conçu et fabriqué aux États-Unis. • Fabriqué en Chine | Diseño y tecnología de los EE.UU. • Hecho en China...
Need help?
Do you have a question about the T303 and is the answer not in the manual?
Questions and answers