Table of Contents
Advertisement
Quick Links
Download this manual
See also:
Instruction Manual
Help Guide:Interchangeable Lens Digital Camera
How to Use
Before Use
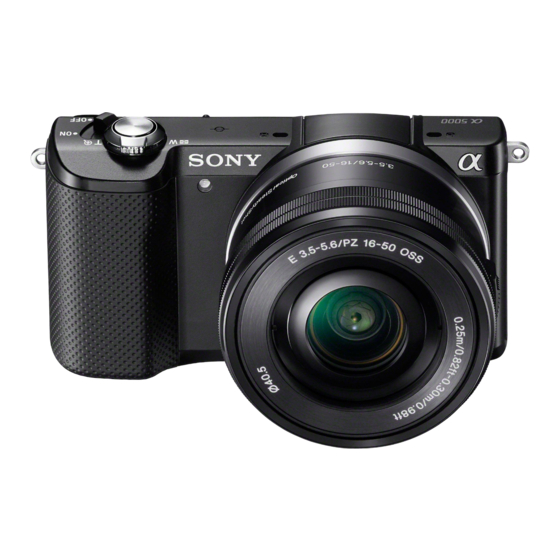
Names of parts
Identifying parts
Identifying parts Lens E PZ 16–50 mm F3.5–5.6 OSS (supplied with ILCE-5000L/ILCE-
5000Y)
Identifying parts Lens E 55-210 mm F4.5-6.3 OSS (supplied with ILCE-5000Y)
Icons and indicators
List of icons on the screen
Using the strap
Using the shoulder strap
In-Camera guide
About the [In-Camera Guide]
About the shooting advice
Confirming the operation method
Confirming the operation method
Using the control wheel
ILCE-5000
Advertisement
Table of Contents

Related Manuals for Sony ILCE-5000


Summary of Contents for Sony ILCE-5000
-
Page 1: Before Use
ILCE-5000 Help Guide:Interchangeable Lens Digital Camera How to Use Before Use Names of parts Identifying parts Identifying parts Lens E PZ 16–50 mm F3.5–5.6 OSS (supplied with ILCE-5000L/ILCE- 5000Y) Identifying parts Lens E 55-210 mm F4.5-6.3 OSS (supplied with ILCE-5000Y) -
Page 2: Selecting A Shooting Mode
Using MENU items Shooting Shooting still images/movies Shooting still images Shooting movies Selecting a shooting mode List of shooting modes Intelligent Auto Superior Auto About Scene Recognition The advantages of automatic shooting Program Auto Sweep Panorama Scene Selection Shutter Priority Aperture Priority Manual Exposure BULB... -
Page 3: Selecting A Screen Display Mode
Using flash Flash Mode Flash Comp. Selecting a screen display mode Switching the screen display (Shooting) DISP Button Selecting still image size/image quality Image Size (still image) Aspect Ratio (still image) Quality (still image) Panorama: Size Panorama: Direction Adjusting the focus Focus Mode Focus Area Focus-lock... -
Page 4: Adjusting The Exposure
AF On Measuring the exact distance to the subject Adjusting the exposure Exposure Comp. Metering Mode AE lock AEL w/ shutter (still image) Zebra Exposure Set. Guide Selecting a drive mode (Continuous shooting/Self-timer) Drive Mode Cont. Shooting Spd Priority Cont. Self-timer Self-timer(Cont) Cont. -
Page 5: Selecting An Effect Mode
Adjusting color tones White Balance Capturing a basic white color in [Custom Setup] mode Selecting an effect mode Picture Effect Creative Style Recording movies File Format (movie) Record Setting (movie) Audio Recording Wind Noise Reduct. Auto Slow Shut. (movie) MOVIE Button Customizing the shooting functions for convenient use Custom Key Settings Function of the ? button... -
Page 6: Viewing Still Images
Red Eye Reduction Auto Obj. Framing (still image) SteadyShot High ISO NR (still image) Color Space (still image) Grid Line Auto Review Live View Display Release w/o Lens S. Auto Img. Extract. Shading Comp. Chro. Aber. Comp. Distortion Comp. Viewing Viewing still images Playing back images Playback zoom... -
Page 7: Using Viewing Functions
Printing Specify Printing Using viewing functions View Mode Display Rotation Slide Show Rotate Protect 4K Still Image PB Viewing images on a TV Viewing images on an HD TV Viewing images on a “BRAVIA” Sync-compatible TV Changing settings Setup menu Monitor Brightness Volume Settings Audio signals... -
Page 8: Connecting This Product And A Smartphone
Language Date/Time Setup Area Setting Format File Number Select REC Folder New Folder Folder Name Recover Image DB Display Media Info. Version Certification Logo (Overseas model only) Setting Reset Using Wi-Fi functions Connecting this product and a Smartphone PlayMemories Mobile Connecting an Android smartphone to this product Connecting the product to an iPhone or iPad Calling up an application using [One-touch(NFC)]... -
Page 9: Transferring Images To A Tv
Transferring images to a TV View on TV Changing the settings of Wi-Fi functions Airplane Mode WPS Push Access Point Set. Edit Device Name Disp MAC Address SSID/PW Reset Reset Network Set. Adding applications to the product PlayMemories Camera Apps PlayMemories Camera Apps Recommended computer environment Installing the applications... -
Page 10: Viewing On Computers
Viewing on computers Recommended computer environment Recommended computer environment Using the software PlayMemories Home Installing PlayMemories Home Software for Mac computers “Image Data Converter” Installing “Image Data Converter” Accessing “Image Data Converter Guide” “Remote Camera Control” Installing “Remote Camera Control” Accessing “Remote Camera Control Help Guide”... -
Page 11: Cleaning This Product
Precautions On the internal rechargeable battery Notes on the battery pack Charging the battery pack Memory card Cleaning this product On cleaning Cleaning the image sensor Number of recordable still images and recordable time of movies Number of still images Recordable time of movies Using this product abroad Plug adaptor... -
Page 12: Troubleshooting
Troubleshooting If you have problems If you have problems Troubleshooting Troubleshooting Battery pack and power You cannot insert the battery pack into the product. You cannot turn on the product. The power turns off suddenly. The remaining battery level indicator shows an incorrect level. The charge lamp on the product flashes when charging the battery pack. -
Page 13: Viewing Images
Dots appear and remain on the screen. You cannot shoot images continuously. The image is whitish (Flare)./Blurring of light appears on the image (Ghosting). The corners of the picture are too dark. The image is blurred. The LCD screen darkens after a short period of time passed. The flash takes too long to recharge. -
Page 14: Situations This Product Has Difficulty Handling
Formatted the memory card by mistake. Printing You cannot print images. The color of the image is strange. Images are printed with both edges cut off. You cannot print images with the date. Others The lens gets fogged. The product becomes warm when you use it for a long time. The Clock Set screen appears when you turn on the product. -
Page 15: Table Of Contents
When the lens is removed 1. Shutter button 2. ON/OFF (Power) switch 3. Hook for shoulder strap (N mark) This mark indicates the touch point for connecting this product and an NFC-enabled smartphone. NFC (Near Field Communication) is an international standard of the short-range wireless communication technology. - Page 16 (Flash pop-up) button 2. LCD screen You can adjust the LCD screen to an easily viewable angle and shoot from any position. You may not be able to adjust the LCD screen angle depending on the type of a tripod you use.
- Page 17 1. Battery cover 2. Battery eject lever 3. Battery insertion slot 4. Connection plate cover Use this when using an AC-PW20 AC Adaptor (sold separately). Insert the connection plate into the battery compartment, and then pass the cord through the connection plate cover as shown below.
- Page 18 1. Zooming/Focusing ring 2. Zooming lever 3. Mounting index 4. Lens contacts* Do not touch this part directly. How to Use Before Use Names of parts Identifying parts Lens E 55-210 mm F4.5-6.3 OSS (supplied with ILCE-5000Y) 1. Focusing ring 2.
-
Page 19: List Of Icons On The Screen
How to Use Before Use Icons and indicators List of icons on the screen List of shooting mode icons List of viewing mode icons P P* A S M Shooting mode Self-portrait self-timer Memory card/Uploading status Scene Recognition icons Scene Selection... - Page 20 Remaining number Aspect ratio of still images 20M / 17M / 10M / 8.4M / 5.0M / 4.2M Image size of still images Image quality of still images Frame rate of movies Recording settings of movies NFC is activated Remaining battery Remaining battery warning Flash charge in progress AF Illuminator...
- Page 21 Database file full/Database file error Setting Effect OFF Smart Zoom Clear Image Zoom Digital Zoom Spot metering area View Mode 100-0003 Folder - file number Recording format of movies Protect DPOF DPOF set Drive Mode Metering mode Flash mode/Red-eye reduction ±0.0 Flash compensation Focus mode...
- Page 22 Focus area D-Range Opt./Auto HDR Smile/Face Detect. ±0 ±0 ±0 Creative Style Lock-on AF Picture Effect Smile detection sensitivity indicator Lock-on AF Guide display for Lock-on AF REC 0:12 Recording time of the movie (m:s) Function of the control wheel Av: Aperture Tv: Shutter speed Focus...
-
Page 23: Using The Shoulder Strap
Exposure compensation ISO400 ISO sensitivity AE lock Shutter speed indicator Aperture indicator Histogram Picture Effect error Auto HDR image warning 2014-1-1 10:37AM Date of recording File number/Number of images in the view mode How to Use Before Use Using the strap Using the shoulder strap Attach the shoulder strap to prevent damage caused by dropping the product. -
Page 24: About The Shooting Advice
How to Use Before Use In-Camera guide About the [In-Camera Guide] The [In-Camera Guide] displays descriptions of MENU items and settings, and if a function cannot be set, the reason why. 1. Press the MENU button. 2. Select the desired MENU item using up/down/left/right side on the control wheel. 3. -
Page 25: Using The Control Wheel
press on the center. The shooting advice is displayed. You can scroll the screen by pressing the up/down side of the control wheel. Hint To view all the shooting advice, select MENU → (Camera Settings) → [Shooting Tip List]. How to Use Confirming the operation method Confirming the operation method Using the control wheel... - Page 26 In this section, you learn how to change settings related to all camera operations and execute camera functions including shooting, playback, and operation methods. 1. Press MENU button to display the Menu screen. 2. Select the desired MENU item using the up/down/left/right side of the control wheel or by turning the control wheel, and then press in the center of the control wheel.
-
Page 27: Shutter Button
How to Use Shooting Shooting still images/movies Shooting still images Shoots still images. 1. Set the shooting mode to (Intelligent Auto). 2. Adjust the monitor angle, and hold the camera. 3. Press the shutter button halfway down to focus. When the image is in focus, a beep sounds and the indicator ( ) lights. -
Page 28: Shooting Movies
When the product cannot focus automatically, the focus indicator flashes and the beep does not sound. Either recompose the shot or change the focus setting. Focusing may be difficult in the following situations: It is dark and the subject is distant. The contrast between the subject and the background is poor. -
Page 29: List Of Shooting Modes
How to Use Shooting Selecting a shooting mode List of shooting modes You can select a desired shooting mode. 1. MENU → (Camera Settings) → [Shoot Mode] → desired setting. Available functions (Intelligent Auto): Allows you to shoot still images with the settings adjusted automatically. (Superior Auto): Allows you to shoot still images in higher quality than with Intelligent Auto mode. -
Page 30: Superior Auto
2. Point the camera to the subject. When the camera recognized the scene, the icon for the recognized scene appears on the screen. 3. Adjust the focus and shoot the image. Note The product will not recognize the scene when you shoot images with zoom functions other than optical zoom. -
Page 31: About Scene Recognition
3. Adjust the focus and shoot the image. When the camera shoots multiple images, it automatically chooses and saves the appropriate image. You can also save all the images by setting the [S. Auto Img. Extract.]. Note When the product is used to create composite images, the recording process takes longer than usual. -
Page 32: Intelligent Auto
In [Superior Auto] mode, the product shoots with higher quality than [Intelligent Auto] mode and performs composite shooting as necessary. In [Program Auto] mode, you can shoot after adjusting various functions, such as white balance, ISO, etc. (Intelligent Auto): Select this mode when you want the camera automatically recognize the scene. (Superior Auto): Select this mode to shoot scenes under difficult circumstances, such as when it is dark or the subjects are back-lit. -
Page 33: Sweep Panorama
To cancel program shift, turn the control wheel to return the indication to “P”. Note According to the brightness of the environment, the program shift may not be used. Set the shooting mode to another one than “P” or turn off the power to cancel the setting you made. - Page 34 5. Pan the camera to the end of the guide in the direction of the arrow on the monitor. (B) Guidance bar Note If the entire angle of the panoramic shot is not achieved within the set time, a gray area occurs in the composite image.
-
Page 35: Scene Selection
How to Use Shooting Selecting a shooting mode Scene Selection Allows you to shoot with preset settings according to the scene. 1. MENU → (Camera Settings) → [Shoot Mode]→[Scene Selection] → desired mode. Menu item details Portrait: Blurs background and sharpens the subject. Accentuates the skin tones softly. Sports Action: Shoots a moving subject at a fast shutter speed so that the subject looks as if it is standing still. -
Page 36: Night Scene
Shoots the red of the sunset beautifully. Night Scene: Shoots night scenes without losing the dark atmosphere. Hand-held Twilight: Shoots night scenes with less noise and blur without using a tripod. A burst of shots are taken, and image processing is applied to reduce subject blur, camera-shake, and noise. Night Portrait: Shoots night scene portraits using the flash. -
Page 37: Shutter Priority
In the [Hand-held Twilight] or [Anti Motion Blur] mode, the shutter clicks 4 times and an image is recorded. If you select [Hand-held Twilight] or [Anti Motion Blur] with [RAW] or [RAW & JPEG], the image quality becomes [Fine] temporarily. Reducing blur is less effective even in [Hand-held Twilight] or [Anti Motion Blur] when shooting the following subjects: Subjects with erratic movement. -
Page 38: Aperture Priority
Hint When a faster shutter speed is used, moving subjects, such as a running person, cars, or sea spray appear as if they are stopped. When a slower shutter speed is used, a trailing image of the movement of the subject is captured to create a more natural and dynamic image. - Page 39 You can shoot with the desired exposure setting by adjusting both the shutter speed and aperture. The shutter speed and the aperture value can be changed while recording movies. 1. MENU → (Camera Settings) → [Shoot Mode] → [Manual Exposure]. 2.
- Page 40 4. Press and hold the shutter button for the duration of the shooting. As long as the shutter button is pressed, the shutter remains open. Note Since the shutter speed becomes slow and the camera-shake tends to occur more easily, it is recommended that you use a tripod.
-
Page 41: The Zoom Features Available With This Product
Aperture Priority: Allows you to shoot after adjusting the aperture value manually. Shutter Priority: Allows you to shoot after adjusting the shutter speed manually. Manual Exposure: Allows you to shoot after adjusting the exposure (both the shutter speed and the aperture value) manually. -
Page 42: Zoom Setting
Zoom images in the zoom range of a lens. When a Power zoom lens is mounted, the zoom bar of the optical zoom range is displayed. When a lens other than a Power zoom lens is mounted, the zoom bar of optical zoom range is not displayed. -
Page 43: About Zoom Scale
Even if the zoom range of the optical zoom is exceeded, the product magnifies images within the range in which image quality does not deteriorate significantly. On:Digital Zoom: When the zoom range of the [Clear Image Zoom] is exceeded, the product magnifies images to the largest scale. -
Page 44: Flash Mode
2. Press the shutter button fully down. When you do not use the flash When not using the flash, press it back into the camera body. Note When not using the flash, press it back into the camera body. You cannot use the flash when recording movies. While charging the flash, flashes. -
Page 45: Slow Sync
Slow Sync.: The flash works every time you trigger the shutter. Slow sync shooting allows you to shoot a clear image of both the subject and the background by slowing the shutter speed. Rear Sync.: The flash works right before the exposure is completed every time you trigger the shutter. Rear sync shooting allows you to shoot a natural image of the trail of a moving subject such as a moving car or a walking person. - Page 46 Each time you press the DISP button, the recording information display changes as follows: Graphic Display → Display All Info. → No Disp. Info. → Histogram → Graphic Display Graphic Display Display All Info. No Disp. Info. Histogram Some display modes are not available in the default settings. To change the display modes, press MENU →...
-
Page 47: Graphic Display
Histogram is not displayed during panorama shooting. How to Use Using shooting functions Selecting a screen display mode DISP Button Allows you to set the screen display modes that can be selected using DISP (Display Setting) in shooting mode. 1. MENU → (Custom Settings) →... - Page 48 S: 5.0M 2736×1824 pixels Image size when [ Aspect Ratio] is 16:9 L: 17M 5456×3064 pixels M: 8.4M 3872×2176 pixels S: 4.2M 2736×1536 pixels Note When [ Quality] is set to [RAW] or [RAW & JPEG], the image size for RAW images corresponds to [L].
- Page 49 Digital processing is not performed on this file format. Select this format to process images on a computer for professional purposes. The image size is fixed to the maximum size. The image size is not displayed on the screen. RAW & JPEG: File format: RAW (Records using the RAW compression format.) + JPEG A RAW image and a JPEG image are created at the same time.
-
Page 50: Focus Mode
How to Use Using shooting functions Selecting still image size/image quality Panorama: Direction Sets the direction to pan the camera when shooting panoramic images. 1. MENU → (Camera Settings) → [Panorama: Direction] → desired setting. Menu item details Right (default setting): Pan the camera from the left to the right. -
Page 51: Focus Area
If the subject is too close, the image may show any dust or fingerprints on the lens. Wipe the lens with a soft cloth, etc. Once you change the focus method, the distance of the focus you set up is cleared. When [Focus Mode] is set to [Continuous AF], the beep does not sound when focus is achieved. - Page 52 Shoots images with the focus locked on the desired subject in auto focus mode. 1. MENU → (Camera Settings) → [Focus Mode] → [Single-shot AF]. 2. Place the subject within the AF area and press the shutter button halfway down. The focus is locked.
- Page 53 You can quickly focus on a subject rather than using the manual focus from the beginning. This is convenient in cases such as macro shooting. 1. MENU → (Camera Settings) → [Focus Mode] → [DMF]. 2. Press the shutter button halfway down to focus automatically. 3.
-
Page 54: Focus Magnifier
Focus Magnifier You can check the focus by enlarging the image before shooting. 1. MENU → (Camera Settings) → [Focus Magnifier]. 2. Press on the center of the control wheel to enlarge the image and select the position you want to enlarge using up/down/left/right side of the control wheel. 3. -
Page 55: Peaking Level
How to Use Using shooting functions Adjusting the focus Peaking Level Enhances the outline of in-focus ranges using a specific color in Manual Focus or Direct Manual Focus shooting. This function allows you to confirm the focus easily. 1. MENU → (Custom Settings) →... - Page 56 Enhances outlines in red. Yellow: Enhances outlines in yellow. White (default setting): Enhances outlines in white. How to Use Using shooting functions Adjusting the focus Lock-on AF Set up the tracking function to continue focusing on the subject. 1. MENU → (Camera Settings) →...
- Page 57 Note The [Lock-on AF] function may not operate well in the following situations: The subject is moving too quickly. The subject is too small, or too large. The contrast between the subject and the background is poor. It is dark. The ambient light changes.
-
Page 58: Af Micro Adj
How to Use Using shooting functions Adjusting the focus AF Illuminator (still image) The AF illuminator supplies fill light to focus more easily on a subject in dark surroundings. The red AF illuminator allows the product to focus easily when the shutter button is pressed halfway, until the focus is locked. -
Page 59: Measuring The Exact Distance To The Subject
[±0], or reset the values of all the lenses using [Clear]. Use [AF Micro Adj.] with Sony, Minolta, and Konica-Minolta lenses only. If you use [AF Micro Adj.] with other brands of lenses, the registered value may be affected. Do not perform [AF Micro Adj.] with an unsupported lens. -
Page 60: Exposure Comp
between the product and the subject, refer to the position of the horizontal line. The distance from the lens contact surface to the image sensor is about 18 mm (23/32 in.). The image sensor is the part that converts the light source to a digital signal. Note If the subject is closer than the minimum shooting distance of the lens, the focus cannot be confirmed. -
Page 61: Metering Mode
set to [ISO AUTO]. How to Use Using shooting functions Adjusting the exposure Metering Mode Selects the metering mode that sets which part of the screen to measure for determining the exposure. 1. MENU → (Camera Settings) → [Metering Mode] → desired setting. Menu item details Multi (default setting): Measures light on each area after dividing the total area into multiple areas and determines the... - Page 62 than the subject and lock the exposure of the entire screen. 1. MENU → (Custom Settings) → [Custom Key Settings], then assign the [AEL toggle] to the desired key. 2. Adjust the focus on the spot at which the exposure is adjusted. 3.
- Page 63 Note When [Focus Mode] is set to [Continuous AF] and [ AEL w/ shutter] is [Off] or [Auto], the aperture is fixed at the moment you press the shutter button halfway. If the brightness changes drastically during continuous shooting, release your finger from the shutter button once, then press the shutter button halfway down again.
-
Page 64: Drive Mode
Does not display the guide. On (default setting): Displays the guide. How to Use Using shooting functions Selecting a drive mode (Continuous shooting/Self- timer) Drive Mode You can set the drive mode, such as continuous or self-timer shooting. 1. MENU → (Camera Settings) →... -
Page 65: Spd Priority Cont
Shoots images continuously while you press and hold down the shutter button. (Camera Settings) → [Drive Mode] → [Cont. Shooting]. 1. MENU→ Hint To hold the focus and exposure during burst, change the following settings. The exposure of the first shot is determined when you press the shutter button halfway down. - Page 66 Set [ AEL w/ shutter] to [Auto] or [Off]. How to Use Using shooting functions Selecting a drive mode (Continuous shooting/Self- timer) Self-timer The product shoots an image using the self-timer with a 10-second or 2-second delay. 1. MENU → (Camera Settings) →...
- Page 67 When you press the shutter button, the self-timer lamp flashes, a beep sounds, and the shutter operates after 10 seconds. Self-timer(Cont.): 10 Sec. 5 Img.: Shoots five frames in succession 10 seconds after you press the shutter button. When you press the shutter button, the self-timer lamp flashes, a beep sounds, and the shutter operates after 10 seconds.
-
Page 68: Single Bracket
The last shot is shown on the Auto Review. In [Manual Exposure], the exposure is shifted by adjusting the shutter speed. When [ISO AUTO] is selected in [Manual Exposure] mode, the exposure is changed by adjusting the ISO value. If a setting other than [ISO AUTO] is selected, the exposure is changed by adjusting the shutter speed. -
Page 69: Dro Bracket
Note When [ISO AUTO] is selected in [Manual Exposure] mode, the exposure is changed by adjusting the ISO value. If a setting other than [ISO AUTO] is selected, the exposure is changed by adjusting the shutter speed. When you adjust the exposure, the exposure is shifted based on the compensated value. How to Use Using shooting functions Selecting a drive mode (Continuous shooting/Self-... - Page 70 2. Select the desired mode using the right/left side of the control wheel. Menu item details DRO Bracket: Lo (default setting): Records a series of three images with small changes in the D-Range Optimizer value. DRO Bracket: Hi: Records a series of three images with large changes in the D-Range Optimizer value. Note The last shot is shown on the Auto Review.
- Page 71 Sensitivity to light is expressed by the ISO number (recommended exposure index). The larger the number, the higher the sensitivity. 1. MENU → (Camera Settings) → [ISO] → desired setting. Menu item details ISO AUTO (default setting): Sets the ISO sensitivity automatically. 100 / 125 / 160 / 200 / 250 / 320 / 400 / 500 / 640 / 800 / 1000 / 1250 / 1600 / 2000 / 2500 / 3200 / 4000 / 5000 / 6400 / 8000 / 10000 / 12800 / 16000: You can reduce image blurring in dark locations or with moving subjects by increasing the ISO...
-
Page 72: Auto Hdr
Corrects the brightness automatically. D-Range Optimizer: Lv1 ― D-Range Optimizer: Lv5: Optimizes the gradation of a recorded image for each divided area. Select the optimization level from Lv1 (weak) to Lv5 (strong). Note [DRO/Auto HDR] is fixed to [Off] when the shooting mode is set to [Sweep Panorama], or when [Picture Effect] is used. -
Page 73: White Balance
You cannot start the next shot until the capture process is completed after you shoot. You may not obtain the desired effect depending on the luminance difference of a subject and the shooting conditions. When the flash is used, this function has little effect. When the contrast of the scene is low or when product shake or subject blur occurs, you may not obtain good HDR images. -
Page 74: Custom Setup
Fluor.: Daylight: The color temperature is adjusted for daylight fluorescent lighting. Flash: The color temperature is adjusted for flash light. Underwater Auto: The color temperature is adjusted for underwater shooting. C.Temp./Filter: Adjusts the color tones depending on the light source. Achieves the effect of CC (Color Compensation) filters for photography. -
Page 75: Picture Effect
Note The message [Custom WB Error] indicates that the value is higher than the expected range, when the flash is used on a subject with too bright colors in the frame. If you register this value, the indicator turns yellow on the recording information display. You can shoot at this point, but it is recommended that you set the white balance again to get a more accurate white balance value. -
Page 76: Hdr Painting
Creates an image filled with a soft lighting effect. HDR Painting: Creates the look of a painting, enhancing the colors and details. Rich-tone Mono.: Creates an image in black and white with rich gradation and reproduction of details. Miniature: Creates an image which enhances the subject vividly, with the background defocused considerably. -
Page 77: Creative Style
occurred, you may not be able to obtain good HDR images. If the product detects such a situation, appear on the recorded image to inform you of this situation. If necessary, change the composition or otherwise adjust the settings, be careful of blurring, and shoot again. - Page 78 Contrast: The higher the value selected, the more the difference of light and shadow is accentuated, and the bigger the effect on the image. Saturation: The higher the value selected, the more vivid the color. When a lower value is selected, the color of the image is restrained and subdued.
- Page 79 Record Setting (movie) Selects the image size, frame rate, and image quality for movie recording. The higher the bit- rate, the higher the image quality. 1. MENU → (Camera Settings) → [ Record Setting] → desired setting. When [ File Format] is set to [AVCHD] 60i/50i: Movies are recorded at approximately 60 fields/sec (for 1080 60i-compatible devices) or 50 fields/sec (for 1080 50i-compatible devices), in interlaced mode, with Dolby Digital audio, in AVCHD format.
-
Page 80: Audio Recording
Bit-rate: Average 17 Mbps File Format]: [MP4] 1440×1080 12M (default setting): Records movies of 1440 × 1080. Bit-rate: Average 12 Mbps VGA 3M: Records movies of VGA size. Bit-rate: Average 3 Mbps * 1080 60i (NTSC) compatible device ** 1080 50i (PAL) compatible device Note Movies recorded with the [60i 24M(FX)]/[50i 24M(FX)]/[24p 24M(FX)]/[25p 24M(FX)] setting in [... -
Page 81: Wind Noise Reduct
How to Use Using shooting functions Recording movies Wind Noise Reduct. Sets whether or not to reduce wind noise during movie recording. 1. MENU → (Camera Settings) → [Wind Noise Reduct.] → desired setting. Menu item details Reduces wind noise. Off (default setting): Does not reduce wind noise. -
Page 82: Movie Button
Auto Slow Shut.] does not function in the following situations: When [Movie] in shooting mode is set to [Shutter Priority] or [Manual Exposure]. How to Use Using shooting functions Recording movies MOVIE Button Sets whether or not to activate the MOVIE button. 1. -
Page 83: Function Of The Center Button
Function of the ? button Once you assign a function to the ? (question mark) button, you can perform that function by simply pressing the ? (question mark) button when the shooting information screen is displayed. 1. MENU → (Custom Settings) → [Custom Key Settings] → [ button] →... -
Page 84: Photo Creativity
How to Use Using shooting functions Customizing the shooting functions for convenient Function of the right button Once you assign a function to the right button, you can perform that function by simply pressing the right button when the shooting information screen is displayed. 1. -
Page 85: Bkground Defocus
3. Select the item to be changed using the control wheel. (Bkground Defocus): Adjusts the blurring of the background. (Brightness): Adjusts brightness. (Color): Adjusts color. (Vividness): Adjusts vividness. (Picture Effect): You can select a desired effect and shoot images with the specific texture. 4. -
Page 86: Smile Shutter
Menu item details Off (default setting): Does not use the [Face Detection] function. On (Regist. Faces): Detects the registered face with higher priority using [Face Registration]. Detects a face without giving higher priority to the registered face. Smile Shutter: Automatically detects and shoots a smile. Face Detection frame When the product detects a face, the gray face detection frame appears. - Page 87 When using zoom functions other than the optical zoom Up to eight faces of your subjects can be detected. The product may not detect faces at all or may accidentally detect other objects as faces in some conditions. If the product cannot detect a face, set the Smile Detection Sensitivity. How to Use Using shooting functions Setting the other functions of this product...
-
Page 88: Red Eye Reduction
Up to eight faces can be registered. Shoot the face from the front in a brightly lit place. The face may not be registered correctly if it is obscured by a hat, a mask, sunglasses, etc. How to Use Using shooting functions Setting the other functions of this product Face Registration (Order Exchanging) When multiple faces are registered to be given priority, the face registered first will be given... - Page 89 phenomenon. 1. MENU → (Camera Settings) → [Red Eye Reduction] → desired setting. Menu item details The flash is always fired to reduce the red-eye phenomenon. Off (default setting): Does not use Red Eye Reduction. Note Red Eye Reduction may not produce the desired effects. It depends on individual differences and conditions, such as distance to the subject, or whether the subject looks at the pre- strobe or not.
- Page 90 Auto (default setting): Automatically trims images into an appropriate composition. Note The trimmed image may not be the best possible composition, depending on the shooting conditions. How to Use Using shooting functions Setting the other functions of this product SteadyShot Sets whether or not to use the SteadyShot function.
-
Page 91: Grid Line
Normal (default setting): Activates high ISO noise reduction normally. Low: Activates high ISO noise reduction moderately. Select this to prioritize the timing of shooting. How to Use Using shooting functions Setting the other functions of this product Color Space (still image) The way colors are represented using combinations of numbers or the range of color reproduction is called “color space.”... -
Page 92: Auto Review
1. MENU → (Custom Settings) → [Grid Line] → desired setting. Menu item details Rule of 3rds Grid: Place main subjects close to one of the grid lines that divide the image into thirds for a well- balanced composition. Square Grid: Square grids make it easier to confirm the horizontal level of your composition. -
Page 93: Live View Display
How to Use Using shooting functions Setting the other functions of this product Live View Display Sets whether or not to show images altered with effects of the exposure compensation, white balance, [Creative Style], or [Picture Effect] on the screen. 1. - Page 94 1. MENU → (Custom Settings) → [Release w/o Lens] → desired setting. Menu item details Enable: Releases the shutter when no lens is attached. Select [Enable] when attaching the product to an astronomical telescope, etc. Disable (default setting): Does not release the shutter when a lens is not attached. Note Correct metering cannot be achieved when you use lenses that do not provide a lens contact, such as the lens of an astronomical telescope.
-
Page 95: Shading Comp
Shading Comp. Compensates for the shaded corners of the screen, caused by certain lens characteristics. 1. MENU → (Custom Settings) → [Lens Comp.] → [Shading Comp.] → desired setting. Menu item details Auto (default setting): Compensates for darker corners of the screen automatically. Off: Does not compensate for darker corners of the screen. -
Page 96: Playing Back Images
Compensates for the distortion of the screen, caused by certain lens characteristics. 1. MENU → (Custom Settings) → [Lens Comp.] → [Distortion Comp.] → desired setting. Menu item details Auto: Compensates for distortion of the screen automatically. Off (default setting): Does not compensate for distortion of the screen. -
Page 97: Image Index
Enlarges the image being played back. 1. Display the image you want to enlarge, and slide the W/T (zoom) lever to the T side. If the image is too large, slide the W/T (zoom) lever to the W side to adjust the zoom scale. -
Page 98: Deleting A Displayed Image
Switching the screen display (during playback) Switches the screen display. 1. Press the DISP (Display Setting) button. The screen display switches in the order “Display Info. → Histogram → No Disp. Info. → Display Info.” each time you press the DISP button. The DISP (Display Setting) settings are applied for the Auto Review display. -
Page 99: Playing Back Movies
1. MENU → (Playback) → [Delete] → desired setting. Menu item details Multiple Img.: Deletes the selected images. (1) Select the images to be deleted, then press on the center of the control wheel. The mark is displayed in the check box. To cancel the selection, press again to remove the mark. -
Page 100: Playing Back Panoramic Images
: Displays the next frame : Displays the previous frame : Sound volume adjustment : Closes the operation panel Hint “Forward slow playback,” “Reverse slow playback,” “Displays the next frame” and “Displays the previous frame” are available during pause. How to Use Viewing Viewing panoramic images Playing back panoramic images... -
Page 101: Cancel All
You can specify in advance on the memory card which still images you want to print out later. (print order) icon will appear on the specified images. DPOF refers to “Digital Print Order Format.” 1. MENU → (Playback) → [Specify Printing] → desired setting. Menu item details Multiple Img.: Selects images to order printing. -
Page 102: Display Rotation
AVCHD View: Displays only AVCHD-format movies. How to Use Viewing Using viewing functions Display Rotation Selects the orientation when playing back recorded still images. 1. MENU → (Playback) → [Display Rotation] → desired setting. Menu items details Manual (default setting): The image is displayed according to the orientation information of the image. - Page 103 Press the MENU key to quit the slideshow. You cannot pause the slideshow. Hint You can activate a slideshow only when [View Mode] is set to [Date View] or [Folder View(Still)]. How to Use Viewing Using viewing functions Rotate Rotates a recorded still image counter-clockwise. 1.
-
Page 104: K Still Image Pb
Applies or cancels the protection of the selected multiple images. (1) Select the image to be protected, then press on the center of the control wheel. The mark is displayed in the check box. To cancel the selection, press again to remove the mark. -
Page 105: Viewing Images On An Hd Tv
3. Turn on the TV and switch the input. 4. Turn on this product. 5. MENU → (Playback) → [4K Still Image PB] → [OK]. Note This menu is only available with 4K-compatible TVs. For details, refer to the operating instructions of the TV. - Page 106 Hint This product is compatible with the PhotoTV HD standard. If you connect Sony PhotoTV HD- compatible devices using an HDMI cable (sold separately), the TV is set to the image quality suitable for viewing still images, and a whole new world of photos can be enjoyed in breathtaking high quality.
-
Page 107: Monitor Brightness
3. Turn on the TV and switch the input. 4. Turn on this product. 5. MENU → (Setup) → [CTRL FOR HDMI] → [On]. 6. Press the SYNC MENU button on the TV Remote Control, and select the desired mode. Note Only TVs that support “BRAVIA”... -
Page 108: Volume Settings
Sets the brightness appropriately for shooting outdoors. Note The [Sunny Weather] setting is too bright for shooting indoors. Set [Monitor Brightness] to [Manual] for indoor shooting. How to Use Changing settings Setup menu Volume Settings Adjusts the sound volume. 1. MENU → (Setup) →... - Page 109 Sets whether to use the upload function when using an Eye-Fi card (commercially available). This item appears when an Eye-Fi card is inserted into the product’s memory card slot. 1. MENU → (Setup) → [Upload Settings] → desired setting. 2. Set your Wi-Fi network or destination on the Eye-Fi card. For details, refer to the manual supplied with the Eye-Fi card.
-
Page 110: Tile Menu
How to Use Changing settings Setup menu Tile Menu Selects whether to always display the first screen of the menu when you press the MENU button. 1. MENU → (Setup) → [Tile Menu] → desired setting. Menu item details On (default setting): Always displays the first screen of the menu (Tile Menu). -
Page 111: Demo Mode
1. MENU → (Setup) → [Pwr Save Start Time] → desired setting. Menu item details 30 Min/5 Min/2 Min/1 Min (default setting)/10 Sec Note Turn off the product when you do not use it for a long time. When using a lens with power zoom, the lens is retracted one minute after the product stops operation if [Pwr Save Start Time] is set to [10 Sec]. -
Page 112: Hdmi Resolution
Normally select [Off]. 1. MENU → (Setup) → [Demo Mode] → desired setting. Menu item details The movie playback demonstration starts automatically if the product is not operated for about one minute. Only protected AVCHD movies are played back. Set the view mode to [AVCHD View], and protect the movie file with the oldest recorded date and time. -
Page 113: Usb Connection
How to Use Changing settings Setup menu CTRL FOR HDMI When connecting this product to a “BRAVIA” Sync-compatible TV using an HDMI cable (sold separately), you can operate this product by aiming the TV remote control at the TV. 1. MENU → (Setup) →... -
Page 114: Usb Lun Setting
Establishes an MTP connection between this product, a computer, and other USB devices. Windows 7 or Windows 8 computers are connected in MTP, and their unique functions are enabled for use. With computers running a different OS (Windows Vista, Mac OS X), the AutoPlay Wizard appears, and the still images in the recording folder on this product are imported to the computer. -
Page 115: Daylight Savings
How to Use Changing settings Setup menu Date/Time Setup Sets the date and time again. 1. MENU → (Setup) → [Date/Time Setup] → desired setting. Menu item details Daylight Savings: Selects Daylight Savings [On]/[Off]. Date/Time: Sets the date and time. Date Format: Selects the date and time display format. -
Page 116: File Number
Note Formatting permanently erases all data including even protected images. How to Use Changing settings Setup menu File Number Selects how to assign file numbers to recorded images. 1. MENU → (Setup) → [File Number] → desired setting. Menu item details Series (default setting): Even if you change the recording destination folder or change the memory card, the product continues to assign numbers to files in sequence. -
Page 117: New Folder
How to Use Changing settings Setup menu New Folder Creates a new folder in the memory card. A new folder is created with a folder number one greater than the largest folder number currently used. Images are recorded in the newly created folder. -
Page 118: Recover Image Db
How to Use Changing settings Setup menu Recover Image DB If image files were processed on a computer, problems may occur in the image database file. In such cases, the images on the memory card will not be played back on this product. If these problems happen, repair the file using [Recover Image DB]. -
Page 119: Setting Reset
Displays some of the certification logos for this product. 1. MENU → (Setup) → [Certification Logo]. How to Use Changing settings Setup menu Setting Reset Resets the product to the default settings. Even if you perform [Setting Reset], the recorded images are retained. -
Page 120: Connecting An Android Smartphone To This Product
For details on PlayMemories Mobile, refer to the support page (http://www.sony.net/pmm/). How to Use Using Wi-Fi functions Connecting this product and a Smartphone Connecting an Android smartphone to this product 1. Launch PlayMemories Mobile on your smartphone. - Page 121 1. Select the model name of this product (DIRECT-xxxx: xxxx) on the Wi-Fi setting screen of your iPhone or iPad. 2. Input the password displayed on this product. The iPhone or iPad is connected to the product. 3. Confirm that your iPhone or iPad was connected to the “SSID” shown on this product. 4.
-
Page 122: Smart Remote Embedded
How to Use Using Wi-Fi functions Connecting this product and a Smartphone Calling up an application using [One-touch(NFC)] You can call up a desired application from the application menu of this product by touching an NFC-enabled Android smartphone to the product. If the application you call up has a feature that works with the smartphone, the product and the smartphone will be connected via Wi-Fi. - Page 123 You can use a smartphone as the remote controller for this product, and shoot still images. Still images shot via remote control are sent to the smartphone from the product. The application PlayMemories Mobile must be installed on your smartphone. 1.
- Page 124 smartphone (NFC One-touch remote) You can connect this product and an NFC-enabled Android smartphone with one touch, without performing a complex setup operation. 1. Activate the NFC function of the smartphone. 2. Switch this product to shooting mode. The NFC function is available only when the (N mark) is displayed on the screen.
-
Page 125: Send To Smartphone
Set [Airplane Mode] to [Off]. If this product and the smartphone are connected when the product is in playback mode, the displayed image is sent to the smartphone. How to Use Using Wi-Fi functions Transferring images to a Smartphone Send to Smartphone You can transfer still images to a smartphone and view them. -
Page 126: Touch Sharing
For iPhone/iPad Select PlayMemories Mobile in the setting menu, and change the image size by [Copy Image Size]. Some images may not be displayed on the smartphone depending on the recording format. RAW images are converted to JPEG format when they are sent. You cannot send AVCHD format movies. -
Page 127: Send To Computer
The NFC function is available only when the (N mark) is displayed on the product. Touch the smartphone to the product for 1-2 seconds until PlayMemories Mobile launches. To transfer two or more images, select MENU → (Wireless) → [Send to Smartphone] to select images. -
Page 128: View On Tv
point or wireless broadband router and easily make backup copies using this operation. Before starting this operation, install PlayMemories Home on your computer and register the access point on the product. 1. Start your computer. 2. MENU → (Wireless) → [Send to Computer]. Note Depending on the application settings of your computer, the product will turn off after saving the images to your computer. -
Page 129: Slideshow Settings
Slideshow settings You can change the slideshow settings by pressing the bottom side of the control wheel. Playback Selection: Selects the group of images to be shown. Folder View(Still): Selects from [All] and [All in Folder]. Date View: Selects from [All] and [All in Date Rng.]. Interval: Selects from [Short] and [Long]. -
Page 130: Access Point Set
If your access point has the WPS button, you can register the access point to this product easily by pushing the WPS button. 1. MENU → (Wireless) → [WPS Push]. 2. Press the WPS button on the access point you want to register. Note [WPS Push] works only if the security setting of your access point is set to WPA or WPA2 and your access point supports the WPS button method. - Page 131 When the desired access point is not displayed on the screen: Select [Manual Setting] and set the access point. For the input method, refer to “How to use the keyboard.” If you select [Manual Setting], input the SSID name of the access point, then select the security system.
-
Page 132: Edit Device Name
Switches the next character to a capital or small letter. Enters a space. To cancel the input, select [Cancel]. Other setting items Depending on the status or the setting method of your access point, you may want to set more items. -
Page 133: Reset Network Set
Displays the MAC address of this product. 1. MENU → (Wireless) → [Disp MAC Address]. How to Use Using Wi-Fi functions Changing the settings of Wi-Fi functions SSID/PW Reset This product shares the connection information for [Send to Smartphone] and [Smart Remote Embedded] with a device that has permission to connect. -
Page 134: Opening A Service Account
Recommended computer environment For details on the recommended computer environments for downloading an application and adding functions to the product, use to the following URL: “PlayMemories Camera Apps” website (www.sony.net/pmca) How to Use Adding applications to the product Installing the applications Opening a service account You can open a service account, which is required to download applications. -
Page 135: Launching The Downloaded Application
instructions on the screen. Connect the computer and the product using the micro USB cable (supplied), following the instructions on the screen. How to Use Adding applications to the product Installing the applications Downloading applications directly to the product using the Wi-Fi function You can download applications using the Wi-Fi function without connecting to a computer. -
Page 136: Uninstalling Applications
1. MENU → (Application) → [Application List] → desired application to launch. Hint How to launch the applications faster Assign [Download Appli.] and [Application List] to the custom key. You can launch the applications or display application list only by pressing the custom key during the shooting information screen is displayed. -
Page 137: Playmemories Home
Adding applications to the product Managing the applications Confirming the account information of PlayMemories Camera Apps The account information for the “Sony Entertainment Network” that is registered on the product is displayed. 1. MENU → (Application) → Application List → [Application Management] → [Display Account Information]. -
Page 138: Installing Playmemories Home
DirectX may be installed depending on your computer’s system environment. Hint For details on PlayMemories Home, refer to the Help of PlayMemories Home or the PlayMemories Home support page (http://www.sony.co.jp/pmh-se/) (English only). -
Page 139: Software For Mac Computers
Using the software Software for Mac computers For details on software for Mac computers, access the following URL: http://www.sony.co.jp/imsoft/Mac/ Wireless Auto Import “Wireless Auto Import” is required if you are using a Mac computer and want to import images to the computer using Wi-Fi function. -
Page 140: Remote Camera Control
Finder → [Applications] → [Image Data Converter] → [Image Data Converter Ver.4], and select [Help] from the menu bar → [Image Data Converter Guide]. For details on operation, you can also refer to the “Image Data Converter” support page (English only). http://www.sony.co.jp/ids-se/ How to Use Viewing on computers Using the software “Remote Camera Control”... -
Page 141: Connecting The Product To A Computer
Download and install the software by accessing the following URL: Windows: http://www.sony.co.jp/imsoft/Win/ Mac: http://www.sony.co.jp/imsoft/Mac/ How to Use Viewing on computers Using the software Accessing “Remote Camera Control Help Guide” Windows: [Start] → [All Programs] → [Remote Camera Control] → [Help] → [Remote Camera Control Ver.3]. -
Page 142: Importing Images To The Computer
Do not edit or otherwise process AVCHD movie files/folders from the connected computer. Movie files may be damaged or become unplayable. Do not delete or copy AVCHD movies on the memory card from the computer. Sony is not held liable for consequences resulting from such operations via the computer. -
Page 143: Disc Type
(HD) disc is created. You can play a high definition image quality (HD) disc on AVCHD format playback devices, such as a Sony Blu-ray Disc player and a PlayStation®3. You cannot play the disc on ordinary DVD players. -
Page 144: Selecting The Disc Creation Method
(Only for Windows) Creates a disc with high-definition image quality (HD) Writable movie format: PS, FX, FH Player: Blu-ray Disc playback devices (Sony Blu-ray Disc player, PlayStation®3, etc.) Creates a disc with high-definition image quality (HD) (AVCHD recording disc) Writable movie format: PS*, FX*, FH Player: AVCHD format playback devices (Sony Blu-ray Disc player, PlayStation®3, etc.) -
Page 145: Creating A Disc With A Device Other Than A Computer
Multi-session recordings cannot be made. To create Blu-ray Discs using PlayMemories Home, be sure to install the dedicated add-on software. For details, see the following URL: http://support.d-imaging.sony.co.jp/BDUW/ To install, your computer must be connected to the Internet. For detailed operations, see the... - Page 146 How to Use Precautions/This product Precautions Precautions Backing up memory cards Data may be corrupted in the following cases. Be sure to back up the data for protection. When the memory card is removed or the product is turned off during a read or write operation.
- Page 147 product. If moisture condensation occurs, turn off the product and wait about an hour for the moisture to evaporate. Note that if you attempt to shoot with moisture remaining inside the lens, you will be unable to record clear images. On the functions available with the product This manual describes the functions of 1080 60i-compatible devices and 1080 50i-compatible devices.
-
Page 148: Flash
These points are normal in the manufacturing process and do not affect the images in any way. Exposing the monitor or lens to direct sunlight for long periods may cause a malfunction. Exercise caution when placing the product near a window or outdoors. Do not press against the monitor. -
Page 149: Notes On The Battery Pack
power off. How to Use Precautions/This product Precautions Notes on the battery pack Charging the battery pack Charge the battery pack (supplied) before using the product for the first time. The charged battery pack will discharge little by little even if you do not use it. Charge the battery pack each time before you use the product so that you do not miss any opportunities to shoot images. - Page 150 We recommend preparing spare battery packs and taking trial shots before taking the actual shots. Do not expose the battery pack to water. The battery pack is not water-resistant. Do not leave the battery pack in extremely hot places, such as in a car or under direct sunlight.
-
Page 151: Charging The Battery Pack
The supplied AC Adaptor is dedicated to this product. Do not connect with other electronic devices. Doing so may cause a malfunction. Make sure to use a genuine Sony AC Adaptor. If the product's Charge lamp flashes while charging, remove the battery pack being charged, and then insert the same battery pack firmly back into the product. - Page 152 GB have been tested and proven to operate with this product. When recording movies, the following memory cards are recommended: (Mark2) (“Memory Stick PRO Duo” media (Mark2)) (“Memory Stick XC-HG Duo” media (Mark2)) (“Memory Stick PRO-HG Duo” media) Class 4 SD card or faster Note When you use a memory card with this product for the first time, it is recommended that you format the card using the product for stable performance of the memory card before...
-
Page 153: Lens
“Memory Stick” media The types of “Memory Stick” media that can be used with the product are as follows. However, proper operation cannot be guaranteed for all “Memory Stick” media functions. “Memory Stick PRO Duo” media: *1*2*3 “Memory Stick PRO-HG Duo” media: *1*2 “Memory Stick XC-HG Duo”... -
Page 154: Mount
Clean the flash surface before use. The heat of the flash emission may cause dirt on the flash surface to start smoking or burning. Wipe the flash surface with a soft cloth to remove dirt or dust, etc. Cleaning the camera body Do not touch the parts of the product inside the lens mount, such as a lens signal contact. -
Page 155: Image Sensor
A blower is not supplied with this product. Use a commercially available blower for camera cleaning. Do not use a spray-type blower as doing so may scatter water droplets inside the product body. Do not insert the tip of the blower into the cavity beyond the lens mount area, in order to make sure that the tip of the blower does not touch the image sensor. -
Page 156: Recordable Time Of Movies
16GB: 520 images 32GB: 1050 images 64GB: 2100 images 2GB: 89 images 4GB: 175 images 8GB: 355 images 16GB: 720 images 32GB: 1400 images 64GB: 2850 images When the [ Aspect Ratio] is set to other than [3:2], you can record more pictures than shown above. - Page 157 2GB: 10 m 4GB: 30 m 8GB: 1 h 16GB: 2 h 32GB: 4 h 5 m 64GB: 8 h 15 m 24p 24M(FX) 25p 24M(FX) 2GB: 10 m 4GB: 20 m 8GB: 40 m 16GB: 1 h 30 m 32GB: 3 h 64GB: 6 h 24p 17M(FH)
-
Page 158: Plug Adaptor
When you record a fast-moving subject, the image is clearer but the recordable time is shorter because more memory is required for recording. The recordable time also varies depending on the shooting conditions, the subject or the image quality/size settings. How to Use Precautions/This product Using this product abroad... -
Page 159: Mount Adaptor
For details, refer to the operating instructions supplied with the Mount Adaptor. Note You may not be able to use the Mount Adaptor with certain lenses. Consult your Sony dealer or local authorized Sony service facility on compatible lenses. You cannot use the AF illuminator when using an A-mount lens. - Page 160 (Approximately two to seven seconds slower (for shooting based on the Sony measurement conditions). This may vary depending on conditions such as subject and brightness during shooting.) When using a Mount Adaptor, the Auto Focus does not work in movie mode.
- Page 161 When an A-mount lens is attached, the autofocus speed will be slower than when an E-mount lens is attached. (Approximately two to seven seconds slower (for shooting based on the Sony measurement conditions). This may vary depending on conditions such as subject and brightness during shooting.).
-
Page 162: Avchd Format
(Single-shot AF/Continuous AF) Available focus area Wide: The product automatically selects a focus area from among 15 areas. Center: The product uses the focus area located in the center area exclusively. Flexible Spot: You can select a focus area from 15 areas using the control wheel. How to Use Precautions/This product Other information... - Page 163 “LICENSE” folder. How to Use Precautions/This product Trademarks Trademarks The following marks are registered trademarks or trademarks of Sony Corporation. , Memory Stick, , Memory Stick PRO, , Memory Stick Duo, Memory Stick PRO Duo, , Memory Stick PRO-HG Duo,...
- Page 164 AVCHD and AVCHD logotype are trademarks of Panasonic Corporation and Sony Corporation. Dolby and the double-D symbol are trademarks of Dolby Laboratories. HDMI, the HDMI logo and High-Definition Multimedia Interface are trademarks or registered trademarks of HDMI Licensing LLC. Microsoft, Windows, DirectX and Windows Vista are either registered trademarks or trademarks of Microsoft Corporation in the United States and/or other countries.
-
Page 165: You Cannot Insert The Battery Pack Into The Product
3. Initialize the settings. 4. Consult your dealer or local authorized service facility. Additional information on this product and answers to frequently asked questions can be found at our Customer Support Website. http://www.sony.net/ Troubleshooting Troubleshooting Battery pack and power You cannot insert the battery pack into the product. - Page 166 Depending on the product and battery pack temperature, the product may turn off automatically to protect itself. In this case, a message is displayed on the product screen before the product turns off. Troubleshooting Troubleshooting Battery pack and power The remaining battery level indicator shows an incorrect level.
-
Page 167: The Battery Pack Is Not Charged
The battery pack is not charged. When the battery pack is not charged (the charge lamp does not light) even if you follow the proper charging procedure, remove the battery pack and re-insert the same battery pack securely, or disconnect and reconnect the USB cable. Troubleshooting Troubleshooting Shooting still images/movies... -
Page 168: The Flash Does Not Work
or manual focus mode. Troubleshooting Troubleshooting Shooting still images/movies The flash does not work. Raise the flash. You cannot use a flash in the following situations: [Anti Motion Blur], [Night Scene] or [Hand-held Twilight] in Scene Selection is selected. During Sweep Panorama shooting. During movie recording. -
Page 169: The Image Colors Are Not Correct
Set the correct date and time. The area selected using [Area Setting] differs from the actual area. Select the actual area. Troubleshooting Troubleshooting Shooting still images/movies The aperture value and/or shutter speed flashes. The subject is too bright or too dark to shoot using the current aperture value and/or shutter speed settings. -
Page 170: Dots Appear And Remain On The Screen
Shoot the subject at a distance closer than the flash range using the flash. Light the room and shoot the subject. Troubleshooting Troubleshooting Shooting still images/movies Dots appear and remain on the screen. This is not a malfunction. These dots are not recorded. Troubleshooting Troubleshooting Shooting still images/movies... -
Page 171: The Image Is Blurred
Comp.]. Troubleshooting Troubleshooting Shooting still images/movies The image is blurred. Activate the SteadyShot function by pressing the shutter button halfway down and then shoot images. The picture was taken in a dark location without the flash, resulting in product-shake. The use of a tripod or the flash is recommended. -
Page 172: The Date And Time Are Not Displayed
Make sure that the memory card is fully inserted into the product. The folder/file name has been changed on your computer. When an image file has been processed by a computer or when the image file was recorded using a model other than this product, playback on this product is not guaranteed. The product is in USB mode. -
Page 173: You Cannot Send Movies To A Smartphone
You cannot place DPOF marks on RAW images. Troubleshooting Troubleshooting Wi-Fi You cannot find the wireless access point to be connected. Wireless access points may not be displayed on the product due to signal conditions. Place the product closer to the wireless access point. Wireless access points may not be displayed on the product depending on the access point settings. - Page 174 Troubleshooting Troubleshooting Wi-Fi [Smart Remote Embedded] or [Send to Smartphone] is canceled halfway. When the remaining battery level is low, [Smart Remote Embedded] or [Send to Smartphone] may be canceled halfway. Charge the battery pack and try again. Troubleshooting Troubleshooting Wi-Fi The shooting screen for [Smart Remote Embedded] is not displayed smoothly./The connection between this product...
-
Page 175: You Cannot Import Images
Troubleshooting Troubleshooting Computers The computer does not recognize this product. Set [USB Connection] to [Mass Storage]. Use the micro USB cable (supplied) to connect the devices. Disconnect the USB cable, and connect it again firmly. Disconnect all equipment other than this product, the keyboard and the mouse from the USB terminals of your computer. -
Page 176: Formatted The Memory Card By Mistake
inserted into this product and view them on this product. Troubleshooting Troubleshooting Memory cards Formatted the memory card by mistake. All the data on the memory card is deleted by formatting. You cannot restore the data. Troubleshooting Troubleshooting Printing You cannot print images. RAW images cannot be printed. -
Page 177: You Cannot Print Images With The Date
When you print images at a shop, ask the shop whether they can print the images without cutting off both edges. Troubleshooting Troubleshooting Printing You cannot print images with the date. If you want to print images with the date, use [Print Setting] under [Specify Printing]. You can print images with the date superimposed if the printer or the software can recognize Exif information. -
Page 178: The Product Does Not Work Properly
If an AC-PW20 AC Adaptor (sold separately) is used, disconnect the power cord. Connect the power cord and turn on the product again. If the product repeats the same error often or still does not work after trying these solutions, consult your Sony dealer or local authorized Sony service facility. -
Page 179: Warning Messages
Troubleshooting Messages Messages Warning messages Set Area/Date/Time. Set the area, date and time. If you have not used the product for a long time, charge the internal rechargeable backup battery. Unable to use memory card. Format? The memory card was formatted on a computer and the file format was modified. Select [Enter], and then format the memory card. - Page 180 Turn the product off and on again. If this icon does not disappear, consult your Sony dealer or local authorized Sony service facility. The retractable lens with power zoom is retracted. Turn off the product and eject the battery pack, then reinsert the battery pack.
- Page 181 difficulty handling Situations this product has difficulty handling The product cannot take full advantage of some features under certain circumstances. When shooting under the following conditions, either recompose the shot or change the shooting mode, then shoot the images again. Low light conditions Sweep Panorama Lock-on AF...
Need help?
Do you have a question about the ILCE-5000 and is the answer not in the manual?
Questions and answers