Table of Contents
Advertisement
Advertisement
Table of Contents

Subscribe to Our Youtube Channel
Related Manuals for TC-Helicon VoiceTone Correct


Summary of Contents for TC-Helicon VoiceTone Correct
- Page 1 ENGLISH VERSION...
-
Page 3: Table Of Contents
Standard Setup ..............page 17 Main/Monitor ..............page 18 FAQ & Troubleshooting .......page 33 Sound Engineer Setup ..........page 19 Advanced Setup .............page 2 Specifications ..........page 35 Manual revision 1.0 – SW – V 1.0 Prod. No: E60507211 TC Helicon Vocal Technologies Ltd. English Version info@tc-helicon.com... -
Page 4: Introduction
Welcome to VoiceTone Correct the most stringent "audiophile" requirements. Many audience members, band members and sound We at TC-Helicon believe that VoiceTone Correct will engineers may be surprised to see a singer taking finally make you truly satisfied with your live vocal sound. - Page 5 Introduction About TC-Helicon Canada that spend every waking moment of their working lives listening, talking, singing, and interacting At TC-Helicon we truly believe that the voice is the with singers and those who have passion for the singing world's most beautiful instrument. We don't mean to voice.
-
Page 6: Quick Start
Quick Start Step 1: Step 2: Connect your microphone to a mic cable Connect the mic cable to the Mic Input on Correct. NOTE: Make sure Correct is not powered. - Page 7 Quick Start Step 3: Step 4: Connect a mic cable to the Main Output of Correct. Connect the mic cable from Correct to a mic input on your sound system. NOTE: At this point it would be best to turn the gain and/or volume on your sound system's mic input to off.
- Page 8 Quick Start Step 5: Step 6: Set all EQ and/or compression on your sound system Turn the Input Knob fully left and set the last four knobs mic channel to off, or unity (middle position - no boost on Correct to their default position as indicated. or cut).
- Page 9 Quick Start Step 7: Step 8: Connect Correct’s power adapter to main power and While singing through your microphone, turn the Input to the Power Input on Correct. Knob to the right until the Input Light turns green, sometimes orange on louder parts, but never red.
- Page 10 Quick Start Step 9: Step 10: Raise the gain and/or volume on your sound system mic You're ready to hear Correct on your voice. input channel and master volume until you hear a good a. Turn the Live Engineer effects on or off with the level from your vocals.
- Page 11 Quick Start Step 11: Here are some quick tips on understanding what Correct will do for your live vocal sound. Live Engineer (LE effects): On Regardless of your microphone, mic technique or whether you are a Bass or Soprano, the LE effects will optimize the balance of low and high frequencies and smooth the loud and soft parts of your singing to make you sound your best.
-
Page 12: Using Two Voicetone Pedals
Using Two VoiceTone Pedals You can use two VoiceTone pedals in series. For Step 3: example, a great combination is to have VoiceTone Connect the second VoiceTone pedal, in this case Create Correct feeding a VoiceTone Create pedal. Generally, to the PA. Correct should be the first device in the chain. -
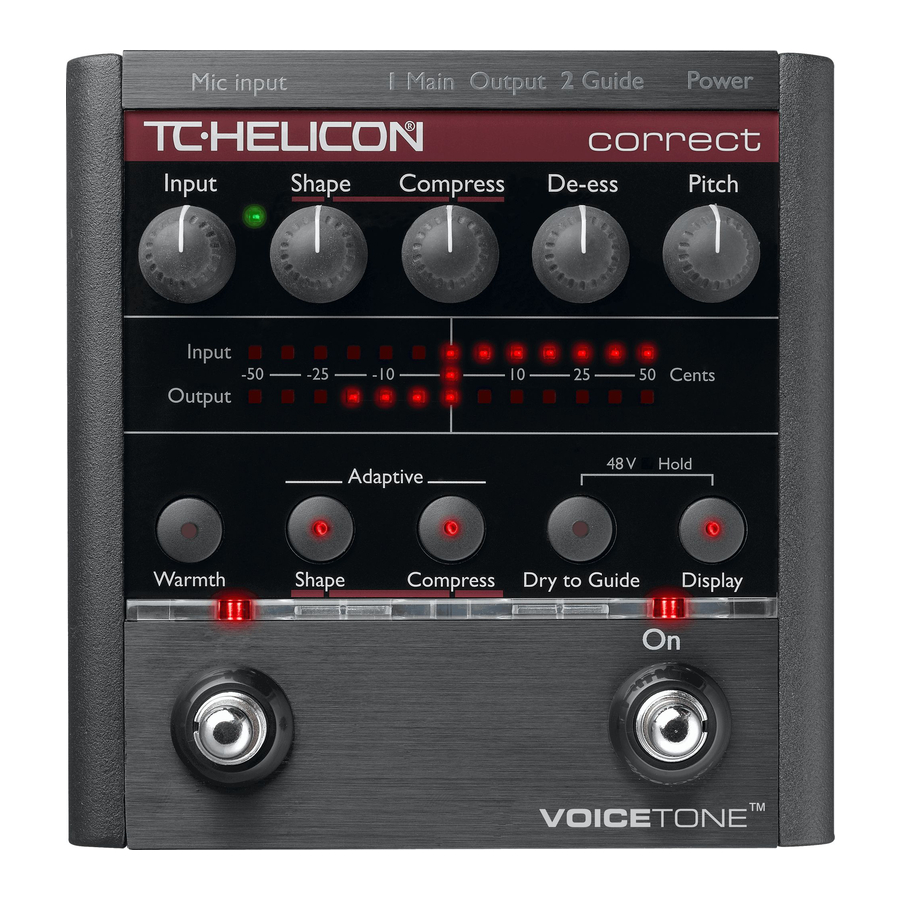
Page 13: Front & Back Panel Descriptions
Front & Back Panel Descriptions 1. Guide Output Alternate output with full time pitch correction when it’s only desired in stage monitors. Diagram below shows possible routings 2. Main Output Typical output for use with sound system. Diagram below shows possible routings. POWER 3. - Page 14 Front & Back Panel Descriptions Input Knob Controls the microphone pre-amplifier gain. Correct can accept dynamic or condenser microphones. 2. Input Light Indicates the input level of the microphone. Flashing green, sometimes orange is good. Flashing red is clipping, which is not good. 3.
- Page 15 Front & Back Panel Descriptions 6. Pitch Knob 11. Dry to Guide Button Controls the amount of pitch correction effect on the When enabled, the Guide Output will feature your pitch voice. 12 o’clock is default position, full left is off. corrected voice in parallel with your natural voice.
-
Page 16: Setup Configurations
Setup Configurations Phantom Power Before using any setup configuration, determine the type of microphone you are using: Dynamic microphone: phantom power off. Condenser microphone: phantom power on. Enabling Phantom Power: 1. Confirm that your sound system master level is off. 2. -
Page 17: Standard Setup
Setup Configurations Standard Setup The standard setup for VoiceTone Correct couldn't be easier - put Correct between your microphone and your mic input on your sound system. In this configuration only Main Output is used. Connecting and Enabling for Standard Setup: 1. -
Page 18: Main/Monitor
Setup Configurations Main / Monitor Setup While Correct’s pitch correction is so transparent that your audience may never know you're using it, we suspect there'll always be purists who'd rather the audience hear only their raw and naked voice. Using the Guide Output, you can route your pitch corrected voice to your monitor mix, while your audience hears no correction effect from the Main Output. -
Page 19: Sound Engineer Setup
Setup Configurations Sound Engineer Setup assumption that the overall sound system has a flat response with no dynamics processing. If you are in a situation where a live sound engineer mixes your vocal sound, there are some details you In the vast majority of cases, it won’t be necessary to should provide to them when working with VoiceTone add any more EQ or compression. - Page 20 Setup Configurations Advanced Settings: Tuning Reference change to correct it. When the two bars match, press the Left Footswitch. Correct will enter regular mode If you know that the instruments you are singing with are with the new tuning reference. not tuned to A440, or you hear that your corrected voice doesn’t sound in tune, then you need to change NOTE:...
- Page 21 Setup Configurations Advanced Settings: Manual Shape For the next 10 seconds, the pitch display meter will change to indicate manual EQ settings. Only the left- The Shape EQ can either run in adaptive or manual most four dots of the input and output display lines are mode.
-
Page 22: Using & Understanding The Effect
Using & Understanding the Effects With all knobs set to 12 o'clock, Correct sounds great in almost every situation. We've gone through a lot of effort to see that it does. The following sections in the manual will allow you to get the best from Correct, as well as learn more about what it takes to get a good vocal sound. -
Page 23: Using The Effects
Using the Effects: Adaptive EQ Adaptive Shape EQ mic, have really good mic technique, and have an extremely well balanced timbre in your voice, you'll Set up the product as follows: barely perceive any change to the sound at all. For the rest of us, you should hear a significant improvement in Shape Control: 12 o’clock both intelligibility and quality. -
Page 24: Adaptive Compression
Using the Effects: Adaptive Compression Adaptive Compression If you're having trouble hearing the effect, try singing with an extreme dynamic range (very loud than Set up the product as follows: suddenly very soft) with the compress knob set at full. Try toggling between LE effects on and off with the Right Shape Control: 12 o’clock Footswitch. -
Page 25: De-Ess
Using the Effects: De-ess De-ess Knob to add more sizzle to your voice with out making the ess sounds excessively loud. Set up the product as follows: Shape Control: 12 o’clock Compress Control: 12 o’clock De-Ess: 12 o’clock Pitch: off Warmth Button: off Adaptive Shape Button: on Adaptive Compress Button: on... -
Page 26: Pitch Correction
Using the Effects: Pitch Correction Pitch Correction to sing with, keep the control between 10 and 2 o'clock. When singing along with your corrected pitch, try to Set up the product as follows: sing the pitch that you hear. This will result in you self- correcting your pitch. -
Page 27: Understanding Live Engineer Effects
Understanding Live Engineer Effects What's the problem? 2. EQ If not treated properly, live vocals often sound: 1. Dynamics - Muddy or woofy Vocals in music define the melody and the message in a - Tinny song. In professional studio recordings, vocals are always - Lacking sizzle, presence or air. - Page 28 Understanding Live Engineer Effects The best we can do to optimize clarity and intelligibility 3. Excessive Sibilance while reducing muddiness is to intelligently limit low frequencies without making them sound thin. This is only a problem with some singers. It is when "ess", "ch", "sh"...
- Page 29 Understanding Live Engineer Effects Current ways of solving the problems 2. EQ Previously, the only real way to fix EQ problems on vocals is to have either out-board graphic or parametric 1. Dynamics EQs, or a high end mixing console with multi-band Fixing the problem of a vocal bouncing in and out of a parametric EQ, and a good engineer who really knows mix is usually done with something called compression.
- Page 30 Understanding Live Engineer Effects How Correct Solves the problems characterize the input vocal and apply the appropriate EQ to approximately match the studio recordings. With Correct, a male vocalist with a deep voice and a very 1. Dynamics close mic technique will get the EQ needed, while a Correct features a new kind of compression;...
-
Page 31: Understanding Pitch Correction
Sometimes, when pitch correction is only applied at the mains, and a singer is singing flat, he VoiceTone Correct can help. or she will keep singing flat. When using the Guide The reasons for singing out of pitch are both a function Output on Correct, the singer immediately hears as they of physiology and psychology. - Page 32 Understand Pitch Correction singers will often use Correct when they are having trouble. When pitch correction is only applied in the mains, what often happens is that if the singer goes really off pitch, the pitch corrector corrects to the wrong pitch. This means that the pitch is actually more out than if it hadn't been corrected in the first place.
-
Page 33: Faq & Troubleshooting
FAQ & Troubleshooting FAQ & Troubleshooting: more of each effect by turning the Shape, Compress and De-ess Knobs further to the right. 1. I'm not getting any sound out of Correct b. If you’re using the the Guide Output check to make sure the Pitch Knob is at 12 o’clock. - Page 34 FAQ & Troubleshooting 4. My corrected voice sounds out of tune a. It’s possible that the tuning reference of the instruments you are singing with are not tuned to the default setting of A440. Please see the Setup Configuration, Advance Settings: Tuning Reference section to change the tuning reference.
-
Page 35: Specifications
Specifications Analog Inputs EMC & Safety Connectors Balanced XLR, Input Impedance 1kOhm Complies with EN 55103-1 and EN 55103-2 FCC part 15, Class B, CISPR 22, Mic Input Sensitivity @ 0dBFS -44dBu to +2dBu Class B Mic Input Sensitivity @ 12dB headroom -56dBu to -10dBu EIN -128dBu @ max.
Need help?
Do you have a question about the VoiceTone Correct and is the answer not in the manual?
Questions and answers