Honda 08A06-3E1-300 Operating Instructions Manual
6 disc in-dash cd changer
Hide thumbs
Also See for 08A06-3E1-300:
- Installation instructions manual (13 pages) ,
- Installation instructions manual (9 pages) ,
- Installation instructions manual (9 pages)
Table of Contents
Advertisement
Quick Links
Advertisement
Table of Contents

Related Manuals for Honda 08A06-3E1-300


Summary of Contents for Honda 08A06-3E1-300
- Page 1 OPERATING INSTRUCTIONS 6 DISC IN-DASH CD CHANGER P/N: 08A06-3E1-300...
-
Page 2: Table Of Contents
Contents Precautions ... 3 Proper Care of Your CDs ... 5 CD Changer Operation ... 7 Installation ... 13 In Case of Difficulty ... 14 Switching the address setting ... 17 Please write the serial number (on the bottom of the unit) in the space below. Keep this booklet as a record of your purchase to help identify the unit if it's stolen. -
Page 3: Precautions
Information to User Alteration or modifications carried out without appropriate autho- rization may invalidate the user’s right to operate the equipment. CAUTION: USE OF CONTROL OR ADJUSTMENT OR PERFORMANCE OF PROCEDURES OTHER THAN THOSE SPECIFIED HEREIN MAY RESULT IN HAZARDOUS RADIATION EXPOSURE. - Page 4 Precautions CAUTIONS DURING PLAYBACK Playing a CD while driving on a very bumpy road may result in skips. This will not scratch the CD or damage the player. The noise level on CDs is much lower than on analog-type records or tapes. Therefore, before playing a CD, turn the volume down all the way then adjust the level by gradually turning the vol- ume up once playback begins.
-
Page 5: Proper Handling
Proper Care of Your CDs PROPER HANDLING Handle CDs as shown. Do not drop CDs. Hold CDs so you will not leave fingerprints on the surface. If the surface is scratched, it may cause the pickup to skip signal tracks. Do not put tape, paper, or gummed labels on the CD. - Page 6 Proper Care of Your CDs Center Hole Bumps Outside (Bumps) NEVER ATTEMPT THE FOLLOWING Do not grip or pull out the CD while it is being pulled back into the player by the automatic reloading mechanism. CAUTION FOR NEW CDS When a new CD is inserted into the player, the CD may fail to play after initial loading.
-
Page 7: Cd Changer Operation
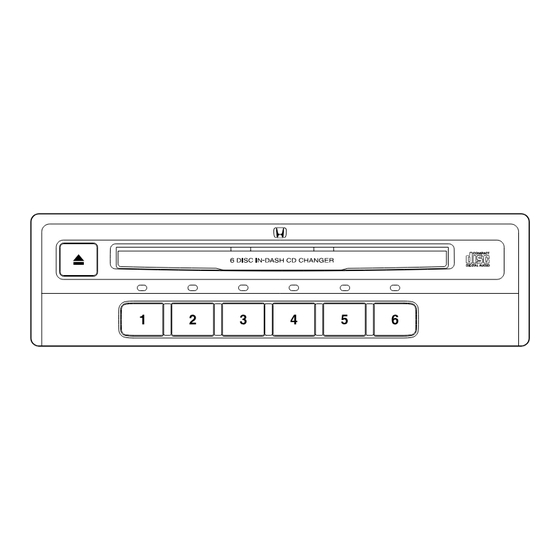
EXPLANATION OF THE HAND MARKS Press momentarily. LOADING THE CD (1 of 2) CD Loading Slot Disc Number Buttons Disc status LED CD Changer Operation Press and hold for at least 3 seconds. 3SEC The CD Changer operates with the same controls used for the audio system. For operation, refer to the audio system section of the Owner’s Manual for your radio. - Page 8 CD Changer Operation LOADING THE CD (con’t) CD Loading Slot Disc status LED You can load a CD under a selected disc number. The system will automatically playback when the CD is loaded. Notes: • Repeat steps ¡ and ™ to load CDs in other disc numbers. •...
-
Page 9: Selecting A Cd
SELECTING A CD Disc Number Buttons Disc status LED CD Changer Operation Flashes orange Press one of the buttons (1–6) to select a desired CD for play. • Green LED indicates CDs are stored and orange LED indicates currently selected •... - Page 10 CD Changer Operation EJECTING THE CD (1 of 2) Eject Button Disc Number Buttons Disc status LED Lights green ≠ Flashes orange ≠ Lights orange Press one of the buttons (1–6) to select the disc number for the CD you want to eject. Then press eject button to eject the •...
- Page 11 EJECTING THE CD (con’t) Eject Button Disc Number Buttons Disc status LED CD Changer Operation Notes: • Pull the CD out. The LED flashes green and orange, and this product switches to the CD loading standby mode. • You can eject CDs even if the ignition is switched OFF. In this case, you cannot per- form step ¡...
- Page 12 CD Changer Operation This product is equipped with illumination ON-OFF Function. ILLUMINATION The illumination turns ON-OFF each time you press and hold the eject Eject Button button for 3 seconds or longer. 3SEC...
-
Page 13: Installation
SHIPPING BRACKET Shipping bracket Caution card A bracket have been attached to the top of the Changer for protection during shipment. A bracket is attached to this unit to protect it from shocks during shipment. Be sure to remove this bracket before installing this unit in your car (before connecting). -
Page 14: In Case Of Difficulty
In Case of Difficulty If you encounter a problem, please review the items in the guide. This guide will help you isolate the problem if the unit is INITIAL POWER UP SYMPTOM No Function Functions OK but no sound. Inoperative (no output) Sound skips from vibration. -
Page 15: Error Mode
ERROR MODE INDICATION E - 0 1 - - - H E - E E - - - CAUSE CD Changer malfunction. High temperature. Miss connection or disconnection of CD Changer. No CD in the CD Changer. In Case of Difficulty SOLUTION Press the eject button, press one of the disc number buttons (1–6), switch... - Page 16 In Case of Difficulty SYMPTOMS I Skips. I Stuck on one track. I CD ejects during play. CAUSE Scratches. 1 Fingerprint marks or dust. (Unclean sur- face.) 2 SOLUTION • Handle CD by edge only. • Keep CD clean by using a cleaning kit specifically designed for CDs.
-
Page 17: Switching The Address Setting
To enable identification of CD Changers when two or more are connected, assign each one with a different Disc Number Buttons Switching the address setting address setting. Notes: • When two or more CD Changers are connected, correct operation is not possible if the same address setting is used for more than one unit. -
Page 18: Specifications
Dimensions (chassis size) ... 180 (W) × 50 (H) × 165 (D) mm Weight ... 1.6 kg CAmerican Honda Motor Co., Inc. 2002 All Rights Reserved. SPECIFICATIONS CD player System ... Compact disc audio system Usable discs ... Compact disc Signal format ... Sampling frequency: 44.1 kHz ...Number of quantization bits: 16;linear...
Need help?
Do you have a question about the 08A06-3E1-300 and is the answer not in the manual?
Questions and answers