Socket 7 Series User Manual
Bluetooth cordless hand scanner 1d laser barcode scanners
Hide thumbs
Also See for 7 Series:
- User manual (130 pages) ,
- Quick start manual (9 pages) ,
- Upgrade program (2 pages)

Related Manuals for Socket 7 Series


Summary of Contents for Socket 7 Series
- Page 1 Socket ® Bluetooth Cordless Hand Scanner (CHS) Series 7 1D Laser Barcode Scanners (v3) User’s Guide...
-
Page 2: Copyright Notice
Reproduction of the contents of this manual without the permission of Socket Mobile is expressly prohibited. Please be aware that the products described in this manual may change without notice. Feel free to contact Socket Mobile at: Socket Mobile, Inc. -
Page 3: Table Of Contents
ABLE OF ONTENTS COPYRIGHT NOTICE 1 | INTRODUCTION 2 | SCANNER SETUP 3 | SETUP FOR WINDOWS PC 4 | SETUP FOR WINDOWS MOBILE 5 | SETUP FOR APPLE 6 | SETUP FOR ANDROID 7 | SETUP FOR BLACKBERRY APPENDICES A SPECIFICATIONS B SAFETY AND USAGE TIPS C BARCODE LABEL SPECIFICATIONS... -
Page 4: Introduction
1 | I NTRODUCTION Thank you for purchasing the Socket Bluetooth Cordless Hand Scanner (CHS) Series 7. The CHS is a portable handheld barcode scanner that is small, light, comfortable to use, and enables you to scan data from 1D barcodes into a wide variety of computers, smartphones and PDAs. - Page 5 *Compatibility verified for latest models at time of testing. Other models or Bluetooth driver versions not tested. **Other devices not tested with SocketScan 10 and may require the previous software version. *** For instructions, please contact Socket technical support at http://support.socketmobile.com Other devices running Symbian OS 9.1 or later may be supported.
- Page 6 Port Profile) and HID (Human Interface Device), each with its advantages and disadvantages. By default, the CHS is set to HID mode for Keyboard devices, which requires no software installation. For better performance, Socket highly recommends that you use SPP (especially if scanning 2D barcodes).
- Page 7 For 7E/7M: SKU# SMS03 For 7P/7NRx: SKU# SMS01 For more information on Socket accessories for the CHS, please visit: http://ww1.socketmobile.com/products/bluetooth-scanners/accessories-bt.aspx For more information on accessories from Taylor Made Cases, Viziflex Seels or other Socket partners, please visit: http://ww1.socketmobile.com/products/star/custom-cases.aspx CHAPTER 1: INTRODUCTION...
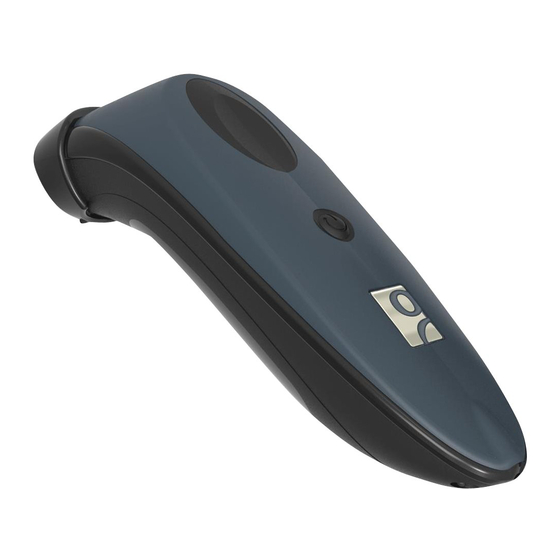
- Page 8 ARDWARE EATURES Product Diagram Trigger button Status indicator LED Power button Stylus tip Protective rubber bumper (7P and 7NRx only) Power connector (For 7P or 7NRx, remove rubber cap to access) Touch Screen Stylus The bottom of the CHS features a stylus tip that you can use on Pocket PC and other resistive device touch screens.
- Page 9 The CHS 7NRx is made with antimicrobial materials to provide an extra layer of protection to the device against the multiplication and spread of potentially harmful bacteria and microbes. Socket recommends using Sani-Cloth® Plus brand disposable cloth wipes as the standard disinfectant wipe for the CHS 7NRx. For more information about the wipes, please visit: http://www.pdipdi.com...
- Page 10 Simultaneous Use of CHS and Socket Plug-in Device You can use the CHS and a Socket plug-in barcode / RFID / magnetic stripe reader simultaneously on the same host computer or device. However, you will need to run two different versions of SocketScan concurrently.
-
Page 11: Scanner Setup
2 | S CANNER ETUP NSTALLING ATTERIES AND TTACHING THE ETHER 1. Use a coin or screwdriver to unlock and remove the battery cover. Turn the lock underneath the scanner to a horizontal position to unlock. 2. Remove the battery cover. The Bluetooth Device Address (BDA) is printed on a label inside the battery compartment. - Page 12 4. If desired, attach the tether to the battery cover. Wrap the string loop around the inside part of the lock. 5. Replace the battery cover and turn the lock to a vertical position to secure it. WARNING: Do not install the batteries incorrectly. Damage may result. WARNING: Charge ONLY NiMH batteries in the CHS.
- Page 13 Power Jack Connector 4 mm barrel Optional Charging Hard • Charging cradle • Car charger • Mobile Power Pack (available in Americas/Asia Pac) • AC or DC adapter from Socket SoMo 650 Purchase online at: http://ww1.socketmobile.com/products/bluetooth- scanners/accessories-bt.aspx CHAPTER 2: SCANNER SETUP...
-
Page 14: Setup For Windows Pc
Toshiba Bluetooth stacks. Due to the many device manufacturer and Bluetooth stack combinations, the CHS might not work correctly in SPP mode on some PCs. Socket highly recommends that you use the CHS in SPP mode. To learn more, read our white paper: http://www.socketmobile.com/pdf/techbrief/socketscan-10-... - Page 15 4. Use you computer’s Bluetooth software to connect to the CHS (see instructions on next page). In the device search, the CHS will appear as Socket CHS [xxxxxx]. The characters in brackets are the last six characters of the CHS Bluetooth Device Address (BDA), which is labeled inside the battery compartment.
- Page 16 In the pop-up menu, (Windows click Add a Device. A device search will begin. 2. In the device list, select Socket CHS [xxxxxx] and click Next. 3. If prompted, select Enter the device’s pairing code. Enter the passkey 0000 (four zeroes). Click Next.
- Page 17 3. In the connection wizard, select Express Mode. Click Next. A device search will begin. 4. In the device list, select Socket CHS [xxxxxx]. Click Next. 5. If a passkey is requested, enter 0000 (four zeroes). Click OK. 6. Follow the remaining screens to complete the wizard.
- Page 18 To scan barcodes: 1. Open your application. Place the cursor where you want to enter data. 2. Press the trigger button to scan a barcode. Make sure the laser beam extends across the entire width of the barcode. For example, try scanning the following barcode: IMPORTANT! Print out this page to scan the barcode.
- Page 19 SING THE To install SocketScan 10 software and configure a COM port: 1. Access the SocketScan 10 installation file, either from the Socket website or the SocketScan 10 installation CD. • To install from a web download (recommended to ensure the latest software) −...
- Page 20 • For Firefox, click Save File. In the Downloads list, double-click on the SocketScan10Setup.exe file. In the warning screen, click OK. • For Chrome, click Save at the bottom of the screen. Click on the link for the SocketScan10Setup.exe file. In the Security Warning screen, click Run. 3.
- Page 21 Click Ports if a suitable incoming Bluetooth COM port is not listed and you would like to add one. Also, if SocketScan Settings lists multiple COM ports, you can determine if any are already paired to a Socket Bluetooth barcode scanner and/or which one is incoming.
- Page 22 You only need to pair the CHS with you computer the first time you try to connect. The following instructions are based on Socket EZ Pair, a feature of SocketScan 10 software. For instructions on how to connect by generating and scanning a special...
- Page 23 (Windows 7) click Add a Device. A device search will begin. 2. In the device list, select Socket CHS [xxxxxx] and click Next. 3. If prompted, select Enter the device’s pairing code. Enter the passkey 0000 (four zeroes). Click Next.
- Page 24 Use Bluetooth v2.1 or later for best results. Do not use Quick Connect | Bluetooth serial devices when the CHS is in HID mode. In the device search, the CHS will appear as Socket CHS [xxxxxx]. The characters in brackets are the last six characters of the CHS Bluetooth Device Address (BDA), which is labeled inside the battery compartment.
- Page 25 6. Click on the SocketScan 10 icon in the task tray. In the pop-up menu, click Socket EZ Pair. If the icon does not appear, open SocketScan 10 by clicking on the desktop shortcut. 7. Select 1D Scanner. 8. Select your CHS in the list and click Pair.
- Page 26 The CHS will beep once when it has connected and is ready to scan barcodes. The LED will also blink blue once every 3 seconds. A CHS icon will also appear in the task tray. 11. Click X to close Socket EZ Pair. The CHS Registration screen will appear. If desired, register your CHS.
- Page 27 To scan barcodes: 1. Make sure the CHS is connected to the computer, indicated by the CHS icon in the task tray. 2. Open your application. Place the cursor where you want to enter data. 3. Press the trigger button to scan a barcode. Make sure the laser beam extends across the entire width of the barcode.
- Page 28 1. Click on the CHS icon in the task tray. In the pop-up menu, click Socket CHS. 2. A screen will appear displaying basic information about your CHS, including the Bluetooth friendly name, scanner type, firmware, and battery level.
- Page 29 SocketScan 10 Settings 1. Click on the SocketScan 10 icon in the task tray. In the pop-up menu, click SocketScan 10 Settings… 2. The SocketScan 10 Settings screen will appear, reporting the manufacturer of the computer’s Bluetooth stack and the computer’s Bluetooth Device Address. •...
-
Page 30: Scanner Settings
Scanner Settings You can access Scanner Settings only when the CHS is connected to your computer. 1. Click on the CHS icon in the task tray. In the pop-up menu, click Scanner settings… 2. The Scanner Settings screen will appear with an empty field. For the Microsoft and Broadcom (Widcomm) Bluetooth stacks, the CHS will also beep twice when in disconnects from SocketScan 10. - Page 31 5. The General properties screen will appear, reporting the Bluetooth friendly name, Bluetooth Device Address, Type of device, firmware version, and battery level. If desired, you can change the Bluetooth friendly name of the CHS. 6. Click on the Configuration tab. If desired, modify how the CHS confirms a good scan and/or select a suffix to automatically add to each instance of scanned data.
- Page 32 7. Click on the Symbologies tab. If desired, modify which symbologies the CHS will be able to read. Enabling all possible symbologies may slow the decoding process. The RSS symbology is now known as GS1 DataBar. If you want to read UPC-A symbols, disable the GS1 DataBar option so that GS1 DataBar symbols don’t get mistakenly decoded.
- Page 33 About 1. Click on the CHS icon in the task tray. In the pop-up menu, click About… 2. The About screen will appear, reporting information about your version of SocketScan 10. 3. After viewing the information, click OK to exit. CHAPTER 3: SETUP FOR WINDOWS PC...
-
Page 34: Setup For Windows Mobile
• Broad character set, including non- Instructions printable ASCII, international on page keyboards • More efficient data communications for barcodes containing lots of data Socket highly recommends that you use the CHS in SPP mode. To learn more, read our white paper: http://www.socketmobile.com/pdf/techbrief/socketscan-10- sdk_white-paper.pdf. - Page 35 1: U HID M PTION SING THE To pair the CHS with your SoMo: You only need to pair the CHS with your SoMo the first time you try to connect. 1. Power on the CHS. Press and hold the small power button until the LED turns blue and the CHS beeps twice (low-high).
- Page 36 4. Use the wireless manager to enable Bluetooth. 5. Tap Start | Settings | Connections tab | Bluetooth. 6. In the Bluetooth utility, tap Add new device… Alternatively, tap Add at the bottom of the screen.
- Page 37 7. In the device list, tap on Socket CHS. In the device search, the CHS will appear as Socket CHS [xxxxxx]. The characters in brackets are the last six characters of the CHS Bluetooth Device Address (BDA), which is labeled inside the battery compartment.
- Page 38 To scan barcodes: 1. Open your application. Place the cursor where you want to enter data. 2. Press the trigger button to scan a barcode. Make sure the laser beam extends across the entire width of the barcode. For example, try scanning the following barcode: IMPORTANT! Print out this page to scan the barcode.
- Page 39 2. Make sure Bluetooth is enabled on your PDA. 3. Access the SocketScan 10 installation file, either from the Socket website or the SocketScan 10 installation CD. • To install from a web download (recommended to ensure the latest software): −...
- Page 40 4. Download and run the installation file. • For Internet Explorer, in the Security Warning screens, click Run. • For Firefox, click Save File. In the Downloads list, double-click on the SocketScan10Setup.exe file. In the Open Executable File? screen, click OK. •...
- Page 41 6. Your computer will instruct you to check your mobile device for additional installation steps. Click OK. In the last screen of the wizard, click Finish. 7. Choose where you would like to install the software. Tap Install. 8. If prompted to soft reset, tap Yes. 9.
- Page 42 | SocketScan Settings. The Bluetooth stack is reported at the top of the screen. In the device search, the CHS will appear as Socket CHS [xxxxxx]. The characters in brackets are the last six characters of the CHS Bluetooth Device Address (BDA), which is labeled inside the battery compartment.
- Page 43 These 2. Follow the screens to pair with the CHS. In the list of found devices, tap instructions Socket CHS. If prompted for a passkey, enter 0000 (four zeroes). are based on the 3. In the Bluetooth Settings screen, tap on the COM Ports tab. Tap New SoMo 650.
- Page 44 9. Tap 1D Scanner. 10. Select Socket CHS and tap Pair. 11. After pairing is complete, tap ok. Close Socket EZ Pair. 12. The CHS registration screen will appear. If desired, register your scanner.
- Page 45 Socket EZ Pair. Tap 1D Scanner. 4. The PDA will automatically try to search for and pair with the CHS. In the list of found devices, tap Socket CHS. Select Socket Serial Port. 5. After pairing is complete, tap ok. Close Socket EZ Pair.
- Page 46 Mobile 6.5 4. Your phone will automatically try to search for and pair with the CHS. • In the device list, select Socket CHS. Select Socket Serial Port. • Select an available COM port for SocketScan 10 to use. 5. After pairing is complete, tap ok. Close Socket EZ Pair.
- Page 47 To scan barcodes: 1. Make sure the CHS is connected to the SoMo, indicated by the CHS icon in the task tray. 2. Open your application. Place the cursor where you want to enter data. 3. Press the trigger button to scan a barcode. Make sure the laser beam extends across the entire width of the barcode.
- Page 48 Settings. 1. Tap on the CHS icon in the task tray. In the pop-up menu, tap Socket CHS 2. A screen will appear displaying basic information about your CHS, including the Bluetooth friendly name, scanner type, firmware, and battery level.
- Page 49 SocketScan 10 Settings You can only view Basic Scanner Properties when the CHS is connected to your SoMo. 1. Tap on the CHS icon in the task tray. In the pop-up menu, tap SocketScan settings… 2. A screen will appear displaying the SocketScan software settings, as well as the Bluetooth stack manufacturer and Bluetooth Device Address.
- Page 50 Scanner Settings You can access Scanner Settings only when the CHS is connected to your PDA. 1. Tap on the CHS icon in the task tray. In the pop-up menu, tap Scanner settings… 2. The CHS will disconnect from SocketScan 10, indicated by two beeps. The Scanner Settings screen will appear with an empty field.
- Page 51 5. Tap on the Configuration tab. If desired, modify how the CHS confirms a good scan and/or select a data suffix to automatically add to each instance of scanned data. For laser versions of the CHS, on the 7P and7NRx support vibrate mode. 6.
- Page 52 8. If desired, tap Test to test scanning a barcode. 9. Scan a barcode that you would like information about. SocketScan will report the barcode’s symbology, data length, and data, in your choice of ASCII text or Hexadecimal format. 10. After testing a barcode, tap ok. Click ok to exit Scanner Settings.
- Page 53 About 1. Tap on the SocketScan 10 icon in the task tray. In the pop-up menu, tap About… 2. The About screen will appear, reporting information about your version of SocketScan 10. 3. After viewing the information, click ok to exit. CHAPTER 4: SETUP FOR WINDOWS MOBILE...
-
Page 54: Setup For Apple
ETUP FOR PPLE This chapter explains how to install and use laser models of the Socket Bluetooth Cordless Hand Scanner (CHS) Series 7 (v3) with Apple devices and computers running iOS or Mac OS. Compatible mobile devices include: • iPod touch (4 generation) •... - Page 55 To pair the CHS with your Apple device: You only need to pair the CHS with your Apple device the first time you try to connect. By default, the CHS is in HID mode for Keyboard devices. If you changed the CHS to a different mode, refer to the Command Barcodes to change it to the correct...
- Page 56 3. In the device list, tap on Socket CHS (initially it will appear as Keyboard). Tap Pair. In the device list, the CHS will appear as Keyboard, then as Socket CHS [xxxxxx]. The characters in brackets are the last six characters of the CHS Bluetooth Device Address (BDA), which is labeled inside the battery compartment.
- Page 57 To scan barcodes: 1. Open your application. Place the cursor where you want to enter data. 2. Press the trigger button to scan a barcode. Make sure the laser beam extends across the entire width of the barcode. For example, try scanning the following barcode: IMPORTANT! Print out this page to scan the barcode.
- Page 58 Automatic Reconnection: After you power on the CHS, it will automatically try to connect to the last device it paired and connected to. Make sure your device is in range with Bluetooth enabled. If the CHS is connected to your device and gets disconnected, it will try to reconnect for a few minutes.
-
Page 59: Setup For Android
• More efficient data communications for barcodes containing lots of data • Compatible with Android 2.1 to 3.x Socket highly recommends that you use the CHS in SPP mode. To learn more, read our white paper: http://www.socketmobile.com/pdf/techbrief/socketscan-10- sdk_white-paper.pdf. The instructions in this chapter are based on the Motorola Droid Pro running Android 2.2. - Page 60 1: U HID M PTION SING THE Compatible with Android 2.2 - 3.x devices that support HID for Peripheral devices. To pair the CHS with your Android device: You only need to pair the CHS with your Android device the first time you try to connect.
- Page 61 4. Make sure your device has Bluetooth on and is Discoverable. Touch Scan for devices. 5. In the list of found devices, select Socket CHS. The CHS will beep once when it has connected and is ready to scan barcodes.
- Page 62 To scan barcodes: 1. Open your application. Place the cursor where you want to enter data. 2. Press the trigger button to scan a barcode. Make sure the laser beam extends across the entire width of the barcode. For example, try scanning the following barcode: IMPORTANT! Print out this page to scan the barcode.
- Page 63 • Open Android Market and search for SocketScan. • In a web browser, open the Amazon Appstore for Android page: http://www.amazon.com/Socket-Mobile-SocketScan-CHS-Scanners/dp/B004X84VZA If prompted, allow the application to access Bluetooth connections and settings and/or modify USB storage / SD card contents.
- Page 64 You only need to pair the CHS with your Android device the first time you try to connect. The following instructions are based on Socket EZ Pair, a feature of SocketScan 10 software. For instructions on how to connect by generating and scanning a special...
- Page 65 4. In the list of found devices, touch Socket CHS. The CHS will appear in the Bluetooth search as Socket CHS [xxxxxx], where the characters in brackets are the last 6 characters of the Bluetooth Device Address (BDA), which is printed on a label inside the battery compartment.
- Page 66 7. Open SocketScan 10 . For some devices, the icon will appear on the Home screen. For other devices, touch Menu to access the Apps or Programs list. 8. A message will tell you to enable SocketScan 10 as your input method. Touch Back 9.
- Page 67 10. Make sure SocketScan 10 is selected. Touch Back 11. Touch Menu | Socket EZ Pair. 12. Touch 1D Scanner. CHAPTER 6: SETUP FOR ANDROID...
- Page 68 If desired, swipe it down to open the software and register the scanner. After you have connected, you can touch Socket CHS in the main screen of SocketScan 10 to view basic scanner properties.
- Page 69 To scan barcodes: 1. Open your application. Place the cursor where you want to enter data. 2. Press the trigger button to scan a barcode. Make sure the laser beam extends across the entire width of the barcode. For example, try scanning the following barcode: IMPORTANT! Print out this page to scan the barcode.
- Page 70 (high-low)), open Scanner Settings and reconnect (indicated by a beep). Basic Scanner Information 1. In the main screen of Scanner Settings, touch Socket CHS. 2. The screen will report the Bluetooth friendly name, scanner type, firmware version, and battery level of your CHS. To change the Bluetooth friendly name,...
- Page 71 Configuration 1. In the main screen of Scanner Settings, touch Menu | Configuration. 2. In the Configuration screen, enter any settings, as desired: • Good scan beep: Select to have the CHS beep to indicate that data was successfully decoded and transmitted to the Android device. •...
- Page 72 Symbology 1. In the main screen of Scanner Settings, touch Menu | Symbology. 2. In the Symbology screen, enable or disable any symbologies (barcode types), as desired. Enabling all possible symbologies will make the decode process slightly longer. The RSS symbology is now known as GS1 DataBar. If you would like to read UPC-A symbols, be sure to disable GS1 DataBar so that GS1 DataBar symbols don’t get mistakenly decoded.
- Page 73 Test The Test feature reports the properties of a scanned barcode. 1. In the main screen of Scanner Settings, touch Menu | Test. 2. In the Scan Window screen, select if you would like scanned data to appear as ASCII or hexadecimal format.
-
Page 74: Setup For Blackberry
7 | S ETUP FOR LACK ERRY This chapter explains how to install and use the Bluetooth Cordless Hand Scanner (CHS) with a RIM BlackBerry® Bold™ 9700 smartphone running BlackBerry OS 5.0.0.714 or later. Before you begin the instructions in this chapter, make sure you have installed the batteries (and tether, if desired), and charged the scanner, as described in Chapter... - Page 75 To install the software: You can install SocketScan 10 software either by downloading directly to the smartphone or synchronizing to a host PC with BlackBerry Desktop Manager. Downloading to the Smartphone 1. Make sure your smartphone is connected to the Internet. 2.
- Page 76 • Chrome: Click Save at the bottom of the screen. Click on the link for SocketScan10Setup.exe. In the Security Warning screen, click Run. 4. The installation wizard will launch. Follow it to install software for BlackBerry. 5. After software installation, click Finish. 6.
- Page 77 You only need to pair the CHS with your phone the first time you try to connect. The following instructions are based on Socket EZ Pair, a feature of SocketScan 10 software. For instructions on how to connect by generating and scanning a special...
- Page 78 6. In the list of found devices, click Socket CHS. The CHS will appear in the Bluetooth search as Socket CHS [xxxxxx], where the characters in brackets are the last 6 characters of the Bluetooth Device Address (BDA), which is printed on a label inside the battery compartment.
- Page 79 13. After they pair and connect, the CHS will beep once to confirm the connection, then beep twice to signal a disconnection. Click Menu | Close to close Socket EZ Pair. 14. SocketScan 10 will try to connect to the CHS. If asked to confirm, click Yes.
- Page 80 To scan barcodes: 1. Open your application. Place the cursor where you want to enter data. 2. Press the trigger button to scan a barcode. Make sure the laser beam extends across the entire width of the barcode. For example, try scanning the following barcode: IMPORTANT! Print out this page to scan the barcode.
- Page 81 1. In SocketScan 10, click Menu | Scanner Settings. The CHS will disconnect from SocketScan 10 and beep twice. 2. If prompted to connect to Socket CHS, click Yes. The CHS will connect to Scanner Settings and beep once. CHAPTER 7: SETUP FOR BLACKBERRY...
- Page 82 General Scanner Info You can view Scanner info only when the CHS is connected to your smartphone. 1. In SocketScan Settings, you can access Scanner Info by clicking on the main screen. 2. Besides viewing general scanner properties, you can also place the cursor in the Scanner Name field to change the Bluetooth friendly name of your CHS.
- Page 83 Scanner Settings - Symbologies 1. In Scanner Settings, click Menu | Symbologies. Press the space bar to enable or disable symbologies. Enabling all possible symbologies will make the decode process slightly longer. The RSS symbology is now known as GS1 DataBar. If you would like to read UPC-A symbols, be sure to disable GS1 DataBar so that GS1 DataBar symbols don’t get mistakenly decoded.
-
Page 84: A Specifications
PPENDIX PECIFICATIONS The following specifications are for laser versions of the CHS v3. Physical Characteristics: Dimensions 7E/7M: 129(l) x 40.1(h) x 34.6(w) mm (5.07(l) x 1.57(h) x 1.36(w) inches) 7P/7NRx: 132(l) x 45.1(h) x 37.9(w) mm (5.20(l) x 1.77(h) x 1.49(w) inches) Total Weight 7E/7M: 51 g (1.8 oz) - Page 85 Barcode Symbology Support: Bookland EAN (ISBN / EAN-13), Chinese 2 of 5, Codabar (including support , Code 11, Code 128, Code 39, Trioptic Code for ISBT 128 bit concatenation) 39, Code 39 Full ASCII, Code 93, Discrete 2 of 5, GS1 DataBar (RSS), GS1-128 (UCC-128 / EAN-128), Interleaved 2 of 5 (ITF-14), MSI, UPC / EAN / JAN, VIN Scanner Performance:...
- Page 86 • The presence of soft, absorbent materials such as paper, fiberglass insulation, foam material in office cubical walls, carpeting and, to a lesser extent, even sheetrock and wood construction materials. • Human bodies or containers of liquid positioned between the host and the CHS. •...
-
Page 87: B Safety And Usage Tips
• Changes or modifications of this product, not expressly approved by Socket, may void the user’s authority to operate the equipment. Antenna Care Do not place a metallic shield around the Socket Bluetooth Cordless Hand Scanner since it will reduce the radio transmission efficiency. Efficient Use For optimum performance, please make sure that there is no metal surrounding your Socket Bluetooth Cordless Hand Scanner. - Page 88 (RF) magnetic fields in the frequency range 2400 to 2483.5 MHz. The output power of the radio transmitter is 15.75 mW. The Socket Bluetooth Cordless Hand Scanner is designed to be in compliance with the RF exposure limits set by national authorities and international health agencies when installed or used separately from other antennas or radio transmitters.
-
Page 89: C Barcode Label Specifications
PPENDIX ARCODE ABEL PECIFICATIONS All barcode symbols/labels should satisfy the appropriate AIM Uniform Symbology Specification. Background Substrate: The barcode symbol should be printed on material (media) that is reflective and has a matte (not glossy) finish. A background diffuse reflectance of at least 70% to 80% is desirable for optimum contrast. -
Page 90: D Decode Zone
PPENDIX ECODE The decode zones for laser models of the Socket Bluetooth Cordless Hand Scanner (v3) are shown below. The minimum element width (“X Dimension” or barcode “size”) is the width in thousandths of an inch (mils) of the narrowest element (bar or space) in the symbol. The figures shown are the typical scanning distances (depths of field) for selected barcode sizes. - Page 91 CHS 7M/7P APPENDIX D: DECODE ZONE...
-
Page 92: E Command Barcodes
OMMAND ARCODES Scan command barcode(s) to quickly configure the Socket Bluetooth Cordless Hand Scanner v3 (1D laser versions). By default, the CHS is in HID mode as a Keyboard device. IMPORTANT! Make sure the CHS is not connected to computer / device before scanning a command barcode! IMPORTANT! Print out the page to scan the barcodes. - Page 93 Factory Defaults Factory Reset Configures the CHS to revert all settings to factory defaults. The CHS will power off after scanning this barcode. Data Editing – Prefix / Suffix Data As Is (default) Configures the CHS to return only the decoded data (i.e., prefix and suffix are not sent).
- Page 94 IMPORTANT! Print out the page to scan the barcodes. Do not scan them onscreen. Good Scan Indicators Scan to Enable Description Scan to Disable Beep after Decoding Data (default) Vibrate after Decoding Data (default) VIN (Vehicle Identification Number) Prefix Removal Scan to Enable Description Scan to Disable...
- Page 95 UPC/EAN Enable/Disable UPC-A Parameter # 0x01 To enable or disable UPC-A, scan the appropriate bar code below. *Enable UPC-A (0x01) Disable UPC-A (0x00) Enable/Disable UPC-E Parameter # 0x02 To enable or disable UPC-E, scan the appropriate bar code below. *Enable UPC-E (0x01) Disable UPC-E (0x00)
- Page 96 Enable/Disable UPC-E1 Parameter # 0x0C To enable or disable UPC-E1, scan the appropriate bar code below. UPC-E1 is not a UCC (Uniform C ode Council) approved symbology. Enable UPC-E1 (0x01) *Disable UPC-E1 (0x00) Enable/Disable EAN-8 Parameter # 0x04 To enable or disable EAN-8, scan the appropriate bar code below. *Enable EAN-8 (0x01) Disable EAN-8...
- Page 97 Enable/Disable EAN-13 Parameter # 0x03 To enable or disable EAN-13, scan the appropriate bar code below. *Enable EAN-13 (0x01) Disable EAN-13 (0x00) Enable/Disable Bookland EAN Parameter # 0x53 To enable or disable EAN Bookland, scan the appropriate bar code below. Enable Bookland EAN (0x01) *Disable Bookland EAN...
-
Page 98: Code 128
Code 128 Enable/Disable Code 128 Parameter # 0x08 To enable or disable Code 128, scan the appropriate bar code below. *Enable Code 128 (0x01) Disable Code 128 (0x00) Enable/Disable UCC/EAN-128 Parameter # 0x0E To enable or disable UCC/EAN-128, scan the appropriate bar code below. *Enable UCC/EAN-128 (0x01) Disable UCC/EAN-128... - Page 99 Enable/Disable ISBT 128 Parameter # 0x54 To enable or disable ISBT 128, scan the appropriate bar code below. *Enable ISBT 128 (0x01) Disable ISBT 128 (0x00) Lengths for Code 128 No length setting is required for Code 128.
- Page 100 Code 39 Enable/Disable Code 39 Parameter # 0x00 To enable or disable Code 39, scan the appropriate bar code below. *Enable Code 39 (0x01) Disable Code 39 (0x00) Enable/Disable Trioptic Code 39 Parameter # 0x0D Trioptic Code 39 is a variant of Code 39 used in marking computer tape cartridges. To enable or disable Trioptic Code 39, scan the appropriate bar code below.
- Page 101 Enable/Disable Code 39 Full ASCII Parameter # 0x11 Code 39 Full ASCII is a variant of Code 39 which pairs characters to encode the full ASCII character set. Enable Code 39 Full ASCII (0x00) Disable Code 39 Full ASCII (0x00) Trioptic Code 39 and Code 39 Full ASCII cannot be enabled simultaneously.
- Page 102 Code 93 Enable/Disable Code 93 Parameter # 0x09 To enable or disable Code 93, scan the appropriate bar code below. Enable Code 93 (0x01) *Disable Code 93 (0x00)
- Page 103 Code 11 Enable/Disable Code 11 Parameter # 0x0A To enable or disable Code 11, scan the appropriate bar code below. Enable Code 11 (0x01) Disable Code 11 (0x00)
-
Page 104: Interleaved 2 Of 5
Interleaved 2 of 5 Enable/Disable Interleaved 2 of 5 Parameter # 0x06 To enable or disable Interleaved 2 of 5, scan the appropriate bar code below. *Enable Interleaved 2 of 5 (0x01) Disable Interleaved 2 of 5 (0x00) -
Page 105: Discrete 2 Of
Discrete 2 of 5 Enable/Disable Discrete 2 of 5 Parameter # 0x05 To enable or disable Discrete 2 of 5, scan the appropriate bar code below. Enable Discrete 2 of 5 (0x01) *Disable Discrete 2 of 5 (0x00) -
Page 106: Chinese 2 Of
Chinese 2 of 5 Enable/Disable Chinese 2 of 5 Parameter # 0xF0 0x98 To enable or disable Chinese 2 of 5, scan the appropriate bar code below. Enable Chinese 2 of 5 (0x01) Disable Chinese 2 of 5 (0x00) - Page 107 Codabar Enable/Disable Codabar Parameter # 0x07 To enable or disable Codabar, scan the appropriate bar code below. Enable Codabar (0x01) *Disable Codabar (0x00)
- Page 108 Enable/Disable MSI Parameter # 0x0B To enable or disable MSI, scan the appropriate bar code below. Enable MSI (0x01) *Disable MSI (0x00)
- Page 109 Enable/Disable RSS-14 Parameter # 0xF0 0x52 To enable or disable RSS-14, scan the appropriate bar code below. Enable RSS-14 (0x01) *Disable RSS-14 (0x00) Enable/Disable RSS-Limited Parameter # 0xF0 0x53 To enable or disable RSS-Limited, scan the appropriate bar code below. Enable RSS-Limited (0x01) *Disable RSS-Limited...
- Page 110 Enable/Disable RSS-Expanded Parameter # 0xF0 0x54 To enable or disable RSS-Expanded, scan the appropriate bar code below. Enable RSS-Expanded (0x01) *Disable RSS-Expanded (0x00)
- Page 111 Command Barcodes for CHS in SPP Mode These command barcodes can be scanned with a CHS in SPP mode. Many will not work for a CHS in HID mode. If you do not know which mode your CHS is in, you can scan the command barcode for SPP Mode to make sure the CHS is in SPP mode.
- Page 112 IMPORTANT! Print out the page to scan the barcodes. Do not scan them onscreen. Factory Defaults Factory Reset Configures the CHS to revert all settings to factory defaults. The CHS will power off scanning this barcode. Data Editing – Prefix / Suffix, VIN Data As Is (default) Configures the CHS to return only the decoded...
- Page 113 IMPORTANT! Print out the page to scan the barcodes. Do not scan them onscreen. VIN Prefix Removal Scan to Enable Description Scan to Disable Return only the last 17 characters of a Code 39 barcode. Good Scan Indicators Scan to Enable Description Scan to Disable Beep after...
-
Page 114: F Special Button Sequences
PPENDIX PECIAL UTTON EQUENCES Restoring Factory Defaults To restore the CHS to its factory defaults, do the following: 1. Power on the CHS. 2. While pressing the trigger button, briefly press and release the power button. 3. After about 15 seconds, the CHS will beep. Release the trigger button. If you performed the actions correctly, the CHS will beep 5 times and power off. -
Page 115: G Cab Installation
If you have the Socket SoMo 650 running Windows Mobile 6 Service Pack 8 or later, SocketScan 10 is pre-loaded on the device. To install, in the Today screen, tap Getting Started and choose the option to install SocketScan 10. -
Page 116: H Connection Barcodes
PPENDIX ONNECTION ARCODES If the CHS supports SPP mode for your OS, you can generate and scan special barcodes to quickly connect to a computer or device. 1. Power on the CHS. Make sure the CHS is in SPP mode. If needed, use the appropriate Command Barcode to change the scanner mode. -
Page 117: I Troubleshooting
PPENDIX ROUBLESHOOTING – A ENERAL ROUBLESHOOTING SYMPTOM When I try to scan, I aim the laser beam at the barcode, but no data appears on my screen, and the laser eventually turns off. POSSIBLE REASON SOLUTION The scanner is too close or too far from the Practice scanning at different distances and angles so you get barcode, or at an incorrect angle accustomed to the most effective position. - Page 118 SYMPTOM When I scan a barcode, odd behaviors occur, such as different applications seem to be invoked in my system, and/or special characters are displayed in the application unexpectedly. POSSIBLE REASON SOLUTION In HID mode, the CHS will only properly Use the SocketScan 10 SDK to develop a custom read printable ASCII characters.
- Page 119 Make sure Bluetooth is enabled. Open SocketScan 10 launching SocketScan 10. Settings by navigating to: Your local drive:\Program Files\Socket Mobile\SocketScan 10\Bin\Windows. Click on SocketScan Settings.exe. Make sure Use keyboard wedge and Show keyboard wedge icon in task tray are selected and click OK.
- Page 120 This is a known issue with the Microsoft Make sure the CHS is discoverable and connectable. In the Bluetooth stack in Windows Vista when Microsoft Bluetooth software, select the Socket CHS in the using a USB Bluetooth adapter. Bluetooth Bluetooth device list (its status may be “Already settings can sometimes become corrupted Connected”).
- Page 121 You are trying to connect the CHS with an The first release of SocketScan 10 for Windows Mobile is HP iPAQ 100 or 200 series Pocket PC. only compatible with the Socket SoMo 650. Check back for HP iPAQ compatibility in future releases. SYMPTOM The Bluetooth software indicates that the CHS has connected, but when I try to scan data, it does not enter into my application.
- Page 122 SYMPTOM When I try to use SocketScan 10 Keyboard Wedge or Scanner Settings in landscape mode, it doesn’t appear correctly. POSSIBLE REASONS SOLUTION This release of SocketScan 10 does not Use your device in Portrait mode and upgrade your support landscape mode for Windows SocketScan 10 software when a later release is available.
- Page 123 ROUBLESHOOTING FOR LACK ERRY SYMPTOM While scanning barcodes into a BlackBerry smartphone, I get an input system error. POSSIBLE REASON SOLUTION You are using a CHS v2 scanner with SocketScan 10 is compatible only with CHS v3. Either SocketScan 10. downgrade your software to SocketScan 7 or upgrade your scanner to CHS v3.
-
Page 124: J Technical Support
PPENDIX ECHNICAL UPPORT If you have trouble installing or using the CHS, Socket has different support options to help you. Online Knowledge Base: Search for articles, Frequently Asked Questions or Hot Topics 24 hours a day. http://support.socketmobile.com/EU_S1a.asp Online Requests: Register your product and submit a question to our Technical Support Team. -
Page 125: Limited Warranty
Socket Mobile Incorporated (Socket) warrants this product against defects in material and workmanship, under normal use and service, for one (1) year from the date of purchase. Product must be purchased new from a Socket Mobile Authorized Distributor or Reseller. Products purchased through non-authorized channels are not eligible for this warranty support. -
Page 126: Socketscan Software License Agreement
License, whether on disk, print or electronic documentation, in read only memory, or any other media, are licensed to you by Socket Mobile, Inc. for use only under the terms of this License, and Socket Mobile reserves all rights not expressly granted to you. The rights granted herein are limited to Socket Mobile Inc's and its licensors' intellectual property rights in SocketScan Software and do not include any other patents or intellectual property rights. -
Page 127: Regulatory Compliance
No amendment to or modification of this License will be binding unless in writing and signed by Socket Mobile. Any translation of this License is done for local requirements and in the event of a dispute between the English and any non-English versions, the English version of this License shall govern. - Page 128 This equipment is also ETS EN300 328-2, ETS EN301 489-1 and ETS EN301 489-17 compliant. These limits are designed to provide reasonable protection against harmful interference when the equipment is operated in a commercial environment. This equipment generates, uses, and can radiate radio frequency energy and, if not installed and used in accordance with the instruction manual, may cause harmful interference to radio communications.
- Page 129 Equipment, Part 4: Electrical Fast Transients Requirements LASER DEVICE: The Socket Bluetooth Cordless Hand Scanner described in this User Guide contains a laser scan engine. For the Class 1 version of this engine (CHS 7E and 7NRx), the following applies: •...
- Page 130 A laser warning label such as the one below appears on the battery door. Example of Class 2 Laser Warning Label Battery Warning: • Your device contains a rechargeable NiMH battery. Never throw the battery into a fire, as that could cause the battery to explode.
- Page 131 7/2011 Printed in U.S.A.
Need help?
Do you have a question about the 7 Series and is the answer not in the manual?
Questions and answers