
Related Manuals for Elation DMX Partner


Summary of Contents for Elation DMX Partner
- Page 1 DMX Partner USER MANUAL Version 2.3 24-004-1631-00 Elation Professional · Los Angeles, Ca 90058 · www.elationlighting.com...
-
Page 2: Table Of Contents
DMX PARTNER Table of contents 1. General Introduction......................3 2. Safety Information & Maintenance...................3 3. Information Notice......................4 4. Front Panel Overview......................5 5. Rear Panel Overview......................6 6. Assigning Joystick......................6 7. Recording Shows.......................7 8. Editing Shows........................8~9 8a. Adding steps to an existing show 8b. -
Page 3: General Introduction
DMX PARTNER Section 1: General introduction Thank you for purchasing the Elation DMX Partner. This unit is a professional DMX recorder and playback device with high performance and advanced capabilities. This device was designed to accept information from any universal DMX controller availible on the market today. Any group of scenes that have been programmed into a universal DMX controller can simply be downloaded into the DMX Partner for easy playback. -
Page 4: Information Notice
Section: 3 Information Notice Product Modification Warning: Elation Professional products are designed and manufactured to meet the requirements of United States and International safety regulations. Modifications to the product could affect safety and render the product non-compliant to relevant safety standards. -
Page 5: Front Panel Overview
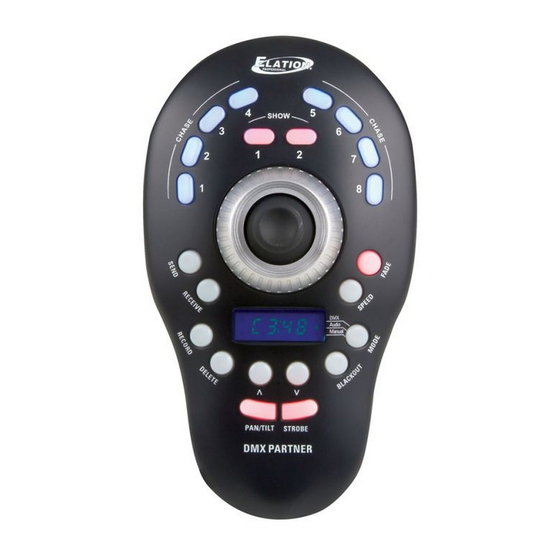
2. Joystick- used to control Pan & Tilt movement of a moving light on the fly. 3. Send Button- used to send memory data file to another DMX Partner or PC. (See Next Secton for additional data transfet information.) 4. Fade Button- used to adjust show fade times. -
Page 6: Rear Panel Overview
As a result, the Record LED will illuminate. (Note: if you do not have a DMX controller connected to the DMX input of the DMX Partner as described in the previous step, you will not be able to access Record mode). -
Page 7: Recording Shows
As a result, the record LED will illuminate. (Note: if you do not have a DMX controller connected to the DMX input of the DMX Partner as described in the previous step, you will not be able to access the Record mode). -
Page 8: Editing Shows
As a result, the Record LED will illuminate. (Note: if you do not have a DMX controller connected to the DMX input of the DMX Partner as described in the previous step, you will not be able to access the Record mode). -
Page 9: 8B. Deleting Show Steps
As a result, the Record LED will illuminate. (Note: if you do not have a DMX controller connected to the DMX input of the DMX Partner as described in the previous step, you will not be able to access the Record mode). -
Page 10: Show Playback
DMX PARTNER Section 10: Show Playback Shows can be played back in two modes- “Sequence“ or “Mix“. Sequence mode allows for shows to be played back one at a time. Ten shows can be selected at one time. However, the show with the flashing LED is the only active show running at the given time. -
Page 11: Audio / Manual
Section 13: Send & Receive Send and Receive are two functions used when wanting to transfer data from one DMX Partner to another or from a DMX Partner to your PC or laptop via our RS232 software program availible on our website at www.elationlighting.com... - Page 12 4. On your PC or laptop, select the “SEND“ button from the RS232 program and select the file that you wish to transfer into the DMX Partner. 5. As a result, the program will notify you that it is sending the selected file and the DMX Partner will also display a receiving track in its LED.
-
Page 13: Blackout Setup
DMX PARTNER Section 14: Blackout Setup This feature allows you to set your DMX Partner to activate or deactivate black out on power up. Deactivating allows you to automatically begin playback of shows on power up. 1. Flip the power switch to the “OFF“ position.
Need help?
Do you have a question about the DMX Partner and is the answer not in the manual?
Questions and answers