Table of Contents
Advertisement
OPERATOR'S MANUAL
VAC ATTACK II
UT08544/UT08546/UT08947
Your blower has been engineered and manufactured to our high standard for dependability, ease of operation, and operator
safety. When properly cared for, it will give you years of rugged, trouble-free performance.
WARNING:
To reduce the risk of injury, the user must read and understand the operator's manual before using
this product.
Thank you for your purchase.
SAVE THIS MANUAL FOR FUTURE REFERENCE
Advertisement
Table of Contents

Subscribe to Our Youtube Channel
Related Manuals for Homelite UT08947


Summary of Contents for Homelite UT08947
- Page 1 OPERATOR’S MANUAL VAC ATTACK II UT08544/UT08546/UT08947 Your blower has been engineered and manufactured to our high standard for dependability, ease of operation, and operator safety. When properly cared for, it will give you years of rugged, trouble-free performance. WARNING: To reduce the risk of injury, the user must read and understand the operator’s manual before using this product.
-
Page 2: Table Of Contents
TABLE OF CONTENTS Introduction ... 2 General Safety Rules ... 3 Specific Safety Rules ... 4 Symbols ... 5-6 Features ... 7-8 Assembly ... 9-11 Operation ... 12-15 Maintenance ... 16-17 Accessories ... 17 ... -
Page 3: General Safety Rules
WARNING: READ AND UNDERSTAND ALL INSTRUCTIONS. Failure to follow all instructions listed below, may result in electric shock, fire and/or serious personal injury. SAVE THESE INSTRUCTIONS Do not allow children or untrained individuals to use this unit. Never start or run the engine inside a closed area; breath- ing exhaust fumes can kill. -
Page 4: Specific Safety Rules
Do not operate vacuum without vacuum bag installed; flying debris could cause serious injury. Always close vacuum bag completely before operating. Always hold the blower in your right hand, refer to the Operation section, later in this manual for additional information. -
Page 5: Symbols
SYMBOL NAME Safety Alert Read The Operator’s Manual Eye and Hearing Protection Long Hair Blower Tubes Vacuum Door Loose Clothing Gasoline and Oil SYMBOLS DESIGNATION/EXPLANATION Precautions that involve your safety. -
Page 6: Symbols
To avoid serious personal injury, do not attempt to use this product until you read thoroughly and understand com- pletely the operator’s manual. If you do not understand the warnings and instructions in the operator’s manual, do not use this product. Call Homelite customer service for assistance. Page 6... -
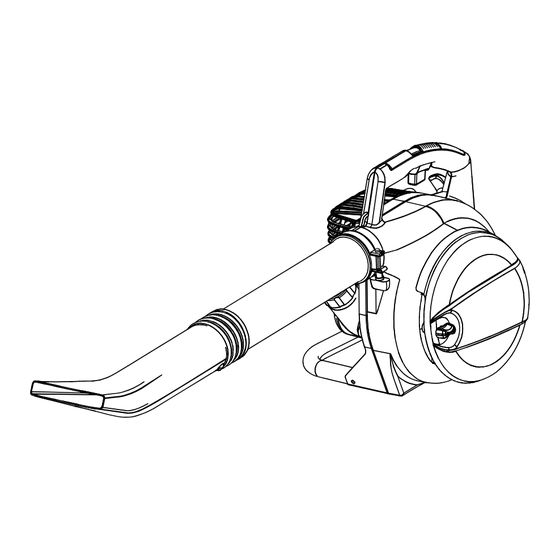
Page 7: Product Specifications
Engine displacement ...30cc Air Velocity: MPH ...200 CFM ...420 HIGH VELOCITY NOZZLE WET LEAF WIDE SWEEPER SCRAPER NOZZLE FEATURES UPPER HANDLE TUBE CLAMP BLOWER TUBE LOWER HANDLE Page 7 CRUISE CONTROL (THROTTLE LOCK) THROTTLE TRIGGER INLET COVER DOOR KNOB DOOR Fig. 1... -
Page 8: Features
The blower is equipped with a mulcher feature that efficiently reduces leaves at a 12:1 ratio. THROTTLE TRIGGER The blower can be operated at any speed between idle and full throttle. VACUUM The blower will convert to a powerful vacuum/mulcher using no tools. -
Page 9: Packing List
If any parts are damaged or missing, please call 1-800-242-4672 for assistance. PACKING LIST Blower Blower Tube Wide Sweeper Nozzle High Velocity Nozzle Upper and Lower Vacuum Tubes Vacuum Bag Bag Adaptor... -
Page 10: Assembling The Blower Tubes
Place clamp around the neck of the blower housing outlet. Do not tighten the knob yet. Align the locking tab on blower tube with the slot in the blower housing outlet; push the tube into the housing. Twist to lock into place. -
Page 11: Installing The Vacuum Tubes
Place the notch in the support arm of the upper vacuum tube under the hinge of the inlet cover door. Push the upper vacuum tube into the blower housing. Align the upper vacuum tube knob with the hole in the housing and tighten securely. -
Page 12: Filling Tank
WARNING: Do not allow familiarity with tools to make you care- less. Remember that a careless fraction of a second is sufficient to inflict serious injury. WARNING: Always wear safety goggles or safety glasses with side shields when operating this tool. Failure to do so could result in objects being thrown into your eyes resulting in possible serious injury. -
Page 13: Starting And Stopping
Any con- tact with the housing can result in burns and/or other serious personal injury. Hold the blower with the upper handle in your right hand as shown. To keep from scattering debris, blow around the outer edges of a debris pile. - Page 14 Watch out for children, pets, open windows or freshly washed cars, and blow debris safely away. Use the full blower nozzle extension so the air stream can work close to the ground. After using blowers or other equipment, CLEAN UP! Dispose of debris in trash receptacles.
-
Page 15: Vacuum Operation
Hold the upper handle in your right hand and the lower handle in your left hand. Move the blower from side to side along outer edge of the debris. To avoid clogging, do not place the vacuum tube directly into the debris pile. -
Page 16: General Maintenance
WARNING: When servicing, use only identical replacement parts. Use of any other parts may create a hazard or cause product damage. WARNING: Always wear safety goggles or safety glasses with side shields during power tool operation or when blowing dust. If operation is dusty, also wear a dust mask. GENERAL MAINTENANCE Avoid using solvents when cleaning plastic parts. -
Page 17: Spark Arrestor
Drain all fuel from the tank into a container approved for gasoline. Run engine until it stops. Clean all foreign material from the blower. Store it in a well-ventilated place that is inaccessible to children. Keep away from corrosive agents such as garden chemicals and de-icing salts. -
Page 18: Troubleshooting
IF THESE SOLUTIONS DO NOT SOLVE THE PROBLEM CONTACT YOUR AUTHORIZED SERVICE DEALER. PROBLEM POSSIBLE CAUSE Engine will not start 1. No spark. 2. No fuel. 3. Engine is flooded. Engine does not reach full 1. Incorrect oil/fuel mixture. speed and emits excessive smoke 2. -
Page 19: Limited Warranty Statement
HOMELITE brand product. Proof of purchase will be required by the dealer to substantiate any warranty claim. All warranty work must be performed by a Homelite authorized service center. - Page 20 The nonroad engine must be free from defects in materials and workmanship which cause it to fail to conform with U.S. EPA standards for the first two years of engine use from the date of sale to the ultimate purchaser. Homelite Consumer Products, Inc.
- Page 21 3 in. x 5 in. card or standard postcard: your name, mailing address, phone numbers, email address, Homelite product(s) purchased with item number from package, and serial number for each product. Mail the card to: Homelite Consumer Products, Attn. Homelite Registration, 1428 Pearman Dairy Road, Anderson, SC 29625.To receive information on our company and products, please include the following statement on your...
-
Page 22: California Proposition
CALIFORNIA PROPOSITION 65 SERVICE For parts or service, contact your nearest Homelite authorized service dealer. Be sure to provide all relevant information when you call or visit. For the location of the authorized service dealer nearest you, please call 1-800-242-4672 or visit us online at www.homelite.com.
Need help?
Do you have a question about the UT08947 and is the answer not in the manual?
Questions and answers