
Related Manuals for INSTEON RemoteLinc 2


Summary of Contents for INSTEON RemoteLinc 2
- Page 1 RemoteLinc ® INSTEON Remote Control Keypad, 4 Scene (#2444A2xx4) Owners Manual Page 1 of 15 2444A2xx4 Rev: 10/24/2011 10:50 AM...
-
Page 2: Table Of Contents
Getting Started ............................6 Setting up INSTEON Scenes ........................6 Add RemoteLinc 2 Button to a Scene as a Controller................6 Remove RemoteLinc 2 Button from a Scene as a Controller ..............6 Using RemoteLinc 2............................ 7 LED Behavior ............................8 Turn Unit On/Off (Pocket Mode)........................ -
Page 3: Remotelinc 2
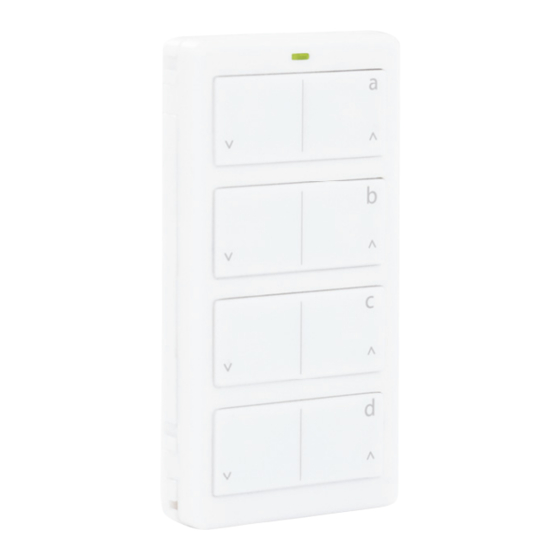
RemoteLinc 2 RemoteLinc 2 is the smallest and most versatile INSTEON remote control in the world. The 4 scene controller can easily be reconfigured to give you toggle control of up to 8 scenes and/or devices. RemoteLinc 2 can be:... -
Page 4: Features & Benefits
Rechargeable battery (pre-installed) Quick-Start Guide Required Accessories A micro USB cable for connecting and recharging RemoteLinc 2 via USB port on a computer or USB power adapter. If the INSTEON device you intend to control does not receive RF signals (i.e., power line only), you will need at least one dual-band INSTEON... -
Page 5: Optional Accessories
Gang two or more together for more control Can be installed adjacent to existing wired-in switches RemoteLinc 2 can easily be removed for portability or recharging Use with any decorator wallplate Pair the Wall Mount Bracket with any decorator style wall plate (sold separately) for the perfect wireless wall switch solution. -
Page 6: Getting Started
Remove RemoteLinc 2 Button from a Scene as a Controller If you are no longer going to use an INSTEON responder that is a scene responder of RemoteLinc 2, it is very important that you remove its scene membership. Otherwise, RemoteLinc 2 will retry every scene command repetitively, thus creating delays and shortening battery life. -
Page 7: Using Remotelinc 2
5) Confirm that Unlinking was successful by tapping the scene button on and off The Responder will not respond 6) If you wish to remove multiple responders from RemoteLinc 2, repeat steps 1-5 for each additional responder (or see Remove Multiple Responders from a... -
Page 8: Led Behavior
LED Behavior RemoteLinc 2 has a two-color LED (Green & Red) which momentarily indicates whether an on or an off is being sent. LED State Meaning Blink Green (Once) On Sent Blink Red (Once) Off Sent Blink Red (for a few... -
Page 9: Change Button / Scene Configuration (E.g., Change To 8 Button Mode)
RemoteLinc 2’s LED will blink 4) Tap Set Button RemoteLinc 2’s LED will double-blink RED-RED 5) For each Responder you wish to remove from scene, Press & Hold its Set Button until RemoteLinc 2 double-beeps RemoteLinc 2’s LED will continue to double-blink RED-RED 6) When all your devices have been removed, tap RemoteLinc 2’s Set Button... -
Page 10: Turn Led Off (Or Back On)
LED On (default) Top Row, Right Side RemoteLinc 2 will (Beep)-(Beep), its LED turns off & returns to Ready Mode Turn Beeper On During Usage (or Back Off) 1) Press & Hold Set Button for 3 seconds - until you hear a beep RemoteLinc 2’s LED will blink... -
Page 11: Beeper Behavior
2) Turn RemoteLinc 2 off (slide power switch to left) 3) Press & Hold Set Button 4) While continuing to hold the Set Button, turn RemoteLinc 2 back on (slide power switch to the right) RemoteLinc 2 will (Beep) & LED stays solid... -
Page 12: Specifications
RemoteLinc 2 will long (Beep) 5) Continue to Hold Set Button until the long beep stops LED turns solid 6) Release Set Button RemoteLinc 2 will (Beep)-(Beep), its LED turns off & returns to Ready Mode Specifications General Product Name RemoteLinc 2 –... -
Page 13: Troubleshooting
1 hour Troubleshooting Problem Possible Cause Solution RemoteLinc 2 may be out of range of Try moving an access point or other dual-band nearest dual-band INSTEON device plug-in module closer to RemoteLinc 2 (hopper) Make sure phases are bridged, add additional... -
Page 14: Certification And Warranty
The Ramp Rate may be set too slow Re-link to Responder with fast Ramp Rate away Remove all unused Responders from the RemoteLinc 2. HINT: If you are using home Responder(s) is taking a RemoteLinc 2 may be sending automation software, you can easily check scene... -
Page 15: Limitations
INSTEON Gold Support Line at 800-762-7845 with the Model # and Revision # of the device to receive an RMA# and send the product, along with all other required materials to: Smarthome ATTN: Receiving 16542 Millikan Ave.
Need help?
Do you have a question about the RemoteLinc 2 and is the answer not in the manual?
Questions and answers