Advertisement
Quick Start Guide
RemoteLinc
™
2 - INSTEON
Model: 2444A2WH4
Introduction
Conveniently control your home's INSTEON network with the compact and
versatile RemoteLinc 2 wireless keypad controller.
What's Included
•
RemoteLinc 2
Getting Started
Fully charge RemoteLinc 2 prior to programming (or anytime the unit is not
responding) using a Type A to Micro-B USB cable (sold separately). The
red Charging LED will turn off once the battery is fully charged
(approximately one hour). Slide the power switch to the ON position.
Note: RemoteLinc 2 requires an INSTEON dual-band or RF device to
communicate with other devices on your INSTEON network.
RemoteLinc 2 uses a subtle beeper sound to assist setup. It is
recommended that you program the unit in a quiet area.
Add RemoteLinc 2 (Button) as an INSTEON Controller
1) Tap ^ on the RemoteLinc 2 scene button of choice.
2) Adjust the responder to the state you want when the scene is activated from RemoteLinc 2.
3) Press and hold RemoteLinc 2's Set button until RemoteLinc 2 beeps.
RemoteLinc 2's Status LED will begin blinking green.
4) Press and hold the responder's Set button until the responder beeps or its LED flashes.
RemoteLinc 2 will double-beep and its LED will stop blinking.
Responder's LED will stop blinking (it may also double-beep).
5) Confirm that scene addition was successful by tapping on/off on the programmed RemoteLinc 2 button.
The responder will toggle between the scene's preset on-level and off.
1
If the responder is a multi-scene device such as a KeypadLinc, tap the scene button you wish to control until its LED is in the desired state (on or off).
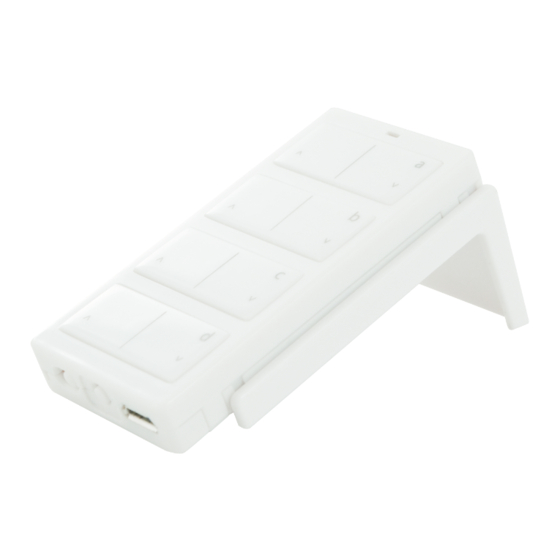
Using RemoteLinc 2
RemoteLinc 2 contains four on/off button pairs (a-d). Each pair controls its own scene, sending commands to
devices linked specifically to that on/off button pair. Dimmable responders may behave differently, depending on
whether you tap, double-tap or press and hold a button to activate/deactivate a scene. Non-dimming responders
will only turn full-on or full-off, no matter what method you use.
Ramp to preset on-level or
off
The RemoteLinc 2 Status LED will flash
sent and
Warning: RemoteLinc 2 is permanently sealed. Do not attempt to open case. Doing so will damage the remote
and void the warranty.
Owner's Manual and Tech Support
Owner's Manual and current Quick Start Guide:
Call: INSTEON Support Line at 800-762-7845
2444A2xx4 Rev. 7/5/2012 10:15 AM / See Owner's Manual for Warranty Information, Patented
© Copyright 2012, INSTEON, 16542 Millikan Ave., Irvine, CA 92606, 800-762-7845
®
Wireless Keypad
Tap
Full-on or full-off instantly
red
once for each off/dim command sent.
Right=On)
Double-tap
Brighten or dim until
released
green
once for each on/brighten command
http://www.insteon.com/support
Status LED
Power
Switch
(Left=Off,
Set button
1
Press and hold
4 Scene Buttons
(Left=Off/dim,
Right=On/brighten)
Charging LED
(inside case)
Micro-USB
Charging
Jack
Advertisement
Table of Contents

Related Manuals for INSTEON RemoteLinc 2


Summary of Contents for INSTEON RemoteLinc 2
- Page 1 Warning: RemoteLinc 2 is permanently sealed. Do not attempt to open case. Doing so will damage the remote and void the warranty. Owner’s Manual and Tech Support Owner’s Manual and current Quick Start Guide:...
- Page 2 (2) l'utilisateur de l'appareil doit accepter tout brouillage radiolectrique subi, mme si le brouillage est susceptible d'en compromettre le fonctionnement. 2444A2xx4 Rev. 7/5/2012 10:15 AM / See Owner’s Manual for Warranty Information, Patented © Copyright 2012, INSTEON, 16542 Millikan Ave., Irvine, CA 92606, 800-762-7845...
Need help?
Do you have a question about the RemoteLinc 2 and is the answer not in the manual?
Questions and answers