Advertisement
Available languages
Available languages
Quick Links
General Controls Reference Guide
user manual
Unit
1
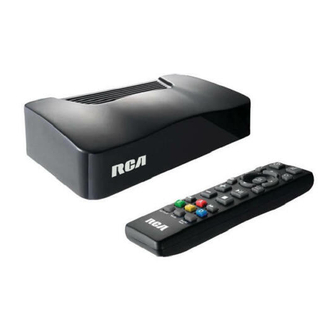
Wi-Fi Streaming Media Player
DSB778W
www.RCAav.com
with 1080p HDMI output
3
4
5
6
7
8
It's important to read this instruction prior to using your new product for the first time.
The lightning flash with an arrowhead symbol, within the equilateral
triangle, is intended to alert the user to the presence of uninsulated
"dangerous voltage" within the product's enclosure that may be of
sufficient magnitude to cause an electric shock.
CAUTION
RISK OF ELECTRIC SHOCK
Remote Control
The exclamation point within the equilateral triangle is intended to
DO NOT OPEN
alert the user to the presence of important operating and maintenance
(servicing) instructions in this owner's manual.
To Install Batteries
1
1. Open the battery door.
2
WARNING:
TO REDUCE THE RISK OF ELECTRIC SHOCK, DO NOT REMOVE COVER (OR BACK). NO USER-SERVICEABLE
PARTS INSIDE. REFER SERVICING TO QUALIFIED SERVICE PERSONNEL.
3
WARNING:
4
TO PREVENT FIRE OR SHOCK HAZARD, DO NOT EXPOSE THIS APPLIANCE TO RAIN OR MOISTURE. DO NOT PLACE
OBJECTS FILLED WITH LIQUIDS ON OR NEAR THIS UNIT.
2. Insert two AAA
5
batteries.
Safety Precautions
6
This device complies with Part 15 of the FCC Rules. Operation is subject to the following two conditions: (1) This
7
device may not cause harmful interference, and (2) this device must accept any interference received, including
interference that may cause undesired operation.
This equipment has been tested and found to comply with the limits for a Class B digital device, pursuant to Part 15
of FCC Rules.These limits are designed to provide reasonable protection against harmful interference in a residential
installation.This equipment generates, uses, and can radiate radio frequency energy and, if not installed and used in
CAUTION: Danger of explosion if battery is
accordance with the instructions, may cause harmful interference to radio communications.
incorrectly replaced. Replace only with the
However,there is no guarantee that interference will not occur in a particular installation.If this equipment does cause
same or equivalent type.
harmful interference to radio or television reception,which can be determined by turning the equipment off and on,
Battery Replacement
the user is encouraged to try to correct the interference by one or more of the following measures:
When the batteries become weak, the operating
• Reorient or relocate the receiving antenna.
distance of the remote control is greatly reduced and
you will need to replace them.
• Increase the separation between the equipment and receiver.
• Connect the equipment into an outlet on a circuit different from that to which the receiver is connected.
Notes:
• Consult the dealer or an experienced radio/TV technician for help.
•
If the remote control is not going to be used for a
long time, remove the batteries to avoid corrosion
WARNING: Changes or modifications not expressly approved by the party responsible for compliance could void
damage caused by battery leakage.
the user's authority to operate the equipment.
•
Do not mix old and new batteries. Do not mix
FCC RF Radiation Exposure Statement :
ALKALINE,standard (CARBON-ZINC) or rechargeable
(NICKEL-CADMIUM) batteries.
This equipment complies with FCC radiation exposure limits set forth for an uncontrolled environment.This equip-
•
Always remove batteries as soon as they become
ment should be installed and operated with minimum distance 20 cm between the radiator and your body. End
weak.
users must follow the specific operating instructions for satisfying RF exposure compliance. This transmitter must
•
Weak batteries can leak and severely damage the
not be co-located or operating in conjunction with any other antenna or transmitter.
remote control.
CAUTION: Regulations of the FCC and FAA prohibit airborne operation of radio-frequency wireless devices because
•
WARNING: Do not dispose of batteries in a fire.
Batteries may explode or leak.
their signals could interfere with critical aircraft instruments.
Accessories
HDMI, the HDMI logo and High-
Manufactured under license from
Dolby Laboratories."Dolby" and the
Definition Multimedia Interface are
• AC Adapter................................................................. x1
trademarksorregisteredtrademarks
double-D symbol are trademarks of
• RemoteControl(withbatteries)............................. x1
of HDMI Licensing, LLC.
Dolby Laboratories.
EN - 1
1
Connecting to a TV
2
A. Using an HDMI cable (for best connection)
1.
IR (remote control) sensor
Connect an HDMI cable (not included) to the HDMI OUT jack on your player and to the HDMI IN jack on your TV.
2.
Status indicator
Notes:
3.
DC IN power jack
•
Do not tilt the connector when inserting it into the HDMI
4.
Analog AUDIO OUT jacks
jack,and make sure the shapes of the jack and the connector
5.
Composite VIDEO OUT jack
are matched.
•
When using non-HDCP compatible TV, the image will not
6.
Digital OPTICAL OUT port
display properly.
7.
HDMI OUT jack
•
An HDMI cable carries both video and audio signals.If you want to use TV speakers,
8.
LAN jack
you do not need to make an additional audio connection if you are using an
HDMI cable.
B. Using an A/V cable
Connect the yellow connectors on an A/V
R
L
cable (not included) to the VIDEO jack on
Standard
Definition
1.
POWER button
your player and the VIDEO IN jack on your
TV. Connect the red and white connectors to
TV
VIDEO IN
AUDIO IN
8
Press to turn on/off the player.
the AUDIO OUT jacks on your player and L/R
9
2.
RETURN button
AUDIO IN jacks on your TV.
(Yellow)
(Red)
(White)
Press to return to the previous screen.
10
3.
Audio button
2
11
Press to select the audio mode.
Connecting to an Audio System
4.
VOLUME +/- buttons
12
Press to adjust the volume.
13
5.
Reverse Scan button
A. Using a Digital Audio Optical cable
14
Press to fast reverse playback.
(for best connection)
6.
A, B, C, D buttons
15
Connect a digital audio optical cable (not included) to the
If a color-coded menu option appears on your screen,
16
OPTICAL OUTPUT on your player and to the OPTICAL INPUT
you can press the corresponding color-coded button
on your AV receiver or amplifier.
to select this option.
7.
NETFLIX button
AV receiver/amplifier
Press to access Netflix service directly.
B. Using an Analog Audio cable
8.
Mute button
Connect an audio cable (not included) to the red and
Press to mute all sound.
white AUDIO OUT jacks on your player and to the AUDIO
R
L
9.
Home button
IN jacks on your AV receiver or amplifier.
Press to display the main menu of the player.
AUDIO IN
10.
, , ,
(Cursor) buttons
Press to select items or settings in on-screen
3
(Red)
(White)
menus.
Connecting to Your Network
OK/ENTER button
Press to confirm or select menu items.
11.
Subtitle button
Your player can be connected to your home network:
•
By connecting an Ethernet cable to the LAN jack on your player and to a wired hub or router.Using a wired network
Press to display the subtitle menu.
provides the best performance, because the attached devices connect directly to the network and are not subject
12.
Play/ Pause button
to radio frequency interference.
Press to start playback.
•
By connecting the player to your Wi-Fi network.
Hub or broadband router
Press to pause playback.
A. Connecting your player to a wired router
13.
Stop button
LAN
Press to stop playback.
Connect an Ethernet cable to the LAN jack
Networking equipment
14.
Forward Scan button
on the back of your player and to an Ethernet
(modem, etc.)
Press to fast forward playback.
jack on a hub or broadband router.
LAN cable
15. VUDU button
Press to access VUDU service directly.
16. Pandora button
Press to access Pandora service directly.
Internet
EN - 2
EN - 3
5
Notes:
•
Do not connect a modular phone cable to the LAN jack.
•
When plugging or unplugging the cable, hold the connector on the end of the cable. When unplugging, do not
pull on the cable. Press down the lock tab and pull the connector out of the jack.
The main menu includes Settings & Entertainment options.Press , , , to highlight an option, press OK/ENTER
to confirm your selection and setting , press
B. Connecting your player to a wireless access point or router
Settings: Use to define your basic settings to your
preference.To return to a previous screen, press
High
Your player has an integrated Wi-Fi device and
Definition
antenna. No physical connection to the wireless
TV
Modem Port
router is necessary.Place your player within range
Unit
of your wireless network. During configuration
Settings options
HDMI IN
Wireless access point
of your player for network access, you may need
Network --> Info --> Quick Setup --> Display --> Audio
to enter a password if your network has security
--> Language --> System
turned on.
Modem Cable
Note:
Do not place anything on the top of your player. Placing objects on the top of your player may interfere with the
wireless signal, or cause the player to overheat.
Entertainment: This gives you access to many applications
and services. Some of the services may require a log-in
C. Connection Status
ID and password, some of the services may require a
(White)
(Red)
(Yellow)
To check your network connection status, select the Settings Option from Main Menu, then select
subscription. The Player will provide you with on-screen
Network -> Network Test.
instructions if a log-in ID or password is required.
4
Powering up & Initial setup
AV receiver/amplifier
A. Operating with the remote control
Troubleshooting
Open the cover and insert the batteries (AAA x 2) matching the polarity indicated inside battery compartment of the
remote control. To use,point the remote control at the remote sensor located on the front of the player. Please ensure
OPTICAL IN
the front of the player is not obstructed.Do not expose the remote sensor of your player to a strong light source such
Player does not work
as direct sunlight or other illumination.If you do so,you may not be able to operate your player via the remote control.
• Unplug the AC power adapter, wait at least ten seconds, then plug it back in.
• Ensure the AC adapter is securely inserted into the Player's power jack and an AC outlet. The Player's blue
B. Starting up & Basic setup
1. After all connections are complete, connect the power adaptor to your player.
• See troubleshooting tips below.
2. If Player doesn't turn on automatically within ten seconds, press
on the remote control to turn on your player.
The remote control does not work properly
3. Turn on your TV.Ensure your TV is switched to the input source that you've connected the player. (For details,refer
to TV's user manual).
Check the following:
If the TV is connected by an HDMI cable, please allow a few moments for the opening screen to display.
• The batteries are inserted correctly.
4. The Player will display a basic setup screen which will guide you though initial setup.
• The batteries are fresh.
(White)
(Red)
• The remote control is pointed directly at the remote sensor of the Player.
• The remote control is not being used from too far a distance from the Player.
• Nothing is obstructing remote sensor (located on front of the Player).
Streaming video services (such as YouTube™, etc.) often stop, pause or "buffer" during playback
• Your Wi-Fi Access Point (eg wireless router) may be too far from the Player. If possible, try to locate your Wi-Fi
• Your broadband service speed may not be fast enough to stream video services. If so, your Internet Service
WAN
LAN
5
4
3
2
1
How can I check if my network connection is OK?
• Go to the Player's Settings Menu, then select Network -> Network Test. This will test if you are successfully
LAN cable
• Go to the Player's Entertainment Menu, select VUDU Movies -> My VUDU -> Info & Settings -> Network Speed
EN - 4
The Player has a poor or intermittent connection to the Wi-Fi access point (eg wireless router)
Settings & Entertainment
• The wireless communication may be interrupted from household devices that are using radio frequencies.
Move the Player away from them.
• The Access Point is located too far from the Player.
to return to previous menu.
My Wi-Fi network is not displayed on the "Network List"
• The access point or wireless LAN router may not broadcast its SSID.
.
- Manually enter your access point's SSID in the Network Settings Menu of the Player.
- Or set your access point to broadcast its SSID.
• Your Wi-Fi network may not be set to the frequency range or range of channels that this Player can support.
Try adjusting the frequency range and/or channel of your network.
I need to input text to manually configure log-in IDs, passwords or network settings, but I don't see an
on-screen keyboard
• Try pressing the OK button on your remote control while the cursor is blinking on the screen's entry field, this
should bring up an on-screen keyboard.Try adjusting the frequency range and channel of your network.
Player doesn't display video on my TV screen
• Select the appropriate video input mode on the TV so the picture from the Player appears on the TV screen.
• Make sure your HDMI cable or RCA cable is securely inserted in both the Player and your TV.
• YourTVmaynotsupporttheresolutionyouhavesetonthePlayer.ChangetheresolutiontomatchyourTV'sresolution.
• The player's HDMI OUT cable is not securely connected to your player or your TV.
The picture noise appears "noisy" or degraded
• Your Player may be set to a HDMI resolution that's higher than your TV's. Change the resolution to match your
TV's resolution.
The Player has "frozen" or stopped working
• To reset the Player, unplug the AC power adapter, wait at least ten seconds, and then plug it back in.
• Make sure your Remote Control is functioning properly.
My Player seems to shut down by itself, is there a problem?
• No, in order to save you power, the Player will shut down after prolonged periods on inactivity - don't worry,
it won't shut down while you're using it." Note: you can disable this feature, or adjust the Auto Power Down
Duration by going to Settings -> System -> Auto Power Down
power indicator should turn on within ten seconds of the Player's AC Adapter being plugged in.
Need More Help?
Please visit online help at http://www.RCAav.com
Important Information Relating to Network Services
All information, data, documents, communications, downloads, files, text, images, photographs, graphics, videos,
webcasts, publications, tools, resources, software, code, programs, applets, widgets, applications, products and
other content ("Content") and all services and offerings ("Services") provided or made available by or through
any third party (each a"Service Provider") is the sole responsibility of the Service Provider from whom it originated.
The availability of and access to Content and Services furnished by the Service Provider through this device
router closer to your Player, or use ethernet connection, or consult an expert on ways to improve your home
are subject to change at any time, without prior notice, including, but not limited to the suspension, removal
network's bandwidth.
or cessation of all or any part of the Content or Services.
Should you have any inquiry or problem related to the Content or Services, you may refer to the Service
Provider (ISP) may have other service plans that provide higher bandwidth.
Provider's website for the most up-to-date information. AVC Multimedia is neither responsible nor liable
for customer service related to the Content and Services. Any question or request for service relating to the
Content or Services should be made directly to the respective Content and Service Providers.
connected to your Home Network and if your broadband connection is connected to the internet.
Please note that AVC Multimedia is not responsible for any Services provided by the Service Provider or any
changes to, removal of, or cessation of such Services and does not warrant or guaranty the availability of or
access to such Content or Services.
Test. This will test the speed/performance of your network
EN - 5
Limited warranty
AVC MULTIMEDIA ("AVC") makes the following limited warranty. This limited warranty extend to the original
consumer purchaser and is limited to non-commercial use of the product.
One Year Parts & Labor Warranty
AVC products purchased in the United States are warranted to be free from defects in materials or workmanship for
a period of one year from the date of their original retail purchase. If the unit fails to conform to this warranty, we will
service the product using new or refurbished parts and products, at AVC's sole discretion.
During a period of one year from the effective warranty date, AVC will provide, when needed, service labor to repair a
manufacturing defect at its designated Service Center.To obtain warranty service in the United States, you must first
call our Customer Support Center at 1-800-506-5746 or 1-877-252-6873, during the hours listed in the box
below. The determination of service will be made by AVC Customer Support. PLEASE DO NOT RETURN YOUR UNIT
TO AVC WITHOUT PRIOR AUTHORIZATION. New or remanufactured replacements for defective parts or products
will be used for repairs by AVC at its designated Service Center for one year from the effective warranty date. Such
replacement parts or products are warranted for an additional one year from the date of repair or replacement.The
Customer will be required to ship the unit to the Service Center indicated at the time Customer Support is contacted
to make the necessary repairs.The customer is responsible for all transportation charges to the service facility.
Packaging and Shipping Instruction
When you send the product to the AVC service facility you must use the original carton box and packing material
or an equivalent as designated by AVC.
LIMITED WARRANTY
Your Responsibility
1) You must retain the original sale receipt to provide proof of purchase.
2) These warranties are effective only if the product is purchased and operated in the U.S.A. or Canada.
3) Warranties extend only to defects in material or workmanship, and do not extend to any product or parts
which have been lost or discarded, or damage to product or parts caused by misuse, accident, improper
operation or maintenance, or use in violation of instructions provided with the product, or to product which
has been altered or modified without authorization of AVC, or to products or parts thereof which have had
the serial number removed or changed.
Out of Warranty
In the event your product requires repair after the limited warranty period has expired, please contact our
Customer Support Center at 1-800-506-5746, 1-877-252-6873 or www.RCAav.com
Hours: Monday–Thursday: 9am–7pm, Friday: 9am–5pm, Saturday: 9am–NOON Eastern time.Important:
You are responsible for any transportation, shipping or insurance relative to the return of product to our
Product Returns Center.
All warranties implied by state law, including the implied warranties of merchantability and fitness for a particular
purpose, are expressly limited to the duration of the limited warranties set forth above. With the exception of
any warranties implied by state law as hereby limited, the foregoing warranty is exclusive and in lieu of all other
warranties, guarantees, agreements and similar obligations of manufacturer or seller with respect to the repair or
replacement of any parts. In no event shall AVC be liable for consequential or incidental damages.
No person, agent, distributor, dealer or company is authorized to change, modify or extend the terms of these
warranties in any manner whatsoever.The time within action must be commenced to enforce any obligation of AVC
arising under the warranty or under any statute, or law of the United States or any state thereof, is hereby limited to
one year from the date of purchase.This limitation does not apply to implied warranties arising under state law.
This warranty gives you specific legal rights and you may also have other rights, which may vary, from state to state.
Some states do not allow limitation on how long an implied warranty lasts, when an action may be brought, or the
exclusion or limitation of incidental or consequential damages, so the above provisions may not apply to you.
For more information on other products and services, please visit our web site at www.RCAav.com
Important:
Also keep your "Bill of Sale" as proof of purchase.
Model no. ......................................................................................... Product name ..................................................................................
Type of set ........................................................................................ Serial no. ................................................................................................
Invoice no. ......................................................................................... Date purchased .................................................................................
Dealer name ..........................................................................................................................................................................................................
FOR SERVICE AND REPAIR, PLEASE VISIT www.RCAav.com
Specifications and external appearance are subject to change without notice.
EN - 6
©2011 AVC Multimedia Trademark(s) ® Registered
811-778891W013
Printed in China
Advertisement

Related Manuals for RCA DSB778W


Summary of Contents for RCA DSB778W
- Page 1 To Install Batteries Press to turn on/off the player. • Make sure your HDMI cable or RCA cable is securely inserted in both the Player and your TV. or an equivalent as designated by AVC. and services. Some of the services may require a log-in the AUDIO OUT jacks on your player and L/R C.
- Page 2 Oprima para ajustar el volumen. • Asegúrese de que el cable de HDMI o RCA esté conectado firmemente en el reproductor y en su televisor. PARA REDUCIR EL RIESGO DE SUFRIR DESCARGAS ELÉCTRICAS, NO RETIRE LA CUBIERTA (NI LA PARTE POSTERIOR).
Need help?
Do you have a question about the DSB778W and is the answer not in the manual?
Questions and answers