
Related Manuals for Klipsch Light Speaker


Summary of Contents for Klipsch Light Speaker
- Page 1 Tech Support: 1-800-KLIPSCH State-of-the-art LIGHT & SOUND One complete system that installs in 30 minutes or less! OWNER’S MANUAL AND INSTALLATION INSTRUCTIONS...
- Page 2 Tech Support: 1-800-KLIPSCH The lightning flash with arrowhead symbol, within an equilateral triangle, is intended to alert the user to the presence of uninsulated “dangerous voltage” within the product’s enclosure that may be of sufficient magnitude to constitute a risk of electric shock to persons.
- Page 3 Tech Support: 1-800-KLIPSCH IMPORTANT SAFETY INSTRUCTIONS 1. Read these instructions. Keep these instructions. Heed all Warnings. Follow all instructions. 2. Do not use this apparatus near water. The apparatus shall not be exposed to dripping or splashing and that no objects filled with liquids, such as vases, shall be placed on apparatus.
- Page 4 ® You have chosen one of the most unique, patented, audio systems in the world. With proper installation and operation, you will enjoy years of trouble-free use. Klipsch ® sells numerous loudspeakers for use inside or outside your home. To see the complete Klipsch product assortment, ®...
-
Page 5: Table Of Contents
Tech Support: 1-800-KLIPSCH Table of Contents System Overview..................6 What is in this box................8 Step 1 - Where will you install............9 Step 2 - Check your connector type...........9 Step 3 - Test fit your LightSpeaker ...........10 ® Step 4 - Removing the trim ring............11 Step 5 - Installing the trim ring............14... -
Page 6: System Overview
Tech Support: 1-800-KLIPSCH System Overview This wireless LightSpeaker ® System is intended to install into any home easily and without any expensive and complicated wiring. You can install a typical system in your home in a few minutes and not have to worry about repairing walls or ceilings. - Page 7 MP3, or any audio source, to any room in your house. To expand your system, additional LightSpeakers ® available from your retailer or at www.klipsch.com. This incredible patented system provides even greater flexibility to you as the owner; since you can take this system with you if you move;...
-
Page 8: What Is In This Box
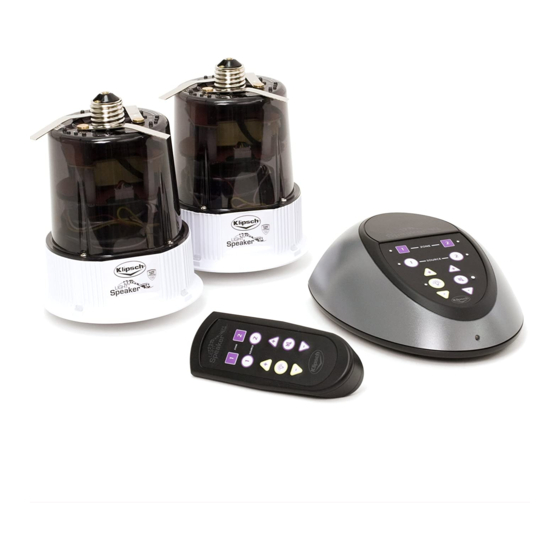
Tech Support: 1-800-KLIPSCH Take just a minute to be sure you have everything you need to install your first wireless distributed audio system from Kadence Designs. Transmitter Power Cord Large & Small Trim Rings LightSpeakers , & Lens Remote ®... -
Page 9: Step 1 - Where Will You Install
Tech Support: 1-800-KLIPSCH Instruction Manual Step 1: Decide which lights will be replaced with LightSpeakers ® Your Klipsch LightSpeakers have been specifically ® ® designed to cover large areas, however if the location of your fixtures allow you to do so, you should think about how you use your room and where you are likely to spend most of your time. -
Page 10: Step 3: Test Fit Your Lightspeaker
Tech Support: 1-800-KLIPSCH Step 3: Test fit your LightSpeaker ® ® Your LightSpeaker is designed to fit directly into most 5“ (R30) and 6“ (R40) down light cans by simply removing the existing light and, in the same manner as a light bulb, re-installing your LightSpeaker in its place. -
Page 11: Step 4 - Removing The Trim Ring
Tech Support: 1-800-KLIPSCH If your Lightspeaker does not fit either because the trim ® ring/reflector opening is too small or the lighting fixture is not set deep enough, please follow the instructions below. STOP! Depth is adjustable in most fixtures! Read on! Step 4: Removing the trim ring and any included reflector. - Page 12 Tech Support: 1-800-KLIPSCH The attachment here is via a common “V” spring. To remove simply pinch the two sides of the spring together and slip out of the “C” shaped brackets on the inside walls of the lighting fixture. C shaped...
- Page 13 Tech Support: 1-800-KLIPSCH Repositioning the socket plate (arm): Loosen the wing nut just enough to push the plate (arm) as far into the enclosure as it will go. Retighten the wing nut. Retest your LightSpeaker for proper fit. If it fits, remove it again ®...
-
Page 14: Step 5: Installing The Trim Ring
Tech Support: 1-800-KLIPSCH HELPFUL TIP! Save all the parts so if you move, you can replace and take your LightSpeakers with you. ® Step 5: Installing the trim ring. Your LightSpeaker comes with their own integrated trim ® ring. There are two different sizes. Choose your trim ring based on either A or B below and place the LightSpeaker ®... -
Page 15: Step 6 - Adjusting The Simple Tabs Tm
Tech Support: 1-800-KLIPSCH Step 6: Adjusting the SimpleTabs™. Your LightSpeaker is equipped with a unique mounting ® system. The three SimpleTabs™, on the back of the speaker can be rotated outward and when the LightSpeaker is pressed into the housing, hold it ®... -
Page 16: Step 7 - Setting The Zone And Stereo Switches
Tech Support: 1-800-KLIPSCH If you are installing into a 6” recessed lighting fixture, rotate each of the SimpleTabs™ out to position “A” on the top of the LightSpeaker unit. ® Step 7: Setting the Zone and L/R Stereo Switches. A) Set the zone switch on the back of the... - Page 17 Tech Support: 1-800-KLIPSCH Step 7B: Setting up a Two Zone System Your system allows you to set up two separate zones. Zones are the different spaces in your home where you want to listen to music, and are important because, later in this setup, your Transmitter will automatically seek out and identify each zone.
- Page 18 Tech Support: 1-800-KLIPSCH Assign Zone 1 to one area and Zone 2 to the other unique area. (See Figure 2B)
- Page 19 Tech Support: 1-800-KLIPSCH Here we have assigned Zone 1 to the family room, and Zone 2 to the kitchen area; these are areas where, even though you are listening to the same music (the same source), you may still want to control lighting brightness and speaker volume separately.
-
Page 20: Step 8 - Installing Your Lightspeakers
Tech Support: 1-800-KLIPSCH Step 8: Installing your LightSpeaker into the recessed ® light fixture: A) Simple Install: If you skipped steps 4-6, and your LightSpeaker fits with no modifications, screw it into ® the lighting fixture. Test your circuit by turning on the circuit breaker and light switch from Step 1. -
Page 21: Step 9 - Pairing
Tech Support: 1-800-KLIPSCH 3) Be certain this trim ring contacts the ceiling uniformly all of the way around your LightSpeaker and that the LightSpeaker itself ® ® is seated securely into the electrical socket. Note: sometimes the metal clip that holds the... - Page 22 Tech Support: 1-800-KLIPSCH LightSpeakers™ in Zone 2) the job is nearly finished all that remains is allowing the transmitter discover where each of the installed LightSpeakers is located. ® 1) To pair your LightSpeakers to your ® transmitter, turn off all of the light switches in the areas where LightSpeakers are located.
-
Page 23: Step 10 - Plug In Your Sources
Tech Support: 1-800-KLIPSCH 5) If after 1 minute the LED on the LightSpeaker ® has not turned “GREEN”, repeat steps 1-4. a) If after 2 attempts the LED on the LightSpeaker fails to turn green, try relocating ® the Transmitter closer to the LightSpeaker ®... -
Page 24: Step 11: Enjoy Your Lightspeakers
Tech Support: 1-800-KLIPSCH CAUTION! Do not use the speaker outputs as this can damage the transmitter! B) If you are attaching only one source it may be attached to either input but may be convenient to attach to source one. -
Page 25: Operating The Transmitter & Remote Control
Tech Support: 1-800-KLIPSCH Operating the Transmitter and Remote Control: The remote control and the transmitter are controlled in exactly the same manner. When you push a button on the remote contol the small LED next to the button will light up and remain lit until you push another button affecting either that zone or that source. - Page 26 Tech Support: 1-800-KLIPSCH light. The LED will flash when the arrows are pushed and will turn red and flash quickly when either the maximum or minimum brightness is reached. E) Pressing and holding the ON/OFF button turns ON or OFF all Zones with source 1 playing if turned ON.
-
Page 27: Helpful Hints
Tech Support: 1-800-KLIPSCH Helpful Hints Types of Recessed Ceiling Light Fixtures The most important step you can take to simplify the installation of your LightSpeakers is to know, before you ® purchase, which type of ceiling light fixtures are installed in your ceilings. - Page 28 Tech Support: 1-800-KLIPSCH When installing in an R40 light fixture you will want to loosen this nut and move the plate as far back as possible. If this wing nut is properly tightened, it will be sufficient to securely hold your LightSpeaker permanently in place.
- Page 29 Tech Support: 1-800-KLIPSCH CAUTION: Do not touch the LED or Speaker Baffle with the lens off when the unit is hot, allow the unit to cool down before touching the baffle. 3) When the lens pops up, gently pry it away from the housing, being gentle and making sure not to break the tabs.
-
Page 30: More About Removing Trim Rings
Tech Support: 1-800-KLIPSCH More About Removing Trim Rings The trim ring is the narrow ring of plastic (usually) that contacts the ceiling and gives your ceiling light, and your LightSpeaker a finished look when butted against the ® ceiling drywall. Your LightSpeaker comes equipped with ®... - Page 31 Tech Support: 1-800-KLIPSCH A) If your hand does not fit easily through the hole you may find the job easier if you have either a “spring removal tool” or even a “long nose pliers”. Both are available at your local hardware store.
- Page 32 Tech Support: 1-800-KLIPSCH D) V Springs. Another method of holding various parts to a recessed lighting fixture, is the use of “V” springs. Like the name implies they are shaped in the form of a V. When compressed (pinching the two legs of the V) and fitted into the “V Spring Clip”...
-
Page 33: Where To Put The Transmitter
Tech Support: 1-800-KLIPSCH Where to put the transmitter? Typically, the perfect place for your transmitter is near your home entertainment system, if you have one. If you don’t have a home audio system then you can chose a place that is centrally located to the rooms you will be transmitting the audio to. -
Page 34: Selecting Lightspeaker ® Locations
Tech Support: 1-800-KLIPSCH Selecting LightSpeaker Locations ® Survey your home to determine the location of 5” and 6” recessed lighting fixtures. As long as these are wired to the home’s electricity through a common light switch, they should work perfectly. If you have multiple locations... - Page 35 Tech Support: 1-800-KLIPSCH To illustrate how the Transmitter and Remote work, here are a few examples: To play Source 1 in Zone 1 Press Zone 1 Press Source 1 To play Source 2 in Zone 1 after the source 1 is playing...
- Page 36 Tech Support: 1-800-KLIPSCH To play Source 1 in Zone 2 after already playing source 2 Press Zone 2 Press Source 1 To turn off lights in Zone 1 Press Zone 1 Press light button once To Dim/Brighten Press light button up...
-
Page 37: Specifications
Tech Support: 1-800-KLIPSCH Specifications LED Light • 10W super bright LED provides a sharp crisp light that is easy on the eyes. • LED outputs the light suitable to replace up to a 60W incandescent bulb • Long Lasting LED is rated for over 25,000 to 40,000 hours of use (15 to 20 years average use) •... - Page 38 Tech Support: 1-800-KLIPSCH Loud Speaker • 2.5” high performance custom engineered woofer with Micro Cellulose Polymer treated cone material provides even coverage and smooth natural sounding audio reproduction • Integrated high frequency disperser. Accessories • Optional flange allows LightSpeaker to fit into either ®...
- Page 39 Tech Support: 1-800-KLIPSCH 5” LightSpeaker® Specifications Woofer 2.5” Micro Cellulose Light Brightness 10W LED Wireless Reception 2.4 GHz proprietary signal Frequency Response (+/- 3 dB) 90 Hz - 20 kHz Amplifier Power 20W Max SPL 93 dB SPL Dimensions LightSpeaker® depth (w/out Edison Screw) 5.3” (135.3 mm) LightSpeaker®...
-
Page 40: Possible Causes Of Interference
Tech Support: 1-800-KLIPSCH Possible causes of interference with your LightSpeaker System ® A) Metal studs, in fact any metal wall material, can cause the signal to be diminished or lost. This may also be a problem if your wall paper happens to be a foil type or have metal fibers in it. -
Page 41: Troubleshooting The Remote
4 seconds. All lights will stop flashing, then pairing is complete. In the event this does not work, try again, beginning at Step A. If the remote still does not operate, try pairing one more time or contact us at www.Klipsch.com. -
Page 42: Warranty
This Warranty does not cover damage due to improper operation, maintenance or installation, or attempted repair by anyone other than KLIPSCH or a KLIPSCH dealer which is authorized to do KLIPSCH warranty work. Any unauthorized repairs will void this Warranty. -
Page 43: Registration Information
Questions? Call us! Have a question about your Klipsch speakers? Talk to the people who know them best! We’re waiting to hear from you! 1-800-KLIPSCH... -
Page 44: Fcc Declaration
Tech Support: 1-800-KLIPSCH THIS DEVICE COMPLIES WITH FCC RULES PART 15. Operation is subject to the following two conditions: (1) this device may not cause harmful interference and (2) This device must accept any interference received including that may cause undesired operation. - Page 45 Tech Support: 1-800-KLIPSCH NOTES:...
- Page 46 Tech Support: 1-800-KLIPSCH NOTES:...
- Page 47 Tech Support: 1-800-KLIPSCH NOTES:...
- Page 48 Tech Support: 1-800-KLIPSCH Klipsch Worldwide Corporate Headquarters 3502 Woodview Trace, Suite 200 Indianapolis, IN 46268 For more detailed installation instructions go to www.klipsch.com Klipsch Technical Support Toll Free: 1-800-KLIPSCH (1-800-554-7724) Monday - Friday, 8:00 AM - 5:30 PM EST E-mail: technicalsupport@klipsch.com...
Need help?
Do you have a question about the Light Speaker and is the answer not in the manual?
Questions and answers